IDEA中MyBatis配置Oracle,实现增删改查_mybatis oracle-程序员宅基地
技术标签: oracle mybatis intellij-idea
新建Project
File-New-Project... 新建一个Project
左侧选择Empty Project,给project起名,并设置路径,点Finish
新建Module
File-New-Module...
左侧选择Maven,勾选Create from archetype,选择这个quickstart,起名设路径,点Next。

设置本地Maven和repository的路径,点Finish

右下角选择Enable Auto-Import

得到下图的项目架构(如果没有这个src文件夹,很可能是jdk版本不对,要去设置里修改)

在main文件夹下右键新建Directory,选择这个resources

在 org.example文件夹下新建dao,entity,utils三个文件夹

查询Oracle版本
在cmd窗口输入sqlplus -v,得到Oracle版本为11.1.0.6.0

导入pom依赖,Oracle版本为11.1.0.6.0,MyBatis使用3.5.1版本:
  <properties>
    <project.build.sourceEncoding>UTF-8</project.build.sourceEncoding>
    <maven.compiler.source>1.8</maven.compiler.source>
    <maven.compiler.target>1.8</maven.compiler.target>
  </properties>

  <dependencies>
    <dependency>
      <groupId>junit</groupId>
      <artifactId>junit</artifactId>
      <version>4.11</version>
      <scope>test</scope>
    </dependency>
    <!--oracle驱动-->
    <dependency>
      <groupId>com.oracle</groupId>
      <artifactId>ojdbc6</artifactId>
      <version>11.1.0.6.0</version>
    </dependency>
    <!--mybatis依赖-->
    <dependency>
      <groupId>org.mybatis</groupId>
      <artifactId>mybatis</artifactId>
      <version>3.5.1</version>
    </dependency>
  </dependencies>

  <build>
    <resources>
      <resource>
        <directory>src/main/java</directory><!--所在的目录   src/main/java-->
        <includes><!--包括目录下的.properties,.xml 文件都会扫描到-->
          <include>**/*.properties</include>
          <include>**/*.xml</include>
        </includes>
        <filtering>false</filtering>
      </resource>
      <resource>
        <directory>src/main/resources</directory><!--所在的目录   src/main/java-->
        <includes><!--包括目录下的.properties,.xml 文件都会扫描到-->
          <include>**/*.properties</include>
          <include>**/*.xml</include>
        </includes>
        <filtering>false</filtering>
      </resource>
    </resources>
  </build>
Oracle版本号爆红,需要手动导入jar包

在oracle安装路径找到ojdbc6.jar(这些jar包不同版本oracle的路径不一样,搜索一下jdbc文件夹)

打开cmd,定位到jar包位置
执行maven安装jar包:
mvn install:install-file -Dfile=ojdbc6.jar -Dpackaging=jar -DgroupId=com.oracle -DartifactId=ojdbc6 -Dversion=11.1.0.6.0
命令解释:mvn install:install-file -Dfile=“jar包的绝对路径” -Dpackaging=“文件打包方式” -DgroupId=groupid名 -DartifactId=artifactId名 -Dversion=jar版本 (我这里是oracle的版本11.1.0.6.0)。
出现BUILD SUCCESS表示安装成功。

Oracle版本号的爆红消失。

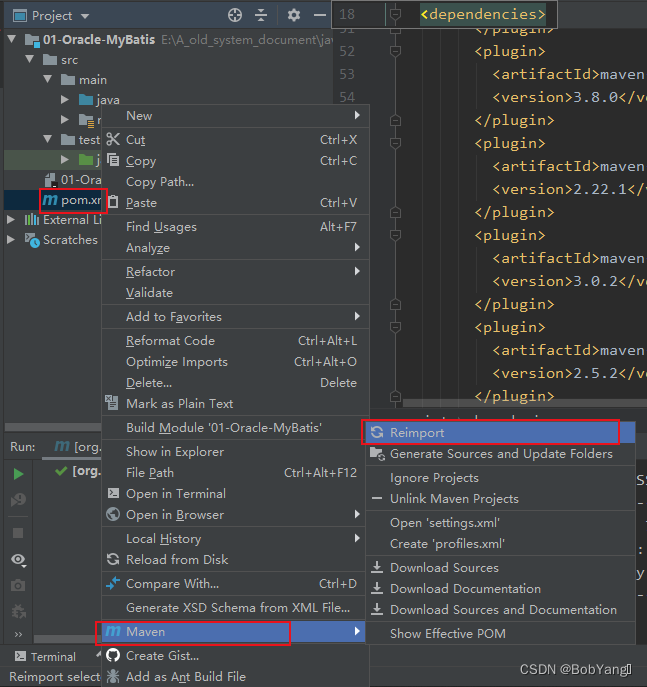
添加完依赖记得刷新一下,右键pom.xml-Maven-Reimport
检查一下右侧Maven-Dependencies中的oracle依赖,如果仍然爆红,重启一下IDEA就好了
在Oracle中新建t_student表
CREATE TABLE t_student (
 id number(10) NOT NULL,
 name varchar2(50) DEFAULT NULL,
 email varchar2(50) DEFAULT NULL,
 age number(10) DEFAULT NULL,
 PRIMARY KEY (id)
);
创建主配置文件mybatis.xml
在resources文件夹下,右键New-File-mybatis.xml(文件名的.xml也要输入)
输入如下内容,其中username和password改成自己oracle数据库的账号密码
<?xml version="1.0" encoding="UTF-8" ?>
<!DOCTYPE configuration
        PUBLIC "-//mybatis.org//DTD Config 3.0//EN"
        "http://mybatis.org/dtd/mybatis-3-config.dtd">
<configuration>
    <typeAliases>
        <typeAlias type="org.example.entity.Student" alias="Student"></typeAlias>
    </typeAliases>
    <environments default="mydev">
        <environment id="mydev">
            <transactionManager type="JDBC"></transactionManager>
            <dataSource type="POOLED">
                <property name="driver" value="oracle.jdbc.driver.OracleDriver"/>
                <property name="url" value="jdbc:oracle:thin://localhost:1521:orcl"/>
                <property name="username" value="bby"/>
                <property name="password" value="123"/>
            </dataSource>
        </environment>
    </environments>
    <mappers>
        <mapper resource="org/example/dao/StudentDao.xml"></mapper>
    </mappers>
</configuration>在entity路径下创建实体类Student--用来保存表中的一行数据
类名建议和表名一致方便记忆。定义id,name,email,age属性,属性名和列名一样。
Alt+Insert创建set get方法,并重写toString方法。
package org.example.entity;

public class Student {
    private int id;
    private String name;
    private String email;
    private int age;

    public int getId() {
        return id;
    }

    public String getName() {
        return name;
    }

    public String getEmail() {
        return email;
    }

    public int getAge() {
        return age;
    }

    public void setId(int id) {
        this.id = id;
    }

    public void setName(String name) {
        this.name = name;
    }

    public void setEmail(String email) {
        this.email = email;
    }

    public void setAge(int age) {
        this.age = age;
    }

    @Override
    public String toString() {
        return "Student{" +
                "id=" + id +
                ", name='" + name + '\'' +
                ", email='" + email + '\'' +
                ", age=" + age +
                '}';
    }
}在dao文件夹下创建StudentDao接口--定义操作数据库的方法
package org.example.dao;

import org.example.entity.Student;

import java.util.List;

public interface StudentDao {
    //查
    public List<Student> selectStudent();
    //增
    public int insertStudent(Student student);
    //删
    public int deleteStudent(int id);
    //改
    public int updateStudent(Student student);
}在dao文件夹下创建StudentDao.xml映射文件--写和Dao接口中方法对应的sql语句
<?xml version="1.0" encoding="UTF-8" ?>
<!DOCTYPE mapper
        PUBLIC "-//mybatis.org//DTD Mapper 3.0//EN"
        "http://mybatis.org/dtd/mybatis-3-mapper.dtd">
<mapper namespace="org.example.dao.StudentDao">
    <select id="selectStudent" resultType="Student">
        select * from t_student
    </select>
    <insert id="insertStudent">
        insert into t_student values(#{id},#{name},#{email},#{age})
    </insert>
    <delete id="deleteStudent">
        delete from t_student where id = #{id}
    </delete>
    <update id="updateStudent">
        update t_student set name=#{name},email=#{email},age=#{age} where id=#{id}
    </update>
</mapper>
在utils文件夹下添加MyBatisUtils工具类--创建获取sqlSession的方法
package org.example.utils;
import org.apache.ibatis.io.Resources;
import org.apache.ibatis.session.SqlSession;
import org.apache.ibatis.session.SqlSessionFactory;
import org.apache.ibatis.session.SqlSessionFactoryBuilder;
import java.io.IOException;
import java.io.InputStream;
public class MyBatisUtils {
    private static SqlSessionFactory factory=null;
    static{
        String config = "mybatis.xml";
        try {
            InputStream in = Resources.getResourceAsStream(config);
            //创建SqlSessionFactory对象,由于整个项目有一个就够了,所以写在静态代码块中只执行一次
//            SqlSessionFactory factory = new SqlSessionFactoryBuilder().build(in);
            factory = new SqlSessionFactoryBuilder().build(in);
        } catch (IOException e) {
            e.printStackTrace();
        }
    }
    public static SqlSession getSqlSession(){
        SqlSession sqlSession = null;
        if (factory!=null){
            sqlSession = factory.openSession();//非自动提交事务 没给true参数
        }
        return sqlSession;
    }
}创建测试类,在test.java.org.example目录下创建TestMyBatis类--实现增删改查操作
package org.example;

import org.apache.ibatis.session.SqlSession;
import org.example.dao.StudentDao;
import org.example.entity.Student;
import org.example.utils.MyBatisUtils;
import org.junit.Test;

import java.util.List;

public class TestMyBatis {

    @Test//查
    public void testSelectStudent(){
        SqlSession sqlSession = MyBatisUtils.getSqlSession();
        StudentDao dao = sqlSession.getMapper(StudentDao.class);

        List<Student> students = dao.selectStudent();
        for (Student stu: students){
            System.out.println("查询到的学生信息:"+stu);
        }
    }

    @Test//增
    public void testInsertStudent(){
        SqlSession sqlSession = MyBatisUtils.getSqlSession();
        StudentDao dao = sqlSession.getMapper(StudentDao.class);

        Student student = new Student();
        student.setId(2);
        student.setName("abb");
        student.setEmail("[email protected]");
        student.setAge(19);
        int nums = dao.insertStudent(student);
        sqlSession.commit();
        System.out.println("增加成功条数为:" + nums);
    }

    @Test//删
    public void testDeleteStudent(){
        SqlSession sqlSession = MyBatisUtils.getSqlSession();
        StudentDao dao = sqlSession.getMapper(StudentDao.class);

        int nums = dao.deleteStudent(2);
        sqlSession.commit();
        System.out.println("删除成功条数为:" + nums);
    }

    @Test//改
    public void testUpdateStudent(){
        SqlSession sqlSession = MyBatisUtils.getSqlSession();
        StudentDao dao = sqlSession.getMapper(StudentDao.class);

        Student student = new Student();
        student.setId(2);
        student.setName("ABB");
        student.setEmail("[email protected]");
        student.setAge(99);
        int nums = dao.updateStudent(student);
        sqlSession.commit();
        System.out.println("修改成功条数为:" + nums);
    }
}
最后附上项目最终的结构图

智能推荐
[VCS]VCS常用命令詳解_vcs -y-程序员宅基地
文章浏览阅读3.4w次,点赞68次,收藏624次。下表所列為VCS常用的命令。_vcs -y
iphone网络编程 http请求 get / post(发送二进制文件) 总结_手机请求发送的是二进制吗-程序员宅基地
文章浏览阅读998次。首先解释下form的enctype属性的问题:该属性为提交表单浏览器对数据的编码方式,常用有两种:application/x-www-form-urlencoded和multipart/form-data,默认为application/x-www-form-urlencoded。 当action为get时候,浏览器用x-www-form-urlencoded的编码方式把form数据转换_手机请求发送的是二进制吗
QT下QSS属性列表_qt中自定义的样式属性名称怎么查-程序员宅基地
文章浏览阅读222次。QSS实际上就是CSS定义下面记录下面链接。_qt中自定义的样式属性名称怎么查
学习正则表达式_if (tin > 0) { for (int t=0; t<aux; t++) { vec_the-程序员宅基地
文章浏览阅读905次。 §1黑暗岁月 有一个String,如何查询其中是否有y和f字符?最黑暗的办法就是:程序1:我知道if、for语句和charAt()啊。class Test{ public static void main(String args[]) { String str="For my money, the important thing "+ _if (tin > 0) { for (int t=0; t
基于java+jdbc+servlet+jsp实现图书商城_javajdbc图书商城购买图书-程序员宅基地
文章浏览阅读2.8k次。1.网站前台首页_javajdbc图书商城购买图书
java中date类型之比较,获取整小时,前一天时间_dateformat 前一天-程序员宅基地
文章浏览阅读1.1w次。在开发web中,我们经常需要用到Date,但是常见的几种方法已经满足不了我们的开发需要,因此在这里拓展一下使用Date的其他方法获取我们想要的结果1. 获取前一天的时间//获取前一天的时间SimpleDateFormat sdf=new SimpleDateFormat("yyyy-MM-dd"); Date date=new Date(); Calendar calenda..._dateformat 前一天
随便推点
加载.npz文件时,出现错误:OSError: Failed to interpret file ‘xxx.npz‘ as a pickle-程序员宅基地
文章浏览阅读9.9k次,点赞4次,收藏6次。.npz文件的内容是怎样的,怎么打开?加载.npz文件时,出现错误:OSError: Failed to interpret file ‘xxx.npz’ as a pickle首先了解pickle的定义:pickle: 用于python特有的类型和python的数据类型间进行转换pickle提供四个功能:dumps,dump,loads,loadpickle可以存储所有python支持的原生类型(bool,int,float,string,byte,none等),由任何原生类型组成的列表、元_as a pickle
关于stack around the variable “” was corrupted问题_stack around the variable 'dataitem' was corrupted-程序员宅基地
文章浏览阅读1k次。错误:stack around the variable “XX” was corrupted.,中文翻译就是“在变量XX周围的堆栈已损坏”。后面在上网看了很多技术资料,发现大多数网站都有这样的文章:Code:把 project->配置属性->c/c++->代码生成->基本运行时检查 为 默认值 就不会报本异常。具体原因正在研究中。。。 如果改为其他就有e_stack around the variable 'dataitem' was corrupted.
Python 可视化库-程序员宅基地
文章浏览阅读236次。https://www.infoq.cn/article/pSV6tZ1SbUC8qJpo_v8H在奥斯汀举行的SciPy 2018年特别会议上,大量开源 Python 可视化工具的代表分享了他们对 Python 数据可视化未来的展望。我们看到了Matplotlib、Plotly、VisPy等许多库的更新。我作为PyViz、GeoViews、Datashader、Panel、hvPl..._python的ae库
python自动化测试 | 接口自动化测试脚本如何写好?_测试自动化脚本怎么写-程序员宅基地
文章浏览阅读1.4k次,点赞9次,收藏17次。接口测试可以在没有前端界面下进行测试后端的功能校验在前端很难进行测试,因为前端已经有初步校验控制,所以接口测试可以发现很多在前端无法发现的问题提升测试效率,降低人工回归测试的人力成本与时间成本,缩短测试周期。真正的业务逻辑核心是后端。例子说明:有个登录页面,你要登上网站,就需要输入你的账号密码,把账号密码作为请求参数打登录接口,这时客户端会给服务器发个登录请求,服务器鉴权和校验通过之后,就登上去了。到这里就完成了一次接口的请求,或者说跑完了一条接口测试用例。_测试自动化脚本怎么写
cdh oozie 无法启动问题Could not load service classes, Cannot create PoolableConnectionFactory_e0103: could not load service classes, cannot crea-程序员宅基地
文章浏览阅读1.1k次。问题描述:在安装cdh元数据myslq高可用时,使用的是myslq主主复制+keepalived实现。期间发现切换时,出现如下异常信息!花了很长时间寻找问题的原因。因为切换的时候,使用本机命令行是可以连接的,但是夸服务器就无法连接,没有去这方面的尝试,后来使用navicate无法连接后,就推测是mysql高可用切换的问题导致的。问题分析:如果不重启keepalived,是无法实现切换和连接..._e0103: could not load service classes, cannot create poolableconnectionfacto
Federated Machine Learning学习笔记(一):综述:概念与模型-程序员宅基地
文章浏览阅读2.2k次,点赞4次,收藏10次。开始将mobile与AI进行靠拢了,RL,FL,DL一网打尽,先多看看survey再说。本文主要来自于Federated Machine Learning: Concept and Applications,主要介绍了使用Federated Machine Learning的原因,常用的一些概念,以及目前存在的一些应用。为了鼓励自己好好学习,决定提炼核心思想,以备不时之需。一、Why we ne..._federated machine learning