numpy+cnn_numpycnn.relu-程序员宅基地
技术标签: deep learning python
import numpy
import sys


def conv_(img, conv_filter):
    filter_size = conv_filter.shape[1]
    result = numpy.zeros((img.shape))
    #Looping through the image to apply the convolution operation.
    for r in numpy.uint16(numpy.arange(filter_size/2.0,
                          img.shape[0]-filter_size/2.0+1)):
        for c in numpy.uint16(numpy.arange(filter_size/2.0,
                                           img.shape[1]-filter_size/2.0+1)):
            """
            Getting the current region to get multiplied with the filter.
            How to loop through the image and get the region based on
            the image and filer sizes is the most tricky part of convolution.
            """
            curr_region = img[r-numpy.uint16(numpy.floor(filter_size/2.0)):r+numpy.uint16(numpy.ceil(filter_size/2.0)),
                              c-numpy.uint16(numpy.floor(filter_size/2.0)):c+numpy.uint16(numpy.ceil(filter_size/2.0))]
            #Element-wise multipliplication between the current region and the filter.
            curr_result = curr_region * conv_filter
            conv_sum = numpy.sum(curr_result) #Summing the result of multiplication.
            result[r, c] = conv_sum #Saving the summation in the convolution layer feature map.

    #Clipping the outliers of the result matrix.
    final_result = result[numpy.uint16(filter_size/2.0):result.shape[0]-numpy.uint16(filter_size/2.0),
                          numpy.uint16(filter_size/2.0):result.shape[1]-numpy.uint16(filter_size/2.0)]
    return final_result
def conv(img, conv_filter):
    if len(img.shape) > 2 or len(conv_filter.shape) > 3: # Check if number of image channels matches the filter depth.
        if img.shape[-1] != conv_filter.shape[-1]:
            print("Error: Number of channels in both image and filter must match.")
            sys.exit()
    if conv_filter.shape[1] != conv_filter.shape[2]: # Check if filter dimensions are equal.
        print('Error: Filter must be a square matrix. I.e. number of rows and columns must match.')
        sys.exit()
    if conv_filter.shape[1]%2==0: # Check if filter diemnsions are odd.
        print('Error: Filter must have an odd size. I.e. number of rows and columns must be odd.')
        sys.exit()

    # An empty feature map to hold the output of convolving the filter(s) with the image.
    feature_maps = numpy.zeros((img.shape[0]-conv_filter.shape[1]+1,
                                img.shape[1]-conv_filter.shape[1]+1,
                                conv_filter.shape[0]))

    # Convolving the image by the filter(s).
    for filter_num in range(conv_filter.shape[0]):
        print("Filter ", filter_num + 1)
        curr_filter = conv_filter[filter_num, :] # getting a filter from the bank.
        """
        Checking if there are mutliple channels for the single filter.
        If so, then each channel will convolve the image.
        The result of all convolutions are summed to return a single feature map.
        """
        if len(curr_filter.shape) > 2:
            conv_map = conv_(img[:, :, 0], curr_filter[:, :, 0]) # Array holding the sum of all feature maps.
            for ch_num in range(1, curr_filter.shape[-1]): # Convolving each channel with the image and summing the results.
                conv_map = conv_map + conv_(img[:, :, ch_num],
                                  curr_filter[:, :, ch_num])
        else: # There is just a single channel in the filter.
            conv_map = conv_(img, curr_filter)
        feature_maps[:, :, filter_num] = conv_map # Holding feature map with the current filter.
    return feature_maps # Returning all feature maps.


def pooling(feature_map, size=2, stride=2):
    #Preparing the output of the pooling operation.
    pool_out = numpy.zeros((numpy.uint16((feature_map.shape[0]-size+1)/stride+1),
                            numpy.uint16((feature_map.shape[1]-size+1)/stride+1),
                            feature_map.shape[-1]))
    for map_num in range(feature_map.shape[-1]):
        r2 = 0
        for r in numpy.arange(0,feature_map.shape[0]-size+1, stride):
            c2 = 0
            for c in numpy.arange(0, feature_map.shape[1]-size+1, stride):
                pool_out[r2, c2, map_num] = numpy.max([feature_map[r:r+size,  c:c+size, map_num]])
                c2 = c2 + 1
            r2 = r2 +1
    return pool_out

def relu(feature_map):
    #Preparing the output of the ReLU activation function.
    relu_out = numpy.zeros(feature_map.shape)
    for map_num in range(feature_map.shape[-1]):
        for r in numpy.arange(0,feature_map.shape[0]):
            for c in numpy.arange(0, feature_map.shape[1]):
                relu_out[r, c, map_num] = numpy.max([feature_map[r, c, map_num], 0])
    return relu_out
import skimage.data
import numpy
import matplotlib
import NumPyCNN as numpycnn
# Reading the image
#img = skimage.io.imread("test.jpg")
#img = skimage.data.checkerboard()
img = skimage.data.chelsea()
#img = skimage.data.camera()
# Converting the image into gray.
img = skimage.color.rgb2gray(img)
# First conv layer
#l1_filter = numpy.random.rand(2,7,7)*20 # Preparing the filters randomly.
l1_filter = numpy.zeros((2,3,3))
l1_filter[0, :, :] = numpy.array([[[-1, 0, 1],
[-1, 0, 1],
[-1, 0, 1]]])
l1_filter[1, :, :] = numpy.array([[[1, 1, 1],
[0, 0, 0],
[-1, -1, -1]]])
print("\n**Working with conv layer 1**")
l1_feature_map = numpycnn.conv(img, l1_filter)
print("\n**ReLU**")
l1_feature_map_relu = numpycnn.relu(l1_feature_map)
print("\n**Pooling**")
l1_feature_map_relu_pool = numpycnn.pooling(l1_feature_map_relu, 2, 2)
print("**End of conv layer 1**\n")
# Second conv layer
l2_filter = numpy.random.rand(3, 5, 5, l1_feature_map_relu_pool.shape[-1])
print("\n**Working with conv layer 2**")
l2_feature_map = numpycnn.conv(l1_feature_map_relu_pool, l2_filter)
print("\n**ReLU**")
l2_feature_map_relu = numpycnn.relu(l2_feature_map)
print("\n**Pooling**")
l2_feature_map_relu_pool = numpycnn.pooling(l2_feature_map_relu, 2, 2)
print("**End of conv layer 2**\n")
# Third conv layer
l3_filter = numpy.random.rand(1, 7, 7, l2_feature_map_relu_pool.shape[-1])
print("\n**Working with conv layer 3**")
l3_feature_map = numpycnn.conv(l2_feature_map_relu_pool, l3_filter)
print("\n**ReLU**")
l3_feature_map_relu = numpycnn.relu(l3_feature_map)
print("\n**Pooling**")
l3_feature_map_relu_pool = numpycnn.pooling(l3_feature_map_relu, 2, 2)
print("**End of conv layer 3**\n")
# Graphing results
fig0, ax0 = matplotlib.pyplot.subplots(nrows=1, ncols=1)
ax0.imshow(img).set_cmap("gray")
ax0.set_title("Input Image")
ax0.get_xaxis().set_ticks([])
ax0.get_yaxis().set_ticks([])
matplotlib.pyplot.savefig("in_img.png", bbox_inches="tight")
matplotlib.pyplot.close(fig0)
# Layer 1
fig1, ax1 = matplotlib.pyplot.subplots(nrows=3, ncols=2)
ax1[0, 0].imshow(l1_feature_map[:, :, 0]).set_cmap("gray")
ax1[0, 0].get_xaxis().set_ticks([])
ax1[0, 0].get_yaxis().set_ticks([])
ax1[0, 0].set_title("L1-Map1")
ax1[0, 1].imshow(l1_feature_map[:, :, 1]).set_cmap("gray")
ax1[0, 1].get_xaxis().set_ticks([])
ax1[0, 1].get_yaxis().set_ticks([])
ax1[0, 1].set_title("L1-Map2")
ax1[1, 0].imshow(l1_feature_map_relu[:, :, 0]).set_cmap("gray")
ax1[1, 0].get_xaxis().set_ticks([])
ax1[1, 0].get_yaxis().set_ticks([])
ax1[1, 0].set_title("L1-Map1ReLU")
ax1[1, 1].imshow(l1_feature_map_relu[:, :, 1]).set_cmap("gray")
ax1[1, 1].get_xaxis().set_ticks([])
ax1[1, 1].get_yaxis().set_ticks([])
ax1[1, 1].set_title("L1-Map2ReLU")
ax1[2, 0].imshow(l1_feature_map_relu_pool[:, :, 0]).set_cmap("gray")
ax1[2, 0].get_xaxis().set_ticks([])
ax1[2, 0].get_yaxis().set_ticks([])
ax1[2, 0].set_title("L1-Map1ReLUPool")
ax1[2, 1].imshow(l1_feature_map_relu_pool[:, :, 1]).set_cmap("gray")
ax1[2, 0].get_xaxis().set_ticks([])
ax1[2, 0].get_yaxis().set_ticks([])
ax1[2, 1].set_title("L1-Map2ReLUPool")
matplotlib.pyplot.savefig("L1.png", bbox_inches="tight")
matplotlib.pyplot.close(fig1)
# Layer 2
fig2, ax2 = matplotlib.pyplot.subplots(nrows=3, ncols=3)
ax2[0, 0].imshow(l2_feature_map[:, :, 0]).set_cmap("gray")
ax2[0, 0].get_xaxis().set_ticks([])
ax2[0, 0].get_yaxis().set_ticks([])
ax2[0, 0].set_title("L2-Map1")
ax2[0, 1].imshow(l2_feature_map[:, :, 1]).set_cmap("gray")
ax2[0, 1].get_xaxis().set_ticks([])
ax2[0, 1].get_yaxis().set_ticks([])
ax2[0, 1].set_title("L2-Map2")
ax2[0, 2].imshow(l2_feature_map[:, :, 2]).set_cmap("gray")
ax2[0, 2].get_xaxis().set_ticks([])
ax2[0, 2].get_yaxis().set_ticks([])
ax2[0, 2].set_title("L2-Map3")
ax2[1, 0].imshow(l2_feature_map_relu[:, :, 0]).set_cmap("gray")
ax2[1, 0].get_xaxis().set_ticks([])
ax2[1, 0].get_yaxis().set_ticks([])
ax2[1, 0].set_title("L2-Map1ReLU")
ax2[1, 1].imshow(l2_feature_map_relu[:, :, 1]).set_cmap("gray")
ax2[1, 1].get_xaxis().set_ticks([])
ax2[1, 1].get_yaxis().set_ticks([])
ax2[1, 1].set_title("L2-Map2ReLU")
ax2[1, 2].imshow(l2_feature_map_relu[:, :, 2]).set_cmap("gray")
ax2[1, 2].get_xaxis().set_ticks([])
ax2[1, 2].get_yaxis().set_ticks([])
ax2[1, 2].set_title("L2-Map3ReLU")
ax2[2, 0].imshow(l2_feature_map_relu_pool[:, :, 0]).set_cmap("gray")
ax2[2, 0].get_xaxis().set_ticks([])
ax2[2, 0].get_yaxis().set_ticks([])
ax2[2, 0].set_title("L2-Map1ReLUPool")
ax2[2, 1].imshow(l2_feature_map_relu_pool[:, :, 1]).set_cmap("gray")
ax2[2, 1].get_xaxis().set_ticks([])
ax2[2, 1].get_yaxis().set_ticks([])
ax2[2, 1].set_title("L2-Map2ReLUPool")
ax2[2, 2].imshow(l2_feature_map_relu_pool[:, :, 2]).set_cmap("gray")
ax2[2, 2].get_xaxis().set_ticks([])
ax2[2, 2].get_yaxis().set_ticks([])
ax2[2, 2].set_title("L2-Map3ReLUPool")
matplotlib.pyplot.savefig("L2.png", bbox_inches="tight")
matplotlib.pyplot.close(fig2)
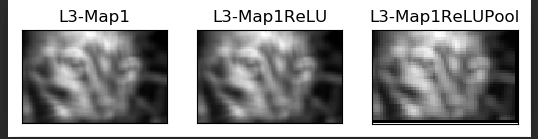
# Layer 3
fig3, ax3 = matplotlib.pyplot.subplots(nrows=1, ncols=3)
ax3[0].imshow(l3_feature_map[:, :, 0]).set_cmap("gray")
ax3[0].get_xaxis().set_ticks([])
ax3[0].get_yaxis().set_ticks([])
ax3[0].set_title("L3-Map1")
ax3[1].imshow(l3_feature_map_relu[:, :, 0]).set_cmap("gray")
ax3[1].get_xaxis().set_ticks([])
ax3[1].get_yaxis().set_ticks([])
ax3[1].set_title("L3-Map1ReLU")
ax3[2].imshow(l3_feature_map_relu_pool[:, :, 0]).set_cmap("gray")
ax3[2].get_xaxis().set_ticks([])
ax3[2].get_yaxis().set_ticks([])
ax3[2].set_title("L3-Map1ReLUPool")
matplotlib.pyplot.savefig("L3.png", bbox_inches="tight")
matplotlib.pyplot.close(fig3)
图片保存结果如下:


It's amazing!
卷积层-激活层-池化层
提问:像素全为正,relu激活层还有什么用呢?
答:卷积滤波器的参数可以为负,卷积层的输出可以是负值,所以relu激活层仍然有意义;
提问:池化层后不是就只有一个值了吗?
答:池化层和卷积层一样也有一个类似滤波器进行池化,进行了一个下采样,而不是对整个featuremap选择最大的一个值;比如说2*2 步长为2,每四个元素中选择最大的一个;
提问:为什么没有训练也会不错的效果呢?
答:从逆向思维的角度来看,说明卷积层参数初始值设置得不错;如图所示:本文中的滤波器值如下

智能推荐
如何配置filezilla服务端和客户端_filezilla server for windows (32bit x86)-程序员宅基地
文章浏览阅读7.8k次,点赞3次,收藏9次。如何配置filezilla服务端和客户端百度‘filezilla server’下载最新版。注意点:下载的版本如果是32位的适用xp和win2003,百度首页的是适用于win7或更高的win系统。32和64内容无异。安装过程也是一样的。一、这里的filezilla包括服务端和客户端。我们先来用filezilla server 架设ftp服务端。看步骤。1选择标准版的就可以了。 _filezilla server for windows (32bit x86)
深度学习图像处理01:图像的本质-程序员宅基地
文章浏览阅读724次,点赞18次,收藏8次。深度学习作为一种强大的机器学习技术,已经成为图像处理领域的核心技术之一。通过模拟人脑处理信息的方式,深度学习能够从图像数据中学习到复杂的模式和特征,从而实现从简单的图像分类到复杂的场景理解等多种功能。要充分发挥深度学习在图像处理中的潜力,我们首先需要理解图像的本质。本文旨在深入探讨深度学习图像处理的基础概念,为初学者铺平通往高级理解的道路。我们将从最基础的问题开始:图像是什么?我们如何通过计算机来理解和处理图像?
数据探索阶段——对样本数据集的结构和规律进行分析_数据分析 规律集-程序员宅基地
文章浏览阅读62次。在收集到初步的样本数据之后,接下来该考虑的问题有:(1)样本数据集的数量和质量是否满足模型构建的要求。(2)是否出现从未设想过的数据状态。(3)是否有明显的规律和趋势。(4)各因素之间有什么样的关联性。解决方案:检验数据集的数据质量、绘制图表、计算某些特征量等,对样本数据集的结构和规律进行分析。从数据质量分析和数据特征分析两个角度出发。_数据分析 规律集
上传计算机桌面文件图标不见,关于桌面上图标都不见了这类问题的解决方法-程序员宅基地
文章浏览阅读8.9k次。关于桌面上图标都不见了这类问题的解决方法1、在桌面空白处右击鼠标-->排列图标-->勾选显示桌面图标。2、如果问题还没解决,那么打开任务管理器(同时按“Ctrl+Alt+Del”即可打开),点击“文件”→“新建任务”,在打开的“创建新任务”对话框中输入“explorer”,单击“确定”按钮后,稍等一下就可以见到桌面图标了。3、问题还没解决,按Windows键+R(或者点开始-->..._上传文件时候怎么找不到桌面图标
LINUX 虚拟网卡tun例子——修改_怎么设置tun的接收缓冲-程序员宅基地
文章浏览阅读1.5k次。参考:http://blog.csdn.net/zahuopuboss/article/details/9259283 #include #include #include #include #include #include #include #include #include #include #include #include _怎么设置tun的接收缓冲
UITextView 评论输入框 高度自适应-程序员宅基地
文章浏览阅读741次。创建一个inputView继承于UIView- (instancetype)initWithFrame:(CGRect)frame{ self = [superinitWithFrame:frame]; if (self) { self.backgroundColor = [UIColorcolorWithRed:0.13gre
随便推点
字符串基础面试题_java字符串相关面试题-程序员宅基地
文章浏览阅读594次。字符串面试题(2022)_java字符串相关面试题
VSCODE 实现远程GUI,显示plt.plot, 设置x11端口转发_vscode远程ssh连接服务器 python 显示plt-程序员宅基地
文章浏览阅读1.4w次,点赞12次,收藏21次。VSCODE 实现远程GUI,显示plt.plot, 设置x11端口转发问题服务器 linux ubuntu16.04本地 windows 10很多小伙伴发现VSCode不能显示figure,只有用自带的jupyter才能勉强个截图、或者转战远程桌面,这对数据分析极为不方便。在命令行键入xeyes(一个显示图像的命令)会failed,而桌面下会出现:但是Xshell能实现X11转发图像,有交互功能,但只能用Xshell输入命令plot,实在不方便。其实VScode有X11转发插件!!方法_vscode远程ssh连接服务器 python 显示plt
Java SE | 网络编程 TCP、UDP协议 Socket套接字的使用_javase套接字socket-程序员宅基地
文章浏览阅读529次。网络编程_javase套接字socket
element-ui switch开关打开和关闭时的文字设置样式-程序员宅基地
文章浏览阅读3.3k次,点赞2次,收藏2次。element switch开关文字显示element中switch开关把on-text 和 off-text 属性改为 active-text 和 inactive-text 属性.怎么把文字描述显示在开关上?下面就是实现方法: 1 <el-table-column label="状态"> 2 <template slot-scope="scope">..._el-switch 不同状态显示不同字
HttpRequestUtil方法get、post、JsonToPost_httprequestutil.httpget-程序员宅基地
文章浏览阅读785次。java后台发起请求使用的工具类package com.cennavi.utils;import org.apache.http.Header;import org.apache.http.HttpResponse;import org.apache.http.HttpStatus;import org.apache.http.client.HttpClient;import org.apache.http.client.methods.HttpPost;import org.apach_httprequestutil.httpget
App-V轻量级应用程序虚拟化之三客户端测试-程序员宅基地
文章浏览阅读137次。在前两节我们部署了App-V Server并且序列化了相应的软件,现在可谓是万事俱备,只欠东风。在这篇博客里面主要介绍一下如何部署客户端并实现应用程序的虚拟化。在这里先简要的说一下应用虚拟化的工作原理吧!App-V Streaming 就是利用templateServer序列化出一个软件运行的虚拟环境,然后上传到app-v Server上,最后客户..._app-v 客户端