android xml布局总结篇_<?xml version="1.0" encoding="utf-8"?> <linearlayo-程序员宅基地
【android-tips】android xml布局总结篇
一.背景
可能很多人跟我一样,做了好久的android程序,却一直没有认真地坐下来好好学习下xml文件的布局。其实有的时候我们用view绘制或是利用ADT的图形界面功能就可以轻松搞定布局,但是最好还是静下来学习下xml的布局文件具体写法。这一节我们要绘制如下图所示的界面。

二基础知识
首先我们要了解android到底有那些布局,和每个布局类型的区别。
1.线性布局 LinearLayout
线性布局分两种。一种是水平布局,一种是垂直布局。下面我们根据上图举例子。
先把上图的代码贴出来吧!
-
<?xml version="1.0" encoding="utf-8"?> -
<LinearLayout android:orientation="vertical" -
android:layout_width="fill_parent" android:layout_height="fill_parent" -
xmlns:android="http://schemas.android.com/apk/res/android"> -
<TextView android:layout_height="wrap_content" android:text="@string/note_title" -
android:layout_width="wrap_content" android:padding="10dp"></TextView> -
<LinearLayout android:layout_height="fill_parent" -
android:layout_width="fill_parent" android:layout_weight="1"> -
<EditText android:id="@+id/EditText02" android:layout_width="fill_parent" -
android:layout_height="fill_parent" android:gravity="left" -
android:hint="@string/edithint"></EditText> -
</LinearLayout> -
<LinearLayout android:layout_height="fill_parent" -
android:layout_width="fill_parent" android:layout_weight="2" -
android:gravity="center"
android:orientation="horizontal"
> <ImageButton android:id="@+id/ImageButton01" android:layout_width="72dp" android:layout_height="72dp" android:src="@drawable/sketchy_paper_003" android:layout_margin="3dp"></ImageButton> <ImageButton android:id="@+id/ImageButton02" android:layout_width="72dp" android:layout_height="72dp" android:src="@drawable/sketchy_paper_004" android:layout_margin="3dp"></ImageButton> <ImageButton android:id="@+id/ImageButton03" android:layout_width="72dp" android:layout_height="72dp" android:src="@drawable/sketchy_paper_007" android:layout_margin="3dp"></ImageButton> <ImageButton android:id="@+id/ImageButton04" android:layout_width="72dp" android:layout_height="72dp" android:src="@drawable/sketchy_paper_011" android:layout_margin="3dp"></ImageButton> </LinearLayout> </LinearLayout>
可以看到,上图是由三部分组成。在大的LinearLayout从上而下垂直分布着三个内容:TextView,LinearLayout,LinearLayout。所以总体的LinearLayout是垂直布局
android:orientation="vertical"
下面我们来看水平布局
其实就是上图中的最下面那个LinearLayout。四个图标平行排列。
android:orientation="horizontal"
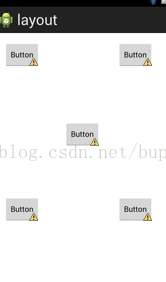
2.相对布局 RelativeLayout
这个布局相对简单一点。一般来讲利用ADT自己拖放按钮就可以。基本上可以随意布局。如下图所示
代码是
-
<RelativeLayout xmlns:android="http://schemas.android.com/apk/res/android" -
xmlns:tools="http://schemas.android.com/tools" -
android:layout_width="match_parent" -
android:layout_height="match_parent" -
android:paddingBottom="@dimen/activity_vertical_margin" -
android:paddingLeft="@dimen/activity_horizontal_margin" -
android:paddingRight="@dimen/activity_horizontal_margin" -
android:paddingTop="@dimen/activity_vertical_margin" -
tools:context=".MainActivity" > -
<Button -
android:id="@+id/button1" -
style="?android:attr/buttonStyleSmall" -
android:layout_width="wrap_content" -
android:layout_height="wrap_content" -
android:layout_alignParentLeft="true" -
android:layout_alignParentTop="true" -
android:text="Button" /> -
<Button -
android:id="@+id/button2" -
style="?android:attr/buttonStyleSmall" -
android:layout_width="wrap_content" -
android:layout_height="wrap_content" -
android:layout_alignBaseline="@+id/button1" -
android:layout_alignBottom="@+id/button1" -
android:layout_alignParentRight="true" -
android:layout_marginRight="14dp" -
android:text="Button" /> -
<Button -
android:id="@+id/button3" -
style="?android:attr/buttonStyleSmall" -
android:layout_width="wrap_content" -
android:layout_height="wrap_content" -
android:layout_below="@+id/button1" -
android:layout_centerHorizontal="true" -
android:layout_marginTop="97dp" -
android:text="Button" /> -
<Button -
android:id="@+id/button4" -
style="?android:attr/buttonStyleSmall" -
android:layout_width="wrap_content" -
android:layout_height="wrap_content" -
android:layout_alignLeft="@+id/button1" -
android:layout_below="@+id/button3" -
android:layout_marginTop="89dp" -
android:text="Button" /> -
<Button -
android:id="@+id/button5" -
style="?android:attr/buttonStyleSmall" -
android:layout_width="wrap_content" -
android:layout_height="wrap_content" -
android:layout_alignLeft="@+id/button2" -
android:layout_alignTop="@+id/button4" -
android:text="Button" /> -
</RelativeLayout>
layout_marginBottom是指控件边以外空下的距离,比如Button1和Button2垂直显示,将Button1中layout_marginBottom = 10dp,那么Button1与Button2之间将有10dp距离。
下面这两句是居左显示和居右显示
android:layout_alignParentLeft="true"
android:layout_alignParentTop="true"
常用语句总结:
android:layout_toLeftOf —— 该组件位于引用组件的左方
android:layout_toRightOf —— 该组件位于引用组件的右方
android:layout_above —— 该组件位于引用组件的上方
android:layout_below —— 该组件位于引用组件的下方
android:layout_alignParentLeft —— 该组件是否对齐父组件的左端
android:layout_alignParentRight —— 该组件是否齐其父组件的右端
android:layout_alignParentTop —— 该组件是否对齐父组件的顶部
android:layout_alignParentBottom —— 该组件是否对齐父组件的底部
android:layout_centerInParent —— 该组件是否相对于父组件居中
android:layout_centerHorizontal —— 该组件是否横向居中
android:layout_centerVertical —— 该组件是否垂直居中
总之,相对视图应该是最有用的,具体的操作比较复杂,更多的是通过图形界面拖拉,再用代码微调!
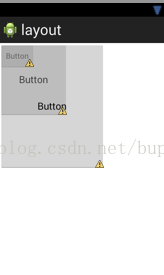
3.FrameLayout
这个布局很简单,而且感觉有点二二的,哈哈!就是控件一个挨一个在左上角罗列。
代码
-
<?xml version="1.0" encoding="utf-8"?> -
<FrameLayout xmlns:android="http://schemas.android.com/apk/res/android" -
android:layout_width="match_parent" -
android:layout_height="match_parent" > -
<Button -
android:id="@+id/button1" -
style="?android:attr/buttonStyleSmall" -
android:layout_width="wrap_content" -
android:layout_height="wrap_content" -
android:text="Button" /> -
<Button -
android:id="@+id/button2" -
android:layout_width="126dp" -
android:layout_height="135dp" -
android:text="Button" /> -
<Button -
android:id="@+id/button3" -
android:layout_width="194dp" -
android:layout_height="232dp" -
android:text="Button" /> -
</FrameLayout>
4.绝对布局 AbsoluteLayout
绝对布局比较容易使用,就是以左上方为原点建立坐标系。每个控件用layout_x和layout_y表示位置。但是据说这种布局比较刚性,不容易适配各种终端,所以要慎用!

代码
-
<?xml version="1.0" encoding="utf-8"?> -
<AbsoluteLayout xmlns:android="http://schemas.android.com/apk/res/android" -
android:layout_width="match_parent" -
android:layout_height="match_parent" > -
<Button -
android:id="@+id/button1" -
android:layout_width="wrap_content" -
android:layout_height="wrap_content" -
android:layout_x="44dp" -
android:layout_y="18dp" -
android:text="Button" /> -
<Button -
android:id="@+id/button2" -
android:layout_width="wrap_content" -
android:layout_height="wrap_content" -
android:layout_x="122dp" -
android:layout_y="173dp" -
android:text="Button" /> -
<Button -
android:id="@+id/button3" -
android:layout_width="wrap_content" -
android:layout_height="wrap_content" -
android:layout_x="36dp" -
android:layout_y="133dp" -
android:text="Button" /> -
</AbsoluteLayout>
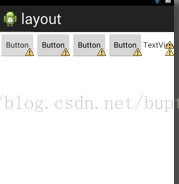
5.表格布局 TableLayout
TableLayout有点像一个表格或是矩阵。在布局中加入TableRow,它的属性是horizontal所以每个TableRow只能横放。它里面的每个控件的高都是一样的。下图所示,是加入了一个TableRow和里面的控件。
代码
-
<?xml version="1.0" encoding="utf-8"?> -
<TableLayout xmlns:android="http://schemas.android.com/apk/res/android" -
android:layout_width="match_parent" -
android:layout_height="match_parent" > -
<TableRow -
android:id="@+id/tableRow1" -
android:layout_width="wrap_content" -
android:layout_height="wrap_content" > -
<Button -
android:id="@+id/button1" -
style="?android:attr/buttonStyleSmall" -
android:layout_width="wrap_content" -
android:layout_height="wrap_content" -
android:text="Button" /> -
<Button -
android:id="@+id/button2" -
style="?android:attr/buttonStyleSmall" -
android:layout_width="wrap_content" -
android:layout_height="wrap_content" -
android:text="Button" /> -
<Button -
android:id="@+id/button3" -
style="?android:attr/buttonStyleSmall" -
android:layout_width="wrap_content" -
android:layout_height="wrap_content" -
android:text="Button" /> -
<Button -
android:id="@+id/button4" -
style="?android:attr/buttonStyleSmall" -
android:layout_width="wrap_content" -
android:layout_height="wrap_content" -
android:text="Button" /> -
<TextView -
android:id="@+id/textView1" -
android:layout_width="wrap_content" -
android:layout_height="wrap_content" -
android:text="TextView" /> -
</TableRow> -
</TableLayout>
ok!你学会了么,have fun!
智能推荐
JS实现复制到剪贴板功能_js复制hidden内容到剪贴板-程序员宅基地
文章浏览阅读789次。原生JS实现原生JS,先使用 select() 选中输入框文本,然后使用 document.execCommand("Copy")复制到剪贴板前提条件select() 方法只对 <input> 和 <textarea> 有效输入框不能有disabled属性输入框不能有hidden属性输入框的 width 和 height 不能为0实现代码HTML<div> <input id="copyInput" type="text" value_js复制hidden内容到剪贴板
Zip压缩文件没有解压密码怎么办?_zip没密码怎么打开-程序员宅基地
文章浏览阅读5.7w次,点赞19次,收藏59次。Zip压缩文件没有解压密码怎么办?在平时,我们难免的需要到浏览器上面寻找一些需要的资源,可往往下载好了zip文件后,解压时却需要密码。真的让人很痛苦,这样设置密码无非是想利用这些资源来赚取利益罢了。那有没有什么办法可以破解zip解压时需要的密码呢?答案当然是有的,下面我就其中一种方法具体演示一遍,希望对大家有所帮助。(第一次写博客,可能讲的没有那么详细,请见谅)首先我们需要下载一个破解软件..._zip没密码怎么打开
ubuntn系统下cuda9.0+cudnn7.5安装教程_ubuntu20.10安装cuda9.0+cudnn7-程序员宅基地
文章浏览阅读1.5k次。在离开之际,将自己的电脑系统重新升级了下,在此做如下记录,以便后续查证。1、双系统安装 这里只是简单说下,win10+Ubuntu,这次采用的Ubuntu分区是“boot”+“swap”+“/”的形式,具体可以去参考另一篇博客。2、cuda安装(1)下载安装文件检查自己的电脑配置是否支持cuda加速(一般英伟达系列显卡支持),这里推荐直接去https://d......_ubuntu20.10安装cuda9.0+cudnn7
VMware ESXi 7.0 U3n macOS Unlocker & OEM BIOS (标准版和厂商定制版)_esxi unlocker-程序员宅基地
文章浏览阅读1k次。VMware ESXi 7.0 U3n macOS Unlocker & OEM BIOS (标准版和厂商定制版)_esxi unlocker
comsol5.4模型涂色_comsol几何模型怎么设置颜色-程序员宅基地
文章浏览阅读1.5w次,点赞8次,收藏13次。COMSOL5.4版本几何模型上色comsol中的几何模型默认为灰白色,为了使不同零件在建模过程中具有分辨度、后期图像更直观,可以给不同的零部件添加不同的颜色。添加方法如下。1.导入一个灰白色模型这是一个锥盆在一个球形域内,从图中可以看出纯灰白色的图像很难将两者分开。这是可以考虑给各自赋不同的颜色。在组件中定义显示选择,选中球体的边界,并设置为蓝色,再点击抑制选择突出显示按钮,即可。同样的操作,将里面的锥盆设置为绿色。当然了,配置什么颜色完全取决于各位的审美。本次分享到此结束,谢谢浏览。._comsol几何模型怎么设置颜色
交叉编译openssh出现错误Makefile:548: recipe for target 'install_sw' failed_makefile:546: recipe for target 'install_sw' faile-程序员宅基地
文章浏览阅读6.9k次,点赞3次,收藏4次。交叉编译openssh出现错误将OpenSSH移植到ARM Linux,交叉编译openssh时,在第二步编译openssl时,make install出现如下错误:cp: 'e_os2.h' and '/home/word/iTOP-4412-Linux-ssh/openssl-1.0.2l/include/openssl/e_os2.h' are the same fileMakefile:5_makefile:546: recipe for target 'install_sw' failed
随便推点
OC基础知识点的总结(全),学习OC的日记_oc setobject-程序员宅基地
文章浏览阅读520次。"font-size:18px;">类的方法 1.在加号方法中不能使用实例变量,实例变量是依托于对象存在的只有有了对象,实例变量才会有空间 2.self 谁调用该方法,self就代表谁 当方法是一个减号方法时, 调用该方法的对象是谁,self就代表当前对象 当方法是一个加号方法时, 调用该方法的类是谁,self就代表当前类 3._oc setobject
解决Java上传文件到Linux 没有读权限_linux设置java上传文件的权限-程序员宅基地
文章浏览阅读1.8k次。问题描述上传图片后想对文件进行查看发现一直是403错误,到linux下找到上传文件的,发现其群组和其他组没有读的权限,修改一下权限则可以访问。由此判定由权限问题导致的403错误。导致权限不足原因<1> tomcat版本差别高版本的tomcat会出现这种问题解决问题<1> 检查linux-- 查看系统默认配置vim /etc/profilelinux文件访问默认权限与umask有关,如果是002或022就正常没有问题。<2> 检查tomcat[_linux设置java上传文件的权限
“有嗅觉”的机器人,闻出8种气味_“有嗅觉”的机器人能闻出8种气味,灵敏度比普通设备高10000倍-程序员宅基地
文章浏览阅读163次。当机器人接触不同气味时,这个传感器向与之连接的一个电子系统传递不同的电信号,随后,该团队使用机器学习方法创建了一个“气味系统库”,包括柠檬、杏仁糖、天竺葵、和混合气味等,并使用了一个随机森林分类器进行气味分类。研究显示,这台机器人能够嗅出天竺葵、柠檬、杏仁蛋白糖等8种气味,就算混合在一起也能分辨出来,而且灵敏度比气相色谱-质谱法(GC-MS)高10000倍!甚至能检测出0.001微克的挥发性发挥物。以色列特拉维夫大学研究人员把蝗虫触须安装到机器人上,利用蝗虫的灵敏嗅觉将机器人辨别气味的灵敏度提高约1万倍。_“有嗅觉”的机器人能闻出8种气味,灵敏度比普通设备高10000倍
阿里CTO程立:阿里巴巴的开源历程、理念和实践-程序员宅基地
文章浏览阅读3.7k次。云和开源,已然共同成为数字世界的根,需要政府和企业、需要我们大家一起来共建和共享。
Vue结合3D技术实现VR看房效果_vue 3d前进看房-程序员宅基地
文章浏览阅读2.6k次。vue 项目中实现vr360度全景看房图片预览_vue 3d前进看房
强烈推荐 10 本我私藏的数据库书单,附读书方法_数据库书籍-程序员宅基地
文章浏览阅读1.2w次,点赞25次,收藏130次。二哥有推荐的数据库书单吗?关于 MySQL 和 Oracle 的,谢谢了。读者小猫私信问了我上面这个问题,我觉得问题挺典型的,值得写篇文章分享一下。因为对于 Java 程序员来说,几乎不可避免地要和数据库打交道,MySQL 和 Oracle 恰好又是两个使用最广泛的数据库。MySQL 和 Oracle 都属于关系型数据库,现在都隶属于甲骨文公司,这家公司的产品很牛逼,CEO 拉里埃尔森也很牛逼,和史蒂夫乔布斯是铁哥们。Oracle 相对 MySQL 更沉重一些,属于企业级应用。而 MySQL 是开源._数据库书籍