关于css中的float_"<div class=\"box\">"-程序员宅基地
技术标签: div css firefox float ie class
什么是CSS Float?
定义: float 属性定义元素浮动到左侧或右侧。以往这个属性总应用于图像,使文本围绕在图像周围,不过在 CSS 中,任何元素都可以浮动。浮动元素会生成一个块级元素,而不论它本身是何种元素。元素对象设置了float属性之后,它将不再独自占据一行。浮动块可以向左或向右移动,直到它的外边缘碰到包含它的框或另一个浮动块的边框为止。
fload属性有四个可用的值:Left 和Right 分别浮动元素到各自的方向,None (默认的) 使元素不浮动,Inherit 将会从父级元素获取float值。
下面让我们来详细了解下css float
1.Float的用处
除了简单的在图片周围包围文字,浮动可用于创建全部网页布局。
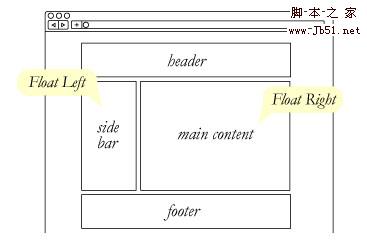
浮动对小型的布局同样有用。例如页面中的这个小区域。如果我们在我们的小头像图片上使用浮动,当调整图片大小的时候,盒子里面的文字也将自动调整位置:

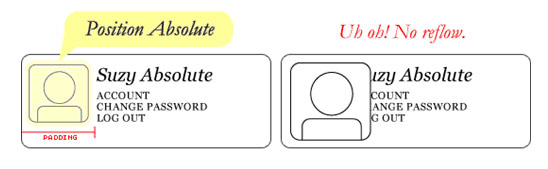
同样的布局可以通过在外容器使用相对定位,然后在头像上使用绝对定位来实现。这种方式中,文本不会受头像图片大小的影响,不会随头像图片的大小而有相应变化。
程序代码
需要用到的CSS样式
body{margin:0px; padding:0px; text-align:center; font:Arial, Helvetica, sans-serif;font-size:12px;}
div,p,ul,li,h2,h3,h4,h5{ padding:0px; margin:0px;line-height:22px;}
h1{ font-size:14px;}
body >div{ text-align:left; margin:10px auto;}
#box{ width:900px; text-align:left;}
.box1{ width:370px;border:1px solid #f00;}
.box3{border:1px solid #f00;}
.box2{ width:370px;border:1px solid #f00;}
.box2:after{display:block;clear:both;content:"";visibility:hidden;height:0;}
.box1_1{ width:100px; height:70px;border:1px solid #6CF;}
.clear{ clear:both; height:0px; width:0px; font-size:0px; line-height:100%; }
.fl{ float:left;}
.fr{ float:right;}
.hidden{overflow:hidden;}
span{ color:#f00; font-weight:bold;}
.mar{ margin-left:20px;}
.inmar{ display:inline; margin-left:20px;}
.box1_2{ width:200px; float:left; height:100px; background-color:green;}
.box1_3{ width:150px; height:100px; margin-left:200px; background-color:red;}
.box1_4{ width:200px; float:left; height:100px;background-color:green;margin-right:-3px;}
.box1_5{ width:150px; float:left; height:100px; background-color:red;}
.box2_1{ margin-bottom:10px;float:left;width:80px; height:70px;border:1px solid#f00;}
.box2_2{ float:left;width:80px; height:70px;border:1px solid #f00;}
.padbot{ padding-bottom:10px;}
2.float浮动元素不占据正常文档流空间
由于浮动块不在文档的普通流中,所以文档的普通流中的块表现得就像浮动块不存在一样。
·以下是3块div均未加float时在浏览器内显示如下图

代码:
<div class="box1">
<div class="box1_1"><span>块1</span></div>
<div class="box1_1"><span>块2</span></div>
<div class="box1_1"><span>块3</span></div>
</div>
·块1向右浮动,脱离文档流并且向右移动,直到它的右边缘碰到包含块的右边缘。如下图

代码:
<divclass="box1">
<div class="box1_1 fr"><span>块1</span>float:right </div>
<div class="box1_1"><span>块2</span></div>
<div class="box1_1"><span>块3</span></div>
</div>
·块1向左浮动,脱离文档流并且向左移动,直到它的左边缘碰到包含块的左边缘;IE8和Firefox中因为它不再处于文档流中,所以它不占据空间,实际上覆盖住了块 2,使块2从视图中消失。而块2的内容却显示在块1未浮动时块2所处的位置。而IE6和IE7中紧跟在浮动元素块1的块2也会跟着浮动。如下图
 IE8和Firefox
 IE6和IE7
<divclass="box1">
<div class="box1_1 fl"><span>块1</span>float:left </div>
<div class="box1_1"style="background:#FCC;">background:#FCC<span>块2</span></div>
<div class="box1_1"><span>块3</span></div>
</div>
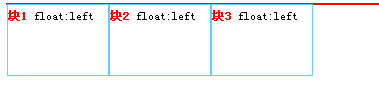
3.浮动“塌陷”
·使用浮动(float)的一个比较疑惑的事情是他们怎么影响包含他们的父元素的。如果父元素只包含浮动元素,且父元素未设置高度和宽度的时候。那么它的高度就会塌缩为零。如果父元素不包含任何的可见背景,这个问题会很难被注意到,但是这是一个很重要的问题。在这里我们可以称为“塌陷”。如下图

代码:
<divclass="box3">
<div class="box1_1 fl"><span>块1</span>float:left</div>
<div class="box1_1 fl"><span>块2</span>float:left</div>
<div class="box1_1 fl"><span>块3</span>float:left</div>
</div>
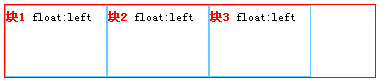
解决“塌陷”问题有以下三个方法
1.在使用float元素的父元素结束前加一个高为0宽为0且有clear:both样式的div 如下图
代码:
<divclass="box1">
<div class="box1_1 fl"><span>块1</span>float:left </div>
<div class="box1_1 fl"><span>块2</span>float:left</div>
<div class="box1_1 fl"><span>块3</span>float:left</div>
<div class="clear"></div>
</div>
2.在使用float元素的父元素添加overflow:hidden;如下图
代码:
<divclass="box1 hidden">
<div class="box1_1 fl"><span>块1</span>float:left </div>
<div class="box1_1 fl"><span>块2</span>float:left</div>
<div class="box1_1 fl"><span>块3</span>float:left</div>
</div>
3 .使用after伪对象清除浮动 如下图
代码:
<divclass="box2">
<div class="box1_1 fl"><span>块1</span>float:left </div>
<div class="box1_1 fl"><span>块2</span>float:left</div>
<div class="box1_1 fl"><span>块3</span>float:left</div>
</div>
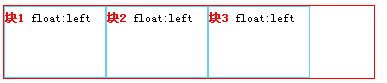
4. IE6双边距问题
·IE6双边距问题:一个居左浮动(float:left)的元素放置进一个容器盒(box),并在浮动元素上使用了左边界(margin-left) 在ie6内便产生双倍边距。如下图
 IE7、IE8和Firefox
 IE6
IE6
代码:
<divclass="box1 hidden">
<div class="box1_1 fl mar"><span>块1</span>float:left marin_left:10px; </div>
<div class="box1_1 fl mar"><span>块2</span>float:left marin_left:10px; </div>
<div class="box1_1 fl"><span>块3</span>float:left</div>
</div>
这个Bug仅当浮动边界和浮动元素的方向相同时出现在浮动元素和容器盒的内边缘之间,在这之后的任意有着相似边界的浮动元素不会呈现双倍边界。只有特定的浮动行的第一个浮动元素会遭遇这个Bug。像居左的情况一样,双倍边界同样神秘地显示在居右的相同方式。
解决IE6双边距问题: display:inline; 使浮动忽略 如下图
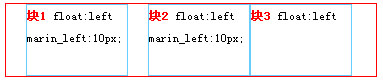
代码:
<divclass="box1 hidden">
<div class="box1_1 fl inmar"><span>块1</span>float:left;marin_left:10px; display:inline; </div>
<div class="box1_1 fl mar"><span>块2</span>float:left marin_left:10px; </div>
<div class="box1_1 fl"><span>块3</span>float:left</div>
</div>
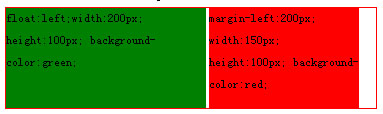
5.IE6文本产生3象素的bug
·浮动IE6文本产生3象素的bug时指挨着浮动元素的文本会神奇的被踢出去3像素,好像浮动元素的周围有一个奇怪的力场一样。如下图
 firefox、IE7、IE8
 IE6
IE6
代码:
<divclass="box1 ">
<div class="box1_2">float:left;width:200px;height:100px; background-color:green;</div>
<div class="box1_3"> margin-left:200px;width:150px; height:100px; background-color:red;</div>
</div>
解决浮动IE文本产生3象素问题以下有两个方法
1.左边对象浮动,右边采用外补丁的左边距来定位 如下图
 firefox、IE7、IE8、IE6
代码:
<divclass="box1">
<div class="box1_4">margin-right:-3px;float:left;width:200px; height:100px; background-color:green;</div>
<div class="box1_3">width:150px;height:100px; background-color:red;</div>
</div>
2.左边对象浮动,右边对象也浮动 如下图
 firefox、IE7、IE8、IE6
代码:
<divclass="box1 hidden">
<div class="box1_4"> float:left;width:200px;height:100px; background-color:green;</div>
<div class="box1_5"> float:left;width:150px;height:100px; background-color:red;</div>
</div>
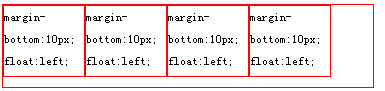
6.IE6,IE7 中,底边距 bug
·IE6,IE7中,底边距 bug是当浮动父元素有浮动子元素时,这些子元素的底边距会被父元素忽略掉。如下图
 firefox
 IE6、IE7
代码:
<divclass="box2">
<div class="box2_1"> margin-bottom:10px;float:left;</div>
<div class="box2_1"> margin-bottom:10px;float:left;</div>
<div class="box2_1"> margin-bottom:10px;float:left;</div>
<div class="box2_1"> margin-bottom:10px;float:left;</div>
</div>
解决IE6,IE7 中,底边距 bug:用父元素的底内补白(padding)代替。如下图
 firefox、IE7、IE8、IE6
代码:
<divclass="box2 padbot">
<div class="box2_2">float:left;</div>
<div class="box2_2">float:left;</div>
<div class="box2_2"> float:left;</div>
<div class="box2_2">float:left;</div>
</div>
这个方法的缺点是不能换行,如果想要换行的话,建议将浮动父元素的浮动子元素设置padding值。
智能推荐
python编码问题之encode、decode、codecs模块_python中encode在什么模块-程序员宅基地
文章浏览阅读2.1k次。原文链接先说说编解码问题编码转换时,通常需要以unicode作为中间编码,即先将其他编码的字符串解码(decode)成unicode,再从unicode编码(encode)成另一种编码。 Eg:str1.decode('gb2312') #将gb2312编码的字符串转换成unicode编码str2.encode('gb2312') #将unicode编码..._python中encode在什么模块
Java数据流-程序员宅基地
文章浏览阅读949次,点赞21次,收藏15次。本文介绍了Java中的数据输入流(DataInputStream)和数据输出流(DataOutputStream)的使用方法。
ie浏览器无法兼容的问题汇总_ie 浏览器 newdate-程序员宅基地
文章浏览阅读111次。ie无法兼容_ie 浏览器 newdate
想用K8s,还得先会Docker吗?其实完全没必要-程序员宅基地
文章浏览阅读239次。这篇文章把 Docker 和 K8s 的关系给大家做了一个解答,希望还在迟疑自己现有的知识储备能不能直接学 K8s 的,赶紧行动起来,K8s 是典型的入门有点难,后面越用越香。
ADI中文手册获取方法_adi 如何查看数据手册-程序员宅基地
文章浏览阅读561次。ADI中文手册获取方法_adi 如何查看数据手册
React 分页-程序员宅基地
文章浏览阅读1k次,点赞4次,收藏3次。React 获取接口数据实现分页效果以拼多多接口为例实现思路加载前 加载动画加载后 判断有内容的时候 无内容的时候用到的知识点1、动画效果(用在加载前,加载之后就隐藏或关闭,用开关效果即可)2、axios请求3、map渲染页面4、分页插件(antd)代码实现import React, { Component } from 'react';//引入axiosimport axios from 'axios';//引入antd插件import { Pagination }_react 分页
随便推点
关于使用CryPtopp库进行RSA签名与验签的一些说明_cryptopp 签名-程序员宅基地
文章浏览阅读449次,点赞9次,收藏7次。这个变量与验签过程中的SignatureVerificationFilter::PUT_MESSAGE这个宏是对应的,SignatureVerificationFilter::PUT_MESSAGE,如果在签名过程中putMessage设置为true,则在验签过程中需要添加SignatureVerificationFilter::PUT_MESSAGE。项目中使用到了CryPtopp库进行RSA签名与验签,但是在使用过程中反复提示无效的数字签名。否则就会出现文章开头出现的数字签名无效。_cryptopp 签名
新闻稿的写作格式_新闻稿时间应该放在什么位置-程序员宅基地
文章浏览阅读848次。新闻稿是新闻从业者经常使用的一种文体,它的格式与内容都有着一定的规范。本文将从新闻稿的格式和范文两个方面进行介绍,以帮助读者更好地了解新闻稿的写作_新闻稿时间应该放在什么位置
Java中的转换器设计模式_java转换器模式-程序员宅基地
文章浏览阅读1.7k次。Java中的转换器设计模式 在这篇文章中,我们将讨论 Java / J2EE项目中最常用的 Converter Design Pattern。由于Java8 功能不仅提供了相应类型之间的通用双向转换方式,而且还提供了转换相同类型对象集合的常用方法,从而将样板代码减少到绝对最小值。我们使用Java8 功能编写了..._java转换器模式
应用k8s入门-程序员宅基地
文章浏览阅读150次。1,kubectl run创建pods[root@master ~]# kubectl run nginx-deploy --image=nginx:1.14-alpine --port=80 --replicas=1[root@master ~]# kubectl get podsNAME READY STATUS REST...
PAT菜鸡进化史_乙级_1003_1003 pat乙级 最优-程序员宅基地
文章浏览阅读128次。PAT菜鸡进化史_乙级_1003“答案正确”是自动判题系统给出的最令人欢喜的回复。本题属于 PAT 的“答案正确”大派送 —— 只要读入的字符串满足下列条件,系统就输出“答案正确”,否则输出“答案错误”。得到“答案正确”的条件是: 1. 字符串中必须仅有 P、 A、 T这三种字符,不可以包含其它字符; 2. 任意形如 xPATx 的字符串都可以获得“答案正确”,其中 x 或者是空字符串,或..._1003 pat乙级 最优
CH340与Android串口通信_340串口小板 安卓给安卓发指令-程序员宅基地
文章浏览阅读5.6k次。CH340与Android串口通信为何要将CH340的ATD+Eclipse上的安卓工程移植到AndroidStudio移植的具体步骤CH340串口通信驱动函数通信过程中重难点还存在的问题为何要将CH340的ATD+Eclipse上的安卓工程移植到AndroidStudio为了在这个工程基础上进行改动,验证串口的数据和配置串口的参数,我首先在Eclipse上配置了安卓开发环境,注意在配置环境是..._340串口小板 安卓给安卓发指令