1、R6为ISP,接口IP地址均为公有地址,该设备只能配置IP地址,之后不能再对其进行任何配置;2、R1-R5为局域网,私有IP地址192.168.1.0/24,请合理分配;3、R1、R2、R4,-程序员宅基地
一、实验拓扑图
二、实验要求
1、R6为ISP,接口IP地址均为公有地址,该设备只能配置IP地址,之后不能再对其进行任何配置;
2、R1-R5为局域网,私有IP地址192.168.1.0/24,请合理分配;
3、R1、R2、R4,各有两个环回IP地址;R5,R6各有一个环回地址;所有路由器上环回均代表连接用户的接口;
4、R3下面的两台PC通过DHCP自动获取IP地址;
5、选路最佳,路由表尽量小,避免环路;
6、R1-R5均可以访问R6的环回;
7、R6 telnet R5的公有地址时,实际登录到R1上;
8、R4与R5正常通过1000M链路,故障时通过100m链路;
三、实验思路
1.根据网段数并且简化路由再划分IP
2.配置DHCP服务,下发给主机IP
3.配置静态路由,使得内网全通
4.配置路由防止成环
5. R4与R5正常通过1000M链路,故障时通过100m链路,即修改优先级
6.配置Easy IP技术,使得公网与私网互通
7.R6telentR5,实则登录R1
四、实验步骤
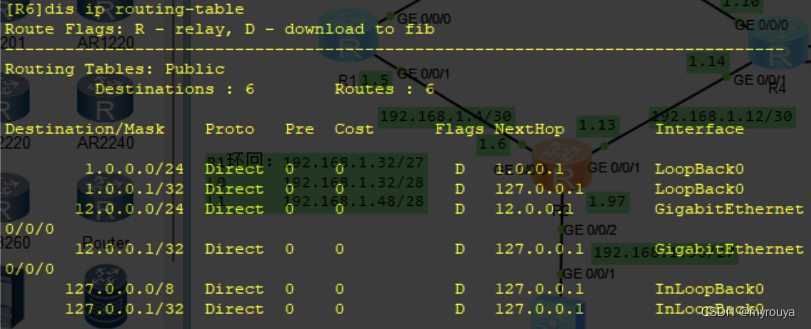
(1)先划分IP地址,根据拓扑图分析,总共需要14个网段,因为要将路由表简化,先分出6个大网段,将骨干链路作为一个大网段,各路由器环回网段作为一个大网段(包括R3下的民用网段)
192.168.1.0000 0000/27---骨干链路
192.168.1.0000 0000/30---192.168.1.0/30
192.168.1.0000 0100/30---192.168.1.4/30
192.168.1.0000 1000/30---192.168.1.8/30
192.168.1.0000 1100/30---192.168.1.12/30
192.168.1.0001 0000/30---192.168.1.16/30
192.168.1.0001 0100/30---192.168.1.20/30
192.168.1.0001 1000/30---192.168.1.24/30
192.168.1.0001 1100/30---192.168.1.28/30
192.168.1.0010 0000---192.168.1.32/27---R1环回链路
192.168.1.0010 0000/28---192.168.1.32/28
192.168.1.0011 0000/28---192.168.1.48/28
192.168.1.0100 0000/27---192.168.1.64/27---R2环回链路
192.168.1.0100 0000/28---192.168.1.64/28
192.168.1.0101 0000/28---192.168.1.80/28
192.168.1.0110 0000/27---192.168.1.96/27---R3民用网段
192.168.1.1000 0000/27---192.168.1.128/27---R4环回链路
192.168.1.1000 0000/28---192.168.1.128/28
192.168.1.1001 0000/28---192.168.1.144/28
192.168.1.1010 0000/27---192.168.1.160/27---R5环回链路
192.168.1.1100 0000/27
192.168.1.1110 0000/27
(2)配置IP地址
R1:
<Huawei>sy
Enter system view, return user view with Ctrl+Z.
[Huawei]sy R1
[R1]int g 0/0/0
[R1-GigabitEthernet0/0/0]ip ad 192.168.1.1 30
[R1-GigabitEthernet0/0/1]ip ad 192.168.1.5 30
[R1]interface LoopBack 0
[R1-LoopBack0]interface LoopBack 1
[R1-LoopBack1]ip address 192.168.1.49
[R1-LoopBack0]interface LoopBack 1
[R1-LoopBack1]ip address 192.168.1.49
R2配置:
<Huawei>sy
Enter system view, return user view with Ctrl+Z.
[Huawei]sy R2
[R2]int
[R2]interface g 0/0/0
[R2-GigabitEthernet0/0/0]ip address 192.168.1.2 30
[R2-GigabitEthernet0/0/0]int g 0/0/1
[R2-GigabitEthernet0/0/1]ip address 192.168.1.9 30
[R2-GigabitEthernet0/0/1]q
[R2]int LoopBack0
[R2-LoopBack0]ip address 192.168.1.65 28
[R2-LoopBack0]int LoopBack1
[R2-LoopBack1]ip address 192.168.1.81 28
[R2-LoopBack1]q
R3配置:
<Huawei>
<Huawei>sy
Enter system view, return user view with Ctrl+Z.
[Huawei]sy R3
[R3]int g 0/0/0
[R3-GigabitEthernet0/0/0]ip ad
[R3-GigabitEthernet0/0/0]ip address 192.168.1.6 30
[R3-GigabitEthernet0/0/0]int g 0/0/1
[R3-GigabitEthernet0/0/1]ip ad
[R3-GigabitEthernet0/0/1]ip address 192.168.1.13 30
[R3-GigabitEthernet0/0/1]int g 0/0/2
[R3-GigabitEthernet0/0/2]ip ad
[R3-GigabitEthernet0/0/2]ip address
[R3-GigabitEthernet0/0/2]ip address 192.168.1.97 27
[R3-GigabitEthernet0/0/2]q
[R3]
R4配置:
<Huawei>sy
Enter system view, return user view with Ctrl+Z.
[Huawei]sy R4
[R4]int g 0/0/0
[R4-GigabitEthernet0/0/0]ip address 192.168.1.10 30
[R4-GigabitEthernet0/0/0]int g 0/0/1
[R4-GigabitEthernet0/0/1]ip ad
[R4-GigabitEthernet0/0/1]ip address 192.168.1.14 30
[R4-GigabitEthernet0/0/1]int g 0/0/2
[R4-GigabitEthernet0/0/2]ip ad
[R4-GigabitEthernet0/0/2]ip address 192.168.1.17 30
[R4-GigabitEthernet0/0/2]int g 0/0/3
[R4-GigabitEthernet0/0/3]ip ad
[R4-GigabitEthernet0/0/3]ip address 192.168.1.21 30
[R4-GigabitEthernet0/0/3]q
[R4]int l
[R4]int Lo
[R4]int LoopBack0
[R4-LoopBack0]ip ad
[R4-LoopBack0]ip address 192.168.1.129 28
[R4-LoopBack0]int LoopBack1
[R4-LoopBack1]ip ad
[R4-LoopBack1]ip address 192.168.1.145 28
[R4-LoopBack1]
R5配置:
<Huawei>sy
Enter system view, return user view with Ctrl+Z.
[Huawei]sy R5
[R5]int g 0/0/0
[R5-GigabitEthernet0/0/0]
[R5-GigabitEthernet0/0/0]ip address 192.168.1.18 30
[R5-GigabitEthernet0/0/0]int g0/0/1
[R5-GigabitEthernet0/0/1]ip ad
[R5-GigabitEthernet0/0/1]ip address 12.0.0.2 24
[R5-GigabitEthernet0/0/1]int g 0/0/2
[R5-GigabitEthernet0/0/2]ip address 192.168.1.22 30
[R5-GigabitEthernet0/0/2]q
[R5]int Lo
[R5]int LoopBack0
[R5-LoopBack0]ip ad
[R5-LoopBack0]ip address 192.168.1.161 30
[R5-LoopBack0]q
[R5]
R6配置:
<Huawei>sy
Enter system view, return user view with Ctrl+Z.
[Huawei]sy R6
[R6]int g 0/0/0
[R6-GigabitEthernet0/0/0]ip ad
[R6-GigabitEthernet0/0/0]ip address
[R6-GigabitEthernet0/0/0]ip address 12.0.0.1 24
[R6]int Lo
[R6]int LoopBack0
[R6-LoopBack0]ip ad
[R6-LoopBack0]ip address 1.0.0.1 24
(3)配置DHCP服务器(R3),下发给主机IP
[R3]dhcp e
[R3]dhcp enable
Info: The operation may take a few seconds. Please wait for a moment.done.
[R3]ip pool aa
Info:It's successful to create an IP address pool.
[R3-ip-pool-aa]net
[R3-ip-pool-aa]network 192.168.1.96 mask 27
[R3-ip-pool-aa]gateway-list 192.168.1.97
[R3-ip-pool-aa]dns-list 114.114.114.114
[R3-ip-pool-aa]int g 0/0/2
[R3-GigabitEthernet0/0/2]dhc
[R3-GigabitEthernet0/0/2]dhcp se
[R3-GigabitEthernet0/0/2]dhcp select gl
[R3-GigabitEthernet0/0/2]dhcp select global
PC1:

PC2:

(4)配置静态路由
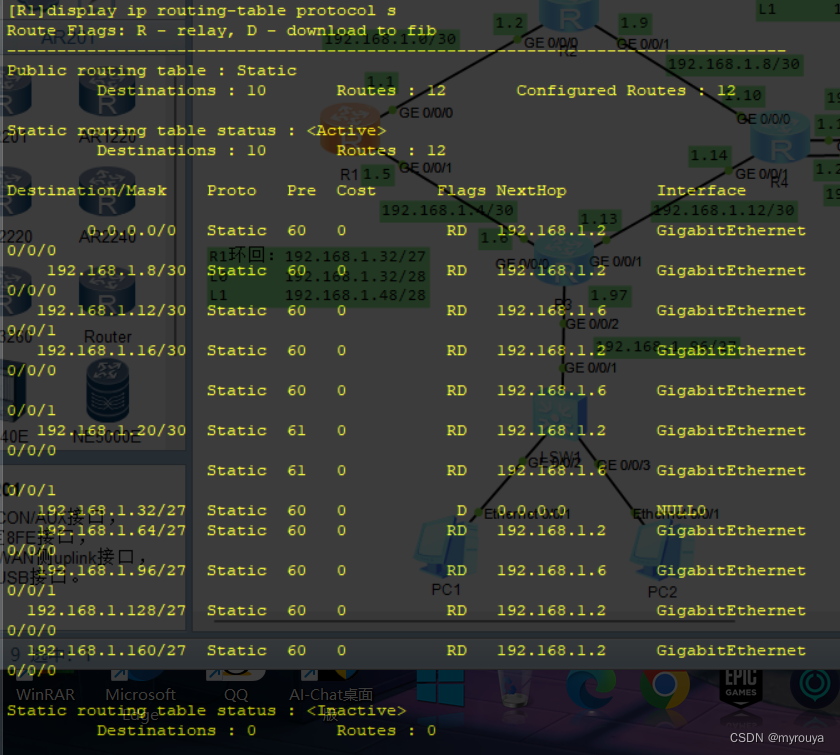
R1配置:
<R1>sy
[R1]ip route-static 192.168.1.64 27 192.168.1.2
[R1]ip route-static 192.168.1.8 30 192.168.1.2
[R1]ip route-static 192.168.1.16 30 192.168.1.2
[R1]ip route-static 192.168.1.20 30 192.168.1.2
[R1]ip route-static 192.168.1.12 30 192.168.1.6
[R1]ip route-static 192.168.1.96 27 192.168.1.6
[R1]ip route-static 192.168.1.128 27 192.168.1.2
[R1]ip route-static 192.168.1.160 27 192.168.1.2
[R1]ip route-static 0.0.0.0 0 192.168.1.2
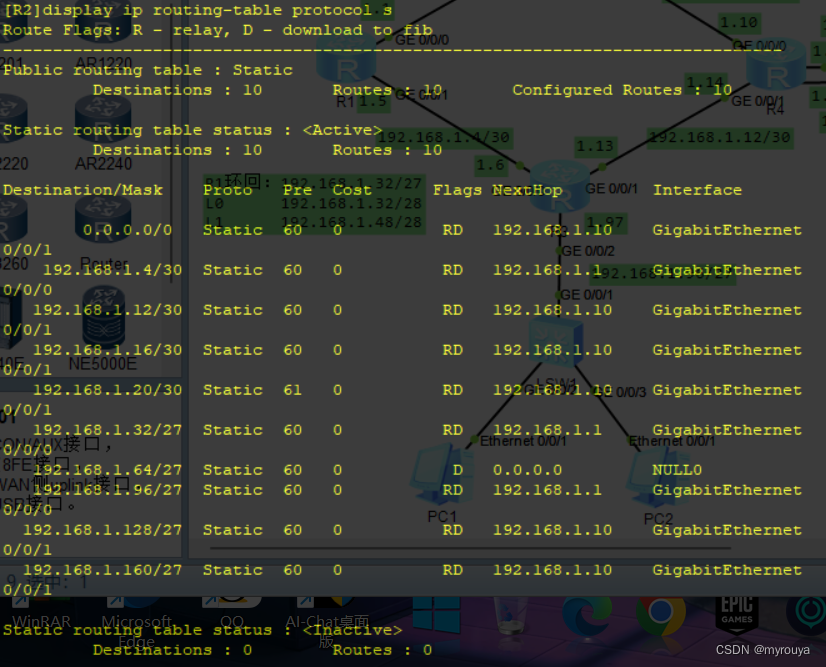
R2配置:
<R2>sy
[R2]ip route-static 192.168.1.32 27 192.168.1.1
[R2]ip route-static 192.168.1.4 30 192.168.1.1
[R2]ip route-static 192.168.1.96 27 192.168.1.1
[R2]ip route-static 192.168.1.128 27 192.168.1.10
[R2]ip route-static 192.168.1.12 30 192.168.1.10
[R2]ip route-static 192.168.1.16 30 192.168.1.10
[R2]ip route-static 192.168.1.20 30 192.168.1.10
[R2]ip route-static 192.168.1.160 27 192.168.1.10
[R2]ip route-static 0.0.0.0 0 192.168.1.10
R3配置:
<R3>
<R3>sy
[R3]ip route-static 192.168.1.32 27 192.168.1.5
[R3]ip route-static 192.168.1.0 30 192.168.1.5
[R3]ip route-static 192.168.1.64 27 192.168.1.5
[R3]ip route-static 192.168.1.8 30 192.168.1.14
[R3]ip route-static 192.168.1.128 27 192.168.1.14
[R3]ip route-static 192.168.1.16 30 192.168.1.14
[R3]ip route-static 192.168.1.20 30 192.168.1.14
[R3]ip route-static 192.168.1.160 27 192.168.1.14
[R3]ip route-static 0.0.0.0 0 192.168.1.14

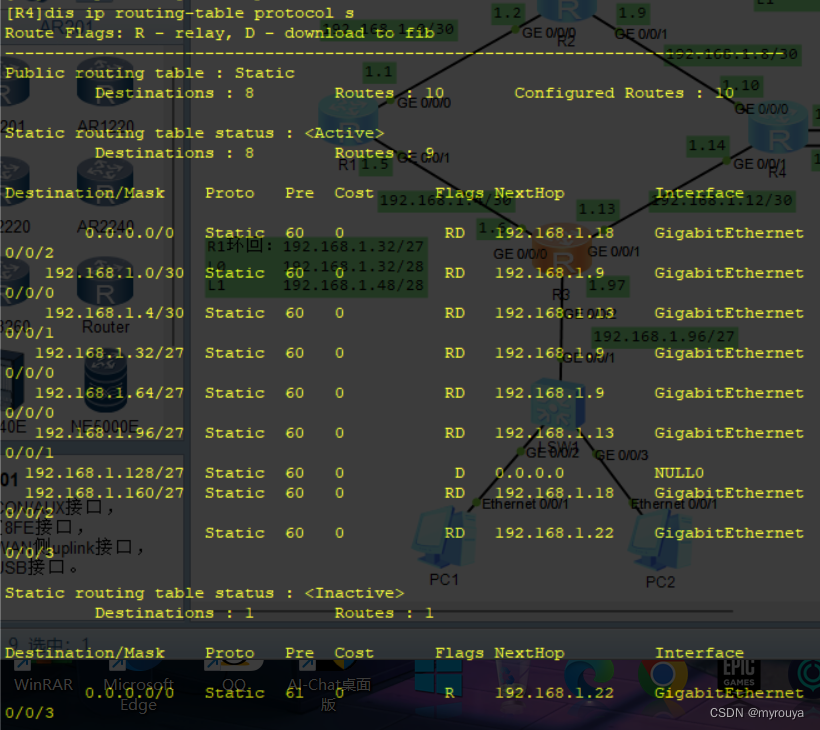
R4配置:
<R4>sy
[R4]ip route-static 192.168.1.0 30 192.168.1.9
[R4]ip route-static 192.168.1.64 27 192.168.1.9
[R4]ip route-static 192.168.1.32 27 192.168.1.9
[R4]ip route-static 192.168.1.4 30 192.168.1.13
[R4]ip route-static 192.168.1.96 27 192.168.1.13
[R4]ip route-static 192.168.1.160 27 192.168.1.18
[R4]ip route-static 192.168.1.160 27 192.168.1.22
[R4]ip route-static 0.0.0.0 0 192.168.1.18
[R4]ip route-static 0.0.0.0 0 192.168.1.22
R5配置:
#因为R5左边全部属于192.168.1.0/24,所以就合在一起
[R5]ip route-static 192.168.1.0 24 192.168.1.17
[R5]ip route-static 192.168.1.0 24 192.168.1.21
[R5]ip route-static 0.0.0.0 0 12.0.0.1

R6不需要配置路由:
PC端通信:
(5)防止成环
R1:
[R1]ip route-static 192.168.1.32 27 NULL 0
R2:
[R2]ip route-static 192.168.1.64 27 NULL 0
R4:
[R4]ip route-static 192.168.1.128 27 NULL 0
R5:
[R5]ip route-static 192.168.1.160 27 NULL 0
(6)R4与R5正常通过1000M链路,故障时通过100m链路
所以我们修改优先级即可
R1:
[R1]ip route-static 192.168.1.20 30 192.168.1.2 preference 61
[R1]ip route-static 192.168.1.20 30 192.168.1.6 preference 61
R2:
[R2]ip route-static 192.168.1.20 30 192.168.1.10 preference 61
R3:
[R3]ip route-static 192.168.1.20 30 192.168.1.14 preference 61
R4:
[R4]ip route-static 0.0.0.0 0 192.168.1.22 preference 61
R5:
[R5]ip route-static 192.168.1.0 24 192.168.1.21 preference 61
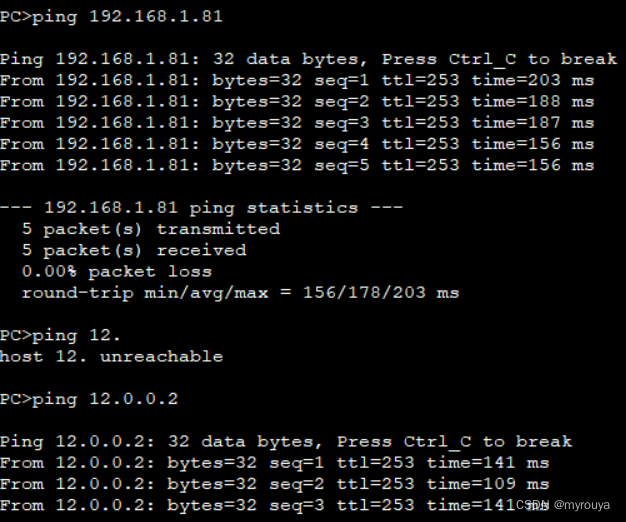
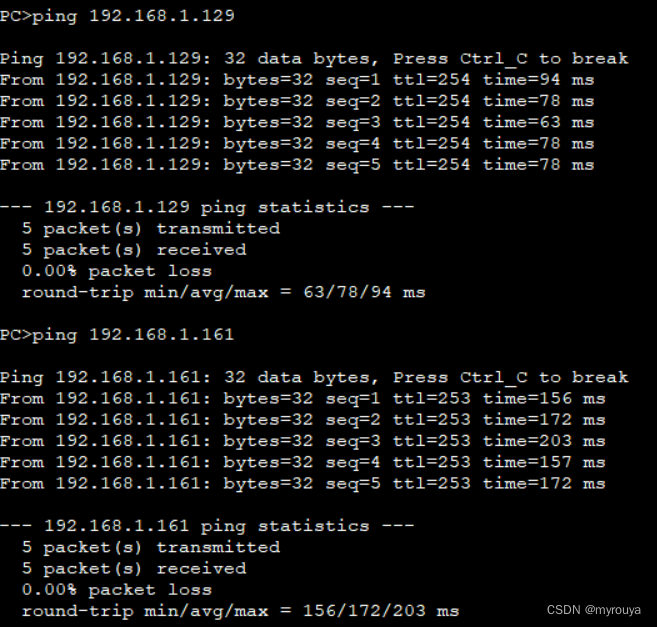
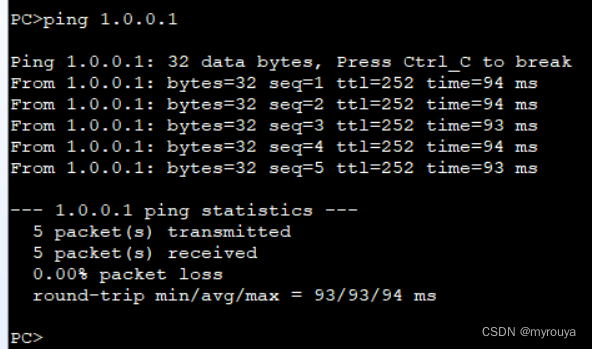
(7)均可访问R6环回:
R5配置easy IP:
[R5]acl 2000
[R5-acl-basic-2000]rule 10 permit source 192.168.1.0 0.0.255.255
[R5-acl-basic-2000]int g 0/0/1
[R5-GigabitEthernet0/0/1]nat outbound 2000
R1 ping R6环回:

PC ping R6环回:
(8)R6telnetR5,实则登录R1
R1配置:
[R1]aaa
[R1-aaa]local-user admin privilege level 15 password cipher 123456
[R1-aaa]local-user admin service-type telnet
[R1]user-interface vty 0 4
[R1-ui-vty0-4]authentication-mode aaa
[R5-GigabitEthernet0/0/1]nat server protocol tcp global current-interface 23 ins
ide 192.168.1.1 23
Warning:The port 23 is well-known port. If you continue it may cause function fa
ilure.
Are you sure to continue?[Y/N]:y
R6验证:
<R6>telnet 12.0.0.2
Trying 12.0.0.2 ...
Press CTRL+K to abort
Connected to 12.0.0.2 ...
Login authentication
Username:admin
Password:
Info: The max number of VTY users is 10, and the number
of current VTY users on line is 1.
The current login time is 2024-03-16 14:16:39.
<R1>
<R1>q
<R6>
验证成功!!!
智能推荐
while循环&CPU占用率高问题深入分析与解决方案_main函数使用while(1)循环cpu占用99-程序员宅基地
文章浏览阅读3.8k次,点赞9次,收藏28次。直接上一个工作中碰到的问题,另外一个系统开启多线程调用我这边的接口,然后我这边会开启多线程批量查询第三方接口并且返回给调用方。使用的是两三年前别人遗留下来的方法,放到线上后发现确实是可以正常取到结果,但是一旦调用,CPU占用就直接100%(部署环境是win server服务器)。因此查看了下相关的老代码并使用JProfiler查看发现是在某个while循环的时候有问题。具体项目代码就不贴了,类似于下面这段代码。while(flag) {//your code;}这里的flag._main函数使用while(1)循环cpu占用99
【无标题】jetbrains idea shift f6不生效_idea shift +f6快捷键不生效-程序员宅基地
文章浏览阅读347次。idea shift f6 快捷键无效_idea shift +f6快捷键不生效
node.js学习笔记之Node中的核心模块_node模块中有很多核心模块,以下不属于核心模块,使用时需下载的是-程序员宅基地
文章浏览阅读135次。Ecmacript 中没有DOM 和 BOM核心模块Node为JavaScript提供了很多服务器级别,这些API绝大多数都被包装到了一个具名和核心模块中了,例如文件操作的 fs 核心模块 ,http服务构建的http 模块 path 路径操作模块 os 操作系统信息模块// 用来获取机器信息的var os = require('os')// 用来操作路径的var path = require('path')// 获取当前机器的 CPU 信息console.log(os.cpus._node模块中有很多核心模块,以下不属于核心模块,使用时需下载的是
数学建模【SPSS 下载-安装、方差分析与回归分析的SPSS实现(软件概述、方差分析、回归分析)】_化工数学模型数据回归软件-程序员宅基地
文章浏览阅读10w+次,点赞435次,收藏3.4k次。SPSS 22 下载安装过程7.6 方差分析与回归分析的SPSS实现7.6.1 SPSS软件概述1 SPSS版本与安装2 SPSS界面3 SPSS特点4 SPSS数据7.6.2 SPSS与方差分析1 单因素方差分析2 双因素方差分析7.6.3 SPSS与回归分析SPSS回归分析过程牙膏价格问题的回归分析_化工数学模型数据回归软件
利用hutool实现邮件发送功能_hutool发送邮件-程序员宅基地
文章浏览阅读7.5k次。如何利用hutool工具包实现邮件发送功能呢?1、首先引入hutool依赖<dependency> <groupId>cn.hutool</groupId> <artifactId>hutool-all</artifactId> <version>5.7.19</version></dependency>2、编写邮件发送工具类package com.pc.c..._hutool发送邮件
docker安装elasticsearch,elasticsearch-head,kibana,ik分词器_docker安装kibana连接elasticsearch并且elasticsearch有密码-程序员宅基地
文章浏览阅读867次,点赞2次,收藏2次。docker安装elasticsearch,elasticsearch-head,kibana,ik分词器安装方式基本有两种,一种是pull的方式,一种是Dockerfile的方式,由于pull的方式pull下来后还需配置许多东西且不便于复用,个人比较喜欢使用Dockerfile的方式所有docker支持的镜像基本都在https://hub.docker.com/docker的官网上能找到合..._docker安装kibana连接elasticsearch并且elasticsearch有密码
随便推点
Python 攻克移动开发失败!_beeware-程序员宅基地
文章浏览阅读1.3w次,点赞57次,收藏92次。整理 | 郑丽媛出品 | CSDN(ID:CSDNnews)近年来,随着机器学习的兴起,有一门编程语言逐渐变得火热——Python。得益于其针对机器学习提供了大量开源框架和第三方模块,内置..._beeware
Swift4.0_Timer 的基本使用_swift timer 暂停-程序员宅基地
文章浏览阅读7.9k次。//// ViewController.swift// Day_10_Timer//// Created by dongqiangfei on 2018/10/15.// Copyright 2018年 飞飞. All rights reserved.//import UIKitclass ViewController: UIViewController { ..._swift timer 暂停
元素三大等待-程序员宅基地
文章浏览阅读986次,点赞2次,收藏2次。1.硬性等待让当前线程暂停执行,应用场景:代码执行速度太快了,但是UI元素没有立马加载出来,造成两者不同步,这时候就可以让代码等待一下,再去执行找元素的动作线程休眠,强制等待 Thread.sleep(long mills)package com.example.demo;import org.junit.jupiter.api.Test;import org.openqa.selenium.By;import org.openqa.selenium.firefox.Firefox.._元素三大等待
Java软件工程师职位分析_java岗位分析-程序员宅基地
文章浏览阅读3k次,点赞4次,收藏14次。Java软件工程师职位分析_java岗位分析
Java:Unreachable code的解决方法_java unreachable code-程序员宅基地
文章浏览阅读2k次。Java:Unreachable code的解决方法_java unreachable code
标签data-*自定义属性值和根据data属性值查找对应标签_如何根据data-*属性获取对应的标签对象-程序员宅基地
文章浏览阅读1w次。1、html中设置标签data-*的值 标题 11111 222222、点击获取当前标签的data-url的值$('dd').on('click', function() { var urlVal = $(this).data('ur_如何根据data-*属性获取对应的标签对象