技术分享:Flink源码分析-Task执行_java.io.ioexception: can't get next record for cha-程序员宅基地
本文作者:擎创科技 研发总监a coder
在介绍JobMaster之前,先插播一篇分析从Task被提交到TaskExecutor后到运行的过程。所有的分布式计算引擎都有一个序列化任务然后提交给各Worker节点去执行的过程,我们在开始开发Flink作业或者Spark作业时,也经常会遇到一些序列化相关的异常,所有这些都牵扯到几个问题:
- Flink如何来描述我们开发的数据处理逻辑(绝大部分是user Function)。
- Flink如何来序列化以及反序列化我们开发的数据处理逻辑。
- Flink最终如何执行我们开发的数据处理逻辑。
这几个问题包括了任务提交客户端、JobMaster 以及 TaskExecutor三个环节,牵扯到了StreamGraph,JobGraph,ExecutionGraph 以及 Task等概念。我准备采取倒序的方式,从后向前一段段进行分析,今天我们先分析Task被提交到Task Executor之后这一段,首先我们来看看Task提交的入口,从方法签名以及实现来看反序列化后的TaskInformation应该就包含了任务执行所需要的信息。
submitTask
public CompletableFuture<Acknowledge> submitTask(
			TaskDeploymentDescriptor tdd,
			JobMasterId jobMasterId,
			Time timeout) {

                        //...
			// deserialize the pre-serialized information
			final JobInformation jobInformation;
			final TaskInformation taskInformation;
			try {
				jobInformation = tdd.getSerializedJobInformation().deserializeValue(getClass().getClassLoader());
                                //反序列化拿到Task的信息
				taskInformation = tdd.getSerializedTaskInformation().deserializeValue(getClass().getClassLoader());
			} catch {}
			...

			Task task = new Task(
				jobInformation,
				taskInformation//,
                                //...
				);

			log.info("Received task {}.", task.getTaskInfo().getTaskNameWithSubtasks());

			boolean taskAdded;

			try {
				taskAdded = taskSlotTable.addTask(task);
			} catch (SlotNotFoundException | SlotNotActiveException e) {
				throw new TaskSubmissionException("Could not submit task.", e);
			}

			if (taskAdded) {
                                //启动Task
				task.startTaskThread();
				taskCompletionTracker.trackTaskCompletion(task);

				//...
                        }
    }
TaskInformation
public class TaskInformation implements Serializable {

	private static final long serialVersionUID = -9006218793155953789L;

	/** Job vertex id of the associated job vertex */
	private final JobVertexID jobVertexId;

	/** Name of the task */
	private final String taskName;

	/** The number of subtasks for this operator */
	private final int numberOfSubtasks;

	/** The maximum parallelism == number of key groups */
	private final int maxNumberOfSubtaks;

	/** Class name of the invokable to run */
	private final String invokableClassName;

	/** Configuration for the task */
	private final Configuration taskConfiguration;
}
这个类的结构比较简单,关键的成员有如下两个:
- invokableClassName,顾名思义以及根据注释这应该是后面需要构造以及执行的类的名称。
- taskConfiguration,其内部包含了一个Map结构来存储具体的序列化后的配置信息。

我通过代码调试,截取了一些这个结构实例化后的值作为参考:
- invokableClassName 为 SourceStreamTask
- taskConfiguration中有两个键值比较关键:serializedUDF 以及 chainedTaskConfig_。具体的用户后面会分析。
Task
我们先来看一下SourceStreamTask,从之前的代码注释(invokableClassName)来看,这个类会作为这个Task的创建以及调用入口,首先看看这个类的继承关系:
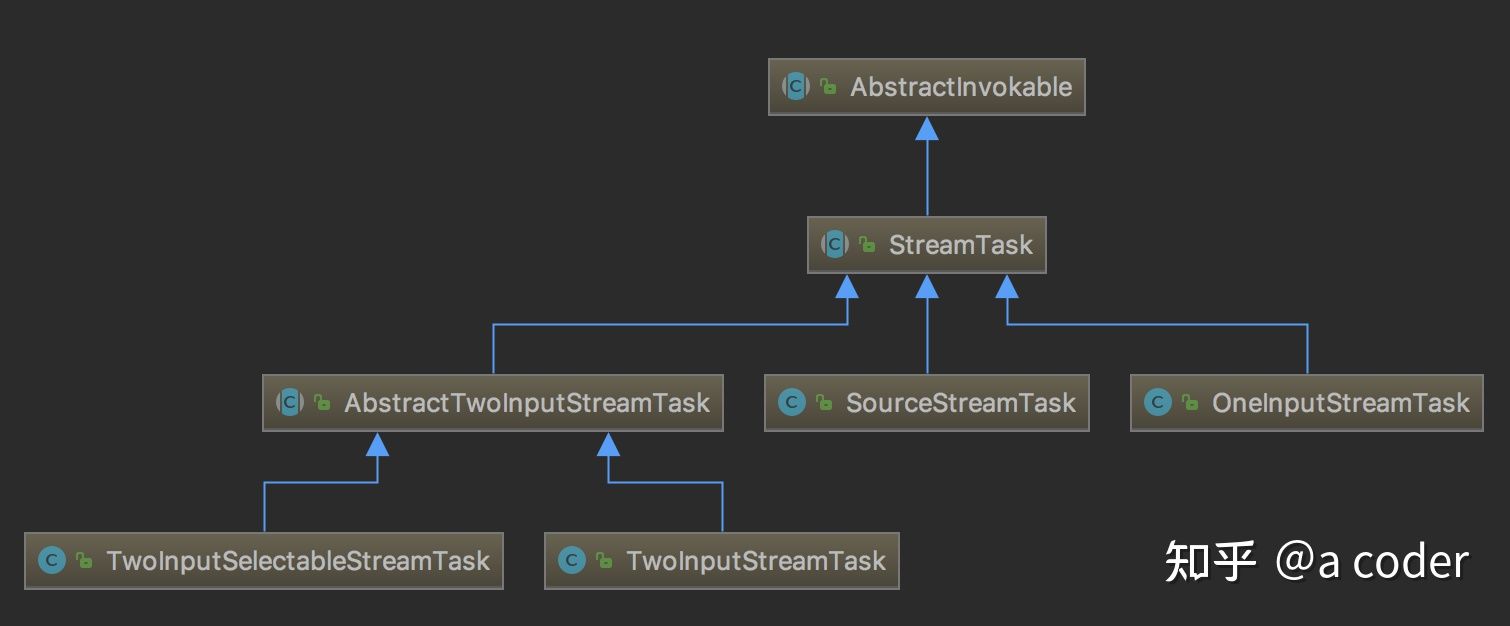
为了阅读方便,我去掉了范型以及接口的关系,上面的结构很清楚,下面大致介绍一下几个类的作用
- AbstractInvokable,下面是该类的介绍,意思很明确:所有TaskManager能执行的任务都是继承自它。
This is the abstract base class for every task that can be executed by a TaskManager.
Concrete tasks extend this class, for example the streaming and batch tasks.
- StreamTask,意思也很明确,所有的流处理任务都继承自它,每一个任务包含一个或多个算子,多个算子可以合成一条Chain,在一个线程内执行。
Base class for all streaming tasks. A task is the unit of local processing that is deployed
and executed by the TaskManagers. Each task runs one or more StreamOperators which form the Task's operator chain. Operators that are chained together execute synchronously in the same thread and hence on the same stream partition. A common case for these chains are successive map/flatmap/filter tasks.
- SourceStreamTask,故名思议代表一个流数据源的任务,它里面包含一个实际产生数据的SourceSource(包含了用户实现的SourceFunction)。
StreamTask for executing a StreamSource.
- OneInputStreamTask,有一个输入的流处理任务。
A StreamTask for executing a OneInputStreamOperator
其他的几个子类,大家可以自行去阅读,基本上每一个子类对应一类任务,包含了某一类算子。
Operator
上面的Task介绍里面,都提到了Operator,网上找到的Flink原理介绍文章里面,也可以常常看见"算子"。我们在开发Flink作业时,最常见的就是去实现一些Function,比如:SourceFunction,RichFlatMapFunction,MapFunction等等,这些Function被用来构造Operator,下面是StreamFlatMap算子的定义,从代码可以看到我们编写的FlatMapFunction作为构造参数来进行实例化StreamFlatMap算子。
//DataStream
public <R> SingleOutputStreamOperator<R> flatMap(FlatMapFunction<T, R> flatMapper) {

		TypeInformation<R> outType = TypeExtractor.getFlatMapReturnTypes(clean(flatMapper),
				getType(), Utils.getCallLocationName(), true);

		return transform("Flat Map", outType, new StreamFlatMap<>(clean(flatMapper)));

}

public class StreamFlatMap<IN, OUT>
		extends AbstractUdfStreamOperator<OUT, FlatMapFunction<IN, OUT>>
		implements OneInputStreamOperator<IN, OUT> {

	private static final long serialVersionUID = 1L;

	private transient TimestampedCollector<OUT> collector;

	public StreamFlatMap(FlatMapFunction<IN, OUT> flatMapper) {
		super(flatMapper);
		chainingStrategy = ChainingStrategy.ALWAYS;
	}

	@Override
	public void open() throws Exception {
		super.open();
		collector = new TimestampedCollector<>(output);
	}

	@Override
	public void processElement(StreamRecord<IN> element) throws Exception {
		collector.setTimestamp(element);
		userFunction.flatMap(element.getValue(), collector);
	}
}
那么这些Operator(算子) 是如何被嵌入到Task中间去执行的呢? 我们以StreamTask为例来一探究竟。
StreamTask
实例化
先来看一下StreamTask的实例化过程。回顾一下前面的TaskInformation里面,我们已经拿到了invokableClassName 以及 taskConfig,实例化代码如下,可以看到在初始化时,只是利用反射的方法找到构造函数,然后进行实例化,没有做额外的其他逻辑。
private static AbstractInvokable loadAndInstantiateInvokable(
		ClassLoader classLoader,
		String className,
		Environment environment) throws Throwable {

		final Class<? extends AbstractInvokable> invokableClass;
		try {
                //根据className获取到其对应的类
			invokableClass = Class.forName(className, true, classLoader)
				.asSubclass(AbstractInvokable.class);
		} catch (Throwable t) {
			throw new Exception("Could not load the task's invokable class.", t);
		}

		Constructor<? extends AbstractInvokable> statelessCtor;

		try {
                 //找到其有Environment参数的构造函数
			statelessCtor = invokableClass.getConstructor(Environment.class);
		} catch (NoSuchMethodException ee) {
			throw new FlinkException("Task misses proper constructor", ee);
		}

		// instantiate the class
		try {
			//noinspection ConstantConditions  --> cannot happen
                        //实例化Task
			return statelessCtor.newInstance(environment);
		} catch (InvocationTargetException e) {
			// directly forward exceptions from the eager initialization
			throw e.getTargetException();
		} catch (Exception e) {
			throw new FlinkException("Could not instantiate the task's invokable class.", e);
		}
	}
invoke
所有Task调用开始执行的入口为invoke方法,以下为invoke方法的执行步骤介绍
invoke()
* +----> Create basic utils (config, etc) and load the chain of operators
* +----> operators.setup()
* +----> task specific init()
* +----> initialize-operator-states()
* +----> open-operators()
* +----> run()
* +----> close-operators()
* +----> dispose-operators()
* +----> common cleanup
* +----> task specific cleanup()
本文会详细介绍粗体的两个步骤(OperatorChain的构建 以及 Run),其他的步骤主要是一些任务、算子、状态的初始化以及回收,不影响执行的主体步骤,这里不再做分析。通过看invoke的代码,可以发现OperatorChain的构造在beforeInvoke方法中,而run的具体方法为runMailboxLoop。
@Override
public final void invoke() throws Exception {
        try {
            beforeInvoke();

            // final check to exit early before starting to run
            if (canceled) {
                throw new CancelTaskException();
            }

            // let the task do its work
            runMailboxLoop();

            // if this left the run() method cleanly despite the fact that this was canceled,
            // make sure the "clean shutdown" is not attempted
            if (canceled) {
                throw new CancelTaskException();
            }

            afterInvoke();
        } catch (Throwable invokeException) {
            failing = !canceled;
            try {
                cleanUpInvoke();
            }
            // TODO: investigate why Throwable instead of Exception is used here.
            catch (Throwable cleanUpException) {
                Throwable throwable =
                        ExceptionUtils.firstOrSuppressed(cleanUpException, invokeException);
                ExceptionUtils.rethrowException(throwable);
            }
            ExceptionUtils.rethrowException(invokeException);
        }
        cleanUpInvoke();
    }

protected void beforeInvoke() throws Exception {
        disposedOperators = false;
        LOG.debug("Initializing {}.", getName());

        operatorChain = new OperatorChain<>(this, recordWriter);
        mainOperator = operatorChain.getMainOperator();

        // task specific initialization
        init();

        // save the work of reloading state, etc, if the task is already canceled
        if (canceled) {
            throw new CancelTaskException();
        }

        // -------- Invoke --------

    }
还是老规矩,我们以结果为导向,先分析runMailboxLoop,经过分析runMailboxLoop方法以及mailboxProcessor的构造,可以得出runMailboxLoop方法最终调用了processInput方法,具体的代码推导片段如下
public void runMailboxLoop() throws Exception {
        mailboxProcessor.runMailboxLoop();
}

//mailboxProcesser的构造
this.mailboxProcessor = new MailboxProcessor(this::processInput, mailbox, actionExecutor);

//mailboxProcessor的runMailboxLoop方法实现
    /** Runs the mailbox processing loop. This is where the main work is done. */
    public void runMailboxLoop() throws Exception {
    ...
        final MailboxController defaultActionContext = new MailboxController(this);

        while (isMailboxLoopRunning()) {
            // The blocking `processMail` call will not return until default action is available.
            processMail(localMailbox, false);
            if (isMailboxLoopRunning()) {
                //开始执行
                mailboxDefaultAction.runDefaultAction(
                        defaultActionContext); // lock is acquired inside default action as needed
            }
        }
    }

protected void processInput(MailboxDefaultAction.Controller controller) throws Exception {
        //执行入口
        InputStatus status = inputProcessor.processInput();
        if (status == InputStatus.MORE_AVAILABLE && recordWriter.isAvailable()) {
            return;
        }
        if (status == InputStatus.END_OF_INPUT) {
            controller.allActionsCompleted();
            return;
        }
    }
终于来到了真正的入口InputProcessor,StreamTask里面并没有去实例化这个对象,我们以OneInputStreamTask为例进行分析,inputProcessor的实例化在init方法中,inputProcessor的processInput方法经过几次中转,最终调用到了mainOperator.processElement方法,具体代码如下:
public void init() throws Exception {
        StreamConfig configuration = getConfiguration();
        int numberOfInputs = configuration.getNumberOfNetworkInputs();

        if (numberOfInputs > 0) {
            DataOutput<IN> output = createDataOutput(numRecordsIn);
            StreamTaskInput<IN> input = createTaskInput(inputGate);
            //构造Processor需要input, output 以及 operatorChain
            inputProcessor = new StreamOneInputProcessor<>(input, output, operatorChain);
        }
    }

    private DataOutput<IN> createDataOutput(Counter numRecordsIn) {
        return new StreamTaskNetworkOutput<>(
                mainOperator, getStreamStatusMaintainer(), inputWatermarkGauge, numRecordsIn);
    }

    private StreamTaskInput<IN> createTaskInput(CheckpointedInputGate inputGate) {
        int numberOfInputChannels = inputGate.getNumberOfInputChannels();
        StatusWatermarkValve statusWatermarkValve = new StatusWatermarkValve(numberOfInputChannels);
        TypeSerializer<IN> inSerializer =
                configuration.getTypeSerializerIn1(getUserCodeClassLoader());
        return new StreamTaskNetworkInput<>(
                inputGate, inSerializer, getEnvironment().getIOManager(), statusWatermarkValve, 0);
    }

public final class StreamOneInputProcessor<IN> implements StreamInputProcessor {
    private final StreamTaskInput<IN> input;
    private final DataOutput<IN> output;

    private final BoundedMultiInput endOfInputAware;

    public StreamOneInputProcessor(
            StreamTaskInput<IN> input, DataOutput<IN> output, BoundedMultiInput endOfInputAware) {

        this.input = checkNotNull(input);
        this.output = checkNotNull(output);
        this.endOfInputAware = checkNotNull(endOfInputAware);
    }

    @Override
    public InputStatus processInput() throws Exception {
        InputStatus status = input.emitNext(output);
        ...
    }
}

public final class StreamTaskNetworkInput<T> implements StreamTaskInput<T> {
    @Override
    public InputStatus emitNext(DataOutput<T> output) throws Exception {
        while (true) {
            // get the stream element from the deserializer
            if (currentRecordDeserializer != null) {
                DeserializationResult result;
                try {
                    result = currentRecordDeserializer.getNextRecord(deserializationDelegate);
                } catch (IOException e) {
                    throw new IOException(
                            String.format("Can't get next record for channel %s", lastChannel), e);
                }
                if (result.isBufferConsumed()) {
                    currentRecordDeserializer.getCurrentBuffer().recycleBuffer();
                    currentRecordDeserializer = null;
                }

                if (result.isFullRecord()) {
                    processElement(deserializationDelegate.getInstance(), output);
                    return InputStatus.MORE_AVAILABLE;
                }
            }

            Optional<BufferOrEvent> bufferOrEvent = checkpointedInputGate.pollNext();
            if (bufferOrEvent.isPresent()) {
                // return to the mailbox after receiving a checkpoint barrier to avoid processing of
                // data after the barrier before checkpoint is performed for unaligned checkpoint
                // mode
                if (bufferOrEvent.get().isBuffer()) {
                    processBuffer(bufferOrEvent.get());
                } else {
                    processEvent(bufferOrEvent.get());
                    return InputStatus.MORE_AVAILABLE;
                }
            } else {
                if (checkpointedInputGate.isFinished()) {
                    checkState(
                            checkpointedInputGate.getAvailableFuture().isDone(),
                            "Finished BarrierHandler should be available");
                    return InputStatus.END_OF_INPUT;
                }
                return InputStatus.NOTHING_AVAILABLE;
            }
        }
    }

    private void processElement(StreamElement recordOrMark, DataOutput<T> output) throws Exception {
        if (recordOrMark.isRecord()) {
            output.emitRecord(recordOrMark.asRecord());
        } else if (recordOrMark.isWatermark()) {
            statusWatermarkValve.inputWatermark(
                    recordOrMark.asWatermark(), flattenedChannelIndices.get(lastChannel), output);
        } else if (recordOrMark.isLatencyMarker()) {
            output.emitLatencyMarker(recordOrMark.asLatencyMarker());
        } else if (recordOrMark.isStreamStatus()) {
            statusWatermarkValve.inputStreamStatus(
                    recordOrMark.asStreamStatus(),
                    flattenedChannelIndices.get(lastChannel),
                    output);
        } else {
            throw new UnsupportedOperationException("Unknown type of StreamElement");
        }
    }

    private void processEvent(BufferOrEvent bufferOrEvent) {
        // Event received
        final AbstractEvent event = bufferOrEvent.getEvent();
        // TODO: with checkpointedInputGate.isFinished() we might not need to support any events on
        // this level.
        if (event.getClass() == EndOfPartitionEvent.class) {
            // release the record deserializer immediately,
            // which is very valuable in case of bounded stream
            releaseDeserializer(bufferOrEvent.getChannelInfo());
        }
    }

    private void processBuffer(BufferOrEvent bufferOrEvent) throws IOException {
        lastChannel = bufferOrEvent.getChannelInfo();
        checkState(lastChannel != null);
        currentRecordDeserializer = recordDeserializers.get(lastChannel);
        checkState(
                currentRecordDeserializer != null,
                "currentRecordDeserializer has already been released");

        currentRecordDeserializer.setNextBuffer(bufferOrEvent.getBuffer());
    }

   private static class StreamTaskNetworkOutput<IN> extends AbstractDataOutput<IN> {

        private final OneInputStreamOperator<IN, ?> operator;
        private StreamTaskNetworkOutput(
                OneInputStreamOperator<IN, ?> operator,
                StreamStatusMaintainer streamStatusMaintainer,
                WatermarkGauge watermarkGauge,
                Counter numRecordsIn) {
            super(streamStatusMaintainer);

            this.operator = checkNotNull(operator);
            this.watermarkGauge = checkNotNull(watermarkGauge);
            this.numRecordsIn = checkNotNull(numRecordsIn);
        }

        @Override
        public void emitRecord(StreamRecord<IN> record) throws Exception {
            numRecordsIn.inc();
            operator.setKeyContextElement1(record);
            //这里开始调用operator
            operator.processElement(record);
        }
    }
接下来的问题就是要搞清楚mainOperator的来历,发现mainOperator和OperatorChain都是在beforeInvoke方法中构造的,代码片段如下,而且mainOperator也是来自OperatorChain,看来所有的谜底都需要去OperatorChain去寻找了。
protected void beforeInvoke() throws Exception {
    disposedOperators = false;
    LOG.debug("Initializing {}.", getName());

    operatorChain = new OperatorChain<>(this, recordWriter);
    mainOperator = operatorChain.getMainOperator();
...
}
OperatorChain
几乎所有的逻辑都在OperatorChain的构造函数里面,包括算子的构造 以及 算子之间Chain关系的构建,算子关联关系的构建是通过递归去创建的,单纯看代码比较绕,大致的过程如下:

大致的过程就是,遍历需要Chain在一起的所有Operator,针对每一个判断其是否有输出到下一个Operator的边,如果有则去递归创建Operator,最终递归退出后,得到了一个可以递归指向所有Operator的Output,最后再拿这个Output去创建MainOperator 或者 老版本里面的HeadOperator,得到了大致如下的一个Chain,每个算子在执行完毕后,调用Output去collect,而Output的collect方法里面会去push给它的下一个Operator
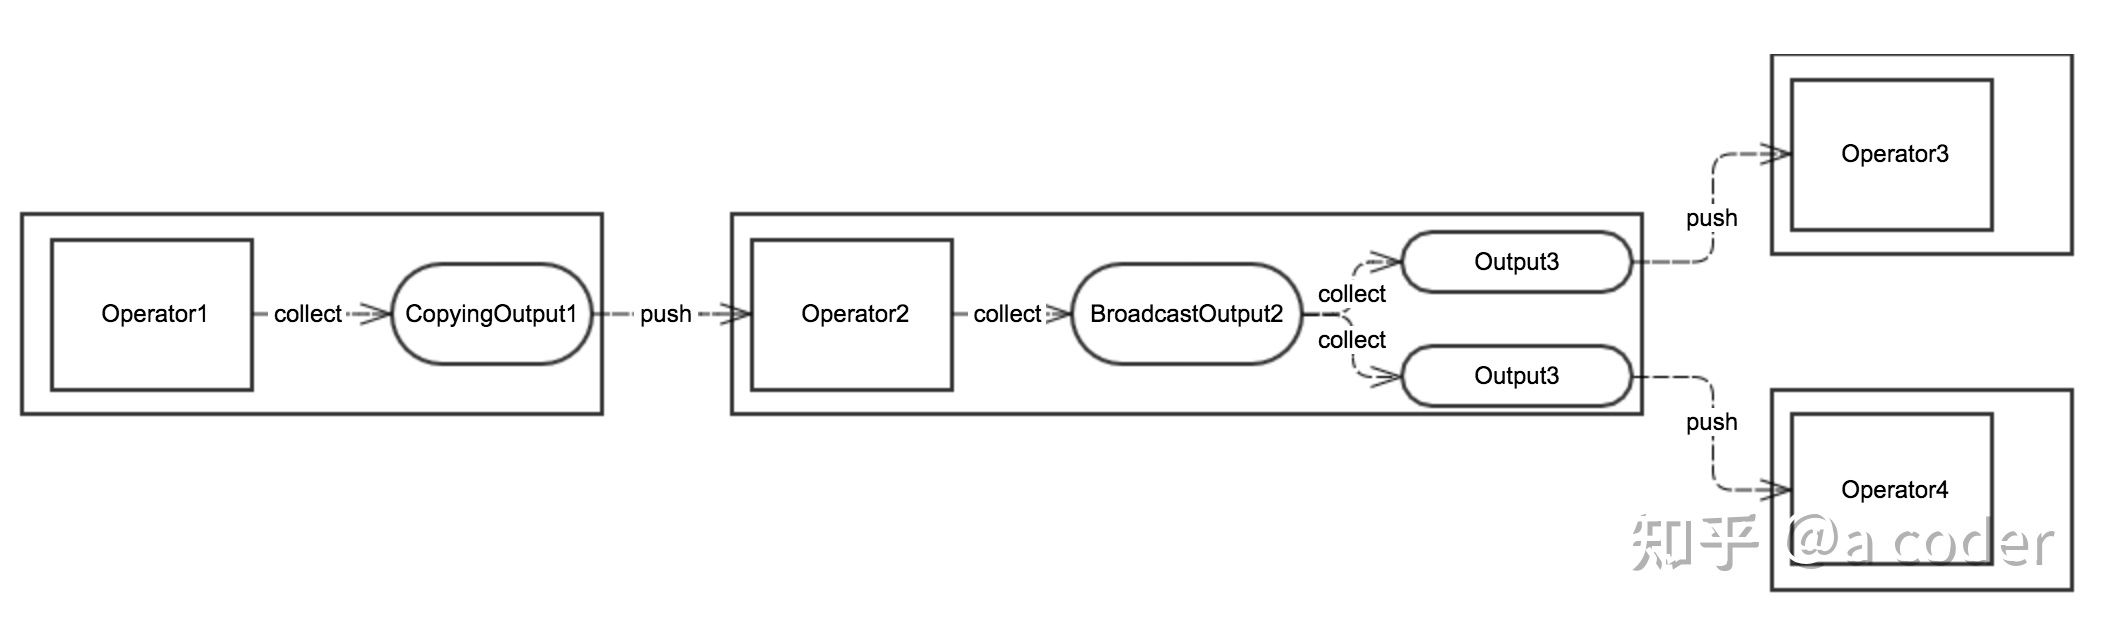
Output有几种实现,最常用的有CopyingChainingOutput,下面是其实现,可以看到每次在push给下一个Operator时,会先用序列化器执行一次深copy,数据量大的情况下应该会有性能的损耗,可以通过env.getConfig().enableObjectReuse()避免深copy。
final class CopyingChainingOutput<T> extends ChainingOutput<T> {

    @Override
    public void collect(StreamRecord<T> record) {
        if (this.outputTag != null) {
            // we are not responsible for emitting to the main output.
            return;
        }

        pushToOperator(record);
    }

    @Override
    public <X> void collect(OutputTag<X> outputTag, StreamRecord<X> record) {
        if (this.outputTag == null || !this.outputTag.equals(outputTag)) {
            // we are not responsible for emitting to the side-output specified by this
            // OutputTag.
            return;
        }

        pushToOperator(record);
    }

    @Override
    protected <X> void pushToOperator(StreamRecord<X> record) {
        try {
            // we know that the given outputTag matches our OutputTag so the record
            // must be of the type that our operator (and Serializer) expects.
            @SuppressWarnings("unchecked")
            StreamRecord<T> castRecord = (StreamRecord<T>) record;

            numRecordsIn.inc();
            StreamRecord<T> copy = castRecord.copy(serializer.copy(castRecord.getValue()));
            input.setKeyContextElement(copy);
            input.processElement(copy);
        } catch (ClassCastException e) {
            if (outputTag != null) {
                // Enrich error message
                ClassCastException replace =
                        new ClassCastException(
                                String.format(
                                        "%s. Failed to push OutputTag with id '%s' to operator. "
                                                + "This can occur when multiple OutputTags with different types "
                                                + "but identical names are being used.",
                                        e.getMessage(), outputTag.getId()));

                throw new ExceptionInChainedOperatorException(replace);
            } else {
                throw new ExceptionInChainedOperatorException(e);
            }
        } catch (Exception e) {
            throw new ExceptionInChainedOperatorException(e);
        }
    }
}
最后还有一个问题,就是算子里面真正的数据处理逻辑(我们自己写的那些Function的类),是在什么时候构建的?
还记得我们上面的taskConfig里面有一个键值为"serializedUDF"的配置项吗?经过观察,Flink只是简单把我们写的那些Function类以及相关的Operator简单粗暴的序列化为Byte数组,然后塞到这个键里面,最后在TaskExecutor侧构建OperatorChain时,进行直接的反序列化。所以如果我们自己的开发的Function类里面,有不可序列化的变量,则会报异常:
StreamOperatorFactory<OUT> operatorFactory =
                configuration.getStreamOperatorFactory(userCodeClassloader);

public <T extends StreamOperatorFactory<?>> T getStreamOperatorFactory(ClassLoader cl) {
        try {
            return InstantiationUtil.readObjectFromConfig(this.config, SERIALIZEDUDF, cl);
        }
}

public static <T> T readObjectFromConfig(Configuration config, String key, ClassLoader cl)
            throws IOException, ClassNotFoundException {
        byte[] bytes = config.getBytes(key, null);
        if (bytes == null) {
            return null;
        }

        return deserializeObject(bytes, cl);
    }
总结一下牵扯到的这几个概念:
- Task:(AbstractInvokable,StreamTask,OneInputStreamTask) 是TaskExecutor的执行入口,通过反射的方法去构建,之后调用其invoke方法去执行。
- Processor: 负责给Task接收数据的类(StreamOneInputProcessor,StreamTwoInputProcessor),如果是SourceStreamTask的话逻辑不同,因为SourceStreamTask自己产生数据。其收到数据后,会传递给OperatorChain中的第一个Operator。
- OperatorChain:第一个Operator收到数据后,通过Output作为连接纽带,依次传给所有的Operator。
- Operator:Operator收到数据后,调用userFunction去进行数据处理,之后通过其Output传给下一个Operator,Operator的构建是简单粗暴的Java序列化/反序列化。
到这里,我们就了解了从TaskExecutor收到Task请求到执行的过程,接下来的文章,我们会分析从收到Dispatcher的job提交请求(submitJob(JobGraph jobGraph)),到提交任务Task到TaskExecutor第二个环节。
#Flink#
智能推荐
874计算机科学基础综合,2018年四川大学874计算机科学专业基础综合之计算机操作系统考研仿真模拟五套题...-程序员宅基地
文章浏览阅读1.1k次。一、选择题1. 串行接口是指( )。A. 接口与系统总线之间串行传送,接口与I/0设备之间串行传送B. 接口与系统总线之间串行传送,接口与1/0设备之间并行传送C. 接口与系统总线之间并行传送,接口与I/0设备之间串行传送D. 接口与系统总线之间并行传送,接口与I/0设备之间并行传送【答案】C2. 最容易造成很多小碎片的可变分区分配算法是( )。A. 首次适应算法B. 最佳适应算法..._874 计算机科学专业基础综合题型
XShell连接失败:Could not connect to '192.168.191.128' (port 22): Connection failed._could not connect to '192.168.17.128' (port 22): c-程序员宅基地
文章浏览阅读9.7k次,点赞5次,收藏15次。连接xshell失败,报错如下图,怎么解决呢。1、通过ps -e|grep ssh命令判断是否安装ssh服务2、如果只有客户端安装了,服务器没有安装,则需要安装ssh服务器,命令:apt-get install openssh-server3、安装成功之后,启动ssh服务,命令:/etc/init.d/ssh start4、通过ps -e|grep ssh命令再次判断是否正确启动..._could not connect to '192.168.17.128' (port 22): connection failed.
杰理之KeyPage【篇】_杰理 空白芯片 烧入key文件-程序员宅基地
文章浏览阅读209次。00000000_杰理 空白芯片 烧入key文件
一文读懂ChatGPT,满足你对chatGPT的好奇心_引发对chatgpt兴趣的表述-程序员宅基地
文章浏览阅读475次。2023年初,“ChatGPT”一词在社交媒体上引起了热议,人们纷纷探讨它的本质和对社会的影响。就连央视新闻也对此进行了报道。作为新传专业的前沿人士,我们当然不能忽视这一热点。本文将全面解析ChatGPT,打开“技术黑箱”,探讨它对新闻与传播领域的影响。_引发对chatgpt兴趣的表述
中文字符频率统计python_用Python数据分析方法进行汉字声调频率统计分析-程序员宅基地
文章浏览阅读259次。用Python数据分析方法进行汉字声调频率统计分析木合塔尔·沙地克;布合力齐姑丽·瓦斯力【期刊名称】《电脑知识与技术》【年(卷),期】2017(013)035【摘要】该文首先用Python程序,自动获取基本汉字字符集中的所有汉字,然后用汉字拼音转换工具pypinyin把所有汉字转换成拼音,最后根据所有汉字的拼音声调,统计并可视化拼音声调的占比.【总页数】2页(13-14)【关键词】数据分析;数据可..._汉字声调频率统计
linux输出信息调试信息重定向-程序员宅基地
文章浏览阅读64次。最近在做一个android系统移植的项目,所使用的开发板com1是调试串口,就是说会有uboot和kernel的调试信息打印在com1上(ttySAC0)。因为后期要使用ttySAC0作为上层应用通信串口,所以要把所有的调试信息都给去掉。参考网上的几篇文章,自己做了如下修改,终于把调试信息重定向到ttySAC1上了,在这做下记录。参考文章有:http://blog.csdn.net/longt..._嵌入式rootfs 输出重定向到/dev/console
随便推点
uniapp 引入iconfont图标库彩色symbol教程_uniapp symbol图标-程序员宅基地
文章浏览阅读1.2k次,点赞4次,收藏12次。1,先去iconfont登录,然后选择图标加入购物车 2,点击又上角车车添加进入项目我的项目中就会出现选择的图标 3,点击下载至本地,然后解压文件夹,然后切换到uniapp打开终端运行注:要保证自己电脑有安装node(没有安装node可以去官网下载Node.js 中文网)npm i -g iconfont-tools(mac用户失败的话在前面加个sudo,password就是自己的开机密码吧)4,终端切换到上面解压的文件夹里面,运行iconfont-tools 这些可以默认也可以自己命名(我是自己命名的_uniapp symbol图标
C、C++ 对于char*和char[]的理解_c++ char*-程序员宅基地
文章浏览阅读1.2w次,点赞25次,收藏192次。char*和char[]都是指针,指向第一个字符所在的地址,但char*是常量的指针,char[]是指针的常量_c++ char*
Sublime Text2 使用教程-程序员宅基地
文章浏览阅读930次。代码编辑器或者文本编辑器,对于程序员来说,就像剑与战士一样,谁都想拥有一把可以随心驾驭且锋利无比的宝剑,而每一位程序员,同样会去追求最适合自己的强大、灵活的编辑器,相信你和我一样,都不会例外。我用过的编辑器不少,真不少~ 但却没有哪款让我特别心仪的,直到我遇到了 Sublime Text 2 !如果说“神器”是我能给予一款软件最高的评价,那么我很乐意为它封上这么一个称号。它小巧绿色且速度非
对10个整数进行按照从小到大的顺序排序用选择法和冒泡排序_对十个数进行大小排序java-程序员宅基地
文章浏览阅读4.1k次。一、选择法这是每一个数出来跟后面所有的进行比较。2.冒泡排序法,是两个相邻的进行对比。_对十个数进行大小排序java
物联网开发笔记——使用网络调试助手连接阿里云物联网平台(基于MQTT协议)_网络调试助手连接阿里云连不上-程序员宅基地
文章浏览阅读2.9k次。物联网开发笔记——使用网络调试助手连接阿里云物联网平台(基于MQTT协议)其实作者本意是使用4G模块来实现与阿里云物联网平台的连接过程,但是由于自己用的4G模块自身的限制,使得阿里云连接总是无法建立,已经联系客服返厂检修了,于是我在此使用网络调试助手来演示如何与阿里云物联网平台建立连接。一.准备工作1.MQTT协议说明文档(3.1.1版本)2.网络调试助手(可使用域名与服务器建立连接)PS:与阿里云建立连解释,最好使用域名来完成连接过程,而不是使用IP号。这里我跟阿里云的售后工程师咨询过,表示对应_网络调试助手连接阿里云连不上
<<<零基础C++速成>>>_无c语言基础c++期末速成-程序员宅基地
文章浏览阅读544次,点赞5次,收藏6次。运算符与表达式任何高级程序设计语言中,表达式都是最基本的组成部分,可以说C++中的大部分语句都是由表达式构成的。_无c语言基础c++期末速成