TensorFlow2学习25、TF2.0使用YoloV3_用tfds下载coco2014-程序员宅基地
一、说明
本文学习资源来自Github开源项目:
https://github.com/breadbread1984/YOLOv3-tf2.0
由于条件限制,本文部分内容我没有实际运行测试。
本文摘选注释部分功能代码,完整项目代码可到开源地址获取。
二、代码实现
1. 训练COCO数据集
下载COCO数据集download_dataset.py
#!/usr/bin/python3

import tensorflow_datasets as tfds;

def main():

    # load dataset
    coco2014_builder = tfds.builder("coco");
    coco2014_builder.download_and_prepare();
    # try to load the dataset once
    coco2014_train = tfds.load(name = "coco", split = tfds.Split.TRAIN, download = False);
    coco2014_test = tfds.load(name = "coco", split = tfds.Split.TEST, download = False);

if __name__ == "__main__":

    assert tf.executing_eagerly();
    main();
数据集37.57GiB比较大,在google colab上超出了磁盘使用量,不适合在colab上复现。
tf eager训练coco数据集 train_eager.py
#!/usr/bin/python3

import os;
import numpy as np;
import cv2;
import tensorflow as tf;
import tensorflow_datasets as tfds;
from YOLOv3 import YOLOv3, Loss;
from Predictor import Predictor;
from preprocess import map_function;

os.environ['TF_ENABLE_AUTO_MIXED_PRECISION'] = '1';
#os.environ['TF_CPP_MIN_VLOG_LEVEL'] = '3';
#os.environ['CUDA_VISIBLE_DEVICES'] = '';
batch_size = 8; # images of different sizes can't be stack into a batch

def main():

    # yolov3 model  导入yolov3模型
    yolov3 = YOLOv3((416,416,3), 80);
    yolov3_loss = Loss((416,416,3), 80);
    # load downloaded dataset 加载数据集
    trainset = tfds.load(name = "coco", split = tfds.Split.TRAIN, download = False);
    trainset = trainset.map(map_function).repeat(100).shuffle(batch_size).batch(batch_size).prefetch(tf.data.experimental.AUTOTUNE);
    validationset = tfds.load(name = "coco", split = tfds.Split.VALIDATION, download = False);
    validationset_iter = validationset.map(map_function).repeat(100).shuffle(batch_size).batch(batch_size).prefetch(tf.data.experimental.AUTOTUNE).__iter__();
    testset = tfds.load(name = "coco", split = tfds.Split.TEST, download = False); # without label
    testset = testset.repeat(100).prefetch(tf.data.experimental.AUTOTUNE);
    testset_iter = testset.__iter__();
    # restore from existing checkpoint 加载checkpoint
    optimizer = tf.keras.optimizers.Adam(1e-4);
    if False == os.path.exists('checkpoints'): os.mkdir('checkpoints');
    checkpoint = tf.train.Checkpoint(model = yolov3, optimizer = optimizer, optimizer_step = optimizer.iterations);
    checkpoint.restore(tf.train.latest_checkpoint('checkpoints'));
    # tensorboard summary
    log = tf.summary.create_file_writer('checkpoints');
    # train model 训练模型
    print("training...");
    train_loss = tf.keras.metrics.Mean(name = 'train loss', dtype = tf.float32);
    validation_loss = tf.keras.metrics.Mean(name = 'validation loss', dtype = tf.float32);
    for images, labels in trainset:
        with tf.GradientTape() as tape:
            outputs = yolov3(images);
            loss = yolov3_loss([*outputs, *labels]);
        # check whether the loss numberic is correct
        try:
            loss_check = tf.debugging.check_numerics(loss, 'the loss is not correct! cancel train_loss update!');
            with tf.control_dependencies([loss_check]):
                train_loss.update_state(loss);
                print('Step #%d Loss: %.6f' % (optimizer.iterations, loss));
        except BaseException as e:
            print(e.message);
        # write log
        if tf.equal(optimizer.iterations % 10, 0):
            with log.as_default():
                tf.summary.scalar('train loss',train_loss.result(), step = optimizer.iterations);
            train_loss.reset_states();
        grads = tape.gradient(loss, yolov3.trainable_variables);
        # check whether the grad numerics is correct
        try:
            grads_check = [tf.debugging.check_numerics(grad, 'the grad is not correct! cancel gradient apply!') for grad in grads];
            with tf.control_dependencies(grads_check):
                optimizer.apply_gradients(zip(grads, yolov3.trainable_variables));
        except BaseException as e:
            print(e.message);
        # save model
        if tf.equal(optimizer.iterations % 2000, 0):
            # save checkpoint every 1000 steps
            checkpoint.save(os.path.join('checkpoints','ckpt'));
            yolov3.save('yolov3.h5');
        # eval on testset 测试集
        if tf.equal(optimizer.iterations % 100, 0):
            # validate with latest model
            print("validating on validation set...");
            for i in range(10):
                images, labels = next(validationset_iter);
                outputs = yolov3(images);
                loss = yolov3_loss([*outputs, *labels]);
                # NOTE: validation loss is not important, numeric validity is not checked
                validation_loss.update_state(loss);
            with log.as_default():
                tf.summary.scalar('validation loss', validation_loss.result(), step = optimizer.iterations);
            validation_loss.reset_states();
            # evaluate every 1000 steps
            print("testing on test set...");
            features = next(testset_iter);
            img = features["image"].numpy().astype('uint8');
            predictor = Predictor(yolov3 = yolov3);
            boundings = predictor.predict(img);
            color_map = dict();
            for bounding in boundings:
                if bounding[5].numpy().astype('int32') in color_map:
                    clr = color_map[bounding[5].numpy().astype('int32')];
                else:
                    color_map[bounding[5].numpy().astype('int32')] = tuple(np.random.randint(low=0, high=256,size=(3,)).tolist());
                    clr = color_map[bounding[5].numpy().astype('int32')];
                cv2.rectangle(img, tuple(bounding[0:2].numpy().astype('int32')), tuple(bounding[2:4].numpy().astype('int32')), clr, 5);
            img = tf.expand_dims(img, axis = 0);
            with log.as_default():
                tf.summary.image('detect', img, step = optimizer.iterations);
    yolov3.save('yolov3.h5'); # 保存模型

if __name__ == "__main__":

    assert tf.executing_eagerly();
    main();
keras训练数据集 train_keras.py
#!/usr/bin/python3

import os;
import numpy as np;
import tensorflow as tf;
import tensorflow_datasets as tfds;
from YOLOv3 import YOLOv3, Loss;
from preprocess import map_function;

os.environ['TF_ENABLE_AUTO_MIXED_PRECISION'] = '1';
#os.environ['TF_CPP_MIN_VLOG_LEVEL'] = '3';
#os.environ['CUDA_VISIBLE_DEVICES'] = '';
batch_size = 8; # images of different sizes can't be stack into a batch

def main():

    # yolov3 model
    yolov3 = YOLOv3((416,416,3,), 80);
    @tf.function
    def loss(outputs, labels):
        return Loss((416,416,3,),80)([outputs[0], outputs[1], outputs[2], labels[0], labels[1], labels[2]]);
    yolov3.compile(optimizer = tf.keras.optimizers.Adam(1e-4), loss = loss);
    # load downloaded dataset
    trainset = tfds.load(name = "coco2014", split = tfds.Split.TRAIN, download = False);
    trainset = trainset.map(map_function).shuffle(batch_size).batch(batch_size).prefetch(tf.data.experimental.AUTOTUNE);
    validationset = tfds.load(name = "coco2014", split = tfds.Split.VALIDATION, download = False);
    validationset = validationset.map(map_function).shuffle(batch_size).batch(batch_size).prefetch(tf.data.experimental.AUTOTUNE);
    yolov3.fit(trainset, epochs = 100, validation_data = validationset);
    yolov3.save('yolov3.h5');

if __name__ == "__main__":

    assert tf.executing_eagerly();
    main();
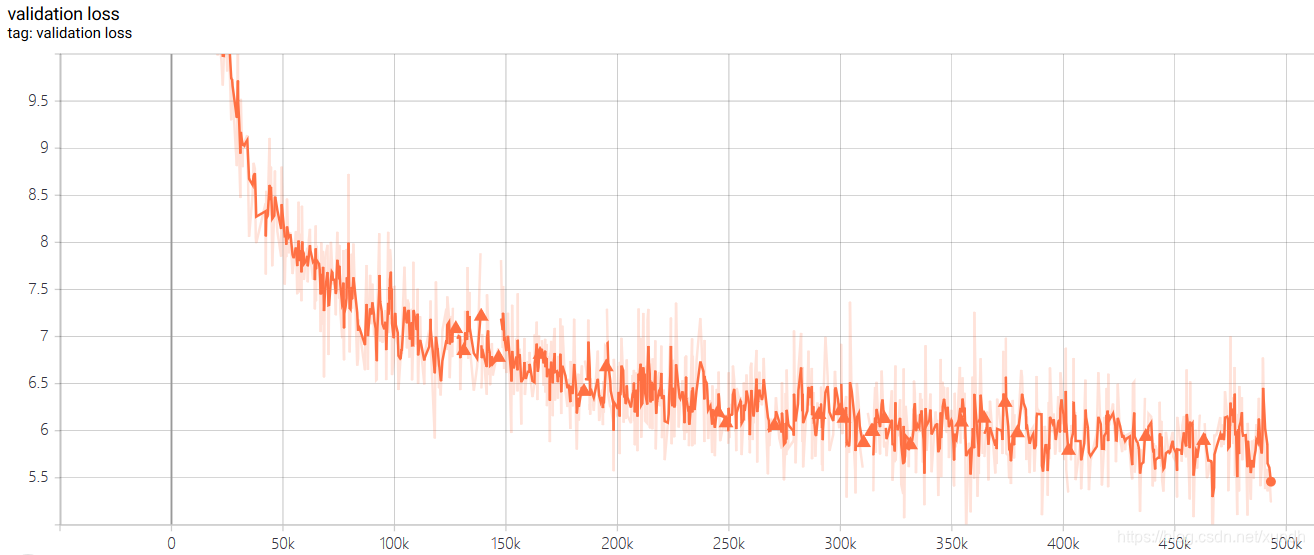
训练过程截图:
训练集损失函数:

测试集损失函数:
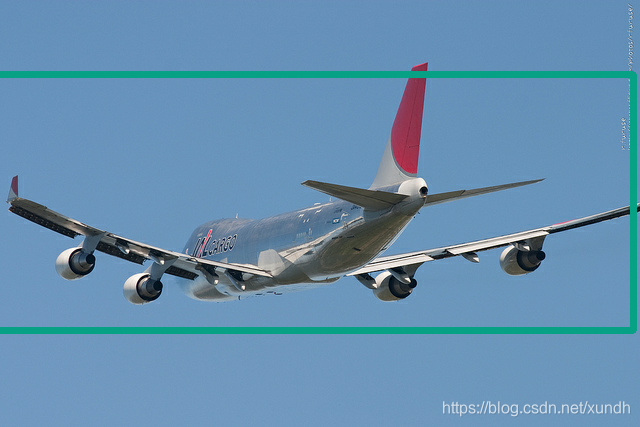
检测结果:

2. 使用训练好的模型预测Predictor.py
调用方式:
python3 Predictor.py <path/to/image>
#!/usr/bin/python3

import sys;
from os.path import exists;
import numpy as np;
import cv2;
import tensorflow as tf;
from YOLOv3 import YOLOv3, OutputParser;

class Predictor(object):

    anchors = {2: [[10, 13], [16, 30], [33, 23]], 1: [[30, 61], [62, 45], [59, 119]], 0: [[116, 90], [156, 198], [373, 326]]};

    def __init__(self, input_shape = (416,416,3), class_num = 80, yolov3 = None):

        if yolov3 is None:
            self.input_shape = input_shape;
            if exists("yolov3.h5"):
                # restore from serialized file
                self.yolov3 = tf.keras.models.load_model('yolov3.h5', compile = False);
            else:
                # restore from checkpoint
                self.yolov3 = YOLOv3(input_shape, class_num);
                optimizer = tf.keras.optimizers.Adam(1e-4);
                checkpoint = tf.train.Checkpoint(model = self.yolov3, optimizer = optimizer, optimizer_step = optimizer.iterations);
                checkpoint.restore(tf.train.latest_checkpoint('checkpoints'));
        else:
            self.input_shape = tuple(yolov3.input.shape[1:]);
            self.yolov3 = yolov3;
        self.parsers = [OutputParser(tuple(self.yolov3.outputs[l].shape[1:]), self.input_shape, self.anchors[l]) for l in range(3)];

    def predict(self, image, conf_thres = 0.5, nms_thres = 0.5):

        images = tf.expand_dims(image, axis = 0);
        resize_images = tf.image.resize(images, self.input_shape[:2], method = tf.image.ResizeMethod.BICUBIC, preserve_aspect_ratio = True);
        resize_shape = resize_images.shape[1:3];
        top_pad = (self.input_shape[0] - resize_shape[0]) // 2;
        bottom_pad = self.input_shape[0] - resize_shape[0] - top_pad;
        left_pad = (self.input_shape[1] - resize_shape[1]) // 2;
        right_pad = self.input_shape[1] - resize_shape[1] - left_pad;
        resize_images = tf.pad(resize_images,[[0,0], [top_pad,bottom_pad], [left_pad,right_pad], [0,0]], constant_values = 128);
        deviation = tf.constant([left_pad / self.input_shape[1], top_pad / self.input_shape[0], 0, 0], dtype = tf.float32);
        scale = tf.constant([
            self.input_shape[1] / resize_shape[1], self.input_shape[0] / resize_shape[0],
            self.input_shape[1] / resize_shape[1], self.input_shape[0] / resize_shape[0]
        ], dtype = tf.float32);
        images_data = tf.cast(resize_images, tf.float32) / 255.;
        outputs = self.yolov3(images_data);
        whole_targets = tf.zeros((0,6), dtype = tf.float32);
        for i in range(3):
            pred_xy, pred_wh, pred_box_confidence, pred_class = self.parsers[i](outputs[i]);
            pred_box = tf.keras.layers.Concatenate(axis = -1)([pred_xy, pred_wh]);
            # target_mask.shape = (h, w, anchor num)
            target_mask = tf.greater(pred_box_confidence, conf_thres);
            # pred_box_confidence = (pred target num, 1)
            pred_box_confidence = tf.boolean_mask(pred_box_confidence, target_mask);
            pred_box_confidence = tf.expand_dims(pred_box_confidence, axis = -1);
            # pred_box.shape = (pred target num, 4)
            pred_box = tf.boolean_mask(pred_box, target_mask);
            pred_box = (pred_box - deviation) * scale * [image.shape[1], image.shape[0], image.shape[1], image.shape[0]];
            # pred_class.shape = (pred target num, 1)
            pred_class = tf.boolean_mask(pred_class, target_mask);
            pred_class = tf.math.argmax(pred_class, axis = -1);
            pred_class = tf.cast(tf.expand_dims(pred_class, axis = -1), dtype = tf.float32);
            # targets,sgaoe = (pred target num, 6)
            targets = tf.keras.layers.Concatenate(axis = -1)([pred_box, pred_box_confidence, pred_class]);
            whole_targets = tf.keras.layers.Concatenate(axis = 0)([whole_targets, targets]);
        # nms
        descend_idx = tf.argsort(whole_targets[..., 4], direction = 'DESCENDING');
        i = 0;
        while i < descend_idx.shape[0]:
            idx = descend_idx[i];
            cur_upper_left = whole_targets[idx, 0:2] - whole_targets[idx, 2:4] / 2;
            cur_down_right = cur_upper_left + whole_targets[idx, 2:4];
            wh = whole_targets[idx, 2:4];
            area = wh[..., 0] * wh[..., 1];
            following_idx = descend_idx[i+1:];
            following_targets = tf.gather(whole_targets, following_idx);
            following_upper_left = following_targets[..., 0:2] - following_targets[..., 2:4] / 2;
            following_down_right = following_upper_left + following_targets[..., 2:4];
            following_wh = following_targets[..., 2:4];
            following_area = following_wh[..., 0] * following_wh[..., 1];
            max_upper_left = tf.math.maximum(cur_upper_left, following_upper_left);
            min_down_right = tf.math.minimum(cur_down_right, following_down_right);
            intersect_wh = min_down_right - max_upper_left;
            intersect_wh = tf.where(tf.math.greater(intersect_wh, 0), intersect_wh, tf.zeros_like(intersect_wh));
            intersect_area = intersect_wh[..., 0] * intersect_wh[..., 1];
            overlap = intersect_area / (area + following_area - intersect_area);
            indices = tf.where(tf.less(overlap, nms_thres));
            following_idx = tf.gather_nd(following_idx, indices);
            descend_idx = tf.concat([descend_idx[:i + 1], following_idx], axis = 0);
            i += 1;
        whole_targets = tf.gather(whole_targets, descend_idx);
        upper_left = (whole_targets[..., 0:2] - whole_targets[..., 2:4] / 2)
        down_right = (upper_left + whole_targets[..., 2:4])
        boundings = tf.keras.layers.Concatenate(axis = -1)([upper_left, down_right, whole_targets[..., 4:]]);
        return boundings;

if __name__ == "__main__":

    assert tf.executing_eagerly() == True;
    if len(sys.argv) != 2:
        print("Usage: " + sys.argv[0] + " <image>");
        exit(0);
    predictor = Predictor();
    img = cv2.imread(sys.argv[1]);
    if img is None:
        print("invalid image!");
        exit(1);
    boundings = predictor.predict(img);
    color_map = dict();
    for bounding in boundings:
        if bounding[5].numpy().astype('int32') in color_map:
            clr = color_map[bounding[5].numpy().astype('int32')];
        else:
            color_map[bounding[5].numpy().astype('int32')] = tuple(np.random.randint(low=0, high=256,size=(3,)).tolist());
            clr = color_map[bounding[5].numpy().astype('int32')];
        cv2.rectangle(img, tuple(bounding[0:2].numpy().astype('int32')), tuple(bounding[2:4].numpy().astype('int32')), clr, 2);
    cv2.imshow('people', img);
    cv2.waitKey();
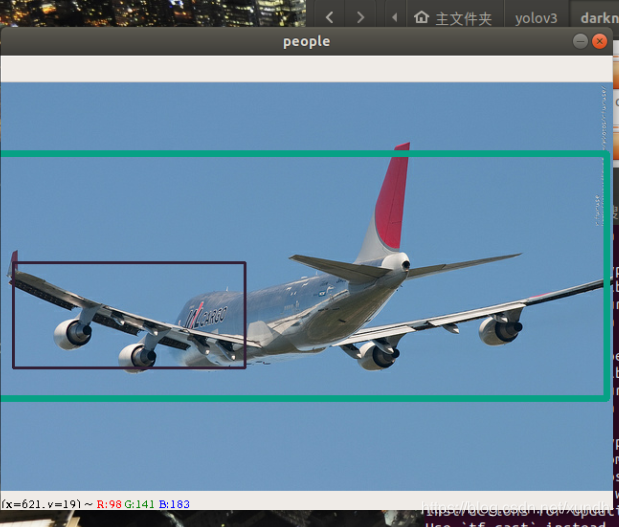
下面是运行效果:
python3 Predictor.py pics/detection1.png
3. 训练自己的数据集
标签文件格式
<path/to/image1> <target num>
<x> <y> <width> <height> <label>
<x> <y> <width> <height> <label>
...
<x> <y> <width> <height> <label>
<path/to/image2> <target num>
...
生成tfrecord文件
python3 create_dataset.py <path/to/annotation>
读取tfrecord可以使用:
from create_dataset import parse_function_generator;
trainset = tf.data.TFRecordDataset('trainset.tfrecord').map(parse_function_generator(num_classes = num_classes)).repeat(100).shuffle(batch_size).batch(batch_size).prefetch(tf.data.experimental.AUTOTUNE);
智能推荐
小米商城项目总结_小米商城项目总结心得-程序员宅基地
文章浏览阅读7.2k次。脚本中判断是否相等不能用equals,没有这个方法,只能用== 数据库工具类,只需要加载一次就够了,所以我们采用静态代码块来初始化该方法,作为工具类使用 public static QueryRunner qr = null;//因为是在不同包下的,所以要用public才可以调用 Ajax往Servlet发送数据的时候Servlet必须response一个数据,不然会报parsee..._小米商城项目总结心得
Windows Phone App测试良好但提交后失败的可能性-程序员宅基地
文章浏览阅读1k次。调用了诸如ScheduledActionService.LaunchForTest 之类只有在测试环境才能用的API。在提交后可能会闪退。写入 InstalledLocation 文件夹。安装文件夹在测试环境是可读写的,但是提交后就只读不可写了,而只能写入独立存储。把ProductId Hard Code了。Product Id 在提交后会变化。但是再次提交后不会变化,如果非要省事Hard Cod
Matlab中double,im2double,mat2gray区别-程序员宅基地
文章浏览阅读459次。转载:http://blog.sina.com.cn/s/blog_6c41e2f30101559d.htm ****************假设某图像数据A(uint8格式)**********************A = 235 200 89 20>> double(A) %返回与原矩阵数值相同但类型为double的矩阵...
ROSBug:Usage: rosrun [--prefix cmd] [--debug] PACKAGE EXECUTABLE [ARGS] rosrun will locate PACKAGE-程序员宅基地
文章浏览阅读1.2w次,点赞20次,收藏28次。输入~$ rosrun turtlesim错误Usage: rosrun [--prefix cmd] [--debug] PACKAGE EXECUTABLE [ARGS] rosrun will locate PACKAGE and try to find an executable named EXECUTABLE in the PACKAGE tree. If it finds it, it will run it with ARGS.解决方法在输入~$ rosrun t_usage: rosrun [--prefix cmd] [--debug] package executable [args] rosrun will
周期方波信号的级数分解_方波信号分解-程序员宅基地
文章浏览阅读1.2w次,点赞9次,收藏54次。根据傅里叶级数的定义我们知道:对于任意一个周期为的周期信号,都可以求出它在三角函数集中各函数中的分量,从而可将在区间内表示为三角函数集中各函数的加权和。即:其中:借助Matlab编写M文件,以方波信号为例,选取不同的级数项数进行合成,观察与原方波的逼近情况。源码如下:%该m文件用于绘制方波信号及其傅立叶级数谐波叠加clc;clear;close all;syms x; %定义符号变量x,用..._方波信号分解
docker kkfile-程序员宅基地
文章浏览阅读110次。映射了file文件夹和application的配置文件。kkfile 文件预览的docker命令。_docker kkfile
随便推点
Windows Terminal完整指南-程序员宅基地
文章浏览阅读2.4k次,点赞4次,收藏29次。在本文中,我们将探讨Windows Terminal,它是WSL2的理想配套。它速度快、可配置、外观漂亮,并且提供了Windows和Linux开发的所有优点。Windows已经完全接受了Linux,而WSL2使它成为一种无缝的乐趣。你可以通过以下方式访问发行版的终端:单击其开始菜单图标在Powershell或命令提示符下输入 wsl 或 bash通过启动 %windir%\system32\bash.exe ~ 的配置文件使用第三方终端选项(例如Cmder,ConEmu和Hyper)在VS .
To install them, you can run: npm install --save core-js/modules/es.array.push.js-程序员宅基地
文章浏览阅读5k次,点赞5次,收藏8次。To install them, you can run: npm install --save core-js/modules/es.array.push.js core-js/modules/es.error.cause.js core-js/modules/es.object.proto.js core-js/modules/es.re
wpf 界面切换-程序员宅基地
文章浏览阅读1.3w次,点赞3次,收藏30次。界面切换和窗口跳转是所有桌面程序都需要的。 wpf里面也有很多方法来做到界面切换,简单常用的有TabControl和UserControl。TabControl优点是简单,继续拖控件。 缺点就是全部代码会堆到一起。代码<TabControl HorizontalAlignment="Left" Height="200" Margin="10,10,0,0" Vert...
win10 vmware 磁盘映射 位置不可用_vmware映射虚拟磁盘 不可用-程序员宅基地
文章浏览阅读1.9w次,点赞6次,收藏22次。原文链接:https://www.itsk.com/thread-395102-1-1.html出现Z:\不可用。如果该位置位于这台电脑上,请确保设备或驱动器已连接,或者光盘已插入,然后重试。如果该位置位于网络上,请确保你已连接到网络或Internet,然后重试。如果仍然找不到该位置,则它可能已移动或删除。解决办法:主要是因为新版WIN10的资源管理不是以管理员身份运行的,这时候只需要打开任务管理器,结束Windows资源管理器的进程,再点左上角文件,运行新任务,打开C:\Windows\exp._vmware映射虚拟磁盘 不可用
闲鱼亿级商品结构化背后的思考和演进-程序员宅基地
文章浏览阅读1.5k次,点赞5次,收藏5次。背景闲鱼是一个典型的C2C场景的闲置交易平台,每个在闲鱼的用户都能享受到自由交易的乐趣,只要简单的输入商品名,商品价格,库存等信息就能完成一个商品的发布。充分的自由是闲鱼..._闲鱼服务端架构演进的心得
VirtualBox使用大全_virtualbox 下的vi-程序员宅基地
文章浏览阅读543次。=================复制虚拟机网卡问题=============== 每次复制的虚拟机的时候如果不选择复制的虚拟机网卡地址跟源的一样,这里点击上就会重新分配网卡mac地址。 重启后的虚拟机的网卡并不能用,这里需要设置。 这里是重新获得的mac地址, vi /etc/sysconfig/network-scripts/ifcfg-eth0将网卡的mac地址手动改成修改后的,_virtualbox 下的vi