最全的Pytest+Allure使用教程,建议收藏-程序员宅基地
Allure是开源的免费的自动化测试报告,支持Java,Python,我们来看看如何使用Python pytest与Allure整合,输出漂亮的测试报告。

一.Allure安装
windows:下载,解压,并配置环境变量:https://github.com/allure-framework/allure2/releases
mac:brew install allure
二.Allure报告结构
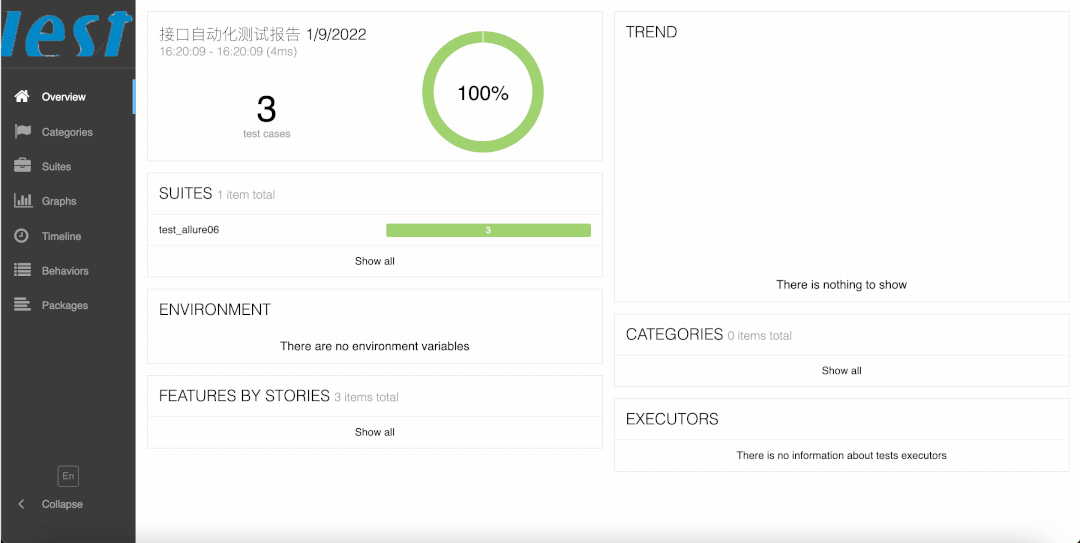
1.Overview:整体数据显示。
2.Suites:用例集合,按照套件和类分组的已执行测试的标准结构表示形式。
3.Behaviors:对于行为驱动的方法,此选项卡根据Epic、Feature和Story标记对测试结果进行分组。
4.Categories:“类别”选项卡提供了创建自定义缺陷分类以应用测试结果的方法。
5.Graphs:用图表显示测试数据中收集的不同统计数据,状态分解或严重性和持续时间图。
6.Packages:软件包选项卡表示测试结果的树状布局,按不同的包名分组。
7.Timeline:时间轴选项卡可视化测试执行的回顾,allure适配器收集测试的精确时间,在这个选项卡上,它们相应地按照顺序或并行的时间结构排列。
三.安装Python依赖
windows:pip install allure-pytest
mac:pip3 install allure-pytest
这将安装Allure-pytest和Allure-python-commons包,以生成与Allure 2兼容的报告数据。
1.Windows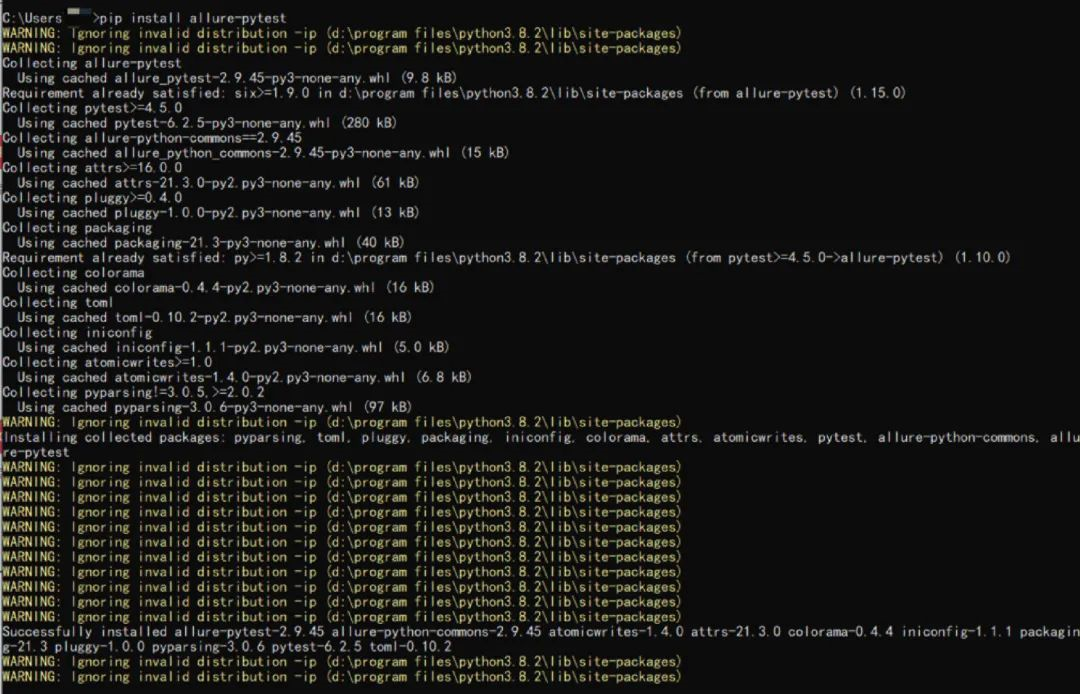

2.Mac

四.基本用法
Allure监听器在测试执行期间会收集结果,只需添加alluredir选项,并选择输出的文件路径即可。
pytest --alluredir=./allure-results

# 执行此命令,将在默认浏览器中显示生成的报告
allure serve ./allure-results
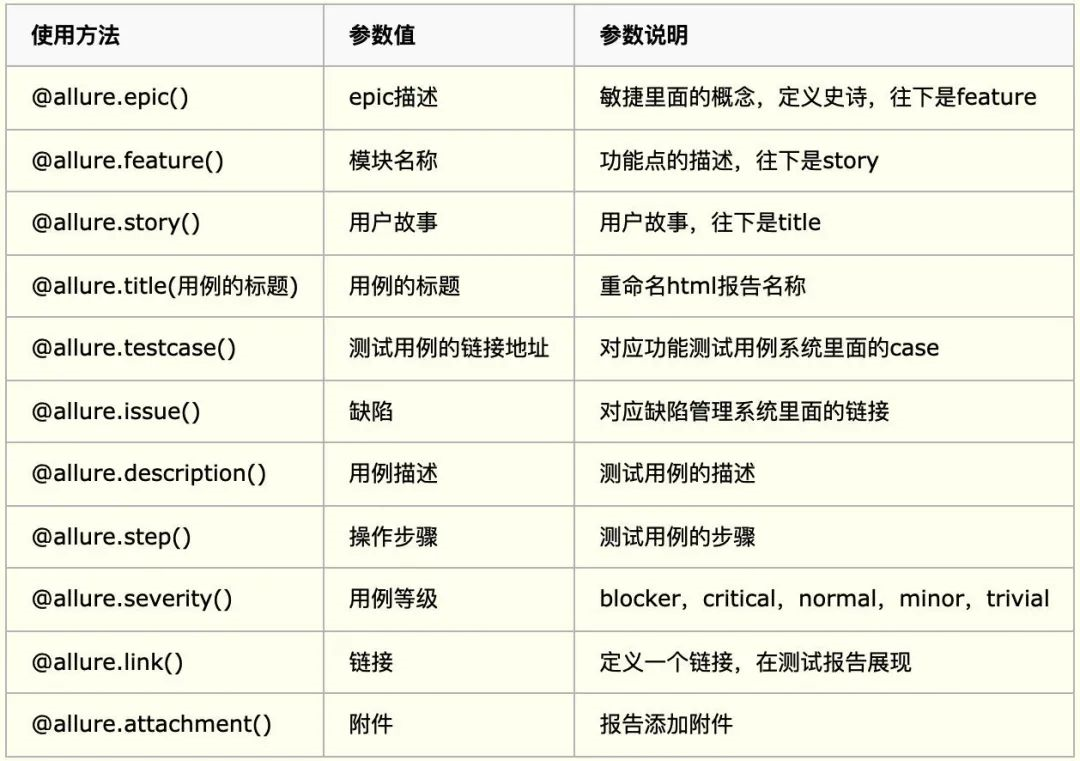
五.Allure注解说明:
六.具体使用方法(以Mac系统为例)
基本报告:可以在Allure报告中看到所有默认的pytest状态: 只有由于断言错误而未成功的测试才会被标记为失败,任何其他异常都会导致测试状态失败。
import allure
import pytest

@allure.feature('test_success')
def test_success():
    """this test succeeds"""
    assert True

@allure.feature('test_failure')
def test_failure():
    """this test fails"""
    assert False

@allure.feature('test_skip')
def test_skip():
    """this test is skipped"""
    pytest.skip('for a reason!')

@allure.feature('test_broken')
def test_broken():
    raise Exception('oops')

if __name__ == '__main__':
    # pytest.main(["-s","allure-test.py"])
    '''
    -q: 安静模式, 不输出环境信息
    -v: 丰富信息模式, 输出更详细的用例执行信息
    -s: 显示程序中的print/logging输出
    '''
    pytest.main(['-s', '-q','test_allure02.py','--clean-alluredir','--alluredir=allure-results'])
    os.system(r"allure generate -c -o allure-report")
命令行输入allure generate -c -o allure-reports,即可在当前路径下生成测试报告。(-c:清空历史数据,-o:指定输出测试报告路径),如果使用allure serve allure-results,则会在系统默认目录下生成测试报告

七.支持Pytest特性
Allure报告支持的一些常见Pytest特性,包括xfails、fixture和finalizers、marks、条件跳过和参数化。
1.xfail
功能未实现或者有Bug尚未修复,当测试通过时尽管会失败,它是一个xpass,将在测试摘要中报告。
import allure
import pytest

@allure.feature('test_xfail_expected_failure')
@pytest.mark.xfail(reason='该功能尚未实现')
def test_xfail_expected_failure():
    print("该功能尚未实现")
    assert False

@allure.feature('test_xfail_unexpected_pass')
@pytest.mark.xfail(reason='该Bug尚未修复')
def test_xfail_unexpected_pass():
    print("该Bug尚未修复")
    assert True

if __name__ == '__main__':
    pytest.main(['-s', '-q','test_allure02.py','--clean-alluredir','--alluredir=allure-results'])
    os.system(r"allure generate -c -o allure-report")


2.skipif
当条件为True,跳过执行
import sys
import allure
import pytest

'''当条件为True则跳过执行'''
@allure.feature("test_skipif")
@pytest.mark.skipif("darwin" in sys.platform,reason="如果操作系统是Mac则跳过执行")
def test_skipif():
    print("操作系统是Mac,test_skipif()函数跳过执行")

# --clean-alluredir:每次执行前清空数据,这样在生成的报告中就不会追加,只显示当前执行的用例
if __name__ == '__main__':
    pytest.main(['-s', '-q','test_allure02.py','--clean-alluredir','--alluredir=allure-results'])
    os.system(r"allure generate -c -o allure-report")

3.parametrize
可以使用@Pytest.mark.paramtrize进行参数化,所有参数名称和值都将被捕获到报告中。
import os
import allure
import pytest

@allure.step
def simple_step(step_param1, step_param2 = None):
    pass

@pytest.mark.parametrize('param1', [True, False], ids=['1', '2'])
def test_parameterize_with_id(param1):
    simple_step(param1)

@pytest.mark.parametrize('param1', [True, False])
@pytest.mark.parametrize('param2', ['1', '2'])
def test_parametrize_with_two_parameters(param1, param2):
    simple_step(param1, param2)

# --clean-alluredir:每次执行前清空数据,这样在生成的报告中就不会追加,只显示当前执行的用例
if __name__ == '__main__':
    pytest.main(['-s', '-q','test_allure03.py','--clean-alluredir','--alluredir=allure-results'])
    os.system(r"allure generate -c -o allure-report")

4.feature
模块名称,功能点描述
5.step
Allure生成的测试报告最重要的一点就是,它允许对每个测试用例进行非常详细的步骤说明
import os
import allure
import pytest

@allure.step("步骤二")
def passing_step():
    pass


@allure.step("步骤三")
def step_with_nested_steps():
    nested_step()


@allure.step("步骤四")
def nested_step():
    nested_step_with_arguments(1, 'abc')


@allure.step("步骤五")
def nested_step_with_arguments(arg1, arg2):
    pass


@allure.step("步骤一")
def test_with_nested_steps():
    passing_step()
    step_with_nested_steps()


if __name__ == '__main__':
    pytest.main(['-s', '-q','test_allure04.py','--clean-alluredir','--alluredir=allure-results'])
    os.system(r"allure generate -c -o allure-report")

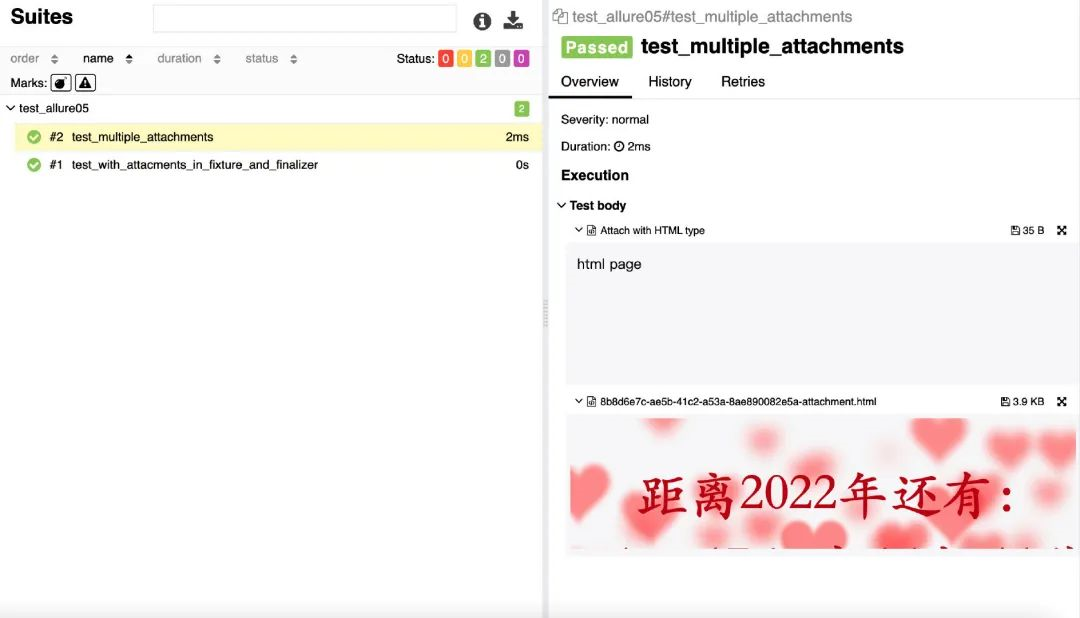
6.attach
Allure测试报告可以显示许多不同类型的附件,这些附件可以补充测试、步骤或结果。可以使用allure.attach(body、name、attachment_type、extension)调用来创建附件。
body:要显示的内容(附件)
name:附件名字
attachment_type:附件类型,是allure.attachment_type里面的其中一种
extension:附件的扩展名
source:文件路径
语法一:allure.attach(body,name,attachment_type,extension)
语法二:allure.attach.file(source,name,attachment_type,extension)
import os
import allure
import pytest
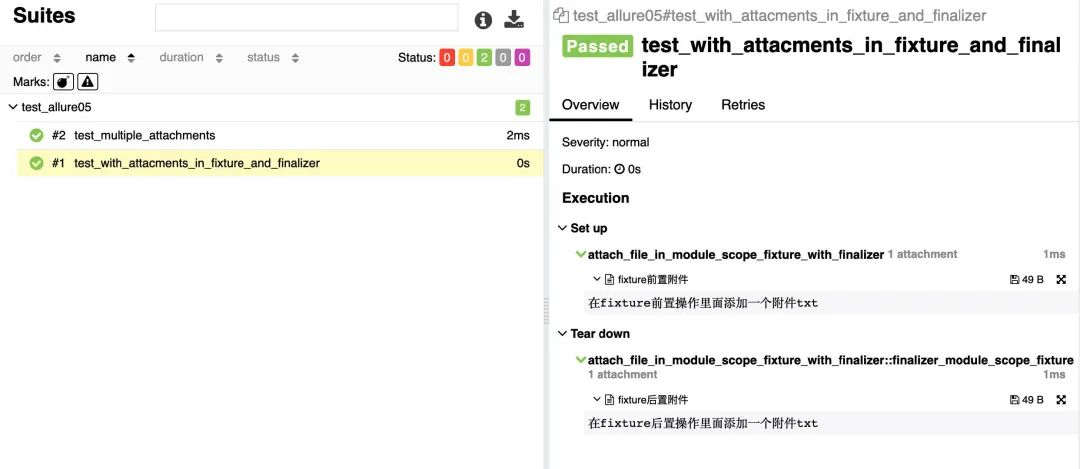
@pytest.fixture
def attach_file_in_module_scope_fixture_with_finalizer(request):
allure.attach('在fixture前置操作里面添加一个附件txt', 'fixture前置附件', allure.attachment_type.TEXT)
def finalizer_module_scope_fixture():
allure.attach('在fixture后置操作里面添加一个附件txt', 'fixture后置附件',allure.attachment_type.TEXT)
request.addfinalizer(finalizer_module_scope_fixture)
def test_with_attacments_in_fixture_and_finalizer(attach_file_in_module_scope_fixture_with_finalizer):
pass
def test_multiple_attachments():
allure.attach('<head></head><body>html page</body>', 'Attach with HTML type', allure.attachment_type.HTML)
allure.attach.file('/Users/mrjade/Downloads/happy-new-year.html', attachment_type=allure.attachment_type.HTML)
if __name__ == '__main__':
pytest.main(['-s', '-q','test_allure05.py','--clean-alluredir','--alluredir=allure-results'])
os.system(r"allure generate -c -o allure-report")
7.description
描述类信息,比如对函数的描述,说明这个函数的作用,如:注册接口。
语法一:@allure.description()
语法二:@allure.description_html()
import os
import allure
import pytest

@allure.description_html("""
<h1>这是html描述</h1>
<table style="width:100%">
  <tr>
    <th>Firstname</th>
    <th>Lastname</th>
    <th>Age</th>
  </tr>
  <tr align="center">
    <td>jade</td>
    <td>mr</td>
    <td>18</td>
  </tr>
  <tr align="center">
    <td>road</td>
    <td>Tester</td>
    <td>18</td>
  </tr>
</table>
""")
def test_html_description():
    assert True

@allure.description("""多行描述""")
def test_description_from_decorator():
    assert 42 == int(6 * 7)

def test_unicode_in_docstring_description():
    """在函数下方描述也可"""
    assert 42 == int(6 * 7)


if __name__ == '__main__':
    pytest.main(['-s', '-q','test_allure06.py','--clean-alluredir','--alluredir=allure-results'])
    os.system(r"allure generate -c -o allure-report")
8.title
添加测试用例标题,通俗来讲就是将函数名直接改成我们想要的,使得测试用例的标题更具有可读性
支持占位符传递关键字参数(动态标题,结合@pytest.mark.parametrize使用)
import os
import allure
import pytest

@allure.title("断言2+2=4")
def test_with_a_title():
    assert 2 + 2 == 4

@allure.title("动态标题: {param1} + {param2} = {expected}")
@pytest.mark.parametrize('param1,param2,expected', [(2, 2, 4),(1, 2, 5)])
def test_with_parameterized_title(param1, param2, expected):
    assert param1 + param2 == expected

@allure.title("这是个动态标题,会被替换")
def test_with_dynamic_title():
    assert 2 + 2 == 4
    allure.dynamic.title('测试结束,做为标题')


if __name__ == '__main__':
    pytest.main(['-s', '-q','test_allure07.py','--clean-alluredir','--alluredir=allure-results'])
    os.system(r"allure generate -c -o allure-report")

9.link
将测试报告与缺陷跟踪或测试管理系统整合,@allure.link、@allure.issue和@allure.testcase。
import os
import allure
import pytest

@allure.link('https://www.cnblogs.com/mrjade/')
def test_with_link():
    pass


@allure.link('https://www.cnblogs.com/mrjade/', name='点击进入mrjade博客园')
def test_with_named_link():
    pass


@allure.issue('https://github.com/allure-framework/allure-python/issues/642', 'bug issue链接')
def test_with_issue_link():
    pass


@allure.testcase("https://www.cnblogs.com/mrjade/", '测试用例地址')
def test_with_testcase_link():
    pass

if __name__ == '__main__':
    pytest.main(['-s', '-q','test_allure08.py','--clean-alluredir','--alluredir=allure-results'])
    os.system(r"allure generate -c -o allure-report")

10.Retries
Allure允许测试报告中显示单个测试运行期间重新执行的测试的信息,以及一段时间内测试执行的历史,需与Pytest插件结合使用。
windows:pip install pytest-rerunfailures
mac:pip3 install pytest-rerunfailures
import os
import allure
import random
import time
import pytest


@allure.step
def passing_step():
    pass


@allure.step
def flaky_broken_step():
    if random.randint(1, 5) != 1:
        raise Exception('Broken!')


"""需安装【pip3 install pytest-rerunfailures】"""
@pytest.mark.flaky(reruns=3, reruns_delay=1)  # 如果失败则延迟1s后重试
def test_broken_with_randomized_time():
    passing_step()
    time.sleep(random.randint(1, 3))
    flaky_broken_step()

if __name__ == '__main__':
    pytest.main(['-s', '-q','test_allure09.py','--clean-alluredir','--alluredir=allure-results'])
    os.system(r"allure generate -c -o allure-report")
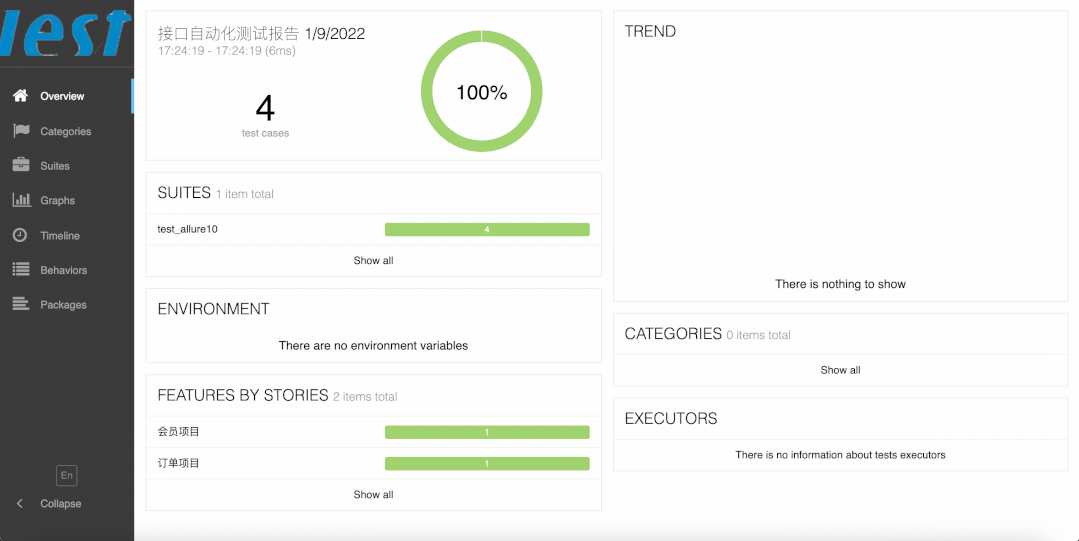
11.tags
我们希望对执行的测试用例保持灵活性。Pytest允许使用标记修饰符@pytest.mark,Allure提供了3种类型的标记装饰符
BDD样式的标记装饰器
@allure.epic:敏捷里面的概念,定义史诗,往下是feature
@allure.feature:功能点的描述,理解成模块往下是story
@allure.story:故事,往下是title
优先级(严重程度)标记装饰器
根据严重程度来标记你的测试。严重程度装饰器,它使用一个allure.severity_level enum值作为参数。如:@allure.severity(allure.severity_level.TRIVIAL)
自定义标记装饰器
import os
import allure
import pytest

@pytest.fixture(scope="session")
def login_fixture():
    print("前置登录")


@allure.step("步骤1")
def step_1():
    print("操作步骤1")


@allure.step("步骤2")
def step_2():
    print("操作步骤2")


@allure.step("步骤3")
def step_3():
    print("操作步骤3")


@allure.step("步骤4")
def step_4():
    print("操作步骤4")

@allure.epic("会员项目")
@allure.feature("登录")
class TestAllureALL:

    @allure.testcase("https://www.cnblogs.com/mrjade/", '测试用例,点我一下')
    @allure.issue("https://github.com/allure-framework/allure-python/issues/642", 'Bug 链接,点我一下')
    @allure.title("用户名错误")
    @allure.story("登录测试用例1")
    @allure.severity(allure.severity_level.TRIVIAL) # 不重要的
    # @allure.severity(allure.severity_level.MINOR) # 轻微的
    # @allure.severity(allure.severity_level.BLOCKER)  # 阻塞的
    # @allure.severity(allure.severity_level.CRITICAL)  # 严重的
    # @allure.severity(allure.severity_level.NORMAL)  # 普通的
    def test_case_1(self):
        """
        公众号:测试工程师成长之路
        """
        print("测试用例1")
        step_1()
        step_2()

    @allure.title("用户名正确,密码错误")
    @allure.story("登录测试用例2")
    def test_case_2(self):
        print("测试用例2")
        step_1()
        step_3()


@allure.epic("订单项目")
@allure.feature("支付")
class TestAllureALL2:
    @allure.title("支付成功")
    @allure.story("支付测试用例例1")
    def test_case_1(self, login_fixture):
        print("支付测试用例例1")
        step_3()

    @allure.title("支付失败")
    @allure.story("支付测试用例例2")
    def test_case_2(self, login_fixture):
        print("支付测试用例例2")
        step_4()

if __name__ == '__main__':
    pytest.main(['-s', '-q','test_allure10.py','--clean-alluredir','--alluredir=allure-results'])
    os.system(r"allure generate -c -o allure-report")
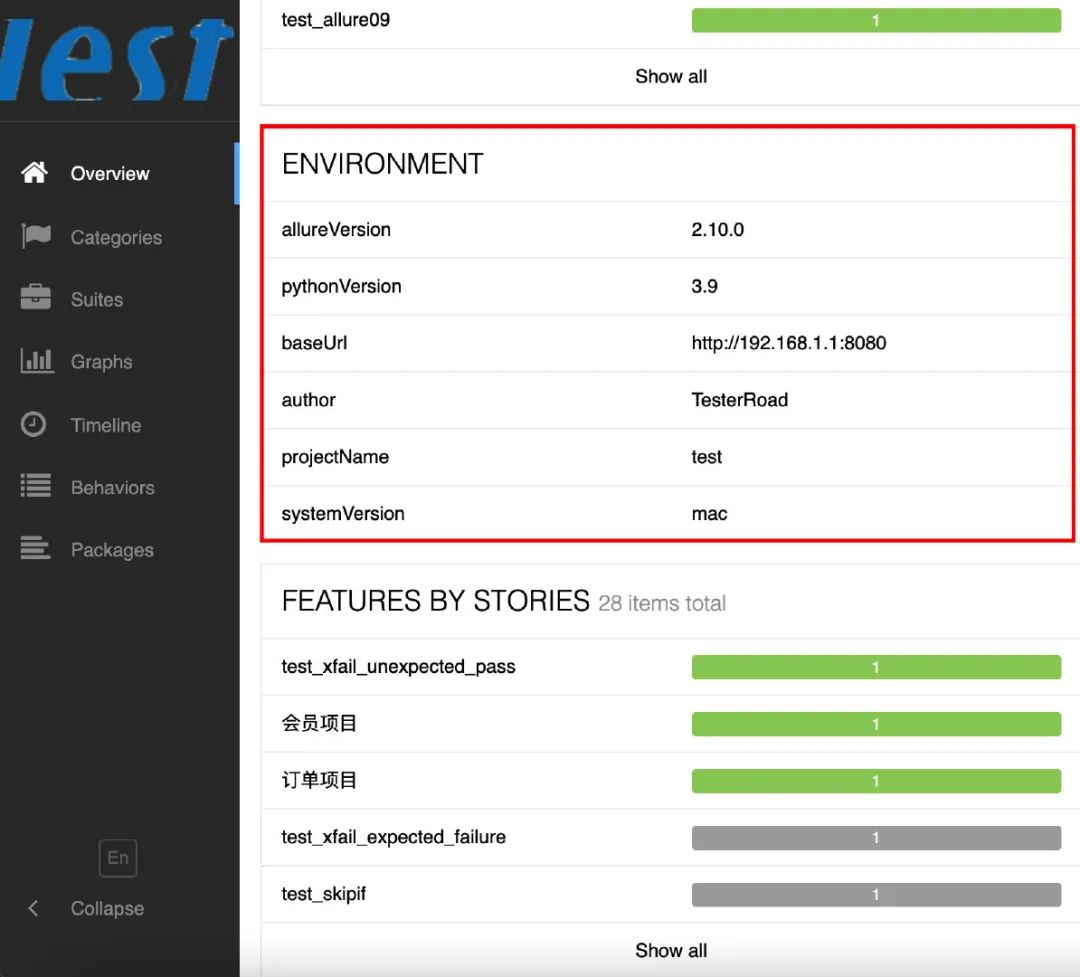
12.environment:环境信息
新建environment.properties文件
编写如下环境信息
systemVersion=mac
pythonVersion=3.9
allureVersion=2.10.0
baseUrl=http://192.168.1.1:8080
projectName=SIT
author=TesterRoad
将environment.properties放在项目根目录或其它目录,在执行测试用例时将其复制到allure-results目录下
# coding=utf-8

import pytest
import os

if __name__ == '__main__':
    pytest.main(['-s', '-q','./','--clean-alluredir','--alluredir=allure-results'])
    os.system('cp environment.properties ./allure-results/environment.properties')
    os.system("allure generate -c -o allure-report")
八.Pytest执行所有.py文件
1.新建run.py文件,编写如下代码
# coding=utf-8

import pytest
import os

if __name__ == '__main__':
    pytest.main(['-s', '-q','./','--clean-alluredir','--alluredir=allure-results'])
    os.system('cp environment.properties ./allure-results/environment.properties')
    os.system("allure generate -c -o allure-report")
2.查看报告

最后:【可能给予你助力的视频教程】

这些资料,对于想学习【软件测试】的朋友来说应该是最全面最完整的备战仓库,这个仓库也陪伴我走过了最艰难的路程,希望也能帮助到你!凡事要趁早,特别是技术行业,一定要提升技术功底。希望对大家有所帮助,需要的小伙伴点击下方插件进群免费领取:
智能推荐
艾美捷Epigentek DNA样品的超声能量处理方案-程序员宅基地
文章浏览阅读15次。空化气泡的大小和相应的空化能量可以通过调整完全标度的振幅水平来操纵和数字控制。通过强调超声技术中的更高通量处理和防止样品污染,Epigentek EpiSonic超声仪可以轻松集成到现有的实验室工作流程中,并且特别适合与表观遗传学和下一代应用的兼容性。Epigentek的EpiSonic已成为一种有效的剪切设备,用于在染色质免疫沉淀技术中制备染色质样品,以及用于下一代测序平台的DNA文库制备。该装置的经济性及其多重样品的能力使其成为每个实验室拥有的经济高效的工具,而不仅仅是核心设施。
11、合宙Air模块Luat开发:通过http协议获取天气信息_合宙获取天气-程序员宅基地
文章浏览阅读4.2k次,点赞3次,收藏14次。目录点击这里查看所有博文 本系列博客,理论上适用于合宙的Air202、Air268、Air720x、Air720S以及最近发布的Air720U(我还没拿到样机,应该也能支持)。 先不管支不支持,如果你用的是合宙的模块,那都不妨一试,也许会有意外收获。 我使用的是Air720SL模块,如果在其他模块上不能用,那就是底层core固件暂时还没有支持,这里的代码是没有问题的。例程仅供参考!..._合宙获取天气
EasyMesh和802.11s对比-程序员宅基地
文章浏览阅读7.7k次,点赞2次,收藏41次。1 关于meshMesh的意思是网状物,以前读书的时候,在自动化领域有传感器自组网,zigbee、蓝牙等无线方式实现各个网络节点消息通信,通过各种算法,保证整个网络中所有节点信息能经过多跳最终传递到目的地,用于数据采集。十多年过去了,在无线路由器领域又把这个mesh概念翻炒了一下,各大品牌都推出了mesh路由器,大多数是3个为一组,实现在面积较大的住宅里,增强wifi覆盖范围,智能在多热点之间切换,提升上网体验。因为节点基本上在3个以内,所以mesh的算法不必太复杂,组网形式比较简单。各厂家都自定义了组_802.11s
线程的几种状态_线程状态-程序员宅基地
文章浏览阅读5.2k次,点赞8次,收藏21次。线程的几种状态_线程状态
stack的常见用法详解_stack函数用法-程序员宅基地
文章浏览阅读4.2w次,点赞124次,收藏688次。stack翻译为栈,是STL中实现的一个后进先出的容器。要使用 stack,应先添加头文件include<stack>,并在头文件下面加上“ using namespacestd;"1. stack的定义其定义的写法和其他STL容器相同, typename可以任意基本数据类型或容器:stack<typename> name;2. stack容器内元素的访问..._stack函数用法
2018.11.16javascript课上随笔(DOM)-程序员宅基地
文章浏览阅读71次。<li> <a href = "“#”>-</a></li><li>子节点:文本节点(回车),元素节点,文本节点。不同节点树: 节点(各种类型节点)childNodes:返回子节点的所有子节点的集合,包含任何类型、元素节点(元素类型节点):child。node.getAttribute(at...
随便推点
layui.extend的一点知识 第三方模块base 路径_layui extend-程序员宅基地
文章浏览阅读3.4k次。//config的设置是全局的layui.config({ base: '/res/js/' //假设这是你存放拓展模块的根目录}).extend({ //设定模块别名 mymod: 'mymod' //如果 mymod.js 是在根目录,也可以不用设定别名 ,mod1: 'admin/mod1' //相对于上述 base 目录的子目录}); //你也可以忽略 base 设定的根目录,直接在 extend 指定路径(主要:该功能为 layui 2.2.0 新增)layui.exten_layui extend
5G云计算:5G网络的分层思想_5g分层结构-程序员宅基地
文章浏览阅读3.2k次,点赞6次,收藏13次。分层思想分层思想分层思想-1分层思想-2分层思想-2OSI七层参考模型物理层和数据链路层物理层数据链路层网络层传输层会话层表示层应用层OSI七层模型的分层结构TCP/IP协议族的组成数据封装过程数据解封装过程PDU设备与层的对应关系各层通信分层思想分层思想-1在现实生活种,我们在喝牛奶时,未必了解他的生产过程,我们所接触的或许只是从超时购买牛奶。分层思想-2平时我们在网络时也未必知道数据的传输过程我们的所考虑的就是可以传就可以,不用管他时怎么传输的分层思想-2将复杂的流程分解为几个功能_5g分层结构
基于二值化图像转GCode的单向扫描实现-程序员宅基地
文章浏览阅读191次。在激光雕刻中,单向扫描(Unidirectional Scanning)是一种雕刻技术,其中激光头只在一个方向上移动,而不是来回移动。这种移动方式主要应用于通过激光逐行扫描图像表面的过程。具体而言,单向扫描的过程通常包括以下步骤:横向移动(X轴): 激光头沿X轴方向移动到图像的一侧。纵向移动(Y轴): 激光头沿Y轴方向开始逐行移动,刻蚀图像表面。这一过程是单向的,即在每一行上激光头只在一个方向上移动。返回横向移动: 一旦一行完成,激光头返回到图像的一侧,准备进行下一行的刻蚀。
算法随笔:强连通分量-程序员宅基地
文章浏览阅读577次。强连通:在有向图G中,如果两个点u和v是互相可达的,即从u出发可以到达v,从v出发也可以到达u,则成u和v是强连通的。强连通分量:如果一个有向图G不是强连通图,那么可以把它分成躲个子图,其中每个子图的内部是强连通的,而且这些子图已经扩展到最大,不能与子图外的任一点强连通,成这样的一个“极大连通”子图是G的一个强连通分量(SCC)。强连通分量的一些性质:(1)一个点必须有出度和入度,才会与其他点强连通。(2)把一个SCC从图中挖掉,不影响其他点的强连通性。_强连通分量
Django(2)|templates模板+静态资源目录static_django templates-程序员宅基地
文章浏览阅读3.9k次,点赞5次,收藏18次。在做web开发,要给用户提供一个页面,页面包括静态页面+数据,两者结合起来就是完整的可视化的页面,django的模板系统支持这种功能,首先需要写一个静态页面,然后通过python的模板语法将数据渲染上去。1.创建一个templates目录2.配置。_django templates
linux下的GPU测试软件,Ubuntu等Linux系统显卡性能测试软件 Unigine 3D-程序员宅基地
文章浏览阅读1.7k次。Ubuntu等Linux系统显卡性能测试软件 Unigine 3DUbuntu Intel显卡驱动安装,请参考:ATI和NVIDIA显卡请在软件和更新中的附加驱动中安装。 这里推荐: 运行后,F9就可评分,已测试显卡有K2000 2GB 900+分,GT330m 1GB 340+ 分,GT620 1GB 340+ 分,四代i5核显340+ 分,还有写博客的小盒子100+ 分。relaybot@re...