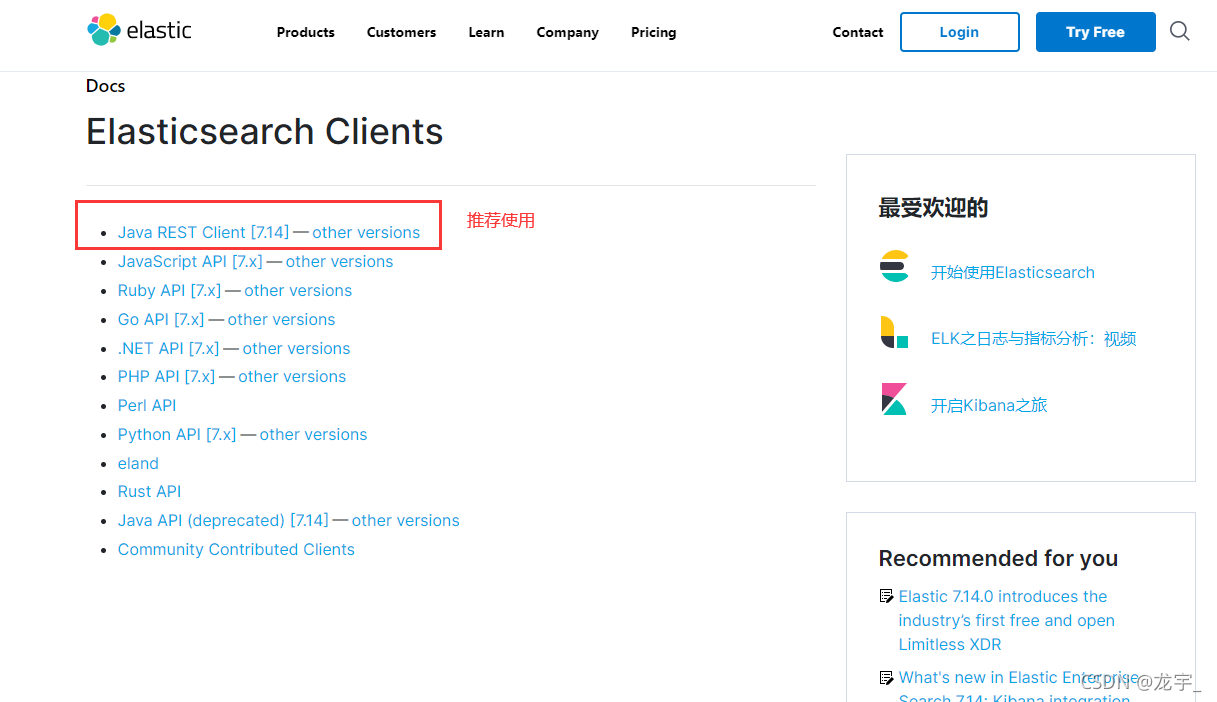
B站狂神说--ElasticSearch笔记_狂神elasticsearch笔记-程序员宅基地
技术标签: java技术栈学习 elasticsearch lucene 搜索引擎
课程(免费)网址:https://www.bilibili.com/video/BV17a4y1x7zq?spm_id_from=333.999.0.0
笔记来源:https://www.kuangstudy.com/bbs/1442736481234939905#header30
ps:狂神很良心,yyds!
一、ElasticSearch概述
1.ElasticSearch
- Elasticsearch是一个实时分布式搜索和分析引擎。 它让你以前所未有的速度处理大数据成为可能。
- 它用于全文搜索、结构化搜索、分析以及将这三者混合使用:
维基百科使用Elasticsearch提供全文搜索并高亮关键字,以及输入实时搜索(search-asyou-type)和搜索纠错(did-you-mean)等搜索建议功能。英国卫报使用Elasticsearch结合用户日志和社交网络数据提供给他们的编辑以实时的反馈,以便及时了解公众对新发表的文章的回应。StackOverflow结合全文搜索与地理位置查询,以及more-like-this功能来找到相关的问题和答案。Github使用Elasticsearch检索1300亿行的代码。- 但是Elasticsearch不仅用于大型企业,它还让像
DataDog以及Klout这样的创业公司将最初的想法变成可扩展的解决方案。 - Elasticsearch可以在你的笔记本上运行,也可以在数以百计的服务器上处理PB级别的数据。
- Elasticsearch是一个基于Apache Lucene的开源搜索引擎。无论在开源还是专有领域, Lucene可被认为是迄今为止最先进、性能最好的、功能最全的搜索引擎库。
- 但是, Lucene只是一个库。 想要使用它,你必须使用Java来作为开发语言并将其直接集成到你的应用中,更糟糕的是, Lucene非常复杂,你需要深入了解检索的相关知识来理解它是如何工作的。
- Elasticsearch也使用Java开发并使用Lucene作为其核心来实现所有索引和搜索的功能,但是它的目的是通过简单的RESTful API来隐藏Lucene的复杂性,从而让全文搜索变得简单。
2.Solar
- Solr是Apache下的一个顶级开源项目,采用Java开发,它是基于Lucene的全文搜索服务器。Solr提供了比Lucene更为丰富的查询语言,同时实现了可配置、可扩展,并对索引、搜索性能进行了优化
- Solr可以独立运行,运行在letty. Tomcat等这些Selrvlet容器中 , Solr 索引的实现方法很简单,用POST方法向Solr服务器发送一个描述Field及其内容的XML文档, Solr根据xml文档添加、删除、更新索引。Solr 搜索只需要发送HTTP GET请求,然后对Solr返回xml、json等格式的查询结果进行解析,组织页面布局。
- Solr不提供构建UI的功能, Solr提供了一个管理界面,通过管理界面可以查询Solr的配置和运行情况。
- Solr是基于lucene开发企业级搜索服务器,实际上就是封装了lucene.
- Solr是一个独立的企业级搜索应用服务器,它对外提供类似于Web-service的API接口。用户可以通过http请求,向搜索引擎服务器提交-定格式的文件,生成索引;也可以通过提出查找请求,并得到返回结果。
3.ElasticSearch和Solr对比
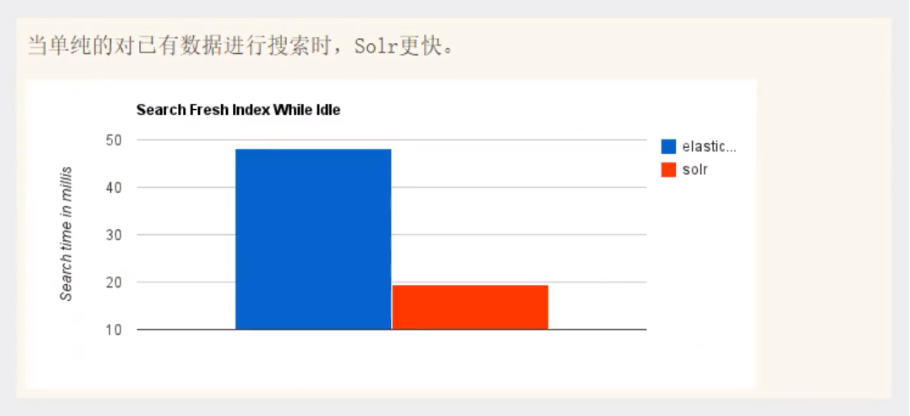
单纯对已有数据进行搜索,solr更快
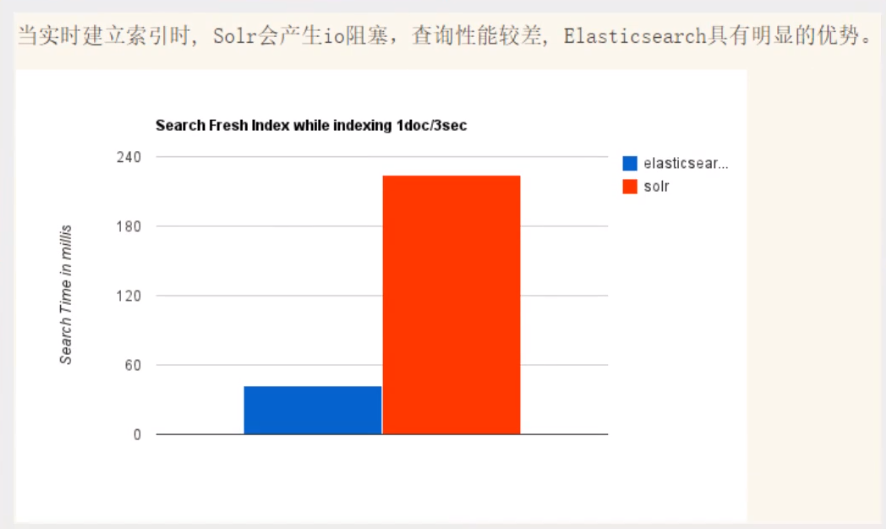
当实时建立索引时,Solr会产生io阻塞,查询性能较差,ElasticSearch具有明显的优势
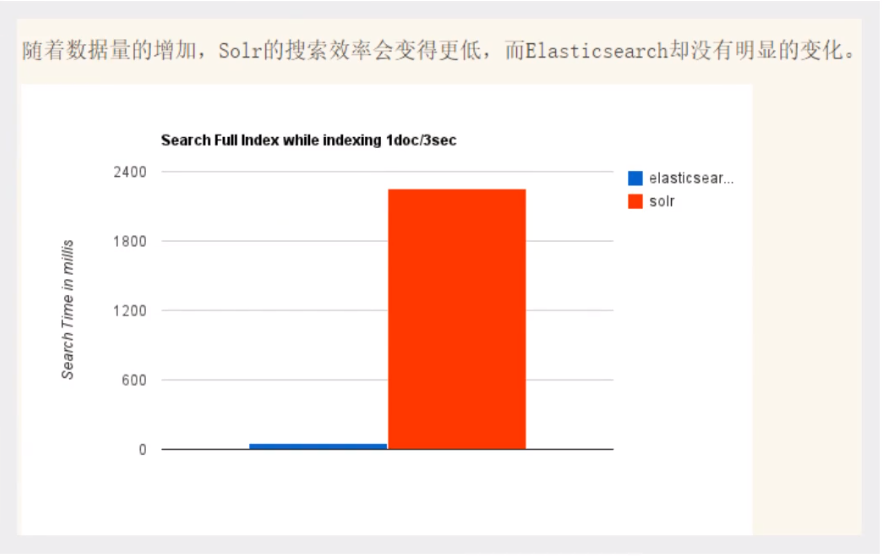
随着数据量的增加,Solr的搜索效率会变得更低,而ElasticSearch却没有明显的变化
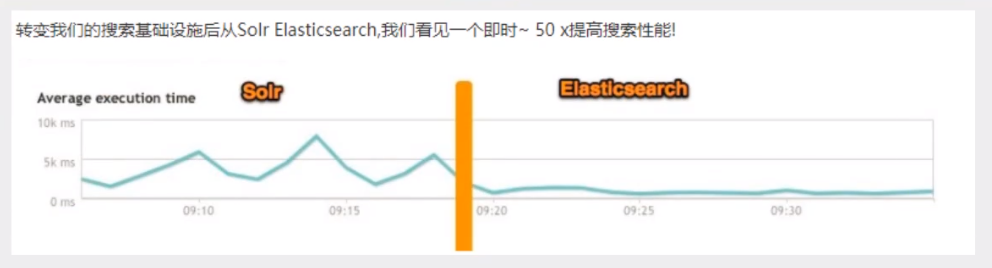
转变我们的搜索基础设施后从Solr ElasticSearch,我们看见一个即时~ 50x提高搜索性能!
4.总结
1、es基本是开箱即用(解压就可以用!) ,非常简单。Solr安装略微复杂一丢丢!
2、Solr 利用Zookeeper进行分布式管理,而Elasticsearch自身带有分布式协调管理功能。
3、Solr 支持更多格式的数据,比如JSON、XML、 CSV ,而Elasticsearch仅支持json文件格式。
4、Solr 官方提供的功能更多,而Elasticsearch本身更注重于核心功能,高级功能多有第三方插件提供,例如图形化界面需要kibana友好支撑
5、Solr 查询快,但更新索引时慢(即插入删除慢) ,用于电商等查询多的应用;
- ES建立索引快(即查询慢) ,即实时性查询快,用于facebook新浪等搜索。
- Solr是传统搜索应用的有力解决方案,但Elasticsearch更适用于新兴的实时搜索应用。
6、Solr比较成熟,有一个更大,更成熟的用户、开发和贡献者社区,而Elasticsearch相对开发维护者较少,更新太快,学习使用成本较高。
二、安装
网上有很多可以参考的帖子,我用的是docker上pull下来的,然后进行配置
三、ES核心概念
1.概述
(1)集群,节点,索引,类型,文档,分片,映射
elasticsearch是面向文档,关系型数据库和elasticsearch客观的对比!一切都是json!
| Relational DB | Elasticsearch |
|---|---|
| 数据库(database) | 索引(indices) |
| 表(tables) | types |
| 行(rows) | documents |
| 字段(columns) | fields |
(2)物理设计
elasticsearch在后台把每个索引划分成多个分片。每个分片可以在集群中的不同服务器间迁移
一个人就是一个集群! ,即启动的ElasticSearch服务,默认就是一个集群,且默认集群名为elasticsearch
(3)逻辑设计
一个索引类型中,包含多个文档,比如说文档1,文档2。当我们索引一篇文档时,可以通过这样的一个顺序找到它:索引->类型->文档id,通过这个组合我们就能索引到某个具体的文档。注意:ID不必是整数,实际上它是一个字符串。
2.文档
文档(”行“)
就是我们的一条条的记录
之前说elasticsearch是面向文档的,那么就意味着索引和搜索数据的最小单位是文档, elasticsearch中,文档有几个重要属性:
- 自我包含, 一篇文档同时包含字段和对应的值,也就是同时包含key:value !
- 可以是层次型的,一个文档中包含自文档,复杂的逻辑实体就是这么来的! {就是一 个json对象! fastjson进行自动转换!}
- 灵活的结构,文档不依赖预先定义的模式,我们知道关系型数据库中,要提前定义字段才能使用,在elasticsearch中,对于字段是非常灵活的,有时候,我们可以忽略该字段,或者动态的添加一个新的字段。
尽管我们可以随意的新增或者忽略某个字段,但是,每个字段的类型非常重要,比如一一个年龄字段类型,可以是字符串也可以是整形。因为elasticsearch会保存字段和类型之间的映射及其他的设置。这种映射具体到每个映射的每种类型,这也是为什么在elasticsearch中,类型有时候也称为映射类型。
3.类型
类型(“表”)
类型是文档的逻辑容器,就像关系型数据库一样,表格是行的容器。类型中对于字段的定 义称为映射,比如name映射为字符串类型。我们说文档是无模式的 ,它们不需要拥有映射中所定义的所有字段,比如新增一个字段,那么elasticsearch是怎么做的呢?elasticsearch会自动的将新字段加入映射,但是这个字段的不确定它是什么类型, elasticsearch就开始猜,如果这个值是18 ,那么elasticsearch会认为它是整形。但是elasticsearch也可能猜不对 ,所以最安全的方式就是提前定义好所需要的映射,这点跟关系型数据库殊途同归了,先定义好字段,然后再使用,别整什么幺蛾子。
4.索引
索引(“库”)
就是数据库!
索引是映射类型的容器, elasticsearch中的索引是一个非常大的文档集合。索|存储了映射类型的字段和其他设置。然后它们被存储到了各个分片上了。我们来研究下分片是如何工作的。
物理设计:节点和分片如何工作
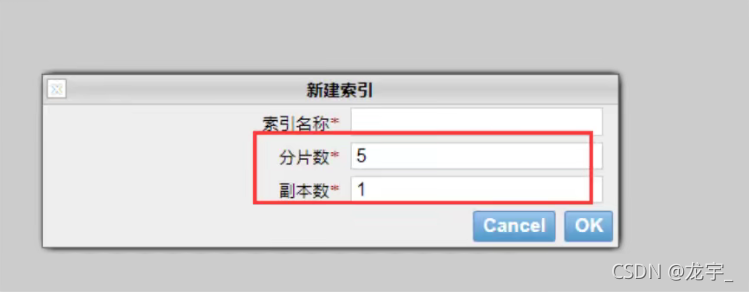
一个集群至少有一 个节点,而一个节点就是一-个elasricsearch进程 ,节点可以有多个索引默认的,如果你创建索引,那么索引将会有个5个分片( primary shard ,又称主分片)构成的,每一个主分片会有-一个副本( replica shard ,又称复制分片)
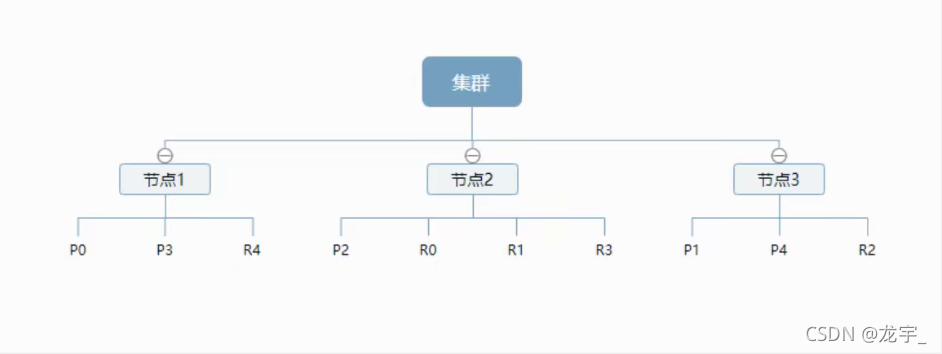
上图是一个有3个节点的集群,可以看到主分片和对应的复制分片都不会在同-个节点内,这样有利于某个节点挂掉了,数据也不至于丢失。实际上, 一个分片是- -个Lucene索引, 一个包含倒排索引的文件目录,倒排索引的结构使得elasticsearch在不扫描全部文档的情况下,就能告诉你哪些文档包含特定的关键字。
5.倒排索引
elasticsearch使用的是一种称为倒排索引 |的结构,采用Lucene倒排索作为底层。这种结构适用于快速的全文搜索,一个索引由文档中所有不重复的列表构成,对于每一个词,都有一个包含它的文档列表。 例如,现在有两个文档,每个文档包含如下内容:
Study every day, good good up to forever  # 文档1包含的内容
To forever, study every day,good good up  # 文档2包含的内容
为为创建倒排索引,我们首先要将每个文档拆分成独立的词(或称为词条或者tokens) ,然后创建一一个包含所有不重 复的词条的排序列表,然后列出每个词条出现在哪个文档:
| term | doc_1 | doc_2 |
|---|---|---|
| Study | √ | x |
| To | x | x |
| every | √ | √ |
| forever | √ | √ |
| day | √ | √ |
| study | x | √ |
| good | √ | √ |
| every | √ | √ |
| to | √ | x |
| up | √ | √ |
现在,我们试图搜索 to forever,只需要查看包含每个词条的文档
| term | doc_1 | doc_2 |
|---|---|---|
| to | √ | x |
| forever | √ | √ |
| total | 2 | 1 |
两个文档都匹配,但是第一个文档比第二个匹配程度更高。如果没有别的条件,现在,这两个包含关键字的文档都将返回。
再来看一个示例,比如我们通过博客标签来搜索博客文章。那么倒排索引列表就是这样的一个结构:
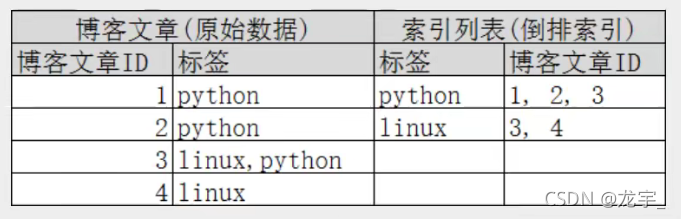
如果要搜索含有python标签的文章,那相对于查找所有原始数据而言,查找倒排索引后的数据将会快的多。只需要查看标签这一栏,然后获取相关的文章ID即可。完全过滤掉无关的所有数据,提高效率!
elasticsearch的索引和Lucene的索引对比
在elasticsearch中,索引(库)这个词被频繁使用,这就是术语的使用。在elasticsearch中 ,索引被分为多个分片,每份分片是-个Lucene的索引。所以一个elasticsearch索引是由多 个Lucene索引组成的。别问为什么,谁让elasticsearch使用Lucene作为底层呢!如无特指,说起索引都是指elasticsearch的索引。
接下来的一切操作都在kibana中Dev Tools下的Console里完成。基础操作!
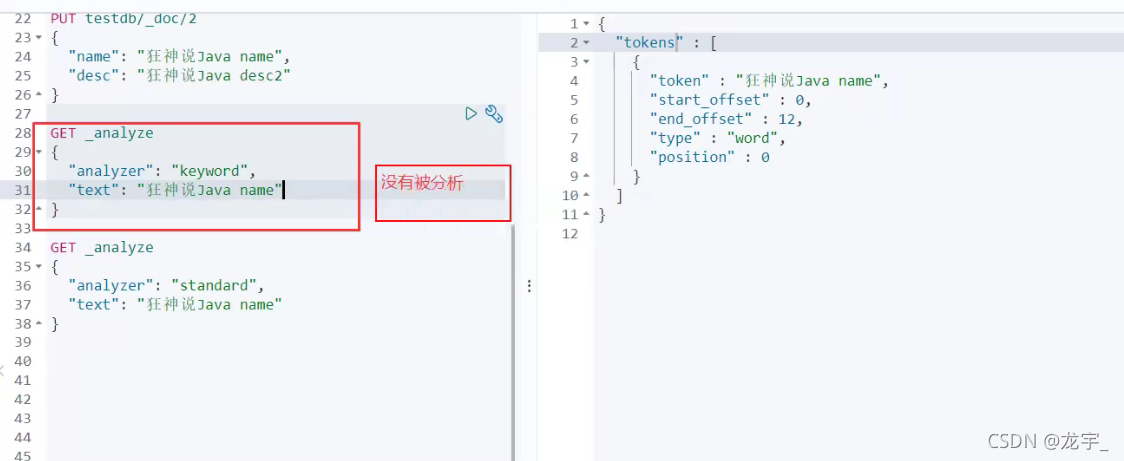
四、IK分词器
在elasticssearch的plugin目录下安装ik分词器:
[root@05592eb427bc plugins]# elasticsearch-plugin install https://github.com/medcl/elasticsearch-analysis-ik/releases/download/v7.14.2/elasticsearch-analysis-ik-7.14.2.zip
不同分词效果:
**ik_smart:**最少切分
**ik_max_word:**最细粒度划分(穷尽词库的可能)
这种自己需要的词,需要自己加到我们的分词器的字典中!
ik 分词器增加自己的配置
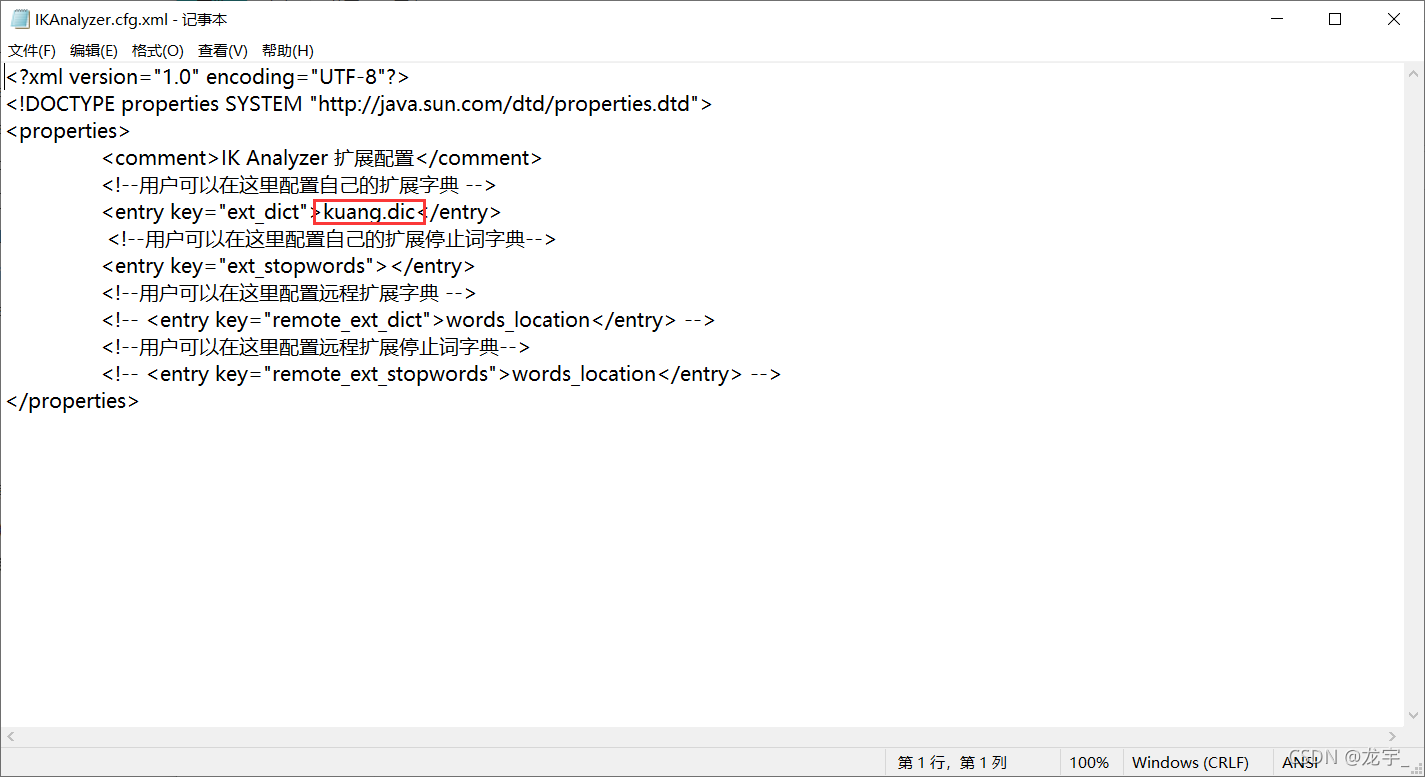
添加自定义的词添加到扩展字典中
elasticsearch目录/plugins/ik/config/IKAnalyzer.cfg.xml
创建 kuang.dic 字典文件,添加字典内容
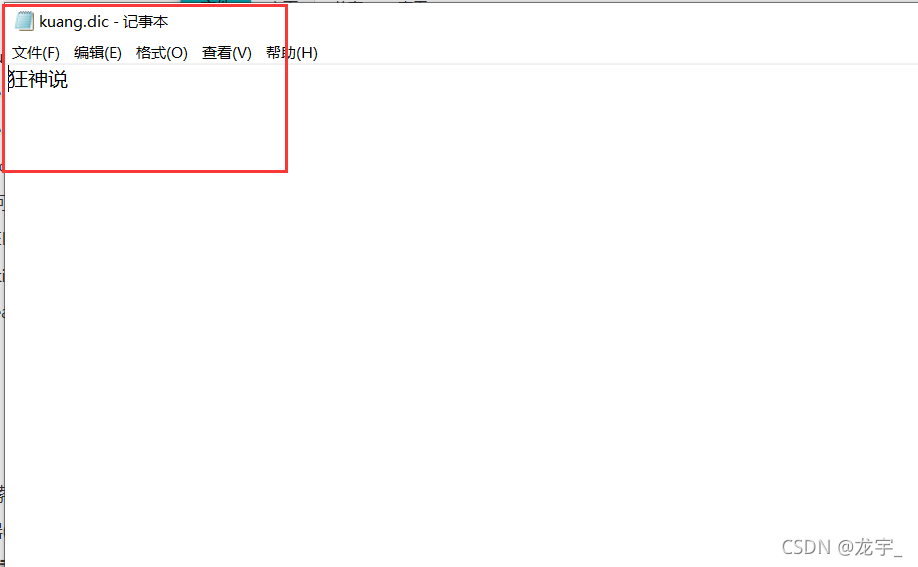
打开 IKAnalyzer.cfg.xml 文件,扩展字典
五、Rest风格
一种软件架构风格,而不是标准,只是提供了一组设计原则和约束条件。它主要用于客户端和服务器交互类的软件。基于这个风格设计的软件可以更简洁,更有层次,更易于实现缓存等机制。
1.基本rest命令说明
| method | url地址 | 描述 |
|---|---|---|
| PUT(创建,修改) | localhost:9200/索引名称/类型名称/文档id | 创建文档(指定文档id) |
| POST(创建) | localhost:9200/索引名称/类型名称 | 创建文档(随机文档id) |
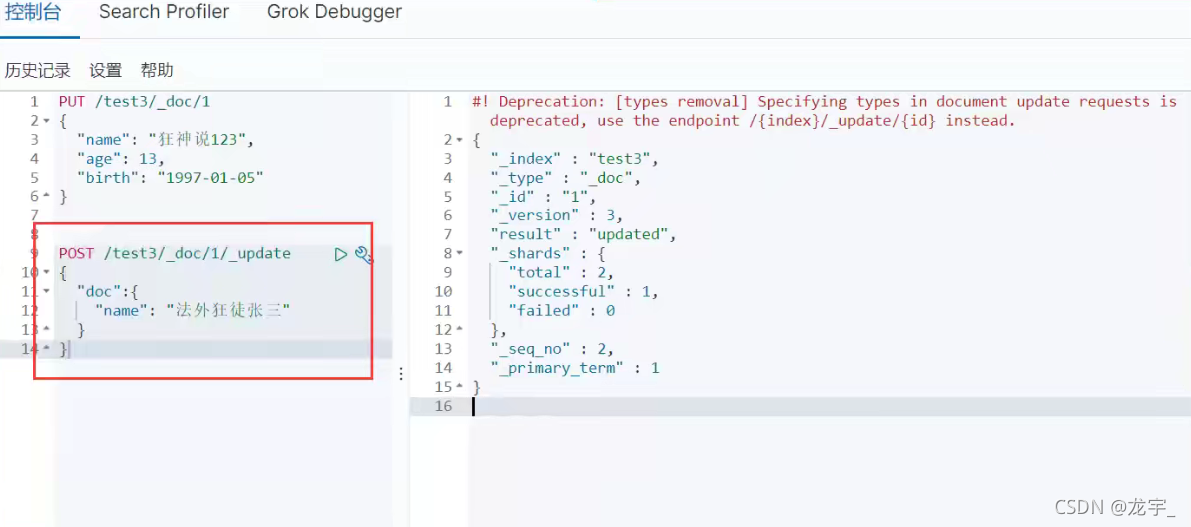
| POST(修改) | localhost:9200/索引名称/类型名称/文档id/_update | 修改文档 |
| DELETE(删除) | localhost:9200/索引名称/类型名称/文档id | 删除文档 |
| GET(查询) | localhost:9200/索引名称/类型名称/文档id | 查询文档通过文档ID |
| POST(查询) | localhost:9200/索引名称/类型名称/文档id/_search | 查询所有数据 |
put->创建、修改
post: 创建,_update修改, _search查询
delete:删除
get: 查询 _search?q=字段:值
2. 关于索引的基本操作
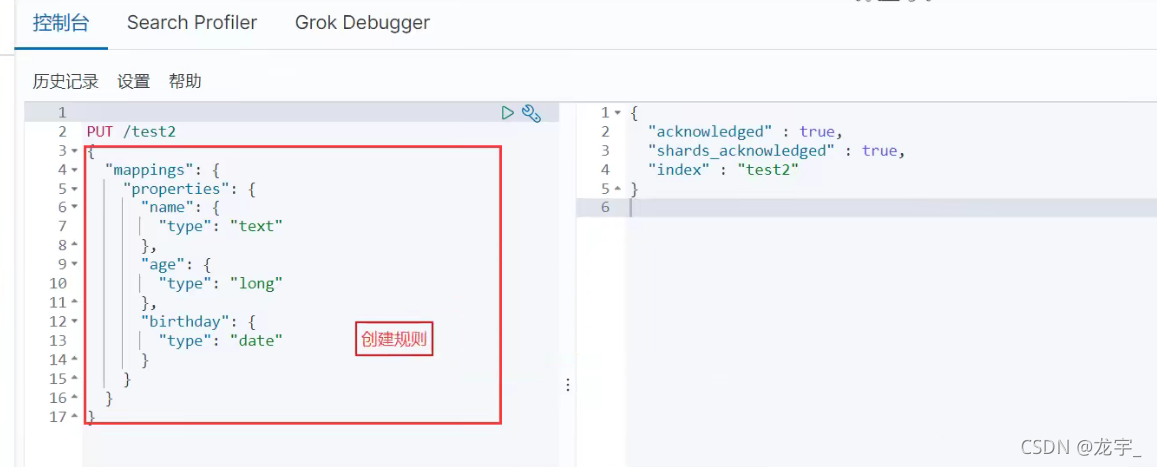
1.创建索引(PUT)
PUT /索引名/~类型名~/文档id
{
    请求体}
PUT /test1/type1/1
{

"name" : "流柚",
"age" : 18
}
# 返回结果
# 警告信息: 不支持在文档索引请求中的指定类型
# 而是使用无类型的断点(/{index}/_doc/{id}, /{index}/_doc, or /{index}/_create/{id}).
{

  "_index" : "test1",    # 索引
  "_type" : "type1",    # 类型(已经废弃)
  "_id" : "1",            # id
  "_version" : 1,        # 版本
  "result" : "created",    # 操作类型
  "_shards" : {
                # 分片信息
    "total" : 2,
    "successful" : 1,
    "failed" : 0
  },
  "_seq_no" : 0,
  "_primary_term" : 1
}
字段类型
-
字符串类型
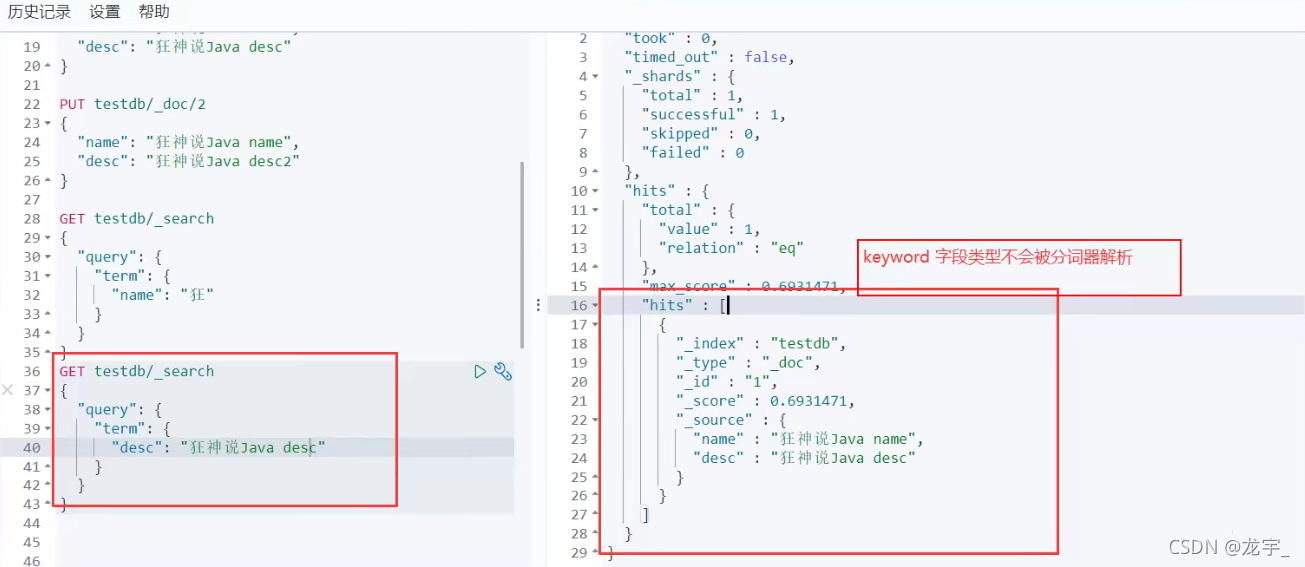
text、keyword
- text:支持分词,全文检索,支持模糊、精确查询,不支持聚合,排序操作;text类型的最大支持的字符长度无限制,适合大字段存储;
- keyword:不进行分词,直接索引、支持模糊、支持精确匹配,支持聚合、排序操作。keyword类型的最大支持的长度为——32766个UTF-8类型的字符,可以通过设置ignore_above指定自持字符长度,超过给定长度后的数据将不被索引,无法通过term精确匹配检索返回结果。
-
数值型
long、Integer、short、byte、double、float、half float、scaled float
-
日期类型
date
-
te布尔类型
boolean
-
二进制类型
binary
-
默认类型是_doc
指定字段类型
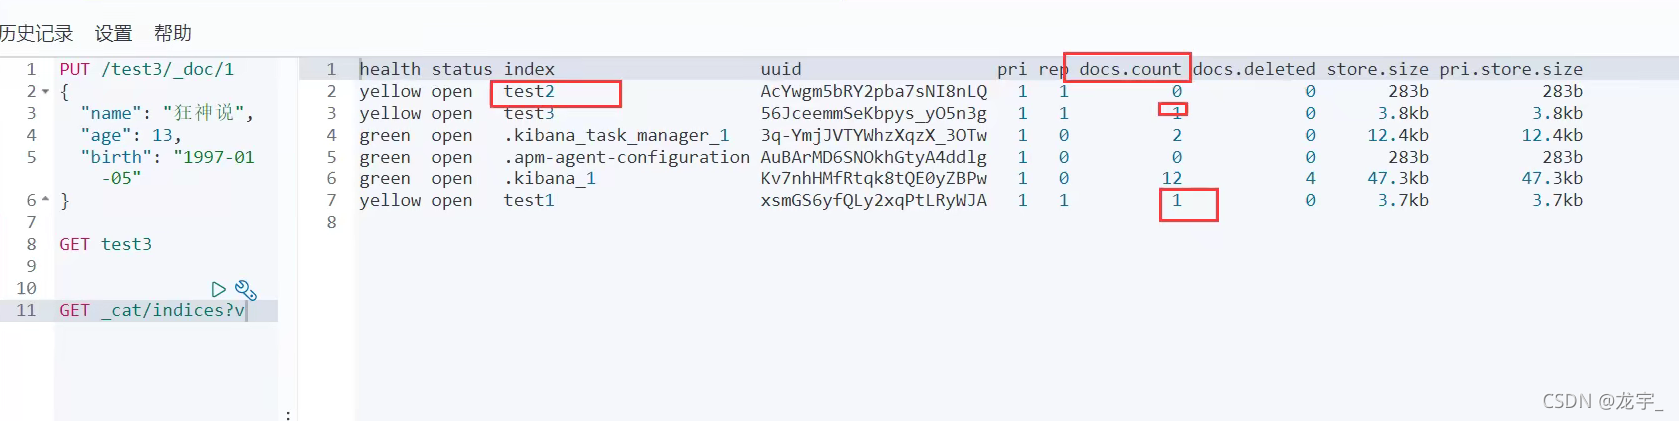
2.获取索引信息(GET)
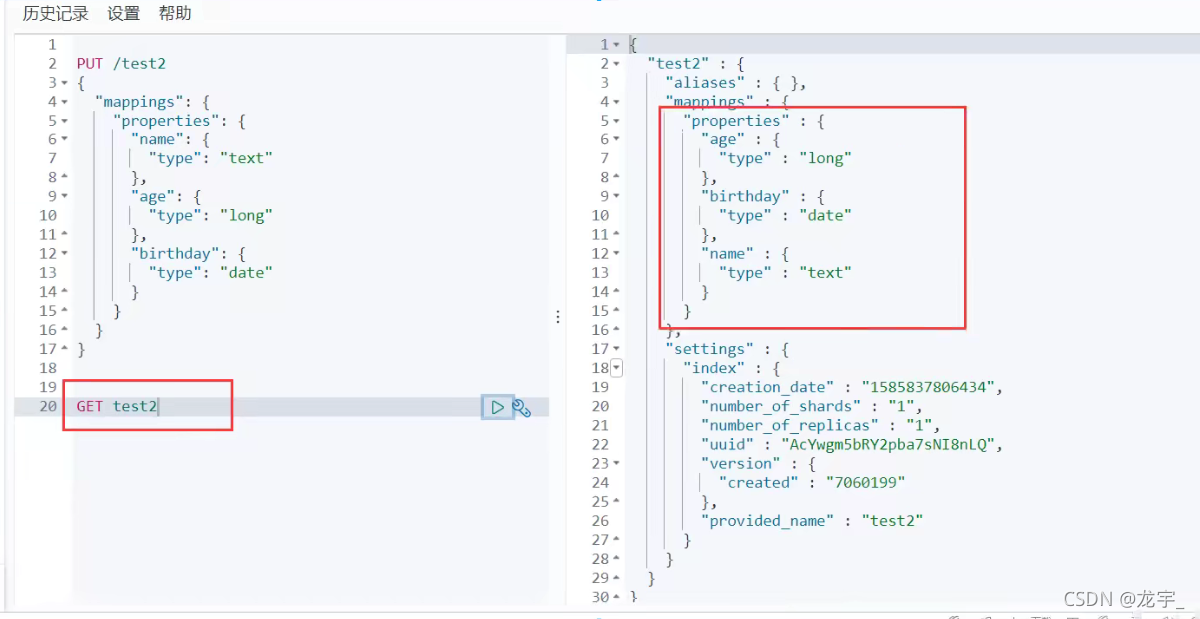
扩展:通过命令 elasticsearch索引情况!通过get _cat/ 可以获取ElasticSearch的当前的很多信息!
3.修改
**方法一:**使用put覆盖原来的值,版本+1(_version),但是如果漏掉某个字段没有写,那么更新是没有写的字段 ,会消失
**方法二:**使用post的update
version不会改变,不会丢失字段
4.删除索引或者字段
通过DELETE 命令实现删除,根据你的请求来判断是删除索引还是删除文档记录!
使用RESTFUL 风格是我们ES推荐大家使用的!
3.关于文档的基本操作
1.添加数据
PUT /kuangshen/user/1
{

  "name": "狂神说",
  "age": 23,
  "desc": "一顿操作猛如虎,一看工资2500",
  "tags": ["运动","阳光","直男"]
}
2.获取数据
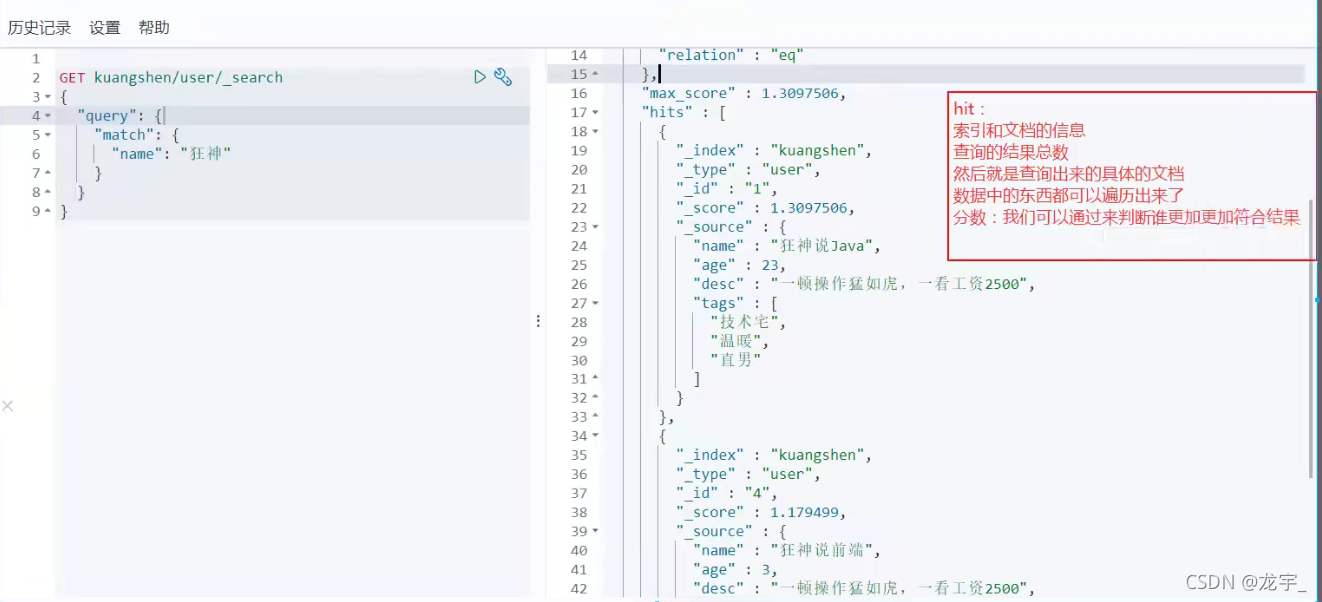
普通查询:
GET kuangshen/user/1
根据条件查询:
GET kuangshen/user/_search:q=name:狂神说
如果是text 就会做分词的查询 如果是keyword就不会分词搜索了
复杂搜索:
hit里包含了所有文档的具体信息
过滤结果:
//测试只能一个字段查询
GET lisen/user/_search
{

  "query": {

    "match": {

      "name": "李森"
    }
  }
}
//结果过滤,只想展示某些字段
"_source":["name","desc"]
排序:
GET lisen/user/_search
{

  "query": {

    "match": {

      "name": "李森"
    }
  }
  "sort":[
      "age":{

          "order":"asc"
       }
  ]
}
分页:
GET lisen/user/_search
{

  "query": {

    "match": {

      "name": "李森"
    }
  }
  "sort":[
      "age":{

          "order":"asc"
       }
  ]
}
"from":0 #从第几个数据开始
"size":1 #单个页面返回多少条数据
多条件查询:
布尔值查询,must(and),must_not(not)所有的条件都要符合 where id=1 and name = xxx
should(or),所有的条件都要符合 where id=1 or name = xxx
GET lisen/user/_search
{

  "query": {

    "bool":{

       ######################################多条件查询
       "must":[
           {

             "match":{

             "name":"狂神"
             }
           },
           {

             "match":{

             "age":23
           }
          }
       ]
        ####################################部分条件符合
        "should":[{

            "match":{

             "name":"狂神"
             }
           },
           {

             "match":{

             "age":23
           }
         }
        ]
        #####################################  must_not
        "must_not":[
            "match":{

               "age":3
            }
        ]
    }
  }
}
过滤器filter
GET lisen/user/_search
{

  "query": {

    "bool":{

       "must":[
           {

             "match":{

             "name":"狂神"
             }
           }
       ],
   "filter":{

      "range":{

          "age":{

          "lt":10
         }
      }
   }

}
- gt 大于
- gte 大于等于
- lte 小于
- lte 小于等于
匹配多个条件(数组)

精确查询
term查询是直接通过倒排索引指定的词条进程精确查找的
关于分词
- term,直接查询精确的
- match,会使用分词器解析!(先分析文档,然后通过分析的文档进行查询)
两个类型 text keyword

3.更新数据
**方法一:**put
PUT /kuangshen/user/3
{

  "name": "李四233",
  "age": 23,
  "desc": "mmp,不知道 如何形容",
  "tags": ["靓仔","旅游","唱歌"]
}
方法二: post …/_update
POST kuang/user/1/_update
{

  "doc":{

     "name":"狂神说java"
  }
}
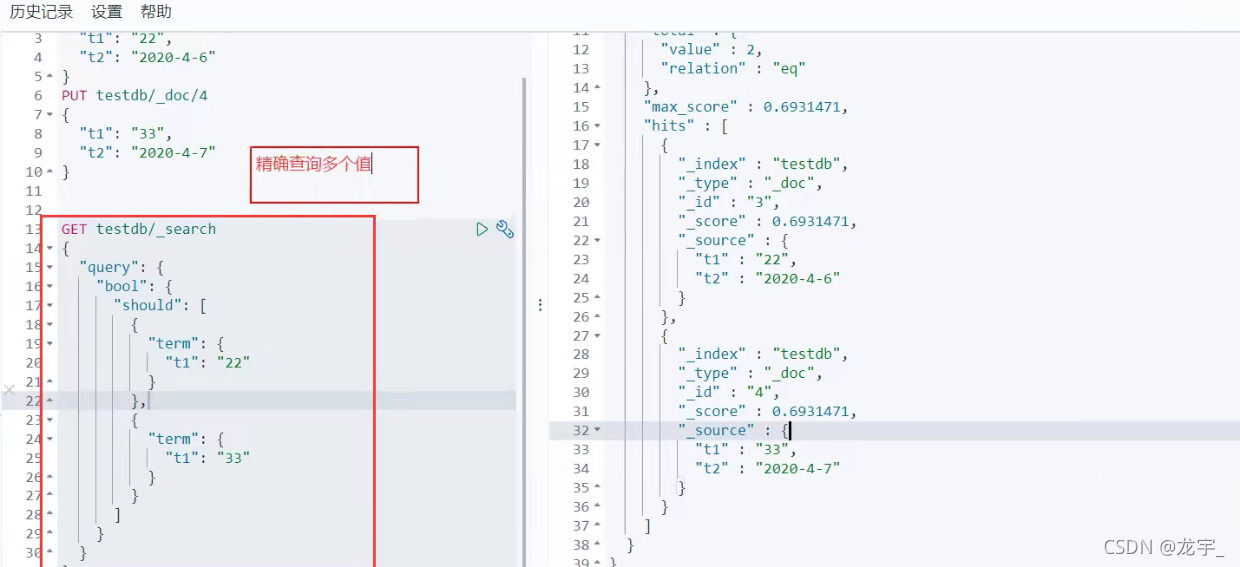
多个值匹配精确查询
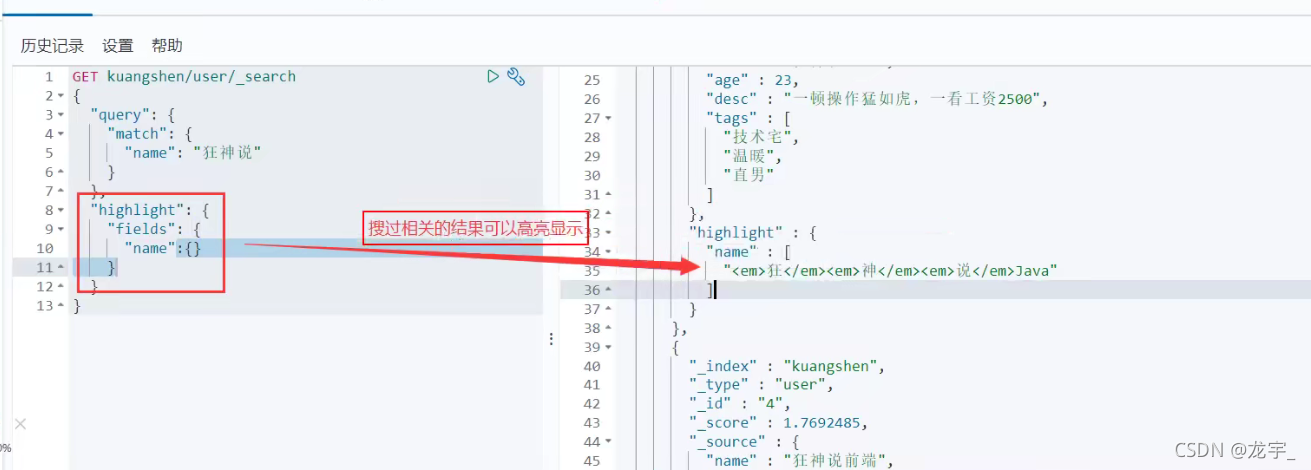
高亮:
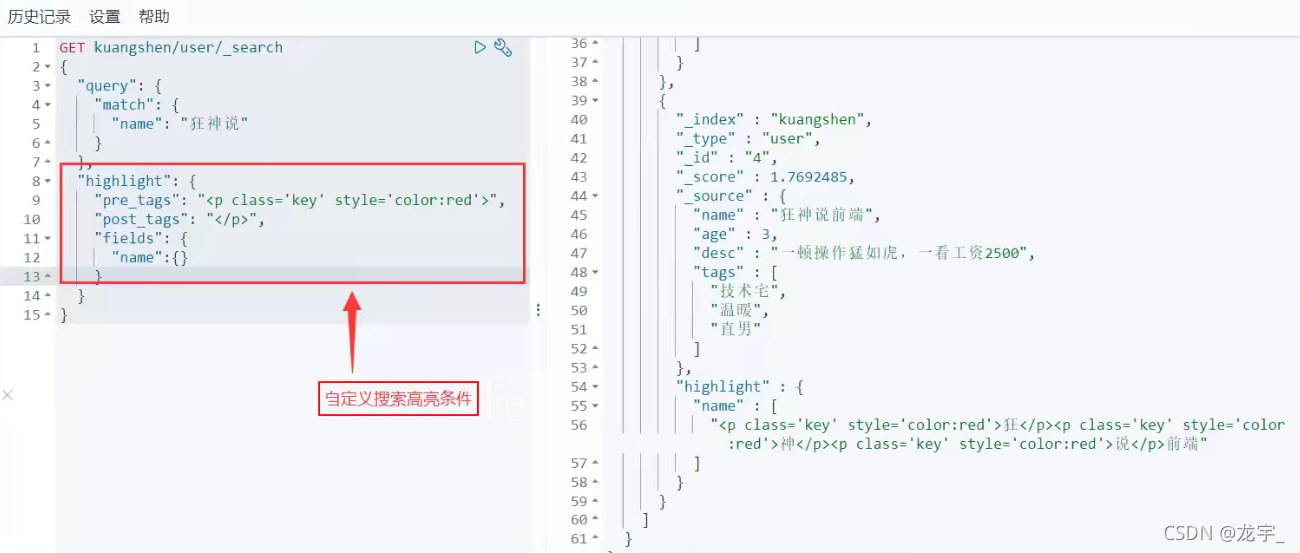
还能自定义高亮的样式
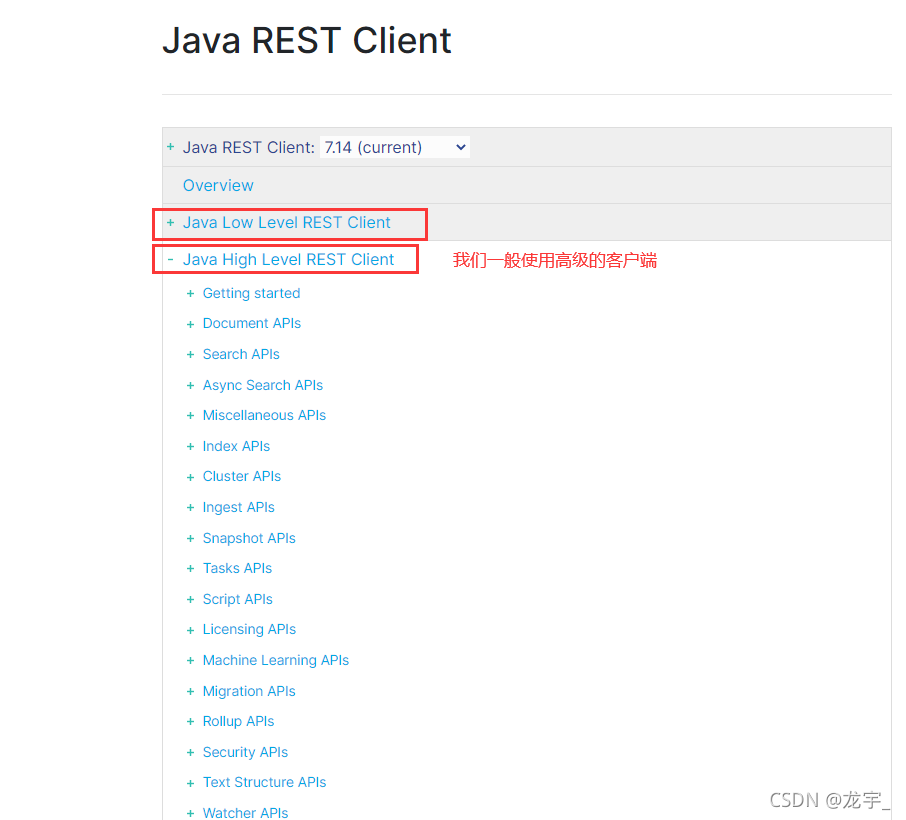
六、springboot集成
找官方文档
1.导入依赖
<dependency>
    <groupId>org.elasticsearch.client</groupId>
    <artifactId>elasticsearch-rest-high-level-client</artifactId>
    <version>7.14.0</version>
</dependency>
注意下spring-boot的parent包内的依赖的es的版本是不是你对应的版本,不是的话就在pom文件下写个properties的版本
<!--这边配置下自己对应的版本-->
<properties>
    <java.version>1.8</java.version>
    <elasticsearch.version>7.14.0</elasticsearch.version>
</properties>
2.设置客户端对象
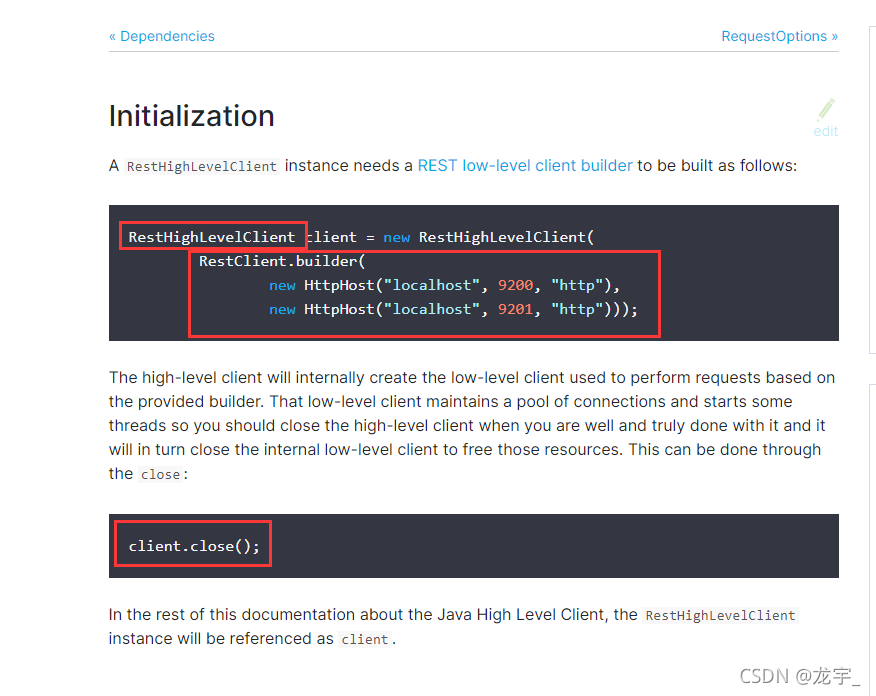
// 1、找对象
// 2、放到spring中待用
// 3、如果是springboot 就先分析源码
@Configuration
public class ElasticSearchClientConfig {

    @Bean
    public RestHighLevelClient restHighLevelClient() {

        RestHighLevelClient client = new RestHighLevelClient(
            RestClient.builder(new HttpHost("127.0.0.1", 9200, "http"))
        );
        return client;
    }
}

核心类配置类:
// Source code recreated from a .class file by IntelliJ IDEA
// (powered by FernFlower decompiler)
package org.springframework.boot.autoconfigure.elasticsearch;
import java.net.URI;
import java.net.URISyntaxException;
import java.time.Duration;
import org.apache.http.HttpHost;
import org.apache.http.auth.AuthScope;
import org.apache.http.auth.Credentials;
import org.apache.http.auth.UsernamePasswordCredentials;
import org.apache.http.client.config.RequestConfig.Builder;
import org.apache.http.impl.client.BasicCredentialsProvider;
import org.apache.http.impl.nio.client.HttpAsyncClientBuilder;
import org.elasticsearch.client.RestClient;
import org.elasticsearch.client.RestClientBuilder;
import org.elasticsearch.client.RestHighLevelClient;
import org.springframework.beans.factory.ObjectProvider;
import org.springframework.boot.autoconfigure.condition.ConditionalOnClass;
import org.springframework.boot.autoconfigure.condition.ConditionalOnMissingBean;
import org.springframework.boot.context.properties.EnableConfigurationProperties;
import org.springframework.boot.context.properties.PropertyMapper;
import org.springframework.context.annotation.Bean;
import org.springframework.context.annotation.Configuration;
import org.springframework.util.StringUtils;
@Configuration(
    proxyBeanMethods = false
)
@ConditionalOnClass({
    RestHighLevelClient.class})
@ConditionalOnMissingBean({
    RestClient.class})
@EnableConfigurationProperties({
    ElasticsearchRestClientProperties.class})
public class ElasticsearchRestClientAutoConfiguration {

    public ElasticsearchRestClientAutoConfiguration() {

    }
    private static class PropertiesCredentialsProvider extends BasicCredentialsProvider {

        PropertiesCredentialsProvider(ElasticsearchRestClientProperties properties) {

            if (StringUtils.hasText(properties.getUsername())) {

                Credentials credentials = new UsernamePasswordCredentials(properties.getUsername(), properties.getPassword());
                this.setCredentials(AuthScope.ANY, credentials);
            }
            properties.getUris().stream().map(this::toUri).filter(this::hasUserInfo).forEach(this::addUserInfoCredentials);
        }
        private URI toUri(String uri) {

            try {

                return URI.create(uri);
            } catch (IllegalArgumentException var3) {

                return null;
            }
        }
        private boolean hasUserInfo(URI uri) {

            return uri != null && StringUtils.hasLength(uri.getUserInfo());
        }
        private void addUserInfoCredentials(URI uri) {

            AuthScope authScope = new AuthScope(uri.getHost(), uri.getPort());
            Credentials credentials = this.createUserInfoCredentials(uri.getUserInfo());
            this.setCredentials(authScope, credentials);
        }
        private Credentials createUserInfoCredentials(String userInfo) {

            int delimiter = userInfo.indexOf(":");
            if (delimiter == -1) {

                return new UsernamePasswordCredentials(userInfo, (String)null);
            } else {

                String username = userInfo.substring(0, delimiter);
                String password = userInfo.substring(delimiter + 1);
                return new UsernamePasswordCredentials(username, password);
            }
        }
    }
    static class DefaultRestClientBuilderCustomizer implements RestClientBuilderCustomizer {

        private static final PropertyMapper map = PropertyMapper.get();
        private final ElasticsearchRestClientProperties properties;
        DefaultRestClientBuilderCustomizer(ElasticsearchRestClientProperties properties) {

            this.properties = properties;
        }
        public void customize(RestClientBuilder builder) {

        }
        public void customize(HttpAsyncClientBuilder builder) {

            builder.setDefaultCredentialsProvider(new ElasticsearchRestClientAutoConfiguration.PropertiesCredentialsProvider(this.properties));
        }
        public void customize(Builder builder) {

            PropertyMapper var10000 = map;
            ElasticsearchRestClientProperties var10001 = this.properties;
            var10001.getClass();
            var10000.from(var10001::getConnectionTimeout).whenNonNull().asInt(Duration::toMillis).to(builder::setConnectTimeout);
            var10000 = map;
            var10001 = this.properties;
            var10001.getClass();
            var10000.from(var10001::getReadTimeout).whenNonNull().asInt(Duration::toMillis).to(builder::setSocketTimeout);
        }
    }
    @Configuration(
        proxyBeanMethods = false
    )
    @ConditionalOnMissingBean({
    RestHighLevelClient.class})
    static class RestHighLevelClientConfiguration {

        RestHighLevelClientConfiguration() {

        }
        // RestHighLevelClient 高级客户端,也是我们这里要讲,后面项目会用到客户端
        @Bean
        RestHighLevelClient elasticsearchRestHighLevelClient(RestClientBuilder restClientBuilder) {

            return new RestHighLevelClient(restClientBuilder);
        }
    }
    @Configuration(
        proxyBeanMethods = false
    )
    @ConditionalOnMissingBean({
    RestClientBuilder.class})
    static class RestClientBuilderConfiguration {

        RestClientBuilderConfiguration() {

        }
        @Bean
        RestClientBuilderCustomizer defaultRestClientBuilderCustomizer(ElasticsearchRestClientProperties properties) {

            return new ElasticsearchRestClientAutoConfiguration.DefaultRestClientBuilderCustomizer(properties);
        }
        // RestClientBuilder
        @Bean
        RestClientBuilder elasticsearchRestClientBuilder(ElasticsearchRestClientProperties properties, ObjectProvider<RestClientBuilderCustomizer> builderCustomizers) {

            HttpHost[] hosts = (HttpHost[])properties.getUris().stream().map(this::createHttpHost).toArray((x$0) -> {

                return new HttpHost[x$0];
            });
            RestClientBuilder builder = RestClient.builder(hosts);
            builder.setHttpClientConfigCallback((httpClientBuilder) -> {

                builderCustomizers.orderedStream().forEach((customizer) -> {

                    customizer.customize(httpClientBuilder);
                });
                return httpClientBuilder;
            });
            builder.setRequestConfigCallback((requestConfigBuilder) -> {

                builderCustomizers.orderedStream().forEach((customizer) -> {

                    customizer.customize(requestConfigBuilder);
                });
                return requestConfigBuilder;
            });
            builderCustomizers.orderedStream().forEach((customizer) -> {

                customizer.customize(builder);
            });
            return builder;
        }
        private HttpHost createHttpHost(String uri) {

            try {

                return this.createHttpHost(URI.create(uri));
            } catch (IllegalArgumentException var3) {

                return HttpHost.create(uri);
            }
        }
        private HttpHost createHttpHost(URI uri) {

            if (!StringUtils.hasLength(uri.getUserInfo())) {

                return HttpHost.create(uri.toString());
            } else {

                try {

                    return HttpHost.create((new URI(uri.getScheme(), (String)null, uri.getHost(), uri.getPort(), uri.getPath(), uri.getQuery(), uri.getFragment())).toString());
                } catch (URISyntaxException var3) {

                    throw new IllegalStateException(var3);
                }
            }
        }
    }
}
3.API使用
1.索引相关
// 测试索引的创建 request  增
@Test
void testCreateIndex() throws IOException {


   // 1、创建索引请求
   CreateIndexRequest request = new CreateIndexRequest("kuang_index");
   // 2、客户端执行请求 indexResponse, 请求后获得相应
   CreateIndexResponse createIndexResponse = client.indices().create(request, RequestOptions.DEFAULT);
   System.out.println(createIndexResponse);
}

// 测试获取索引,只能判断其是否存在 查
@Test
void testExistIndex() throws IOException {

   GetIndexRequest request = new GetIndexRequest("kuang_index");
   boolean exists = client.indices().exists(request, RequestOptions.DEFAULT);
   System.out.println(exists);
}

// 删除索引
@Test
void testDeleteIndex() throws IOException {

   DeleteIndexRequest request = new DeleteIndexRequest("kuang_index");
   AcknowledgedResponse delete = client.indices().delete(request, RequestOptions.DEFAULT);
   System.out.println(delete.isAcknowledged());
}
2.文档相关
// 测试创建文档
@Test
void testAddDocument() throws IOException {

    // 创建对象
    User user = new User("狂神说", 3);
    // 索引请求
    IndexRequest request = new IndexRequest("kuang_index");
    // 规则 put /kuang_index/_doc/1
    request.id("1");
    request.timeout(TimeValue.timeValueDays(1));
    //    request.timeout("1");
    // 将我们的数据放入请求 json
    request.source(JSON.toJSONString(user), XContentType.JSON);
    // 客户端发送请求,获取响应结果
    IndexResponse indexResponse = client.index(request, RequestOptions.DEFAULT);
    System.out.println(indexResponse.toString());
    System.out.println(indexResponse.status());
}

// 获取文档,判断是否存在 get /index/doc/1
@Test
void testIsExists() throws IOException {

    GetRequest request = new GetRequest("kuang_index", "1");
    // 不获取返回的 _source 的上下文了
    request.fetchSourceContext(new FetchSourceContext(false));
    request.storedFields("_none_");
    boolean exists = client.exists(request, RequestOptions.DEFAULT);
    System.out.println(exists);
}

// 获取文档信息
@Test
void testGetDocument() throws IOException {

    GetRequest request = new GetRequest("kuang_index", "1");
    GetResponse getResponse = client.get(request, RequestOptions.DEFAULT);
    System.out.println(getResponse.getSourceAsString()); // 打印文档的内容
    System.out.println(getResponse);  // 返回的全部内容和命令是一样的
}

// 更新文档的信息
@Test
void testUpdateDocument() throws IOException {

    UpdateRequest updateRequest = new UpdateRequest("kuang_index", "1");
    updateRequest.timeout("1s");
    User user = new User("狂神说java", 18);
    updateRequest.doc(JSON.toJSONString(user), XContentType.JSON);
    UpdateResponse updateResponse = client.update(updateRequest, RequestOptions.DEFAULT);
    System.out.println(updateResponse.status());
}

// 删除文档记录
@Test
void testDeleteRequest() throws IOException {

    DeleteRequest request = new DeleteRequest("kuang_index", "3");
    request.timeout("1s");
    DeleteResponse delete = client.delete(request, RequestOptions.DEFAULT);
    System.out.println(delete.status());
}

// 批量插入
@Test
void testBulkRequest() throws IOException {

    BulkRequest bulkRequest = new BulkRequest();
    bulkRequest.timeout("10s");
    ArrayList<User> list = new ArrayList<>();
    list.add(new User("kuangshen1", 3));
    list.add(new User("kuangshen2", 3));
    list.add(new User("kuangshen3", 3));
    list.add(new User("qinjiang1", 3));
    list.add(new User("qinjiang2", 3));
    list.add(new User("qinjiang3", 3));
    // 批处理请求
    for (int i = 0; i < list.size(); i++) {

        // 批量更新和批量删除,就在这里修改对应的请求就可以了
        bulkRequest.add(
            new IndexRequest("kuang_index")
            .id("" + (i + 1))
            .source(JSON.toJSONString(list.get(i)), XContentType.JSON));
    }
    BulkResponse bulkResponse = client.bulk(bulkRequest, RequestOptions.DEFAULT);
    System.out.println(bulkResponse.hasFailures());  // 是否失败,返回false代表成功
}

// 查询
// HighLightBuilder 构建高亮
// MatchAllQueryBuilder
// xxx QueryBuilder 对应我们刚才看到的命令!
@Test
void testSearch() throws IOException {

    // SearchRequest 搜索请求
    SearchRequest searchRequest = new SearchRequest("kuang_index");
    //  SearchSourceBuilder 构建搜索条件
    SearchSourceBuilder sourceBuilder = new SearchSourceBuilder();
    // TermQueryBuilder查询条件,我们可以使用 QueryBuilders 工具来实现
    // QueryBuilders.termQuery  精确
    // QueryBuilders.matchAllQuery 匹配所有
    TermQueryBuilder termQueryBuilder = QueryBuilders.termQuery("name", "qinjiang1");
    // MatchAllQueryBuilder matchAllQueryBuilder = QueryBuilders.matchAllQuery();
    sourceBuilder.query(termQueryBuilder);
    sourceBuilder.timeout(new TimeValue(60, TimeUnit.SECONDS));
    searchRequest.source(sourceBuilder);
    SearchResponse searchResponse = client.search(searchRequest, RequestOptions.DEFAULT);
    System.out.println(JSON.toJSONString(searchResponse.getHits()));
    System.out.println("===========================");
    for (SearchHit documentFields : searchResponse.getHits().getHits()) {

        System.out.println(documentFields.getSourceAsMap());
    }
}
七、项目实战–京东搜索
1.搭建项目
导入依赖
<dependencies>
    <dependency>
        <groupId>org.springframework.boot</groupId>
        <artifactId>spring-boot-starter-data-elasticsearch</artifactId>
    </dependency>
    <dependency>
        <groupId>org.springframework.boot</groupId>
        <artifactId>spring-boot-starter-thymeleaf</artifactId>
    </dependency>
    <dependency>
        <groupId>org.springframework.boot</groupId>
        <artifactId>spring-boot-starter-web</artifactId>
    </dependency>
    <dependency>
        <groupId>org.springframework.boot</groupId>
        <artifactId>spring-boot-devtools</artifactId>
        <scope>runtime</scope>
        <optional>true</optional>
    </dependency>
    <dependency>
        <groupId>org.projectlombok</groupId>
        <artifactId>lombok</artifactId>
        <optional>true</optional>
    </dependency>
    <dependency>
        <groupId>org.springframework.boot</groupId>
        <artifactId>spring-boot-starter-test</artifactId>
        <scope>test</scope>
    </dependency>
</dependencies>
修改配置文件
server.port=9090
# 关闭 thymeleaf 的缓存
spring.thymeleaf.cache=false
导入前端测试页面
创建IndexController测试:测试访问 http://localhost:9090/
@Controller
public class IndexController {

   @GetMapping({
    "/", "index"})
   public String index() {

       return "index";
   }
}
2.爬虫
数据问题?数据库获取,消息队列中获取,都可以成为数据源,爬虫!
爬取数据:(获取请求返回的页面信息,筛选出我们想要的数据就可以了!)导入jsoup包
<!--        解析网页jsoup-->
<dependency>
    <groupId>org.jsoup</groupId>
    <artifactId>jsoup</artifactId>
    <version>1.13.1</version>
</dependency>
创建HtmlParseUtil
@Component
public class HtmlParseUtil {

    public List<Content> parseJD(String keywords) throws Exception {

        String url = "http://search.jd.com/search?keyword=" + keywords;
        Document document = Jsoup.parse(new URL(url), 30000);
        Element element = document.getElementById("J_goodsList");
        Elements li = element.getElementsByTag("li");
        List<Content> list = new ArrayList<>();
        for (Element el : li) {

            String img = el.getElementsByTag("img").eq(0).attr("data-lazy-img");
            String price = el.getElementsByClass("p-price").eq(0).text();
            String title = el.getElementsByClass("p-name").eq(0).text();
            Content content = new Content();
            content.setImg(img);
            content.setTitle(title);
            content.setPrice(price);
            list.add(content);
        }
        return list;
    }
}
service调用
/**
 * 1、解析数据放入 es 索引中
 */
public Boolean parseContent(String keywords) throws Exception {
    List<Content> contents = new HtmlParseUtil().parseJD(keywords);
    // 把查询到的数据放入 es 中
    BulkRequest bulkRequest = new BulkRequest();
    bulkRequest.timeout("2m");
    for (Content content : contents) {
        bulkRequest.add(
            new IndexRequest("jd_goods")
            .source(JSON.toJSONString(content), XContentType.JSON)
        );
    }
    BulkResponse bulk = restHighLevelClient.bulk(bulkRequest, RequestOptions.DEFAULT);
    return !bulk.hasFailures();
}
controller调用,使得解析出来的内容存放到elasticsearch中
@GetMapping("/parse/{keyword}")
public Boolean parse(@PathVariable("keyword") String keywords) throws Exception {
   return contentService.parseContent(keywords);
}
分页查询
service
/**
 * 2、获取这些数据实现搜索功能
 */
public List<Map<String, Object>> searchPage(String keyword, int pageNo, int pageSize) throws IOException {

    if (pageNo <= 1) {

        pageNo = 1;
    }
    // 条件搜索
    SearchRequest searchRequest = new SearchRequest("jd_goods");
    SearchSourceBuilder sourceBuilder = new SearchSourceBuilder();
    // 精准匹配
    TermQueryBuilder termQueryBuilder = QueryBuilders.termQuery("title", keyword);
    sourceBuilder.query(termQueryBuilder);
    sourceBuilder.timeout(new TimeValue(60, TimeUnit.SECONDS));
    // 分页
    sourceBuilder.from(pageNo);
    sourceBuilder.size(pageSize);
    // 执行搜索
    searchRequest.source(sourceBuilder);
    SearchResponse searchResponse = restHighLevelClient.search(searchRequest, RequestOptions.DEFAULT);
    // 解析结果
    List<Map<String, Object>> list = new ArrayList<>();
    for (SearchHit documentFields : searchResponse.getHits().getHits()) {

        list.add(documentFields.getSourceAsMap());
    }
    return list;
}
controller层
@GetMapping("/search/{keyword}/{pageNo}/{pageSize}")
public List<Map<String, Object>> search(@PathVariable("keyword") String keyword,
                                        @PathVariable("pageNo") int pageNo,
                                        @PathVariable("pageSize") int pageSize) throws IOException {

    return contentService.searchPage(keyword, pageNo, pageSize);
}
3.前后端分离
载并引入Vue.min.js和axios.js
如果安装了nodejs,可以按如下步骤
npm install vue
npm install axios
修改静态页面引入js
<script th:src="@{/js/vue.min.js}"></script>
<script th:src="@{/js/axios.min.js}"></script>
修改后的index.html
<!DOCTYPE html>
<html xmlns:th="http://www.thymeleaf.org">
    <head>
        <meta charset="utf-8"/>
        <title>狂神说Java-ES仿京东实战</title>
        <link rel="stylesheet" th:href="@{/css/style.css}"/>
    </head>
    <body class="pg">
        <div class="page" id="app">
            <div id="mallPage" class=" mallist tmall- page-not-market ">
                <!-- 头部搜索 -->
                <div id="header" class=" header-list-app">
                    <div class="headerLayout">
                        <div class="headerCon ">
                            <!-- Logo-->
                            <h1 id="mallLogo">
                                <img th:src="@{/images/jdlogo.png}" alt="">
                            </h1>
                            <div class="header-extra">
                                <!--搜索-->
                                <div id="mallSearch" class="mall-search">
                                    <form name="searchTop" class="mallSearch-form clearfix">
                                        <fieldset>
                                            <legend>天猫搜索</legend>
                                            <div class="mallSearch-input clearfix">
                                                <div class="s-combobox" id="s-combobox-685">
                                                    <div class="s-combobox-input-wrap">
                                                        <input v-model="keyword" type="text" autocomplete="off" value="dd"
                                                               id="mq"
                                                               class="s-combobox-input" aria-haspopup="true">
                                                    </div>
                                                </div>
                                                <button type="submit" @click.prevent="searchKey" id="searchbtn">搜索</button>
                                            </div>
                                        </fieldset>
                                    </form>
                                    <ul class="relKeyTop">
                                        <li><a>狂神说Java</a></li>
                                        <li><a>狂神说前端</a></li>
                                        <li><a>狂神说Linux</a></li>
                                        <li><a>狂神说大数据</a></li>
                                        <li><a>狂神聊理财</a></li>
                                    </ul>
                                </div>
                            </div>
                        </div>
                    </div>
                </div>
                <!-- 商品详情页面 -->
                <div id="content">
                    <div class="main">
                        <!-- 品牌分类 -->
                        <form class="navAttrsForm">
                            <div class="attrs j_NavAttrs" style="display:block">
                                <div class="brandAttr j_nav_brand">
                                    <div class="j_Brand attr">
                                        <div class="attrKey">
                                            品牌
                                        </div>
                                        <div class="attrValues">
                                            <ul class="av-collapse row-2">
                                                <li><a href="#"> 狂神说 </a></li>
                                                <li><a href="#"> Java </a></li>
                                            </ul>
                                        </div>
                                    </div>
                                </div>
                            </div>
                        </form>
                        <!-- 排序规则 -->
                        <div class="filter clearfix">
                            <a class="fSort fSort-cur">综合<i class="f-ico-arrow-d"></i></a>
                            <a class="fSort">人气<i class="f-ico-arrow-d"></i></a>
                            <a class="fSort">新品<i class="f-ico-arrow-d"></i></a>
                            <a class="fSort">销量<i class="f-ico-arrow-d"></i></a>
                            <a class="fSort">价格<i class="f-ico-triangle-mt"></i><i class="f-ico-triangle-mb"></i></a>
                        </div>
                        <!-- 商品详情 -->
                        <div class="view grid-nosku">
                            <div class="product" v-for="result in results">
                                <div class="product-iWrap">
                                    <!--商品封面-->
                                    <div class="productImg-wrap">
                                        <a class="productImg">
                                            <img :src="result.img">
                                        </a>
                                    </div>
                                    <!--价格-->
                                    <p class="productPrice">
                                        <em><b>¥</b>{ {result.price} }</em>
                                    </p>
                                    <!--标题-->
                                    <p class="productTitle">
                                        <a>{ {result.title} }</a>
                                    </p>
                                    <!-- 店铺名 -->
                                    <div class="productShop">
                                        <span>店铺: 狂神说Java </span>
                                    </div>
                                    <!-- 成交信息 -->
                                    <p class="productStatus">
                                        <span>月成交<em>999笔</em></span>
                                        <span>评价 <a>3</a></span>
                                    </p>
                                </div>
                            </div>
                        </div>
                    </div>
                </div>
            </div>
        </div>
        <script th:src="@{/js/axios.min.js}"></script>
        <script th:src="@{/js/vue.min.js}"></script>
        <script>
            new Vue({

                el: "#app",
                data: {

                    keyword: '', //搜素的关键字
                    results: []   //搜素的结果
                },
                methods: {

                    searchKey() {

                        let keyword = this.keyword;
                        console.log(keyword);
                        axios.get('search/' + keyword + '/0/10').then(response => {

                            console.log(response.data);
                            this.results = response.data; //绑定数据
                        })
                    }
                }
            });
        </script>
    </body>
</html>
测试搜索
4.高亮
service
/**
 * 3、获取这些数据实现搜索高亮功能
 */
public List<Map<String, Object>> searchHighLightPage(String keyword, int pageNo, int pageSize) throws IOException {

    if (pageNo <= 1) {

        pageNo = 1;
    }
    // 条件搜索
    SearchRequest searchRequest = new SearchRequest("jd_goods");
    SearchSourceBuilder sourceBuilder = new SearchSourceBuilder();
    // 精准匹配
    TermQueryBuilder termQueryBuilder = QueryBuilders.termQuery("title", keyword);
    sourceBuilder.query(termQueryBuilder);
    sourceBuilder.timeout(new TimeValue(60, TimeUnit.SECONDS));
    // 高亮
    HighlightBuilder highlightBuilder = new HighlightBuilder();
    highlightBuilder.field("title");
    highlightBuilder.requireFieldMatch(false);  // 多个高亮显示!
    highlightBuilder.preTags("<span style='color:red'>");
    highlightBuilder.postTags("</span>");
    sourceBuilder.highlighter(highlightBuilder);
    // 分页
    sourceBuilder.from(pageNo);
    sourceBuilder.size(pageSize);
    // 执行搜索
    searchRequest.source(sourceBuilder);
    SearchResponse searchResponse = restHighLevelClient.search(searchRequest, RequestOptions.DEFAULT);
    // 解析结果
    List<Map<String, Object>> list = new ArrayList<>();
    for (SearchHit documentFields : searchResponse.getHits().getHits()) {

        Map<String, HighlightField> highlightFields = documentFields.getHighlightFields();
        HighlightField title = highlightFields.get("title");
        Map<String, Object> sourceAsMap = documentFields.getSourceAsMap();  // 原来的结果!
        // 解析高亮的字段,将原来的字段换为我们高亮的字段即可!
        if (title != null) {

            String n_title = "";
            Text[] fragments = title.fragments();
            for (Text text : fragments) {

                n_title += text;
            }
            sourceAsMap.put("title", n_title); // 高亮字段替换掉原来的内容即可!
        }
        list.add(sourceAsMap);
    }
    return list;
}
修改html
<!--标题-->
<p class="productTitle">
    <a v-html="result.title"></a>
</p>
智能推荐
【已解决可更新】VS2008 写入位置 0xCDCDCDCD 时发生访问冲突_vs写入位置时发生访问冲突怎么解决-程序员宅基地
文章浏览阅读1k次。VS2008项目中的变量初始化很关键_vs写入位置时发生访问冲突怎么解决
css从左到右弹出的效果,Vue transition实现从屏幕右边往左进入过渡效果-程序员宅基地
文章浏览阅读1.8k次。想要实现这个div.good从右往左出现到屏幕的过渡效果,实现不了,我觉得应该是css的问题,不知道怎么修改。代码如下:标签内的js代码可忽略。 export default {props: {food: {type: Object}},data () {return {showFlag: false};},methods: {show () {this.showFlag = t..._vue transition hover时从左向右渐进
数学笔记:FFT(快速傅里叶变换)_快速傅里叶变换fft公式-程序员宅基地
文章浏览阅读7.8k次,点赞21次,收藏124次。0 前言FFT是一个很厉害的算法,几乎任何和信号处理有关的算法都依赖于FFT0.1 引入:多项式的系数表示法我们从一个简单的问题中引入FFT:给定两个多项式,我们希望去计算二者的乘积中学的时候我们学过,展开相乘就可以了但是在计算机里面,一个很重要的问题是,如何存储一个多项式?显然,最自然的方法就是存储多项式的系数,我们把系数映射到一个列表中,这样列表中第k个数字正好对应第k阶系数——>这种表示方法,即是多项式的系数表示法一般来说,给定两......_快速傅里叶变换fft公式
dom4j 最常用最简单的用法_element root = document.getdocumentelement();-程序员宅基地
文章浏览阅读9.2k次,点赞5次,收藏15次。要使用dom4j读写XML文档,需要先下载dom4j包,dom4j官方网站在 http://www.dom4j.org/目前最新dom4j包下载地址:http://nchc.dl.sourceforge.net/sourceforge/dom4j/dom4j-1.6.1.zip解开后有两个包,仅操作XML文档的话把dom4j-1.6.1.jar加入工程就可以了,如果需要使用XPath的_element root = document.getdocumentelement();
通过Flex布局设置水平垂直居中_flex布局水平垂直居中-程序员宅基地
文章浏览阅读1.9w次,点赞4次,收藏5次。效果如下:实现代码:通过给父元素设置CSS样式:display:flex;align-items:center;justify-content:center;//HTML<div class='box'> <div class='box-item'> </div></div>//css.box{..._flex布局水平垂直居中
如何实现音频变速不变调、变调不变速、变速又变调?_qt的音频倍速,怎么才能让其音色不变化呢-程序员宅基地
文章浏览阅读3.1k次。SoundTouch,Sonic实现音频变速和变调处理_qt的音频倍速,怎么才能让其音色不变化呢
随便推点
rxjava : Completable # andThen_completable andthen-程序员宅基地
文章浏览阅读932次。Completable # andThen() 源码:先订阅Completable,再订阅 ObservableSource 、 Publisher 、 SingleSource 、 MaybeSource 、 CompletableSource ,并返回新的Observable、Flowable、Single、Maybe、Completable来自此Completable的【错误事..._completable andthen
开发者数量2025年预计破亿,TypeScript受欢迎度飙升:GitHub最新年度报告-程序员宅基地
文章浏览阅读244次。转载:机器之心报道编辑:杜伟、蛋酱2020 年的 GitHub Octoverse 报告,比往年来得稍微晚了一些。虽迟但到,2020 年 GitHub 年度 Octoverse 报告终于..._typescript使用量增长曲线
VC++中的Win32 Application和Win32 Console Application区别_visual 的 win32 application 和win32 console applicat-程序员宅基地
文章浏览阅读722次。Win32 Application和Win32 Console Application 都是工作在32位Windows环境的程序。 其中Win32 Application 就是普通的常见的窗口应用程序,当然有的界面做得比较个性化,比如圆形的、不规则形状的…… 它们都是所谓的GUI(Graphics User Interface图形用户接口),我们可以通过鼠标点击来完成控制。 Win32_visual 的 win32 application 和win32 console application
Python如何读取pkl文件_如何将pkl加载dataload-程序员宅基地
文章浏览阅读5.5w次,点赞10次,收藏27次。以mnist.pkl为例 方法一: 然而我的还是会出现EOFError,无解,郁闷方法二: dataset=’mnist.pkl’ datasets = load_data(dataset) train_set_x, train_set_y = datasets[0] valid_set_x, valid_set_y = datasets[1] test_set_x, test_s_如何将pkl加载dataload
STA环境_generate clock与与源时钟是同步的吗-程序员宅基地
文章浏览阅读665次。STA环境只要是对约束的精确设定,包括时钟、IO时序特征以及一些时序路径等设置。注意:STA只能针对同步电路,对异步电路是无能为力的。下面主要讲述create_clock、clock_generate_clock、create_clock主要用来设置时钟源端。create_clock_uncertainty包含了jitter和其他悲观因素。约束条件更加严苛,使得电路更加稳健。在时序分析中,悲观就是安全。source latency的min max设置可分别应用于setup与ho._generate clock与与源时钟是同步的吗
c语言程序中小括号"()"和大括号"{}"的本质是什么,C程序中,用一对大括号{}括起来的多条语句称为复合语句,复合语句在语法上被认为是一条语句。...-程序员宅基地
文章浏览阅读3.5k次。C程序中,用一对大括号{}括起来的多条语句称为复合语句,复合语句在语法上被认为是一条语句。序中“经”是一种在理论体系建构上从现象界到本体界反推的逻辑。()用对语句条语句《中华人民共和国网络安全法》是我国第一部全面规范网络空间安全管理方面问题的基础性法律。国家倡导诚实守信、大括的多健康文明的网络行为,大括的多推动传播社会主义核心价值观,采取措施提高全社会的( )和水平,形成全社会共同参与促进网络安全..._c语言中的大括号和小括号