PXE自动化安装CentOS 8_centos8 pxe boot arp timeout-程序员宅基地
技术标签: PEX linux centos8 PXE自动化安装 linux PEX
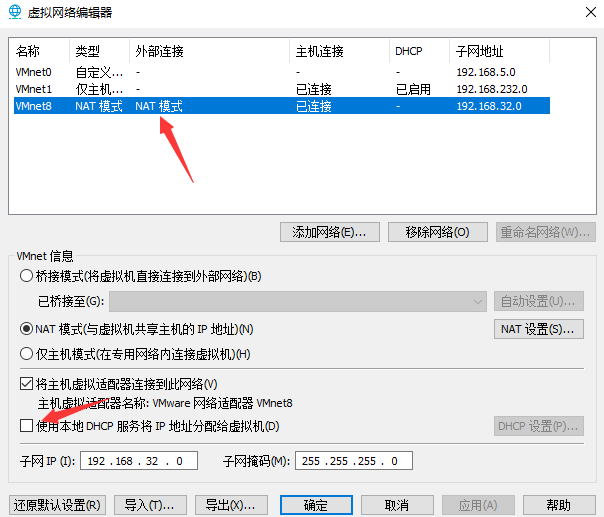
安装前准备:关闭防火墙和SELINUX,DHCP服务器静态IP。
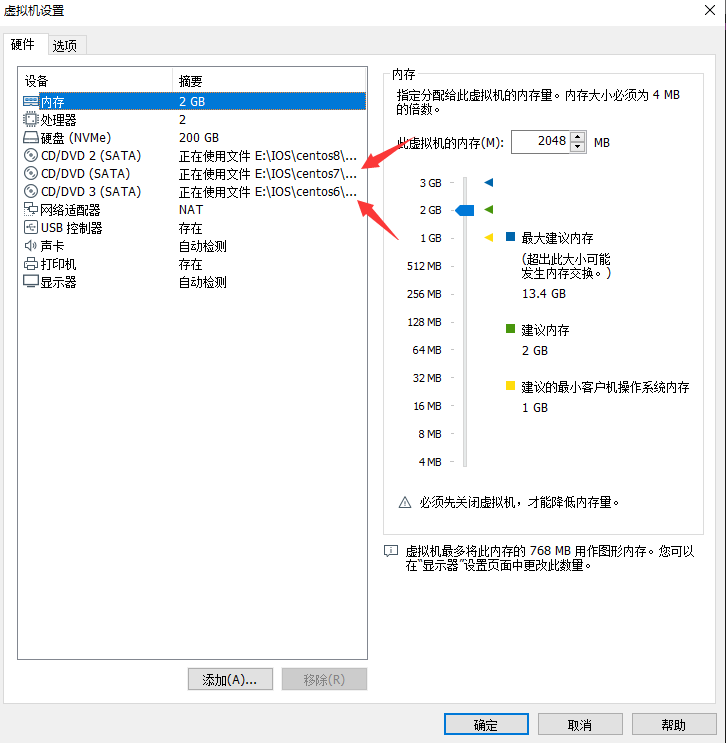
切勿用桥接模式 最好是NET模式而且把自动分配DHCP对勾取消。
查看防火墙和seelinux是否关闭
[root@centos8 ~]#firewall-cmd --state
not running
[root@centos8 ~]#getenforce
Disabled
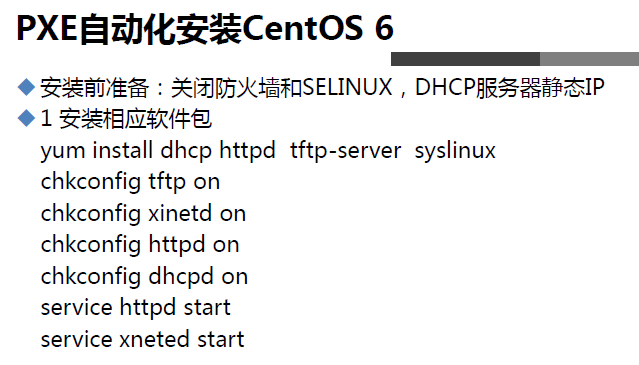
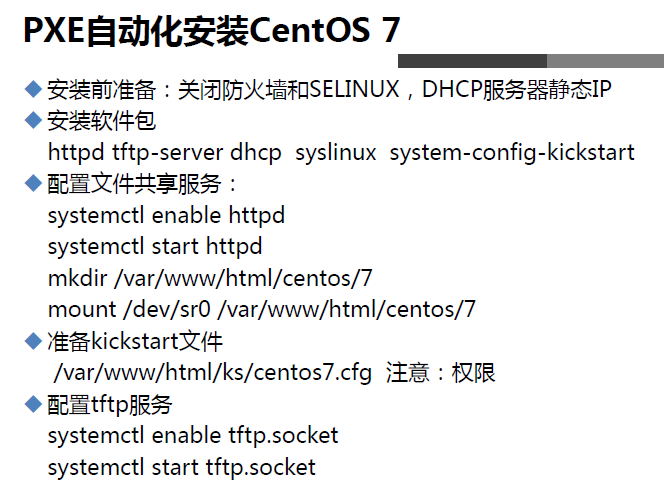
安装对应的软件包

安装syslinux的时候centos8和centos7存在一点不同在后面的后缀-nonlinux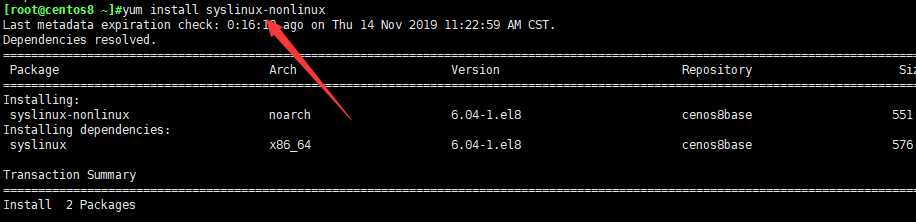
启动相应的三个服务 但是由于dhcp的文件配置还没有配置,所以这里起不来。

[root@centos8 ~]#ss -ntulp
查看对应端口号

可以正常访问,http服务正常
配置tftp服务
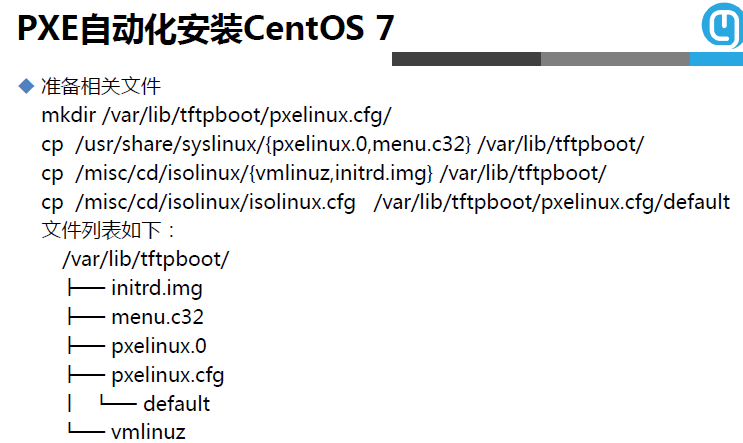
[root@centos8 ksdir]#cd /var/lib/tftpboot/
[root@centos8 tftpboot]#rpm -ql syslinux-nonlinux
查找对应的安装包文件。这里我们需要/usr/share/syslinux/menu.c32和/usr/share/syslinux/pxelinux.0
拷贝到 /var/lib/tftpboot/内
[root@centos8 tftpboot]#cp /usr/share/syslinux/menu.c32 .
[root@centos8 tftpboot]#cp /usr/share/syslinux/pxelinux.0 .
[root@centos8 tftpboot]#ls
menu.c32  pxelinux.0
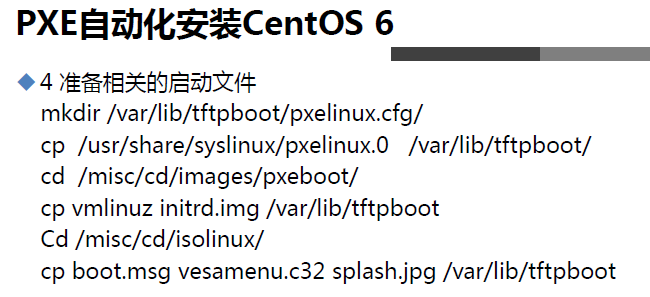
还需要对应的内核启动文件,这些文件在光盘里面有,可以直接拷贝过来
[root@centos8 tftpboot]#ls /var/www/html/centos/8/isos/x86_64/isolinux/
boot.cat  grub.conf   isolinux.bin  ldlinux.c32   libutil.c32  splash.png  vesamenu.c32
boot.msg  initrd.img  isolinux.cfg  libcom32.c32  memtest      TRANS.TBL   vmlinuz

[root@centos8 tftpboot]#cp /var/www/html/centos/8/isos/x86_64/isolinux/vmlinuz .
[root@centos8 tftpboot]#cp /var/www/html/centos/8/isos/x86_64/isolinux/initrd.img .
[root@centos8 tftpboot]#ls
initrd.img  menu.c32  pxelinux.0  vmlinuz
创建一个新的文件夹 pxelinux.cfg,里面用于放置菜单配置文件
[root@centos8 tftpboot]#mkdir pxelinux.cfg
[root@centos8 tftpboot]#cp /var/www/html/centos/8/isos/x86_64/isolinux/isolinux.cfg pxelinux.
pxelinux.0 pxelinux.cfg/
[root@centos8 tftpboot]#cp /var/www/html/centos/8/isos/x86_64/isolinux/isolinux.cfg pxelinux.
pxelinux.0 pxelinux.cfg/
[root@centos8 tftpboot]#cp /var/www/html/centos/8/isos/x86_64/isolinux/isolinux.cfg pxelinux.cfg/default
拷贝过来改名为default
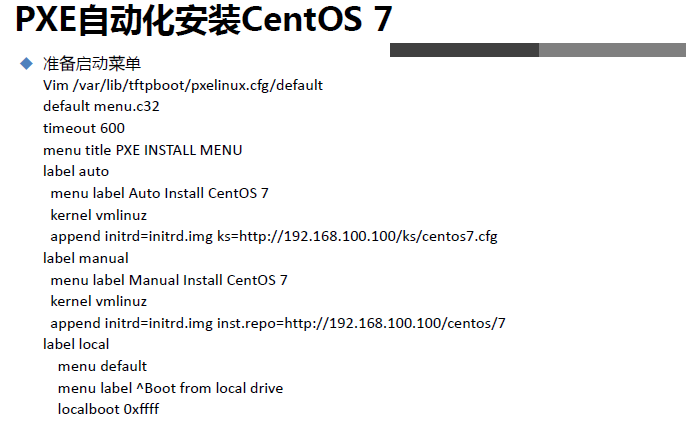
[root@centos8 tftpboot]#vim /var/lib/tftpboot/pxelinux.cfg/default
default menu.c32
timeout 600
menu title CentOS Linux 8
label linux
menu label ^Auto Install CentOS Linux 8.0 mini
kernel vmlinuz
append initrd=initrd.img ks=http://192.168.32.8/ksdir/ks8.cfg
label manual
menu label ^Manual Install CentOS Linux 8.0
kernel vmlinuz
append initrd=initrd.img inst.repo=http://192.168.32.8/centos/8/isos/x86_64/
menu separator # insert an empty line
label local
menu default
menu label Boot from ^local drive
localboot 0xffff
[root@centos8 tftpboot]#cp /var/www/html/centos/8/isos/x86_64/isolinux/ldlinux.c32 .
[root@centos8 tftpboot]#cp /var/www/html/centos/8/isos/x86_64/isolinux/libutil.c32 .
[root@centos8 tftpboot]#cp /var/www/html/centos/8/isos/x86_64/isolinux/libcom32.c32 .
centos 7上面以上三个可以不要  但是centos8上面对于上面三个文件有一定的依赖性,所以也要一起拷贝过来
[root@centos8 tftpboot]#tree
.
├── initrd.img
├── ldlinux.c32
├── libcom32.c32
├── libutil.c32
├── menu.c32
├── pxelinux.0
├── pxelinux.cfg
│   └── default
└── vmlinuz

1 directory, 8 files
到这里tftp服务就配置好了
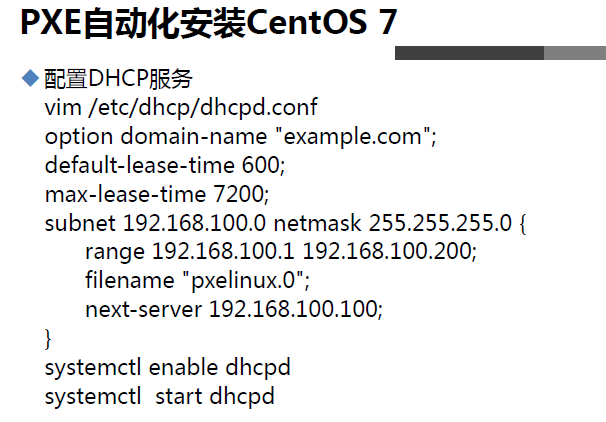
配置DHCP服务
[root@centos8 tftpboot]#systemctl start dhcpd
Job for dhcpd.service failed because the control process exited with error code.
See "systemctl status dhcpd.service" and "journalctl -xe" for details.
报错是因为没有配置/etc/dhcp/dhcpd.conf 这个文件暂时为空。需要复制参考文件
[root@centos8 tftpboot]#cp /usr/share/doc/dhcp-server/dhcpd.conf.example /etc/dhcp/dhcpd.conf
cp: overwrite '/etc/dhcp/dhcpd.conf'? y

[root@centos8 tftpboot]#vim /etc/dhcp/dhcpd.conf
# dhcpd.conf
#
# Sample configuration file for ISC dhcpd
#

# option definitions common to all supported networks...
option domain-name "example.org";
option domain-name-servers 180.76.76.76, 114.114.114.114;

default-lease-time 84600;
max-lease-time 100000;

# Use this to enble / disable dynamic dns updates globally.
#ddns-update-style none;

# If this DHCP server is the official DHCP server for the local
# network, the authoritative directive should be uncommented.
#authoritative;

# Use this to send dhcp log messages to a different log file (you also
# have to hack syslog.conf to complete the redirection).
log-facility local7;

# No service will be given on this subnet, but declaring it helps the
# DHCP server to understand the network topology.

# This is a very basic subnet declaration.

subnet 192.168.32.0 netmask 255.255.255.0 {

  range 192.168.32.100 192.168.32.200;
  option routers 192.168.32.2;
  next-server 192.168.32.8;
  filename "pxelinux.0";
}
~
重启服务即可
[root@centos8 ~]#systemctl restart dhcpd
[root@centos8 ~]#systemctl status dhcpd
● dhcpd.service - DHCPv4 Server Daemon
   Loaded: loaded (/usr/lib/systemd/system/dhcpd.service; enabled; vendor preset: disabled)
   Active: active (running) since Thu 2019-11-14 14:12:29 CST; 5s ago
     Docs: man:dhcpd(8)
           man:dhcpd.conf(5)
 Main PID: 10692 (dhcpd)
   Status: "Dispatching packets..."
    Tasks: 1 (limit: 11377)
   Memory: 5.1M
   CGroup: /system.slice/dhcpd.service
           └─10692 /usr/sbin/dhcpd -f -cf /etc/dhcp/dhcpd.conf -user dhcpd -group dhcpd --no-pid

Nov 14 14:12:29 centos8 dhcpd[10692]: ** Ignoring requests on virbr0.  If this is not what
Nov 14 14:12:29 centos8 dhcpd[10692]: you want, please write a subnet declaration
Nov 14 14:12:29 centos8 dhcpd[10692]: in your dhcpd.conf file for the network segment
Nov 14 14:12:29 centos8 dhcpd[10692]: to which interface virbr0 is attached. **
Nov 14 14:12:29 centos8 dhcpd[10692]:
Nov 14 14:12:29 centos8 dhcpd[10692]: Listening on LPF/eth0/00:0c:29:fe:da:42/192.168.32.0/24
Nov 14 14:12:29 centos8 dhcpd[10692]: Sending on   LPF/eth0/00:0c:29:fe:da:42/192.168.32.0/24
Nov 14 14:12:29 centos8 dhcpd[10692]: Sending on   Socket/fallback/fallback-net
Nov 14 14:12:29 centos8 dhcpd[10692]: Server starting service.
Nov 14 14:12:29 centos8 systemd[1]: Started DHCPv4 Server Daemon.
[root@centos8 ~]#
PEX自动化安装就配置好了
安装新系统
现在去安装一个新的centos8的系统
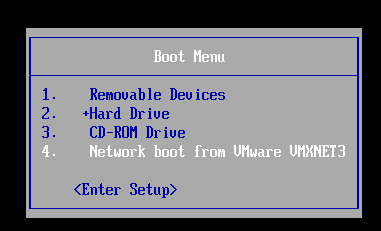
选择菜单
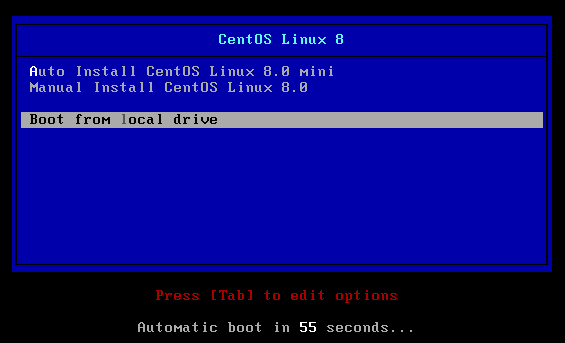
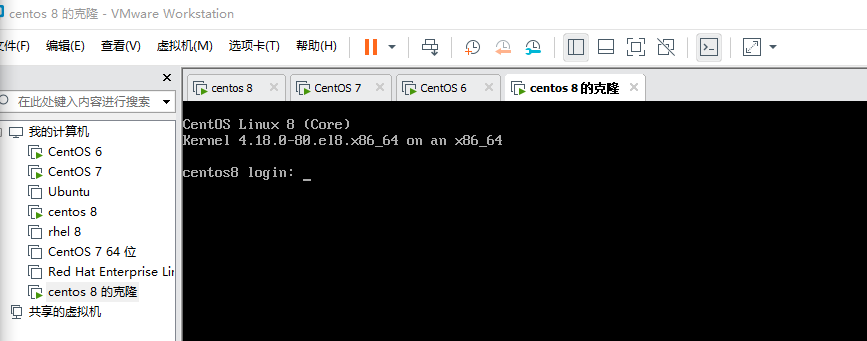
安装成功
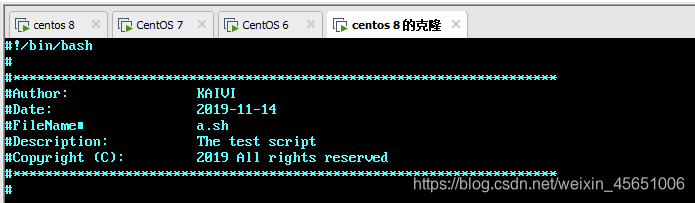
脚本运行成功
扩展同时配置加载安装centos6 和 centos 7
需要安装什么系统,对应的光盘同样需要挂载上去
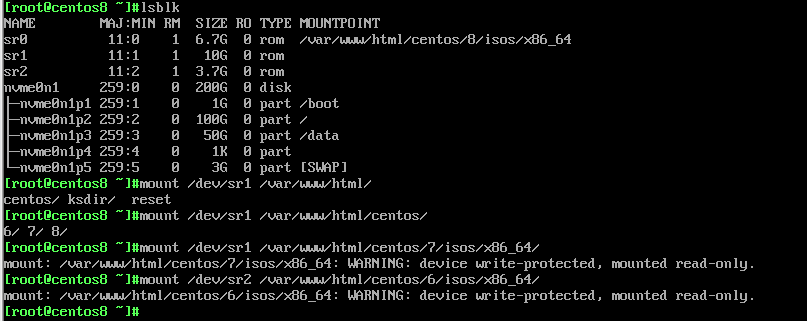
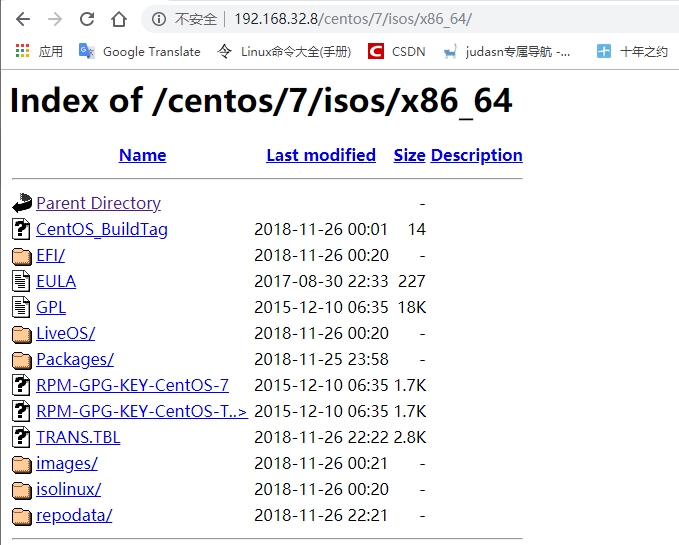
查看web服务器上是否挂载

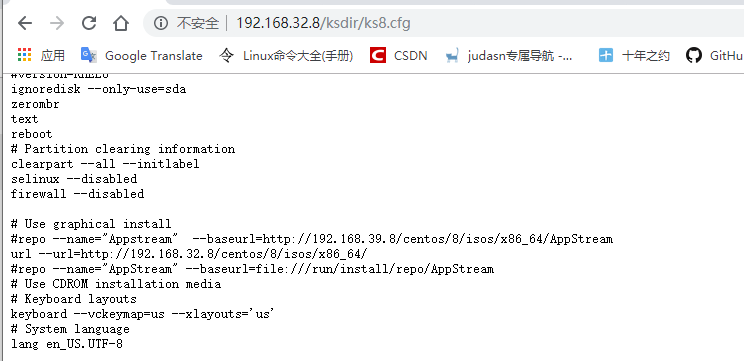
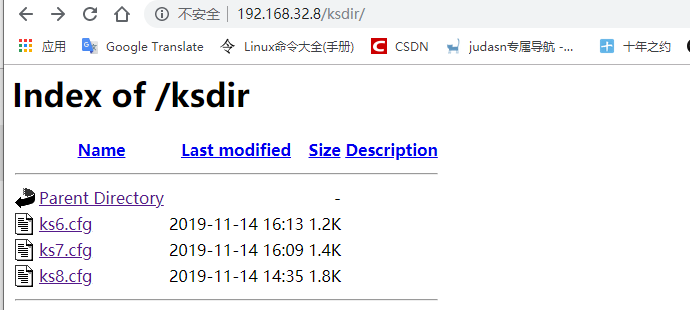
现在配置应答文件,这里用之前已经做好的应答文件
[root@centos8 html]#cd /var/www/html/
[root@centos8 html]#ls
centos  ksdir  reset
[root@centos8 html]#cd ksdir/
[root@centos8 ksdir]#ls
ks8.cfg
[root@centos8 ksdir]#rz -E
rz waiting to receive.
[root@centos8 ksdir]#ls
ks6.cfg  ks7.cfg  ks8.cfg
修改对应的应答文件 特别是注意路径
[root@centos8 ksdir]#vim ks7.cfg
[root@centos8 ksdir]#vim ks6.cfg
[root@centos8 ksdir]#ll
-rw-r--r-- 1 root root 1235 Nov 14 16:13 ks6.cfg
-rw-r--r-- 1 root root 1435 Nov 14 16:09 ks7.cfg
-rw-r--r-- 1 root root 1805 Nov 14 14:35 ks8.cfg
在网页需要分别能打开对应的应答文件,不然就是权限问题 需要设置一下权限
设置tftp配置文件
[root@centos8 tftpboot]#ls
initrd.img  ldlinux.c32  libcom32.c32  libutil.c32  menu.c32  pxelinux.0  pxelinux.cfg  vmlinuz
创建分别放置不同操作系统的目录6 7 8.用来放置不同的内核文件
[root@centos8 tftpboot]#mkdir {6,7,8}
[root@centos8 tftpboot]#mv vmlinuz initrd.img 8/

[root@centos8 tftpboot]#cp /var/www/html/centos/7/isos/x86_64/isolinux/vmlinuz ./7/
[root@centos8 tftpboot]#cp /var/www/html/centos/7/isos/x86_64/isolinux/initrd.img ./7/


[root@centos8 tftpboot]#cp /var/www/html/centos/6/isos/x86_64/isolinux/vmlinuz ./6/
[root@centos8 tftpboot]#cp /var/www/html/centos/6/isos/x86_64/isolinux/initrd.img ./6/
[root@centos8 tftpboot]#tree
.
├── 6
│   ├── initrd.img
│   └── vmlinuz
├── 7
│   ├── initrd.img
│   └── vmlinuz
├── 8
│   ├── initrd.img
│   └── vmlinuz
├── ldlinux.c32
├── libcom32.c32
├── libutil.c32
├── menu.c32
├── pxelinux.0
└── pxelinux.cfg
    └── default

4 directories, 12 files
修改菜单项 注意路径 是相对路径
[root@centos8 tftpboot]#vim pxelinux.cfg/default

default menu.c32
timeout 600

menu title CentOS Linux

label linux8
  menu label Auto Install CentOS Linux ^8.0 mini
  kernel 8/vmlinuz
  append initrd=8/initrd.img ks=http://192.168.32.8/ksdir/ks8.cfg

label linux7
  menu label Auto Install CentOS Linux ^7.0 mini
  kernel 7/vmlinuz
  append initrd=7/initrd.img ks=http://192.168.32.8/ksdir/ks7.cfg

label linux6
  menu label Auto Install CentOS Linux ^6.0 mini
  kernel 6/vmlinuz
  append initrd=6/initrd.img ks=http://192.168.32.8/ksdir/ks6.cfg


label manual
  menu label Manual Install CentOS Linux 8.0
  kernel vmlinuz
  append initrd=initrd.img inst.repo=http://192.168.32.8/centos/8/isos/x86_64/

menu separator # insert an empty line


label local
   menu default
  menu label Boot from ^local drive
  localboot 0xffff
参考文献如下
智能推荐
SQL Server修改数据-程序员宅基地
文章浏览阅读1.6w次,点赞2次,收藏22次。SQL Server 修改数据的相关语句
前端工程与性能优化-程序员宅基地
文章浏览阅读881次。前端工程与性能优化 · Issue #3 · fouber/blog https://github.com/fouber/blog/issues/3
yolov5测试单张图片-程序员宅基地
文章浏览阅读4.1k次,点赞2次,收藏20次。yolov5测试单张图片,返回一个列表[类别,置信度,x,y,w,h]from numpy import randomimport torchfrom models.experimental import attempt_loadfrom utils.datasets import LoadStreams, LoadImagesfrom utils.general import ( check_img_size, non_max_suppression, apply_classifier_yolov5测试单张图片
SQL做的能改成Oracle吗,从SQL改写到SQL重写,什么样的SQL才是好SQL?(黄浩)-程序员宅基地
文章浏览阅读88次。从SQL改写到SQL重写,什么样的SQL才是好SQL?黄浩 2016-12-14 10:02:26作者介绍黄浩,现任职于中国惠普,从业十年,始终专注于SQL。十年一剑,十年磨砺。3年通信行业,写就近3万条SQL;5年制造行业,遨游在ETL的浪潮;2年性能优化,厚积薄发自成一家。在生活中,很多时候我们会有这样的体悟:问题要么不出,一旦出现,会像多诺米骨牌一样,会连锁引发诸多相关问题,让我们疲于应付。..._黄浩 sql
.NET 学习教程下载地址_.net课程下载-程序员宅基地
文章浏览阅读578次,点赞2次,收藏2次。==============================================================================================================教程&电子书==============================================================================================================C#入门经典_.net课程下载
STM32F7 + FREERTOS + LWIP 接收数据从网卡到应用层完整流程_stm32f7 lwip-程序员宅基地
文章浏览阅读3.8k次,点赞2次,收藏8次。来来来,这里解释下从网卡PHY到IP层的数据接收流程:这里是以函数调用方式来体现:netif_add——》ethernetif_init——》low_level_init——》ethernetif_input——》low_level_input和tcpip_input——》ethernet_input——》ip4_input(etharp_input、pppoe_disc_input)——》udp..._stm32f7 lwip
随便推点
UNITY中判断两个点之间距离的方法_unity 判断两个距离-程序员宅基地
文章浏览阅读3.1k次,点赞3次,收藏4次。Vector3.SqrMagnitude与Vector3.Distance_unity 判断两个距离
Idea设置未使用的方法,变量的提示颜色_idea 更改未使用变量的颜色-程序员宅基地
文章浏览阅读2.8w次,点赞6次,收藏14次。修改未被调用的变量,方法的提示,方便观赏代码_idea 更改未使用变量的颜色
在Linux系统下C语言编译过程的四个步骤_linux下编写一个c程序的基本过程分为几部分?-程序员宅基地
文章浏览阅读2.7k次,点赞7次,收藏23次。1. 简介C语言程序从源代码到可执行文件(二进制文件)都经历了那些过程?本文以Linux下C语言的编译过程为例,讲解C语言程序的编译过程。以hello.c文件为例:#include <stdio.h>int main(){ printf("hello world!\n");}在linux下编译C程序:$ gcc hello.c -o hello # 编译$ ./hello # 执行hello world! # 输出文本2. 编译的步骤gcc命令编译C语言的过程中_linux下编写一个c程序的基本过程分为几部分?
pyqt5界面开发-制作程序集合桌面-基本的框架_用pyqt做程序集合的界面-程序员宅基地
文章浏览阅读340次。pyqt5界面开发-制作多个小程序-基本的框架和思路最近现在无事,看到了电脑桌面,又想到了最近入门的pyqt5,再看看以往的程序,想到了可不可以做一个集成的UI桌面_用pyqt做程序集合的界面
对网站商城源码的研究分析 分享大量源码下载_chengren 电影-程序员宅基地
文章浏览阅读2k次。第一部分(1-6):前端纯静态网页模板无后台+大量网站设计素材 1:PC模板: 9900套响应式html5+css3网页模板【页面齐,二级,三级页均有,含中文模板】 2:PSD模板:3000套PSD模板+600套Flash酷站源文件+千套矢量ICO图标 3:手机模板:2000套各行业中文手机..._chengren 电影
ORA-39143: 转储文件 "F:\ora10G_expdp\ic_price_fromlufang.dmp" 可能是原始的导出转 储文件...-程序员宅基地
文章浏览阅读441次。连接到: Oracle Database 10g Enterprise Edition Release 10.2.0.1.0 - ProductionWith the Partitioning, OLAP and Data Mining optionsORA-39001: 参数值无效ORA-39000: 转储文件说明错误ORA-39143: 转储文件 "F:\ora10G_expdp\ic_pri..._ora39143