VIM插件离线安装与配置(taglist,airliner,gutentags,LeaderF,gtags,AutoComplPop,omnicppcomplete,fzf,Rg)_离线安装vim-程序员宅基地
技术标签: vim
VIM插件离线安装与配置
- 1.VIM 插件离线安装与配置
- 2.vim8安装
- 3. vimrc通用配置
- 4.插件管理([vim-plug](https://github.com/junegunn/vim-plug.git))
- 5.标签列表插件([taglist](https://github.com/vim-scripts/taglist.vim))
- 6.快速注释插件([nerdcommenter](https://github.com/preservim/nerdcommenter))
- 7. 状态栏([airline](https://github.com/vim-airline/vim-airline))
- 8. 自动异步生成tags插件([gutentags](https://github.com/ludovicchabant/vim-gutentags))
- 9. 异步模糊查找([LeaderF](https://github.com/Yggdroot/LeaderF))
- 10. 索引跳转插件([gtags](https://www.gnu.org/software/global/))
- 11. c/c++ 语法高亮([cpp-enhanced-highlight](https://github.com/octol/vim-cpp-enhanced-highlight))
- 12. 自动补全([AutoComplPop](https://github.com/vim-scripts/AutoComplPop))
- 13. 结构体补全([omnicppcomplete](http://www.vim.org/scripts/script.php?script_id=1520))
- 14 字符串/文件模糊查找([ripgrep](https://github.com/BurntSushi/ripgrep),[fzf.vim](https://github.com/junegunn/fzf.vim))
- 15. 括号匹配插件([auto-pairs](https://github.com/jiangmiao/auto-pairs))
- 16. 自动保存([auto-save](https://github.com/907th/vim-auto-save))
1.VIM 插件离线安装与配置
- 看了很多vim的安装贴(这里特别感谢知乎韦易笑大部分文献都参考于他),基本都是基于github或者网络才能安装。对于一些离线安装的同学非常不友好,小白就更别说了。
- 本贴将提供安装包和安装步骤,以及配置尽量手把手的教大家安装vim插件。
- 本帖提供git(白嫖方式)和安装包(投币方式)安装方式
环境:Ubuntu 16.04
VIM:vim 8.x
1.1 离线包
- 更新于20200510:离线全安装包1.0
- 包含:
- vim82.zip
- vim-plug-master.zip,异步插件管理
- taglist.vim.zip,标签列表插件
- nerdcommenter-master.zip,快速注释插件
- vim-airline-master.zip,状态栏插件
- vim-gutentags-master.zip,异步生成tags插件
- LeaderF-master_4991.zip,异步模糊查找插件
- global-6.6.4.tar.gz,gutentags_plus-master.zip,索引跳转插件
- vim-cpp-enhanced-highlight-master.zip,语法高亮插件
- AutoComplPop-master.zip,自动补全插件
- 包含:
- 更新于20200922:离线全安装包2.0
- 新增:
- omnicppcomplete-0.41.zip,结构体补全插件
- ripgrep_11.0.2_amd64.deb,fzf.vim-master.zip,fzf-master.zip异步模糊查找文件,字符串插件
- 新增:
- 更新于20201219:离线全安装包3.0
- 新增:
- vim-auto-save-master.zip, 自动保存插件
- auto-pairs-master.zip,括号匹配插件
- 新增vimrc通用配置:
- 自动去除尾行空格和tab。
- 搜索时默认不区分大小写,只有搜索关键字中出现一个大字母时才区分大小写。
- 在vim中打开终端。
- 新增:
- 更新于20230320:
- 新增:
- 开QuickFix窗口选择后自动关闭的方法(详情查看,3.vimrc通用配置或添加gutentags_plus,vimrc配置)。
- 解决global(gtags)不跟踪某些目录和文件的方法(详情查看,global跳过目录或文件不扫描&跟踪)。
- 解决异步生成GTAGS时,退出在进入报
gutentags: gutentags: gtags-cscope job failed, returned: 1,导致gtags无法使用。(详情查看,生成GPATH,GRTAGS,GTAGS三个文件过程中意外退出出现如下报错)。
- 新增:
2.vim8安装
VIM:vim 8.x
2.1.查看vim版本
:~# vim --version
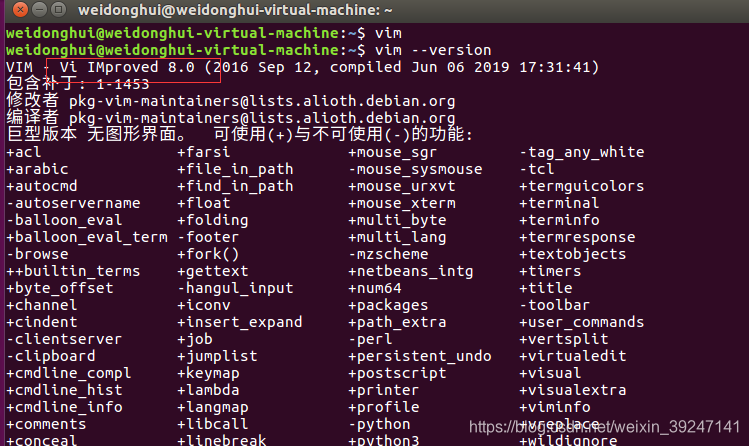
- 版本必须大于 vim 8.0(因为我曾经apt update过,不过我经常用的版本是8.2),小于这个版本有些插件可能不兼容,特别是如果需要安装YouCompleteMe,vim需要7.4.**(具体是几忘了)以上,并支持python2.6 or 3.4以上,索性直接安装vim8.2。
- 离线下载方式:vim-8.2安装包
- (vim安装扩展)
2.2.vim下载
- git下载方式:
git clone https://github.com/vim/vim.git
- apt方式下载:
sudo add-apt-repository ppa:jonathonf/vim
sudo apt update
sudo apt install vim
2.3 vim安装步骤
- 解压vim-plugin
cd ~ && unzip ~/vim_plugin.zip
unzip ~/vim_plugin/vim_plugin.zip
- 解压vim82zip
unzip ~/vim_plugin/vim82.zip
- 解压vim-8.2.tar.bz2:
tar -jxvf vim-8.2.tar.bz2
- 根据自己习惯新建一个文件夹放vim82源码:
mkdir -p ~/.code_vim82
- 配置环境以及指定安装目录,注意这里不能用相对路径不然会报错。
cd ./vim82
make distclean
//python配置
./configure --prefix=/home/weidonghui/.code_vim82 \
--enable-pythoninterp=yes \
--with-python-config-dir=/usr/lib/python2.7/config-x86_64-linux-gnu

//python3配置
./configure --enable-multibyte \
--enable-python3interp=yes \
--with-python3-config-dir=/usr/lib/python3.5/config-3.5m-x86_64-linux-gnu \
--enable-perlinterp=yes \
--with-python3-command=/usr/bin/python3 \
--prefix=/home/weidonghui/.code_vim82
configure 其他配置可以参看:INSTALL
- 如果出现以下报错说明缺少ncurses库请,
sudo apt-get install libncurses5-dev安装。
checking for tgetent()... configure: error: NOT FOUND!
      You need to install a terminal library; for example ncurses.
      Or specify the name of the library with --with-tlib.
这个安装包已经把决大多数依赖包对放在里面了。但是不同的环境可能依赖会不一样,请认真的查看报错,百度解决。
-
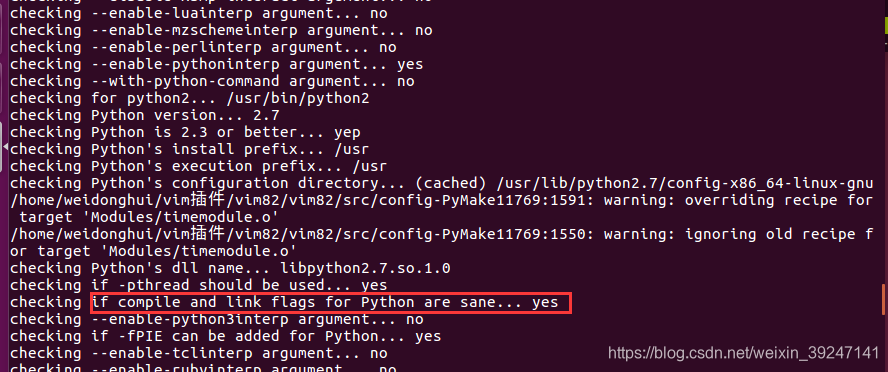
Python安装配置情况
if compile and link flags for Python are sane... yes出现这句话证明支持python,没有这句话,则安装出来的vim不支持python。
-
编译与安装
make
sudo make install
-
这个时候其实已经可以用了可以通过
~/.code_vim82/bin/vim验证
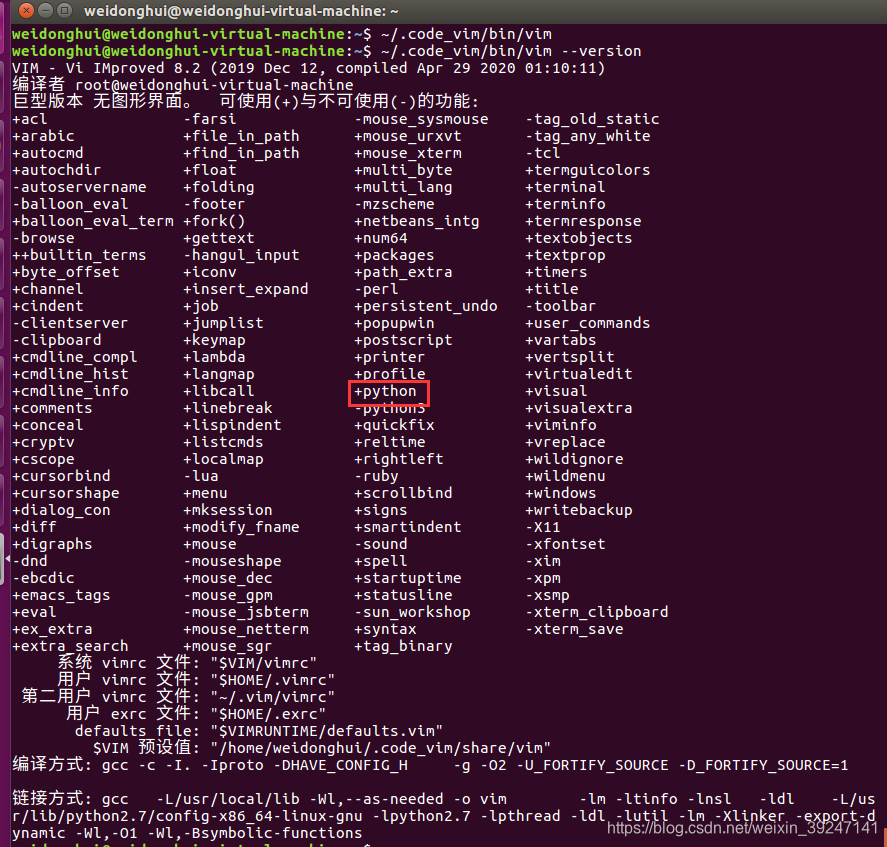
-
配置环境变量,我们直接
vim --version发现还是自己原来的vim,这是没有配置环境变量导致的。这里给出一种解决办法。适用于非root用户和root用户。在~/.bashrc中添加vim的环境路径,注意必须添加到$PATH的前面,这样打开vim就优先找自己安装的版本。注意:关闭窗口在打开才有效。
vim ~/.bashrc
export PATH="/home/weidonghui/.code_vim82/bin/:$PATH"
- 这个时候你会发现vi和vim打开的版本可能不一样我们可以利用软连接将vi和vim开的版本变成一致的。注意:
关闭窗口在打开才有效。
cd ~/.code_vim82/bin
ln -s vim vi
3. vimrc通用配置
"通用配置
syntax on  " 开启语法高亮
colorscheme peachpuff "vim配置方案
set number  " 显示行号
set hls "搜索时高亮显示被找到的文本
set scrolloff=3 " 上下可视行数
set incsearch   " 搜索时高亮显示被找到的文本
set ignorecase smartcase "搜索时默认不区分大小写,只有搜索关键字中出现一个大字母时才区分大小写
set enc=utf-8  "编码设置
set fileencodings=ucs-bom,utf-8,cp936,gb18030,big5,euc-jp,euc-kr,latin1 "编码自动识别
set mouse=n "鼠标普通模式
" set cursorline "选中行出现下划线
set autowriteall "可使切换文件时,修改的文件被自动保存
set autoread "打开文件监视。如果在编辑过程中文件发生外部改变(比如被别的编辑器编辑了),就会发出提示。
set hidden  " 允许在有未保存的修改时切换缓冲区,此时的修改由 vim 负责保存
map qq :qa!<CR> "多窗口不保存关闭
map ww :wqa!<CR> "多窗口保存关闭
"vim自动打开跳到上次的光标位置
if has("autocmd")
        au BufReadPost * if line("'\"") > 1 && line("'\"") <= line("$") | exe "normal! g'\"" | endif
endif
set nocompatible  "设置backspace的工作方式
set backspace=indent,eol,start " 设置backspace的工作方式
" 自动去除尾行空格和tab
" From: Vigil <vim5632@rainslide.net>
function RemoveTrailingWhitespace()
    if &ft != "diff"
        let b:curcol = col(".")
        let b:curline = line(".")
		"去掉每一尾行的空格和Tab
		silent! %s/\s\+$//
		"去掉文件最后无内容的行尾
		" silent! %s/\(\s*\n\)\+\%$//
        call cursor(b:curline, b:curcol)
    endif
endfunction
" autocmd BufWritePre * call RemoveTrailingWhitespace()
" TAB会被显示成 >— 而行尾多余的空白字符显示成 -
map <silent> <C-L> :ter<CR> "在vim内终端
set listchars=tab:>-,trail:-
map <silent> <F5> :set list<CR> " 显示空格和tab
map <silent> <F6> :set list!<CR> " 取消显示空格和tab
map <silent> <F3> <leader>cq<CR> " 手动关闭QuickFix窗口
autocmd FileType qf nnoremap <silent> <CR> <CR>:cclose<CR> "打开QuickFix窗口选择后自动关闭
4.插件管理(vim-plug)
4.1.插件下载
- git下载方式
git clone https://github.com/junegunn/vim-plug.git ~/.vim/autoload
- 离线的同学点这里vim-plug安装包
4.2.插件安装步骤
4.2.1 解压vim-plug-master.zip
cd ~ && unzip ~/vim_plugin.zip
unzip ~/vim_plugin/vim-plug-master.zip
4.2.2 将下载好的plug.vim放到autoload
mkdir -p ~/.vim/autoload
cp -rf vim-plug-master/plug.vim ~/.vim/autoload/
4.2.3 在.vimrc中添加配置
call plug#begin('~/.vim/plugged')
"plug插件管理,全异步安装,不仅支持在线安装,更支持下载好的离线包直接安装。
"且安装完后,可以注释掉相关指令很方便的关闭对应插件。下面基本都是离线安装的例子
"Plug 'vim-scripts/vim-gutentags'
call plug#end()
4.2.4 打开vim在命令行模式下输入:PluginInstall(离线的同学可以忽略,不需要管)

5.标签列表插件(taglist)
taglist 依赖ctags。离线的同学搜一下自行安装。
sudo apt-get install ctags
5.1.效果预览
- 优点可以在列表中看到函数定义,函数声明,全局变量,宏定义。
- 可以通过鼠标或者ctrl +ww跳转到Tlist列表选择函数跳转到该函数定义。

5.2.安装步骤
5.2.1 下载
- git下载方式
git clone https://github.com/vim-scripts/taglist.vim
- 安装包方式(taglist安装包)
5.2.2 解压安装包
cd ~ && unzip ~/vim_plugin.zip
cd ~/.vim/plugged
unzip ~/vim_plugin/taglist.vim.zip
5.2.3 部署
- 打开.vimrc添加以下指令
call plug#begin('~/.vim/plugged')
Plug 'vim-scripts/taglist.vim' "Tlist标签列表插件
call plug#end()
5.2.3 添加vimrc配置
"Tlist插件配置
let Tlist_Show_One_File           = 1 " 只显示当前文件的tags
"let Tlist_Auto_Open			  = 1 " 打开vim自动打开Tlist
"let Tlist_GainFocus_On_ToggleOpen = 1 " 打开Tlist窗口时,光标跳到list窗口
let Tlist_Exit_OnlyWindow         = 1 " 如果Tlist窗口是最后一个窗口则退出Vim
let Tlist_Use_Left_Window         = 1 " 在左侧窗口中显示
let Tlist_File_Fold_Auto_Close    = 1 " 自动折叠
let Tlist_Auto_Update             = 1 " 自动更新
" <F4> 打开 Tlist 窗口,在左侧栏显示
map <F4> :TlistToggle<CR>
6.快速注释插件(nerdcommenter)
- .c,Makefile,vimrc等都有效
6.1 效果预览

6.2 安装步骤
6.2.1 下载
- git下载方式
git clone https://github.com/preservim/nerdcommenter
- (nerdcommenter)安装包下载
6.2.2 解压安装包
cd ~ && unzip ~/vim_plugin.zip
cd ~/.vim/plugged
unzip ~/vim_plugin/nerdcommenter-master.zip
6.2.3 部署
- 打开.vimrc添加以下指令
call plug#begin('~/.vim/plugged')
Plug 'vim-scripts/nerdcommenter-master' "nerdcommenter快速注释插件
call plug#end()
6.2.4 添加vimrc配置
"nerdcommenter插件快速注释
let g:NERDSpaceDelims            = 1      " 在注释符号后加一个空格
let g:NERDCompactSexyComs        = 1      " 紧凑排布多行注释
let g:NERDDefaultAlign           = 'left' " 逐行注释左对齐
let g:NERDAltDelims_java         = 1      " JAVA 语言使用默认的注释符号
let g:NERDCustomDelimiters       = {
    'c': {
    'left': '/*', 'right': '*/'}} " C 语言注释符号
let g:NERDCommentEmptyLines      = 1      " 允许空行注释
let g:NERDTrimTrailingWhitespace = 1      " 取消注释时删除行尾空格
let g:NERDToggleCheckAllLines    = 1      " 检查选中的行操作是否成功
map <F12> <plug>NERDCommenterSexy         " 选中注释
map <c-F12> <plug>NERDCommenterUncomment  " 选中取消注释
7. 状态栏(airline)
- 显示当前文件名及路径,总行数,当前光标行数等
- 多文件间切换
7.1 效果预览

- 文件切换注意看上半部分

7.2 安装步骤
7.2.1 下载
- git下载方式
git clone https://github.com/vim-airline/vim-airline.git
- (airline)安装包下载
7.2.2 解压安装包
cd ~ && unzip ~/vim_plugin.zip
cd ~/.vim/plugged
unzip ~/vim_plugin/vim-airline-master.zip
7.2.4 添加环境变量
export TERM=xterm-256color
7.2.3 部署
- 打开.vimrc添加以下指令
call plug#begin('~/.vim/plugged')
Plug 'vim-scripts/vim-airline-master' "airline状态栏
call plug#end()
7.2.4 添加vimrc配置
"airline状态栏配置
"这个是安装字体后 必须设置此项"
let g:airline_powerline_fonts = 1

"打开tabline功能,方便查看Buffer和切换,省去了minibufexpl插件
let g:airline#extensions#tabline#enabled = 1
let g:airline#extensions#tabline#buffer_nr_show = 1

let g:airline#extensions#tabline#formatter = 'unique_tail'

" " 关闭状态显示空白符号计数
let g:airline#extensions#whitespace#enabled = 0
let g:airline#extensions#whitespace#symbol = '!'
" " 设置consolas字体"前面已经设置过
" " set guifont=Consolas\ for\ Powerline\ FixedD:h11
if !exists('g:airline_symbols')
  let g:airline_symbols = {
    }
endif
"
" " unicode symbols
let g:airline_left_sep = ''
let g:airline_right_sep = ''
let g:airline_symbols.crypt = ''
let g:airline_symbols.linenr = '¶'
let g:airline_symbols.maxlinenr = '☰'
let g:airline_symbols.branch = '⎇'
let g:airline_symbols.paste = '∥'
let g:airline_symbols.spell = 'Ꞩ'
let g:airline_symbols.notexists = '∄'
let g:airline_symbols.whitespace = 'Ξ'
"设置切换Buffer快捷键"
map <c-Left> :bp<CR>    " 切换到上一个
map <c-Right> :bn<CR>   " 切换到下一个
map <F2> :bd<CR>        " 关闭当前窗口
map 11 :b1<CR>          " 切换到编号1
map 22 :b2<CR>          " 切换到编号2
map 33 :b3<CR>          " 切换到编号3
map 44 :b4<CR>          " 切换到编号4
map 55 :b5<CR>          " 切换到编号5
map 66 :b6<CR>          " 切换到编号6
map 77 :b7<CR>          " 切换到编号7
map 88 :b8<CR>          " 切换到编号8
map 99 :b9<CR>          " 切换到编号9
map 00 :b10<CR>         " 切换到编号10
8. 自动异步生成tags插件(gutentags)
- gutentags自动异步生成tags,并管理在~/.cache目录下不污染当前目录
- 依赖vim8和ctags
8.1 效果预览
- 进行tags跳转时不需要手动生成tags,在阅读linux源码时有很大帮助。
- 可以看到当前目录下没有tags,而是异步生成在~/.cache目录下

8.2 安装步骤
8.2.1 下载
- git下载方式
git clone https://github.com/ludovicchabant/vim-gutentags.git
- gutentags安装包下载
8.2.2 解压安装包
cd ~ && unzip ~/vim_plugin.zip
cd ~/.vim/plugged
unzip ~/vim_plugin/vim-gutentags-master.zip
8.2.3 部署
- 打开.vimrc添加以下指令
call plug#begin('~/.vim/plugged')
Plug 'vim-scripts/vim-gutentags-master' "gutentags异步tags插件
call plug#end()
8.2.4 添加vimrc配置
- ctags --vesrion查看自己的ctags版本
" " 配置 ctags 的参数 "
map <c-]> g<c-]>  "ctags跳转不自动选择

" gutentags 搜索工程目录的标志,当前文件路径向上递归直到碰到这些文件/目录名
let g:gutentags_project_root = ['.root', '.svn', '.git', '.hg', '.project']

" 所生成的数据文件的名称
let g:gutentags_ctags_tagfile = '.tags'

" 同时开启 ctags 和 gtags 支持:
let g:gutentags_modules = []
if executable('ctags')
        let g:gutentags_modules += ['ctags']
endif
if executable('gtags-cscope') && executable('gtags')
        let g:gutentags_modules += ['gtags_cscope']
endif

" 将自动生成的 ctags/gtags 文件全部放入 ~/.cache/tags目录中,避免污染工程目录
let g:gutentags_cache_dir = expand('~/.cache/tags')

" 配置 ctags 的参数,老的 Exuberant-ctags 不能有--extra=+q,注意
let g:gutentags_ctags_extra_args = ['--fields=+niazS']
let g:gutentags_ctags_extra_args += ['--c++-kinds=+px']
let g:gutentags_ctags_extra_args += ['--c-kinds=+px']

" 如果使用 universal ctags 需要增加下面一行,老的Exuberant-ctags 不能加下一行
"let g:gutentags_ctags_extra_args += ['--output-format=e-ctags']
" 禁用 gutentags 自动加载 gtags 数据库的行为
let g:gutentags_auto_add_gtags_cscope = 0
9. 异步模糊查找(LeaderF)
- 本人已弃用,使用fzf(第14章)代替,坚持用leaderF可以继续部署。
- LeaderF参考链接
9.1 效果预览
- 异步快速搜索文件

- 异步快速搜索函数,变量,宏(内存要够不然会卡)

9.2 安装步骤
9.2.1 下载
- git下载方式
git clone https://github.com/Yggdroot/LeaderF.git
- (LeaderF)安装包下载
9.2.2 解压安装包
cd ~ && unzip ~/vim_plugin.zip
cd ~/.vim/plugged
unzip ~/vim_plugin/LeaderF-master_4991.zip
9.2.3 部署
- 打开.vimrc添加以下指令
call plug#begin('~/.vim/plugged')
Plug 'vim-scripts/LeaderF-master' "LeaderF模糊查找插件
call plug#end()
9.2.4 添加vimrc配置
"LeaderF 模糊文件查找配置
let g:Lf_ShortcutF = '<c-p>' " 文件快速搜索
" 函数,宏,变量快速搜索
noremap <c-f> :LeaderfTag<cr>
let g:Lf_StlSeparator = {
     'left': '', 'right': '', 'font': '' }
let g:Lf_RootMarkers = ['.project', '.root', '.svn', '.git']
let g:Lf_WorkingDirectoryMode = 'Ac'
let g:Lf_WindowHeight = 0.30
let g:Lf_CacheDirectory = expand('~/.vim/cache')
let g:Lf_ShowRelativePath = 0
let g:Lf_HideHelp = 1
let g:Lf_StlColorscheme = 'powerline'
let g:Lf_PreviewResult = {
    'Function':0, 'BufTag':0}
| 命令 | 描述 |
|---|---|
| <ESC> | 退出LeaderF |
| <C-F> | 在完整路径搜索模式和仅名称搜索模式之间切换 |
| <C-J> | 在结果窗口中向下移动光标 |
| <C-K> | 在结果窗口中向上移动光标 |
| <Up>/<Down> | 从历史回忆起上一个/下一个输入模式 |
| <C-X> | 在水平分割窗口打开 |
| <C-]> | 在垂直分割窗口打开 |
| <C-T> | 在新标签页中打开 |
10. 索引跳转插件(gtags)
10.1 效果预览

10.2 安装步骤
10.2.1 下载
- 需要下gtags,vim-gutentags
https://ftp.gnu.org/pub/gnu/global/global-6.6.4.tar.gz
git clone https://github.com/skywind3000/gutentags_plus.git
- gtags-6.6.4安装包,gutentags_plus安装包
10.2.2 解压global-6.6.4.tar.gz安装包
cd ~ && unzip ~/vim_plugin.zip
cd ~/.vim/plugged
tar -xf ~/vim_plugin/global-6.6.4.tar.gz
10.2.3 编译安装
./configure --with-sqlite3 --prefix=/home/weidonghui/.gtags_code
# gtags可以使用Sqlite3作为数据库, 在编译时需要加这个参数
# 将global安装到指定路径,必须是绝对路径
make -j
sudo make install
10.2.4 添加环境变量
vim ~/.bashrc
export PATH="/home/weidonghui/.gtags_code/bin:/home/weidonghui/.gtags_code/lib/gtags:/home/weidonghui/.gtags_code/share/gtags:/home/weidonghui/.gtags_code/share/info:$PATH"
- 关闭窗口在打开新窗口
virtual-machine:~$ global --version
global (GNU GLOBAL) 6.6.4
Powered by Berkeley DB 1.85 and SQLite3 3.8.7.1.
Copyright (c) 1996-2019 Tama Communications Corporation
License GPLv3+: GNU GPL version 3 or later <http://www.gnu.org/licenses/gpl.html>
This is free software; you are free to change and redistribute it.
There is NO WARRANTY, to the extent permitted by law.
virtual-machine:~$
10.2.5 global-6.6.4部署
- 在global-6.6.4新建一个plugin目录,将*.vim,copy到plugin
mkdir -p ~/.vim/plugged/global-6.6.4/plugin
cd ~/.vim/plugged/global-6.6.4
cp -rf *.vim plugin/
- 打开.vimrc添加以下指令
call plug#begin('~/.vim/plugged')
Plug 'vim-scripts/global-6.6.4' "gtags引用跳转
call plug#end()
10.2.6 添加global-6.6.4,vimrc配置
- 这是Gtags,配合LeaderF进行
- LeaderF gtags参考链接
let g:Lf_GtagsAutoGenerate = 1
let g:Lf_Gtagslabel = 'native-pygments'
" let g:Lf_Gtagsconf = '/usr/local/share/gtags/gtags.conf'
let g:Lf_Gtagsconf = '/home/weidonghui/.gtags_code/share/gtags/gtags.conf'
noremap <leader>fr :<C-U><C-R>=printf("Leaderf! gtags -r %s --auto-jump", expand("<cword>"))<CR><CR>
noremap <leader>fd :<C-U><C-R>=printf("Leaderf! gtags -d %s --auto-jump", expand("<cword>"))<CR><CR>
noremap <leader>fo :<C-U><C-R>=printf("Leaderf! gtags --recall %s", "")<CR><CR>
noremap <leader>fn :<C-U><C-R>=printf("Leaderf gtags --next %s", "")<CR><CR>
noremap <leader>fp :<C-U><C-R>=printf("Leaderf gtags --previous %s", "")<CR><CR>
10.2.7 global跳过目录或文件不扫描&跟踪
- linux环境中有各种各样的问题,导致一些文件无法跟踪一直报错,致使global无法生成GPATH,GRTAGS,GTAGS三个文件。
- 而从gtags --help中并没有提供好的办法使其跳过某些文件或者目录。
weidh@xxx:~$ gtags --help
Usage: gtags [-ciIOqvw][-d tag-file][-f file][dbpath]
Options:
--accept-dotfiles
       Accept files and directories whose names begin with a dot.
       By default, gtags ignores them.
-c, --compact
       Make GTAGS in compact format.
       This option does not influence GRTAGS,
       because that is always made in compact format.
--config[=name]
       Print the value of config variable name.
       If name is not specified then print all names and values.
       In addition to the variables listed in the ENVIRONMENT section,
       you can refer to install directories by read only variables:
       bindir, libdir, datadir, localstatedir and sysconfdir.
-d, --dump tag-file
       Dump a tag file as text to the standard output.
       Output format is 'key<tab>data'. This is for debugging.
--explain
       Explain handling files.
-f, --file file
       Give a list of candidates of target files.
       Files which are not on the list are ignored.
       The argument file can be set to - to accept a list of
       files from the standard input.
       File names must be separated by newline.
       To make the list you may use find(1), which has rich options
       for selecting files.
--gtagsconf file
       Set environment variable GTAGSCONF to file.
--gtagslabel label
       Set environment variable GTAGSLABEL to label.
-I, --idutils
       In addition to tag files, make ID database for idutils(1).
-i, --incremental
       Update tag files incrementally.
       It's better to use global(1) with the -u command.
-O, --objdir
       Use BSD-style obj directory as the location of tag files.
       If GTAGSOBJDIRPREFIX is set and $GTAGSOBJDIRPREFIX directory exists,
       gtags creates $GTAGSOBJDIRPREFIX/<current directory> directory
       and makes tag files in it.
       Though you can use MAKEOBJDIRPREFIX instead of GTAGSOBJDIRPREFIX,
       it is deprecated.
       If dbpath is specified, this option is ignored.
--single-update file
       Update tag files for a single file.
       It is considered that file was added, updated or deleted,
       and there is no change in other files.
       This option implies the -i option.
--skip-unreadable
       Skip unreadable files.
--skip-symlink [=type]
       Skip symbolic links. If type is 'f' then skip only symbolic links for
       file, else if 'd' then skip only symbolic links for directory.
       The default value of type is 'a' (all symbolic links).
--sqlite3
       Use Sqlite 3 API to make tag files. By default, BSD/DB 1.85 API is used.
       To use this option, you need to invoke configure script with
       --with-sqlite3 in the build phase.
--statistics
       Print statistics information.
-q, --quiet
       Quiet mode.
-v, --verbose
       Verbose mode.
-w, --warning
       Print warning messages.
dbpath
       The directory in which tag files are generated.
       The default is the current directory.
See also:
       GNU GLOBAL web site: http://www.gnu.org/software/global/
weidh@xxx:~$
- 还好我们有global的源码可以去修改它,下面是我跳过"busybox-", “centos”, “debian”, "ubuntu"为关键词的目录的修改,仅做参考。
注意:修改后需要重新编译。
weidh@xxxx:~/.vim/plugged/global-6.6.4$ git diff libutil/find.c
diff --git a/libutil/find.c b/libutil/find.c
index 69ccbb0..c0d516f 100644
--- a/libutil/find.c
+++ b/libutil/find.c
@@ -851,6 +851,9 @@ find_read_filelist(void)
  *
  *     @return         path
  */
+
+char skip_dir_list[][32] = {
    "busybox-", "centos", "debian", "ubuntu"};
+
 static char *
 find_read_traverse(void)
 {

@@ -860,6 +863,7 @@ find_read_traverse(void)

        for (;;) {

                while (curp->p < curp->end) {

+skip_dir:
                        char type = *(curp->p);
                        const char *unit = curp->p + 1;

@@ -872,6 +876,12 @@ find_read_traverse(void)
                        strlimcpy(path, makepath(dir, unit, NULL), sizeof(path));
                        if (type == 'd')
                                strcat(path, "/");
+                       for (int i = 0; i < sizeof(skip_dir_list)/sizeof(skip_dir_list[0]); i++) {

+                               if (strstr(path, skip_dir_list[i]) != NULL) {

+                                       warning("'%s' is a directory. skip.", trimpath(path));
+                                       goto skip_dir;
+                               }
+                       }
                        if (skipthisfile(path))
                                continue;
                        if (type == 'f') {

weidh@xxxx:~/.vim/plugged/global-6.6.4$
10.2.8 解压gutentags_plus安装包
cd ~ && unzip ~/vim_plugin.zip
cd ~/.vim/plugged
unzip ~/vim_plugin/gutentags_plus-master.zip
10.2.9 gutentags_plus部署
- 打开.vimrc添加以下指令
call plug#begin('~/.vim/plugged')
Plug 'vim-scripts/gutentags_plus-master' "gutentags_plus异步ctags插件
call plug#end()
10.2.10 添加gutentags_plus,vimrc配置
"启用gtags模块
let g:gutentags_modules = ['ctags', 'gtags_cscope']

"配置项目根标记。
let g:gutentags_project_root = ['.root']

"在我的缓存目录中生成日期数据库,防止gtags文件污染我的项目
let g:gutentags_cache_dir = expand('~/.cache/tags')

"搜索后将焦点更改为quickfix窗口(可选)。
let g:gutentags_plus_switch = 1
map <F3> :cclose<CR> "关闭quickfix窗口
autocmd FileType qf nnoremap <silent> <CR> <CR>:cclose<CR> "打开QuickFix窗口选择后自动关闭
"在vim内终端
| 命令(红色最为常用) | 类型 | 描述 |
|---|---|---|
<leader>ca |
符号定义查找 | 查找分配当前符号的位置 |
<leader>cg |
函数定义查找 | 在光标下查找符号定义 |
<leader>cz |
符号定义,函数定义&声明查找 | 在 ctags 数据库中查找当前单词 |
<leader>cc |
函数调用查找 | 查看有哪些函数调用了该函数 |
<leader>cs |
符号引用查找 | 在光标下查找符号的引用(参考) |
| <leader>ct | 文本查找 | 查找光标下的文本字符串 |
| <leader>ce | 文本查找 | 找到光标下的 egrep 模式 |
| <leader>cf | include文件查找 | 查找光标下的文件名 |
| <leader>ci | include文件查找 | 查找文件#包括光标下的文件名 |
| <leader>cd | 函数调用查找 | 此函数调用的函数 |
10.2.11 生成GPATH,GRTAGS,GTAGS三个文件过程中意外退出出现如下报错
gutentags: gutentags: gtags-cscope job failed, returned: 1
- 可以直接删除对应的tag目录,如下:
rm -rf ~/.cache/tags/home-weidh-*
- 也可以添加自动删除代码,自动删除,之后重新触发保存即可。
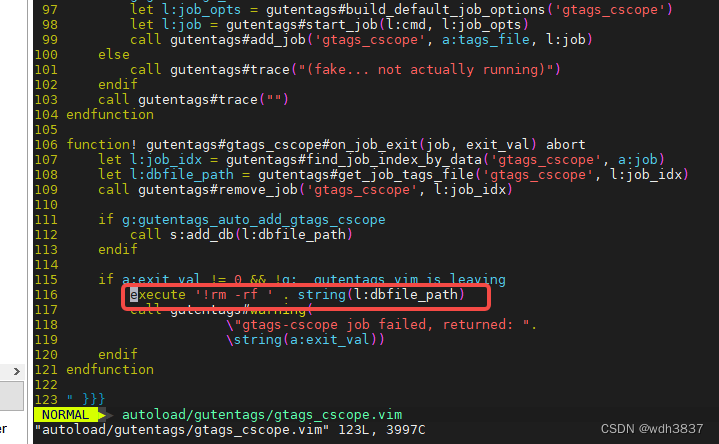
weidh@xxx:~/.vim/plugged/vim-gutentags-master$ git diff
diff --git a/autoload/gutentags/gtags_cscope.vim b/autoload/gutentags/gtags_cscope.vim
index 1131066..f4864f6 100644
--- a/autoload/gutentags/gtags_cscope.vim
+++ b/autoload/gutentags/gtags_cscope.vim
@@ -88,7 +88,7 @@ function! gutentags#gtags_cscope#generate(proj_dir, tags_file, gen_opts) abort
         let l:proj_options = readfile(l:proj_options_file)
         let l:cmd += l:proj_options
     endif
-    let l:cmd += ['--incremental', '"'.l:db_path.'"']
+    let l:cmd += ['--skip-unreadable', '-q', '--incremental', '"'.l:db_path.'"']
     let l:cmd = gutentags#make_args(l:cmd)

     call gutentags#trace("Running:gtags_cscope.vim: " . string(l:cmd))
@@ -113,6 +113,7 @@ function! gutentags#gtags_cscope#on_job_exit(job, exit_val) abort
     endif

     if a:exit_val != 0 && !g:__gutentags_vim_is_leaving
+        execute '!rm -rf ' . string(l:dbfile_path)
         call gutentags#warning(
                     \"gtags-cscope job failed, returned: ".
                     \string(a:exit_val))
weidh@xxx:~/.vim/plugged/vim-gutentags-master$
'--skip-unreadable', '-q'为gtags参数,用户可以根据需要添加,详情可参看gtags --help。
11. c/c++ 语法高亮(cpp-enhanced-highlight)
11.1 效果预览

11.2 安装步骤
11.2.1 下载
- git下载方式
git clone https://github.com/octol/vim-cpp-enhanced-highlight.git
- (vim-cpp-enhanced-highlight)安装包下载
11.2.2 解压安装包
cd ~ && unzip ~/vim_plugin.zip
cd ~/.vim/plugged
unzip ~/vim_plugin/vim-cpp-enhanced-highlight-master.zip
11.2.3 部署
- 打开.vimrc添加以下指令
call plug#begin('~/.vim/plugged')
Plug 'vim-scripts/vim-cpp-enhanced-highlight-master' "c/c++ 语法高亮
call plug#end()
11.2.4 添加vimrc配置
" cpp-enhanced-highlight c/c++ 语法高亮配置
" 默认情况下,不突出显示类范围。启用设置
let g:cpp_class_scope_highlight = 1

" 默认情况下,成员变量突出显示为禁用状态。启用设置
let g:cpp_member_variable_highlight = 1

" 默认情况下,在声明中高亮显示类名。启用设置
let g:cpp_class_decl_highlight = 1

" POSIX功能的突出显示默认情况下处于禁用状态。启用设置
let g:cpp_posix_standard = 1

" 有两种突出显示模板功能的方法。要么
let g:cpp_experimental_simple_template_highlight = 1

" 在大多数情况下都可以使用,但是在大文件上可能会有点慢。替代设置
let g:cpp_experimental_template_highlight = 1

" 这是一个较快的实现,但是在某些极端情况下它不起作用。
" 注意:众所周知,C ++模板语法很难解析,因此不要指望此功能是完美的。
" 库概念的突出显示由
let g:cpp_concepts_highlight = 1

" 这将突出显示关键字的概念,要求以及标准库中的所有命名要求(例如DefaultConstructible)
" 可以通过以下方式禁用突出显示用户定义的功能
let g:cpp_no_function_highlight = 1
12. 自动补全(AutoComplPop)
vim的自动补全有很多种强大入YouCompleteMe不过在离线状态下比较难安装目前还在研究目前找到一个替代品AutoComplPop效果也不错,安装方便效果也不错。
12.1 效果预览

12.2 安装步骤
12.2.1 下载
- git下载方式
git clone https://github.com/vim-scripts/AutoComplPop.git
- (AutoComplPop-master)安装包下载
12.2.2 解压安装包
cd ~ && unzip ~/vim_plugin.zip
cd ~/.vim/plugged
unzip ~/vim_plugin/AutoComplPop-master.zip
12.2.3 部署
- 打开.vimrc添加以下指令
call plug#begin('~/.vim/plugged')
Plug 'vim-scripts/AutoComplPop-master' "查字典补全
call plug#end()
13. 结构体补全(omnicppcomplete)
这个需要依赖ctags
13.1 效果预览
omnicppcomplete可以配合AutoComplPop,AutoComplPop不能再输入“::”,“->”,“.”进行补全,而omnicppcomplete可以达到这个目的。

13.2 安装步骤
13.2.1 下载
- 下载方式
http://www.vim.org/scripts/script.php?script_id=1520
- (omnicppcomplete)安装包下载
13.2.2 解压安装包
cd ~ && unzip ~/vim_plugin.zip
cd ~/.vim/plugged
unzip ~/vim_plugin/omnicppcomplete-0.41.zip
13.2.3 部署
- 打开.vimrc添加以下指令
call plug#begin('~/.vim/plugged')
Plug 'vim-scripts/omnicppcomplete-0.41' "全能补全
call plug#end()
13.3 添加vimrc配置
- 使用omnicppcomplete前使用,需要设置
set tags,如果使用gutentags自动生成tags,只需要set tags+=g:gutentags_cache_dir即可,如果没有使用自动生成tags,则需要手动添加tags绝对路径。 - 使用gutentags自动生成tags时,需要在vimrc加以下配置
let g:gutentags_ctags_extra_args = ['--fields=+niazS']
let g:gutentags_ctags_extra_args += ['--c++-kinds=+px']
let g:gutentags_ctags_extra_args += ['--extra=+q']
- 手动生成tags时,需要带以下参数:
ctags -R . --c++-kinds=+p --fields=+iaS --extra=+q
--c++-kinds=+p: 为标签添加函数原型(prototype)信息 。
--fields=+iaS: 为标签添加继承信息(inheritance),访问控制(access)信息,函数特征(function Signature,如参数表或原型等) 。
--extra=+q: 为类成员标签添加类标识。
"-- omnicppcomplete setting --
" 按下F7自动补全代码,注意该映射语句后不能有其他字符,包括tab;否则按下F3会自动补全一些乱码
" imap <F7> <C-X><C-O>
"按下F8根据头文件内关键字补全
" imap <F8> <C-X><C-I>
set tags+=g:gutentags_cache_dir "添加ctags绝对路径
set completeopt=menu,menuone " 关掉智能补全时的预览窗口
let OmniCpp_MayCompleteDot = 1 " autocomplete with .
let OmniCpp_MayCompleteArrow = 1 " autocomplete with ->
let OmniCpp_MayCompleteScope = 1 " autocomplete with ::
let OmniCpp_SelectFirstItem = 2 " select first item (but don't insert)
let OmniCpp_NamespaceSearch = 2 " search namespaces in this and included files
let OmniCpp_ShowPrototypeInAbbr = 1 " show function prototype in popup window
let OmniCpp_GlobalScopeSearch=1 " enable the global scope search
let OmniCpp_DisplayMode=1 " Class scope completion mode: always show all members
"let OmniCpp_DefaultNamespaces=["std"]
let OmniCpp_ShowScopeInAbbr=1 " show scope in abbreviation and remove the last column
let OmniCpp_ShowAccess=1
14 字符串/文件模糊查找(ripgrep,fzf.vim)
- fzf.vim覆盖了LeaderF的功能,而且更强大,响应速度更快比vim-clap慢但是不是百万千万级别的文件查找几乎看不出差距。但是vim-clap需要依赖rust(离线状态下把rust及其依赖搭建起来,对我来说几乎做不到)才能发挥其真正的优势。(
默认使用vimscript解析)响应的速度实在拉胯,有时候我甚至觉得是电脑卡了。rust环境搭建就不说了。我甚至把最重要的二进制文件maple都编译出来了。看下图:

- 然而依然不能使用。搞了一天决定放弃,有哪位大神安装成功了,请指教。我先转战fzf.vim
14.1 效果预览
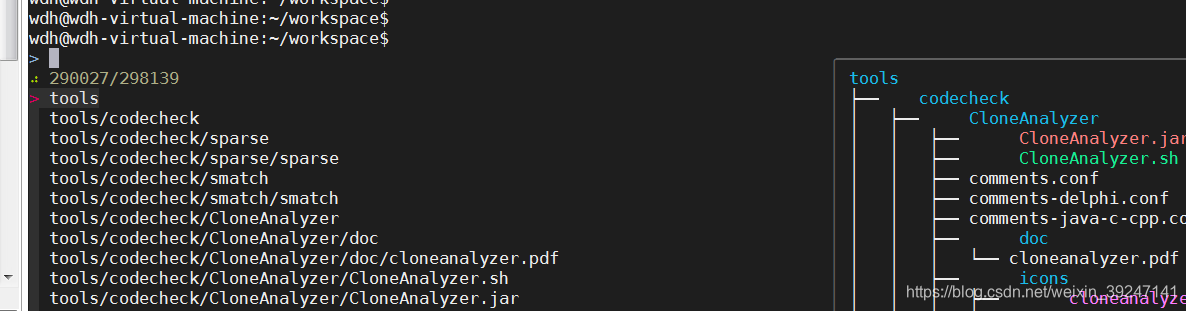
14.1.1 模糊查找文件
- 左下框为待选框,右下框为预览框,在字符串搜索的时候将更明显。

14.1.2 模糊查找字符串

14.2 安装步骤
14.2.1 fzf下载
- 下载方式,注意两个都有下载
https://github.com/junegunn/fzf
https://github.com/junegunn/fzf.vim
- (fzf-vim)安装包下载
14.2.2 fzf解压安装包
cd ~ && unzip ~/vim_plugin.zip
cd ~/.vim/plugged
unzip ~/vim_plugin/fzf-master.zip
unzip ~/vim_plugin/fzf.vim-master.zip
14.2.3 fzf安装与部署
- 打开.vimrc添加以下指令
call plug#begin('~/.vim/plugged')
"异步安装
Plug 'vim-scripts/fzf-master', {
     'do': {
     -> fzf#install() } }
"fzf异步模糊查找插件
Plug 'vim-scripts/fzf.vim-master'
call plug#end()
14.2.4 fzf离线安装卡在Running fzf installer ...的问题
- plug是异步安装的我们进入vim,输入命令行模式
:Files就会跳出以下对话,进行安装。


-
此时联网的同学会很快的过去,但是离线的同学就会发现一直卡在这
Running fzf installer ...,当然使用的我的离线包的同学是不会卡在这的。这里主要针对的是那些白嫖加离线同学,顺便也是为了记录当时怎么解决这个问题的。原因是fzf需要下载一个二进制包,这个二进制包是根据系统来选择的比如的我的电脑是Ubuntu64位就会去下载对应的二进制包。 -
首先我们要明确既然是下载文件Ubuntu在线下载命令常用的几个要知道
wget,url。我们进入fzf的源码找到install打开,搜索一下wget或url就可以看以下代码。

-
在尝试去找一下
try_wget()调用的地方

-
这里我们很容易的发现其实
$url就是需要下载的文件。我们可以根据try_wget()可以看出将要下载的文件包可能是tgz
或zip格式的。预期自己将要下哪种格式的文件包我们可以看180~202的代码。对于Ubuntu64位系统下的是187行的文件包。这里不考虑zip格式的情况。

-
此时我们要知道的就是两点,
1.知道下载的路径,2.下载下来的文件包要放哪。我们需要在代码里加两句打印确认以上两点。

-
运行install就得到以下信息。

-
我们只需要将
https://github.com/junegunn/fzf-bin/releases/download/0.22.0/fzf-0.22.0-linux_amd64.tgz复制出来贴到浏览器上即可下载(由于是外网,下不了的同学请自行解决),然后将文件包放到/home/wdh/.vim/plugged/fzf-master/bin -
搞定完上一步之后再次运行install还是会进入下载。这个时候就需要对
install进行一些改写了。

download() {

  echo "Downloading bin/fzf ..."
  if [[ ! "$version" =~ alpha ]]; then
    if [ -x "$fzf_base"/bin/fzf ]; then
      echo "  - Already exists"
      check_binary && return
    fi
    link_fzf_in_path && return
  fi
  mkdir -p "$fzf_base"/bin && cd "$fzf_base"/bin
  if [ $? -ne 0 ]; then
    binary_error="Failed to create bin directory"
    return
  fi
  echo "download_dir:$fzf_base/bin"
  if [ ! -f $fzf_base/bin/$1 ]; then
  local url
  [[ "$version" =~ alpha ]] &&
    url=https://github.com/junegunn/fzf-bin/releases/download/alpha/${1} ||
    url=https://github.com/junegunn/fzf-bin/releases/download/$version/${1}
  set -o pipefail
  echo "url:$url"
  if ! (try_curl $url || try_wget $url); then
    set +o pipefail
    binary_error="Failed to download with curl and wget"
    return
  fi
  set +o pipefail
  else
        tar -xzf $1
  fi
  if [ ! -f fzf ]; then
    binary_error="Failed to download ${1}"
    return
  fi

  chmod +x fzf && check_binary
}
- 退出在运行一次
install就可以使用啦。

- 进入vim在输入一次
:Files


- 打开~/.fzf.bash添加如下配置
export FZF_CTRL_T_OPTS="--preview '(highlight -O ansi -l {} 2> /dev/null || cat {} || tree -C {}) 2> /dev/null | head -200'"
- 就可以使用
Ctrl + t时打开预览框
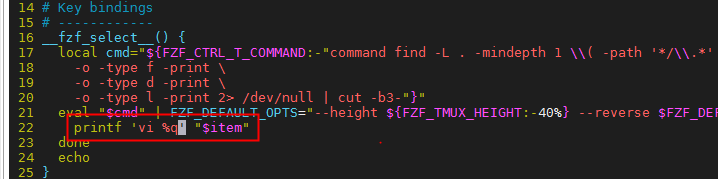
- 如果想输入
Ctrl + t选中需要的文件后用vi打开可以修改~/.vim/plugged/fzf-master/shell/key-bindings.bash配置实现:
将:
printf '%q' "$item"
修改成:
printf 'vi %q' "$item"
14.2.5 ripgrep下载
-
此时已经可以使用
模糊查找文件但是模糊查找字符串还需要依赖ripgrep才可以使用,也可以使用其他的如Ag,ack等搜索引擎(其实Ubuntu自带的grep也可以用,就是大工程的搜索时比较卡)。这里放出这些搜索引擎的速度对比。

-
不装ripgrep的可以直接跳到vimrc配置那里把
Ubuntu自带的grep配置用起来,也可以使用。
sudo apt-get install ripgrep
14.2.6 ripgrep.deb包安装与部署
sudo dpkg -i ripgrep_11.0.2_amd64.deb
14.2.7 ripgrep使用

14.3 添加vimrc配置
- fzf支持多种grep,下面是rg的配置
"调用Rg进行搜索,包含隐藏文件
command! -bang -nargs=* Rg
  \ call fzf#vim#grep(
  \   'rg --column --line-number --no-heading --color=always --smart-case --hidden '.shellescape(<q-args>), 1,
  \   <bang>0 ? fzf#vim#with_preview('up:60%')
  \           : fzf#vim#with_preview('right:50%'),
  \   <bang>0)

"模糊查找文件
map <C-P> :Files<CR>
 "模糊查找字符串
map <C-F> :Rg<CR>
- 使用git的同学可以试试git grep
command! -bang -nargs=* GGrep
  \ call fzf#vim#grep(
  \   'git grep --line-number  '.shellescape(<q-args>), 0,
  \   <bang>0 ? fzf#vim#with_preview('up:60%')
  \           : fzf#vim#with_preview('right:50%'),
  \   <bang>0)

"模糊查找文件
map <C-P> :GFiles<CR>
" 模糊查找字符串
map <C-F> :GGrep<CR>
- 用ubuntu自带的grep
command! -bang -nargs=* Grg
  \ call fzf#vim#grep(
  \   'grep -nri --exclude=tags '.shellescape(<q-args>), 1,
  \   <bang>0 ? fzf#vim#with_preview('up:60%')
  \           : fzf#vim#with_preview('right:50%'),
  \   <bang>0)
"模糊查找文件
map <C-P> :Files<CR>
"模糊查找字符串
map <C-F> :Grg<CR>
15. 括号匹配插件(auto-pairs)
- 该插件在输入/删除左括号时,能自动补上/删除右括号。
15.1 效果预览
| 功能 | 支持 | 原文本 | 按键 | 新文本 |
|---|---|---|---|---|
| 成对插入 | {},[],(),”“,”,“ | [ | [|] | |
| 成对删除 | {},[],(),”“,”,“ | foo[|] | BACKSPACE | foo| |
| 换行并自动缩进 | {},[],() | node{|} | ENTER | node { | } |
| 在括号内两侧各插入空格 | {},[],() | foo{|} | SPACE | foo{ | } |
| 词后单引号不成对插入 | ’ | foo| | ’ | foo’ | |
| 跳过右括号 | {},[],() | [ foo| ] | ] | [ foo ]| |
| 在转义符\后禁用插件 | {},[],(),”“,”,“ | foo| | { | foo\{ | |
| 对字符串加小括号 | C风格字符串 | |’foo’ | ALT+e | (‘foo’)| |
| 删除重复成对符号 | {},[],(),”,”“,“ | foo”’|”’ | BACKSPACE | foo| |
| 飞行模式,跳出括号对而不插入 | {},[],() | if(a[3|]) | ) | if(a[3])| |
| 撤销飞行模式,插入而不是跳出括号对 | {},[],() | if(a[3])| | ALT+b | if(a[3])| |
15.2 安装步骤
15.2.1 auto-pairs下载
https://github.com/jiangmiao/auto-pairs
15.2.2 auto-pairs解压
cd ~ && unzip ~/vim_plugin.zip
cd ~/.vim/plugged
unzip ~/vim_plugin/auto-pairs-master.zip
15.2.3 安装与部署
call plug#begin('~/.vim/plugged')
"括号匹配插件
Plug 'vim-scripts/auto-pairs-master'
call plug#end()
15.3 添加vimrc配置
- 根据自己的情况选择,我的配置一个都不开用默认的就好。
" 设置要自动配对的符号
" let g:AutoPairs = {'(':')', '[':']', '{':'}',"'":"'",'"':'"'}

" 添加要自动配对的符号<>
" let g:AutoPairs['<']='>'

" 设置要自动配对的符号,默认为g:AutoPairs,可以通过自动命令来对不同文件类型设置不同自动匹配对符号。
" let b:AutoPairs = g:AutoParis

" 设置插件打开/关闭的快捷键,默认为ALT+p。
" let g:AutoPairsShortcutToggle = '<M-p>'

" 设置自动为文本添加圆括号的快捷键,默认为ALT+e。
" let g:AutoPairsShortcutFastWrap = '<M-e>'

" 设置调到下一层括号对的快捷键,默认为ALT+n。
" let g:AutoPairsShortcutJump = '<M-n>'

" 设置撤销飞行模式的快捷键,默认为ALT+b。
" let g:AutoPairsShortcutBackInsert = '<M-b>'

" 把BACKSPACE键映射为删除括号对和引号,默认为1。
" let g:AutoPairsMapBS = 1

" 把ctrl+h键映射为删除括号对和引号,默认为1。
" let g:AutoPairsMapCh = 1

" 把ENTER键映射为换行并缩进,默认为1。
" let g:AutoPairsMapCR = 1

" 当g:AutoPairsMapCR为1时,且文本位于窗口底部时,自动移到窗口中间。
" let g:AutoPairsCenterLine = 1

" 把SPACE键映射为在括号两侧添加空格,默认为1。
" let g:AutoPairsMapSpace = 1

" 启用飞行模式,默认为0。
" let g:AutoPairsFlyMode = 0

" 启用跳出多行括号对,默认为1,为0则只能跳出同一行的括号。
let g:AutoPairsMultilineClose = 1
16. 自动保存(auto-save)
- 我是个比较懒的人。不喜欢按
:w但又喜欢没事保存的人,切来切去真的很烦。在用vscode的时候发现vscode可以设置没有操作的后的一段时间自动保存。于是我发现了auto-save。
16.1 效果预览
- 下图可以看出在插入状态下,在输入停止了一段时间后(这里我设置为5秒)左上框的蓝色变成了黄色,
+号也消失了。

16.2 安装步骤
16.2.1 auto-save下载
https://github.com/907th/vim-auto-save.git
16.2.2 auto-save解压安装包
cd ~ && unzip ~/vim_plugin.zip
cd ~/.vim/plugged
unzip ~/vim_plugin/vim-auto-save-master.zip
16.2.3 部署
- 打开.vimrc添加以下指令
call plug#begin('~/.vim/plugged')
Plug 'vim-scripts/vim-auto-save-master' "自动保存插件
call plug#end()
16.3 添加vimrc配置
" auto-save配置
" TextChangedI:在插入模式下对当前缓冲区中的文本进行更改后,TextChangedI将保存。
" CursorHold:在正常模式下,CursorHold将保存updatetime选项中定义的每毫秒量。
" CursorHoldI:CursorHoldI将在插入模式下执行相同的操作。
" CompleteDone:在每个完成事件之后,CompleteDone也将触发保存。
let g:auto_save = 1	" 开启自动保存
let g:auto_save_silent = 1 " 不显示命令
let g:auto_save_events = ["CursorHold", "CursorHoldI"] " 添加自动保存触发的事件
set updatetime=5000  " 配合CursorHold, CursorHoldI。5000ms后自动保存
智能推荐
php无刷新上传文件,php+iframe实现隐藏无刷新上传文件-程序员宅基地
文章浏览阅读53次。首先ajax不能上传文件,这误导了我有段时间,今晚睡不着就照着说明做了个无刷新上传文件其实原理很简单和一般的标签相比多了一个target属性罢了,用于指定标签页在哪里打开以及提交数据。如果没有设置该属性,就会像平常一样在本页重定向打开action中的url。而如果设置为iframe的name值,即"upload"的话,就会在该iframe内打开,因为CSS设置为隐藏,因而不会有任何动静。若将dis..._php无刷新上传zip文件
如何利用Packet Capture技术免费进入付费直播间-程序员宅基地
文章浏览阅读4.8k次,点赞3次,收藏17次。首先,查看数据包中的登录请求,找到登录所需的用户名和密码。通过分析直播平台与主播之间的数据包交互,我们可以找到直播数据传输的关键信息,从而模拟登录过程,实现免费观看付费直播间的目的。Packet Capture(数据包捕获)是一种网络诊断工具,可以捕获在网络上传输的数据包,以便分析和调试网络问题。通过分析捕获到的数据包,我们可以了解网络协议的通信过程,从而找到免费进入付费直播间的方法。此时,你可以访问任何网络资源,例如一个付费直播间的网址,以便捕获与该直播间相关的数据包。选择一个合适的软件并下载安装。_packet capture
linux 中/proc 详解-程序员宅基地
文章浏览阅读97次。proc 文件系统在Linux中有额外的机制可以为内核和内核模块将信息发送给进程-- /proc 文件系统。最初设计的目的是允许更方便的对进程信息进行访问(因此得名),现在它被每一个有有趣的东西报告的内核使用,例如/proc/modules 有模块的列表/proc/meminfo 有内存使用的统计表。 使用proc 文件系统的方法和使用设备驱动程序非常相似--创建一个/proc 文件需要的所..._(5条消息) 【linux】proc详解_zclinux_的博客-csdn博客_linux proc
路漫漫其修远兮:js的成长经历(十七)—— vue基础(一)-程序员宅基地
文章浏览阅读241次。目录什么是Vue.js为什么要学习流行框架框架和库的区别Node(后端)中的 MVC 与 前端中的 MVVM 之间的区别Vue.js 基本代码 和 MVVM 之间的对应关系Vue之 - 基本的代码结构`Vue指令之`插值表达式`、`v-cloak``v-text`和`v-html`Vue指令之`v-bind`的三种用法Vue指令之`v-on`和`跑马灯效果`跑马灯效果Vue指令之`v-on的缩写...
node.js云学堂微信小程序学习系统的设计与实现毕业设计源码011735_基于微信平台的《javascript程序设计》学习系统的设计与实现-程序员宅基地
文章浏览阅读246次。用户:免费好课、直播公开课、课程信息推荐、云学堂资讯、精选好课管理员:首页、用户管理、课程信息管理、精选好课管理、直播公开管理、免费分类管理、云学堂资讯管理_基于微信平台的《javascript程序设计》学习系统的设计与实现
【解决Anaconda3安装问题】conda --version 不是内部命令、没有script文件_conda --version没反应-程序员宅基地
文章浏览阅读9.7k次,点赞11次,收藏9次。这里写自定义目录标题欢迎使用Markdown编辑器新的改变功能快捷键合理的创建标题,有助于目录的生成如何改变文本的样式插入链接与图片如何插入一段漂亮的代码片生成一个适合你的列表创建一个表格设定内容居中、居左、居右SmartyPants创建一个自定义列表如何创建一个注脚注释也是必不可少的KaTeX数学公式新的甘特图功能,丰富你的文章UML 图表FLowchart流程图导出与导入导出导入欢迎使用Ma..._conda --version没反应
随便推点
next.js博客搭建_六一卡通风格的登录注册(第二步)_nextjs登录窗口-程序员宅基地
文章浏览阅读3.5w次。大家好,我是yma16,本期给大家分享next项目渲染markdown。该系列的往期文章博客搭建_初始化next项目。_nextjs登录窗口
Wordpress 永久链接_wordpress永久免费-程序员宅基地
文章浏览阅读8.6k次。 前段时间架了个Wordpress的博客,开始一直蛮顺利的,一直后来发现在改永久链接的时候,改后居然出现404错误。百度一下,网上说Mod_rewrite要打开,于是也就按照着网上的方法,试了很多都不是很见成效。也有说linux平台下不存在问题,于是就尝试了下ubuntu,可是依然存在问题,找找啊,弄啊弄,最终还是成功了,以下是个人整理的方法,仅供我等菜鸟参考。 :)------------------------------------------------------------------_wordpress永久免费
MIT开源协议,多端适用的租房小程序,带完整的管理员后台_使用到mit的开源项目-程序员宅基地
文章浏览阅读769次。这个项目的经历也让作者明白了一些事情,就是如果别人委托自己帮做项目的时候,不管项目的规模如何,在接受委托前一定要考虑清楚。特别是没有付定金的这种委托,一定要谨慎,不要期望那种说你先做着后面再谈钱,哪怕是跟你认识的人也是一样要谨慎。在项目快完成的时候,介绍的那个人跑路了,所以就没有后续了,想着与其直接删除还不如开源分享给大家一起讨论学习。1、使用Uniapp开发的前台,基于 Vue.js 开发所有前端应用的框架,开发者编写一套代码,可发布到iOS、Android、Web(响应式)、以及各种小程序。_使用到mit的开源项目
mysql如何进行分区_mysql如何进行分区_mysql分区有哪些方法-程序员宅基地
文章浏览阅读3.4k次。MySQL 可应用于多种语言,包括 PERL, C, C++, JAVA 和 PHP。 在这些语言中,MySQL 在 PHP 的 web 开发中是应用最广泛。大家知道mysql如何分区的吗?下面由学习啦小编为大家整理的mysql分区的方法,希望大家喜欢!mysql分区的方法一、概述当 MySQL的总记录数超过了100万后,会出现性能的大幅度下降吗?答案是肯定的,但是,性能下降>的比率不一而同..._mysql 分区方式
事件处理系统的概念模型-程序员宅基地
文章浏览阅读580次。简介很多领域中的企业过去总是以一种事件驱动的方式经营,且必须每天处理不断增加的业务事件和交易。事件处理(Event Processing,EP)是一个新兴的领域,主要受到企业对这种大量业务和 IT 事件进行快速响应的需求所推动。它通过更有效地处理具有企业意义的事件来满足支持决策制定周期的需求,在面向服务架构(Service Oriented Architectures,SO..._event processing network
Thinkjs——采用nodemailer发送邮件_thinkjs服务端发送邮件-程序员宅基地
文章浏览阅读863次。介绍 ThinkJS 是一款面向未来开发的 Node.js 框架,整合了大量的项目最佳实践,让企业级开发变得如此简单、高效。从 3.0 开始,框架底层基于 Koa 2.x 实现,兼容 Koa 的所有功能。 官方文档传送门点这里步骤: 1.创建一个thinkjs项目,执行 thinkjs new [project_name] 来创建项目,如: 2.安装如下包:..._thinkjs服务端发送邮件