基于Dlib训练一个自定义目标检测器并进行手势操控_dlib内置的训练器-程序员宅基地
技术标签: 面试 python 机器学习 计算机视觉 深度学习
本文中,您将学习如何使用AI构建基于python的手势控制应用程序。
主要包括以下几部分内容:
- 如何用Dlib训练一个自定义手检测器。
- 如何巧妙地自动化标注
- 如何通过手势控制游戏和视频播放器。
以下是一个demo的展示:
手势识别QQ录屏1
大多数人可能都熟悉dlib库,这是一个流行的计算机视觉库,主要用于人脸关键点检测。如果你是Dlib的老用户,那么你就会知道这个库远不止于此。
Dlib包含许多有趣的特定于应用程序的算法,例如,它包含面部识别、跟踪、关键点检测等方法。当然,关键点检测本身也可以用于创建各种其他应用程序,如换脸、情感识别。面部操纵等。你已经可以在网上找到很多这样的例子,所以今天我将向你展示Dlib的一个不太为人所知但非常有趣的能力。我将逐步向您展示如何使用Dlib训练一个自定义目标检测器。
Dlib包含一个基于HOG + SVM的检测pipeline。
注:OpenCV也包含一个HOG + SVM检测管道,但就我个人而言,我觉得dlib的实现要干净得多。虽然OpenCV版本给了你更多不同参数的控制。
什么是HOG和SVM?
方向梯度直方图(Histogram of Oriented Gradient, HOG),是一种特征描述符。
什么是特性描述符?
特征描述符是向量(一组数字),这些向量对你来说可能很普通,但对计算机来说,它编码了图像的有用信息。您可以将特征描述符看作图像(或图像补丁)的表示,它包含关于图像内容的有用信息。
例如,一个蓝色背景下的人的特征描述符与另一个背景下的人的特征描述符非常相似。因此,使用这些描述符,您可以匹配包含相同内容的图像,通过这种方式,您可以进行分类、聚类类似的图像,以及其他操作。
在深度学习兴起之前,我们使用特征描述符从图像中获取有用的信息。(直到今天,当没有深度学习的选项时,这个方法仍在使用)。
如今,HOG是最强大的特性描述符之一,有了特征描述符,你可以得到有用的向量,但你仍然需要一个机器学习模型来理解这个向量,并给你一个预测。这就是支持向量机的用武之地。
SVM是一个ML分类器。所以,如果DL不是一个选项,那么SVM + HOG就是你拥有的最好的机器学习方法,以下就是我们算法的处理流程:
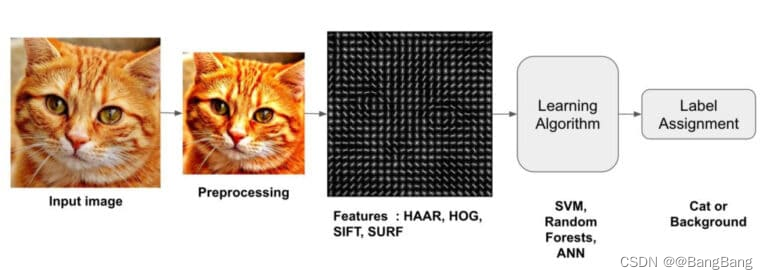
因此,通过使用HOG作为特征描述符,SVM作为我们的学习算法,我们得到了一个鲁棒的ML图像分类器。
但是等等!我们不是要做一个目标检测器,它也输出被检测目标的位置(边界框坐标)吗?
是的,把这个分类器转换成目标检测器是很容易的。您所需要使用的是一个滑动窗口。如果你还不知道,滑动就是它的名字所暗示的在整个图像上滑动的窗口,你可以把它想象成一个核或过滤器。看看下面的插图,窗口从左到右移动覆盖图像。当它到达行尾后,它向下移动一个步幅,然后回到行首。
还有一件事你需要做,使它成为一个完整的检测器,你需要添加图像金字塔,这将使你的检测器尺度不变,它将允许你滑动窗口检测不同大小的目标。你可以在这里了解更多关于图像金字塔的信息。
有深度学习目标检测器,为什么还需使用这种方法?
是的,这是一个有效的问题,因为使用基于DL的方法,你可能会得到一个更好的检测器,但这里的主要好处是,使用这种方法,你会在几秒钟内训练目标检测器,这也只使用你的CPU和少量的数据样本。
本博客主要分两个部分进行介绍:
- 第1部分:使用DLIB训练自定义手检测器
- 第2部分:将手势控制与应用程序集成。
第1部分:使用DLIB训练自定义手检测器
这一部分可以分为以下几个步骤:
步骤1:数据生成和自动标注。
步骤2:数据预处理。
步骤3:显示图像(可选)
步骤4:训练侦探。
步骤5:保存并评估检测器。
步骤6:在实时网络摄像头上测试训练好的检测器。
步骤7:如何进行多目标检测(可选)
导入库
# Import Libraries
import dlib
import glob
import cv2
import os
import sys
import  time
import numpy as np
import matplotlib.pyplot as plt
import pyautogui as pyg
import shutil
步骤1:数据生成和自动标注。
通常情况下,当你训练手检测器时,你需要几张手的图片,然后你需要对它们进行标注,这意味着你必须在每张图片中在手的上方画边框。
有两个选择
选项1:手动标注图像
录一段自己的视频,在视频中挥动你的手,移动它,旋转一点,等等,但不要让你的手变形(每次手掌都要面对镜头)。录制完成后,将视频分割成图像,下载标注工具。可以安装labelimg(一个流行的注释工具),只需执行以下操作:pip install labelimg。在此之后,您必须用边界框标注每个图像。取决于图像的数量,可能需要几个小时来标注。
选项2:自动化标注
更聪明的方法是在收集训练图像时自动执行标注过程。我们要怎么做呢?
你所需要做的就是使用一个滑动窗口,我已经在上面解释了什么是滑动窗口。
现在我们要做的是把我们的手放在窗口里面每当窗口移动时,我们会随之移动手,完成后我们会保存图像和标注。
通过这种方式,我们将实现标注过程的自动化。多酷啊。
下面的脚本就是这样做的,它将图像保存在名为training_images的文件夹中,并将窗口框位置追加到python列表中。
# If cleanup is True then the new images and annotations will be appended to previous ones
# If False then all previous images and annotations will be deleted.
cleanup = True

# Set the window to a normal one so we can adjust it
cv2.namedWindow('frame', cv2.WINDOW_NORMAL)

# Resize the window and adjust it to the center
# This is done so we're ready for capturing the images.
cv2.resizeWindow('frame', 1920,1080)
cv2.moveWindow("frame", 0,0)

# Initialize webcam
cap = cv2.VideoCapture(0,cv2.CAP_DSHOW)

# Initalize sliding window's x1,y1
x1 ,y1 = 0,0

# These will be the width and height of the sliding window.
window_width = 190#140
window_height = 190

# We will save images after every 4 frames
# This is done so we don't have lot's of duplicate images
skip_frames = 3
frame_gap = 0

# This is the directory where our images will be stored
# Make sure to change both names if you're saving a different Detector
directory = 'train_images_h'
box_file = 'boxes_h.txt'

# If cleanup is True then delete all imaages and bounding_box annotations.
if cleanup:

    # Delete the images directory if it exists
    if os.path.exists(directory):
        shutil.rmtree(directory)

    # Clear up all previous bounding boxes
    open(box_file, 'w').close()

    # Initialize the counter to 0
    counter = 0

elif os.path.exists(box_file):

    # If cleanup is false then we must append the new boxes with the old
    with open(box_file,'r') as text_file:
        box_content = text_file.read()

    # Set the counter to the previous highest checkpoint
    counter = int(box_content.split(':')[-2].split(',')[-1])

# Open up this text file or create it if it does not exists
fr = open(box_file, 'a')

# Create our image directory if it does not exists.
if not os.path.exists(directory):
   os.mkdir(directory)

# Initial wait before you start recording each row
initial_wait = 0

# Start the loop for the sliding window
while(True):

    # Start reading from camera
    ret, frame = cap.read()
    if not ret:
        break

    # Invert the image laterally to get the mirror reflection.
    frame = cv2.flip( frame, 1 )

    # Make a copy of the original frame
    orig = frame.copy()

    # Wait the first 50 frames so that you can place your hand correctly
    if initial_wait > 60:

        # Increment frame_gap by 1.
        frame_gap +=1

        # Move the window to the right by some amount in each iteration.
        if x1 + window_width < frame.shape[1]:
            x1 += 4
            time.sleep(0.1)

        elif y1 + window_height + 270 < frame.shape[1]:

            # If the sliding_window has reached the end of the row then move down by some amount.
            # Also start the window from start of the row
            y1 += 80
            x1 = 0

            # Setting frame_gap and init_wait to 0.
            # This is done so that the user has the time to place the hand correctly
            # in the next row before image is saved.
            frame_gap = 0
            initial_wait = 0

        # Break the loop if we have gone over the whole screen.
        else:
            break

    else:
        initial_wait += 1

    # Save the image every nth frame.
    if frame_gap == skip_frames:

        # Set the image name equal to the counter value
        img_name = str(counter)  + '.png'

        # Save the Image in the defined directory
        img_full_name = directory + '/' + str(counter) +  '.png'
        cv2.imwrite(img_full_name, orig)

        # Save the bounding box coordinates in the text file.
        fr.write('{}:({},{},{},{}),'.format(counter, x1, y1, x1+window_width, y1+window_height))

        # Increment the counter
        counter += 1

        # Set the frame_gap back to 0.
        frame_gap = 0

    # Draw the sliding window
    cv2.rectangle(frame,(x1,y1),(x1+window_width,y1+window_height),(0,255,0),3)

    # Display the frame
    cv2.imshow('frame', frame)
    if cv2.waitKey(1) == ord('q'):
                break

# Release camera and close the file and window
cap.release()
cv2.destroyAllWindows()
fr.close()
[视频]
手势识别2
注意:上述代码的构建是这样的,当你再次运行代码时,它会附加新的图像到之前图像中,这样做是为了您可以收集更多的样本在不同的地方,不同的背景,所以你可以有一个不同的数据集。通过将clear_images变量设置为True,您可以选择删除所有以前的图像。
你们应该知道我们正在训练的检测器并不是一个成熟的手检测器而是一个手掌检测器,这是因为HOG + SVM模型还不够健壮,不能捕捉物体的变形,比如手。如果我们正在训练一个基于深度学习的检测器,那么这就不是一个大问题,但对于这种情况,确保没有采集变形手的图片,并确保手掌正对着相机。
步骤2:数据预处理
在开始训练之前,只需要加载和预处理数据(图像和标签)。
首先,我们将从images目录中提取所有的图像名称。然后我们将使用这些图像的索引来提取它们相关联的边界框。边界框将被转换为dlib矩形格式,然后图像和它的边界框将一起存储在一个字典中,格式为:index:(image, bounding_box)
注意:你可以直接从列表中的位置读取所有图片和标签,但这是一个不好的做法,因为如果你在记录图片后从它的目录中删除一个图片,那就会引起麻烦。理想情况下,如果您觉得train_images目录中的图像不合适,那么应该在训练前清除掉它。
# In this dictionary our images and annotations will be stored.
data = {
    }

# Get the indexes of all images.
image_indexes = [int(img_name.split('.')[0]) for img_name in os.listdir(directory)]

# Shuffle the indexes to have random train/test split later on.
np.random.shuffle(image_indexes)

# Open and read the content of the boxes.txt file
f = open(box_file, "r")
box_content = f.read()

# Convert the bounding boxes to dictionary in the format `index: (x1,y1,x2,y2)` ...
box_dict =  eval( '{' +box_content + '}' )

# Close the file
f.close()

# Loop over all indexes
for index in image_indexes:

    # Read the image in memmory and append it to the list
    img = cv2.imread(os.path.join(directory, str(index) + '.png'))

    # Read the associated bounding_box
    bounding_box = box_dict[index]

    # Convert the bounding box to dlib format
    x1, y1, x2, y2  = bounding_box
    dlib_box = [ dlib.rectangle(left=x1 , top=y1, right=x2, bottom=y2) ]

    # Store the image and the box together
    data[index] = (img, dlib_box)
让我们再检查一下当前图像和框的总数。
print('Number of Images and Boxes Present: {}'.format(len(data)))
Number of Images and Boxes Present: 148
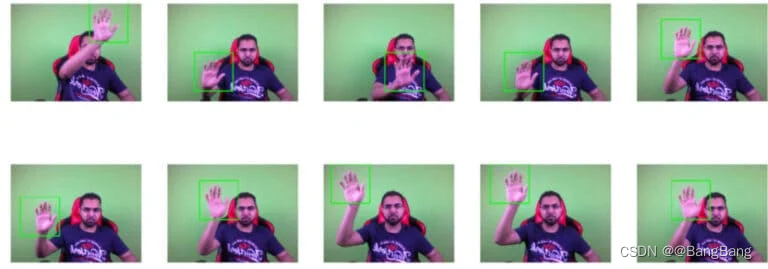
步骤3:显示图像(可选)
可以选择显示图像以及它们的边界框,这样您就可以可视化这些框是否绘制正确。
no_of_samples = 10

image_names = os.listdir(directory)

np.random.shuffle(data)

# Extract the subset of boxes
#subset = data[][:no_of_samples ]

cols = 5

# Given the number of samples to display, what's the number of rows required.
rows = int(np.ceil(no_of_samples / cols))

# Set the figure size
plt.figure(figsize=(cols*cols, rows*cols))

#Loop for each class
for i in range(no_of_samples):

        # Extract the bonding box coordinates
        d_box = data[i][1][0]
        left, top, right,bottom = d_box.left(), d_box.top(), d_box.right(), d_box.bottom()

        # Get the image
        image = data[i][0]

        # Draw reectangle on the detected hand
        cv2.rectangle(image,(left,top),(right,bottom),(0,255,0),3)

        # Display the image
        plt.subplot(rows,cols,i+1);plt.imshow(image[:,:,::-1]);plt.axis('off');
步骤4:训练检测器
可以通过调用dlib.train_simple_object_detector来开始训练检测器。并传入一个图像列表和一个相关的dlib矩形列表。首先,我们将从我们的字典中提取图像和边框矩形,然后将它们传递给训练函数。
在开始训练之前,您还可以指定一些训练选项
# This is the percentage of data we will use to train
# The rest will be used for testing
percent = 0.8

# How many examples make 80%.
split = int(len(data) * percent)

# Seperate the images and bounding boxes in different lists.
images = [tuple_value[0] for tuple_value in data.values()]
bounding_boxes = [tuple_value[1] for tuple_value in data.values()]

# Initialize object detector Options
options = dlib.simple_object_detector_training_options()

# I'm disabling the horizontal flipping, becauase it confuses the detector if you're training on few examples
# By doing this the detector will only detect left or right hand (whichever you trained on).
options.add_left_right_image_flips = False

# Set the c parameter of SVM equal to 5
# A bigger C encourages the model to better fit the training data, it can lead to overfitting.
# So set an optimal C value via trail and error.
options.C = 5

# Note the start time before training.
st = time.time()

# You can start the training now
detector = dlib.train_simple_object_detector(images[:split], bounding_boxes[:split], options)

# Print the Total time taken to train the detector
print('Training Completed, Total Time taken: {:.2f} seconds'.format(time.time() - st))
Training Completed, Total Time taken: 22.48 seconds
步骤5:保存并评估检测器
保存训练好的检测器
现在应该保存检测器,这样下次使用它时就不必再训练它了。该模型的扩展为支持向量机.svm。
file_name = 'Head_Detector.svm'
detector.save(file_name)
查看Hog Descriptor:
可以从下面的代码中查看最终的hog描述符,描述符应该看起来像目标对象。运行此代码后,将弹出一个窗口。
win_det = dlib.image_window()
win_det.set_image(detector)
查看训练指标
可以调用dlib.test_simple_object_detector()在训练数据上测试模型
print("Training Metrics: {}".format(dlib.test_simple_object_detector(images[:split], bounding_boxes[:split], detector)))
Training Metrics: precision: 0.991379, recall: 0.974576, average precision: 0.974576
查看测试指标:
类似地,我们也可以通过使用剩余20%的数据来检查测试指标
print("Testing Metrics: {}".format(dlib.test_simple_object_detector(images[split:], bounding_boxes[split:], detector)))
Testing Metrics: precision: 1, recall: 0.933333, average precision: 0.933333
训练最终的检测器
我们在80%的数据上训练模型,如果您对上面的指标满意,那么现在可以在100%的数据上重新训练检测器。
detector = dlib.train_simple_object_detector(images, bounding_boxes, options)
detector.save(file_name)
你可能已经注意到的一件事是,模型的精度相当高,我们不希望在尝试手势控制游戏时出现任何的false positives。
步骤6:在实时网络摄像头上测试训练检测器
最后让我们测试我们的检测器。现在我们要用训练好的检测器进行推理。你可以通过调用detector = dlib.simple_object_detector()来加载检测器。加载检测器之后,你可以通过使用detector(frame)传入一个帧,如果检测到手,它将返回手的边框位置。
#file_name = 'Hand_Detector.svm'

# Load our trained detector
detector = dlib.simple_object_detector(file_name)

# Set the window name
cv2.namedWindow('frame', cv2.WINDOW_NORMAL)

# Initialize webcam
cap = cv2.VideoCapture(0, cv2.CAP_DSHOW)

# Setting the downscaling size, for faster detection
# If you're not getting any detections then you can set this to 1
scale_factor = 2.0

# Initially the size of the hand and its center x point will be 0
size, center_x = 0,0

# Initialize these variables for calculating FPS
fps = 0
frame_counter = 0
start_time = time.time()

# Set the while loop
while(True):

    # Read frame by frame
    ret, frame = cap.read()

    if not ret:
        break

    # Laterally flip the frame
    frame = cv2.flip( frame, 1 )

    # Calculate the Average FPS
    frame_counter += 1
    fps = (frame_counter / (time.time() - start_time))

    # Create a clean copy of the frame
    copy = frame.copy()

    # Downsize the frame.
    new_width = int(frame.shape[1]/scale_factor)
    new_height = int(frame.shape[0]/scale_factor)
    resized_frame = cv2.resize(copy, (new_width, new_height))

    # Detect with detector
    detections = detector(resized_frame)

    # Loop for each detection.
    for detection in (detections):

        # Since we downscaled the image we will need to resacle the coordinates according to the original image.
        x1 = int(detection.left() * scale_factor )
        y1 =  int(detection.top() * scale_factor )
        x2 =  int(detection.right() * scale_factor )
        y2 =  int(detection.bottom()* scale_factor )

        # Draw the bounding box
        cv2.rectangle(frame,(x1,y1),(x2,y2),(0,255,0), 2 )
        cv2.putText(frame, 'Hand Detected', (x1, y2+20), cv2.FONT_HERSHEY_COMPLEX, 0.6, (0, 0, 255),2)

        # Calculate size of the hand.
        size = int( (x2 - x1) * (y2-y1) )

        # Extract the center of the hand on x-axis.
        center_x = x2 - x1 // 2

    # Display FPS and size of hand
    cv2.putText(frame, 'FPS: {:.2f}'.format(fps), (20, 20), cv2.FONT_HERSHEY_COMPLEX, 0.6, (0, 0, 255),2)

    # This information is useful for when you'll be building hand gesture applications
    cv2.putText(frame, 'Center: {}'.format(center_x), (540, 20), cv2.FONT_HERSHEY_COMPLEX, 0.5, (233, 100, 25))
    cv2.putText(frame, 'size: {}'.format(size), (540, 40), cv2.FONT_HERSHEY_COMPLEX, 0.5, (233, 100, 25))

    # Display the image
    cv2.imshow('frame',frame)

    if cv2.waitKey(1) & 0xFF == ord('q'):
        break

# Relase the webcam and destroy all windows
cap.release()
cv2.destroyAllWindows()
[视频]
手势识别3
我为什么要这么做?
记住,我们的HOG + SVM实际上是一个分类器,允许它成为一个检测器的东西是滑动窗口和图像金字塔。现在我们已经知道,图像越大,滑动窗口遍历它的行和列所需的时间就越多,所以可以肯定地说,如果每帧尺寸小,我们的检测器会运行得更快。
这就是我们缩小框架尺寸的原因。虽然如果你缩小的太多,检测器的精度会受到影响,但你需要找到合适的缩放系数,在我的例子中,2.0的缩放系数可以将尺寸缩小50%,这样可以在速度和精度之间取得最好的平衡。
在调整图像大小并执行检测之后,必须根据原始图像重新调整检测到的坐标。
步骤7:同时使用多个目标检测器
在,如果你想在多个类上训练检测器,而不仅仅是手很不幸,你不能这么做。做到这一点的唯一方法是训练多个检测器,并同时运行它们,这当然会大大降低你的速度。
这里有一线希望,即dlib附带了一个名为dlib.fhog_object_detector.run_multiple()的函数,该函数允许您以有效的方式同时运行多个目标检测器。当然,您添加的检测器越多,您的代码就会变得越慢。这种方法还为每次检测提供了置信度得分。
这里有一个例子,我使用两个检测器,一个放在手上,一个放在脸上
# Load our trained detector
detector = dlib.simple_object_detector(file_name)

# Set the window to normal
cv2.namedWindow('frame', cv2.WINDOW_NORMAL)

# Initialize webcam
cap = cv2.VideoCapture(0, cv2.CAP_DSHOW)

# Setting the downscaling size, for faster detection
# If you're not getting any detections then you can set this to 1
scale_factor = 2.0

# Initially the size of the hand and its center x point will be 0
size, center_x = 0,0

# Initialize these variables for calculating FPS
fps = 0
frame_counter = 0
start_time = time.time()

# load up all the detectors using this function.
hand_detector = dlib.fhog_object_detector("Hand_Detector.svm")
head_detector = dlib.fhog_object_detector("Head_Detector.svm")

# Now insert all detectors in a list
detectors = [hand_detector, head_detector]

# Create a list of detector names in the same order
names = ['Hand Detected', 'Head Detected']

# Set the while loop
while(True):

    # Read frame by frame
    ret, frame = cap.read()

    if not ret:
        break

    # Laterally flip the frame
    frame = cv2.flip( frame, 1 )

    # Calculate the Average FPS
    frame_counter += 1
    fps = (frame_counter / (time.time() - start_time))

    # Create a clean copy of the frame
    copy = frame.copy()

    # Downsize the frame.
    new_width = int(frame.shape[1]/scale_factor)
    new_height = int(frame.shape[0]/scale_factor)
    resized_frame = cv2.resize(copy, (new_width, new_height))

    # Perform the Detection
    # Beside's boxes you will also get confidence scores and ID's of the detector
    [detections, confidences, detector_idxs] = dlib.fhog_object_detector.run_multiple(detectors, resized_frame,
    upsample_num_times=1)

    # Loop for each detected box
    for i in range(len(detections)):

        # Since we downscaled the image we will need to resacle the coordinates according to the original image.
        x1 = int(detections[i].left() * scale_factor )
        y1 =  int(detections[i].top() * scale_factor )
        x2 =  int(detections[i].right() * scale_factor )
        y2 =  int(detections[i].bottom()* scale_factor )

        # Draw the bounding box with confidence scores and the names of the detector
        cv2.rectangle(frame,(x1,y1),(x2,y2),(0,255,0), 2 )
        cv2.putText(frame, '{}: {:.2f}%'.format(names[detector_idxs[i]], confidences[i]*100), (x1, y2+20),
        cv2.FONT_HERSHEY_COMPLEX, 0.6, (0, 0, 255),2)

        # Calculate size of the hand.
        size = int( (x2 - x1) * (y2-y1) )

        # Extract the center of the hand on x-axis.
        center_x = int(x1 + (x2 - x1) / 2)

    # Display FPS and size of hand
    cv2.putText(frame, 'FPS: {:.2f}'.format(fps), (20, 20), cv2.FONT_HERSHEY_COMPLEX, 0.6, (0, 0, 255),2)

    # This information is useful for when you'll be building hand gesture applications
    cv2.putText(frame, 'Center: {}'.format(center_x), (540, 20), cv2.FONT_HERSHEY_COMPLEX, 0.5, (233, 100, 25))
    cv2.putText(frame, 'size: {}'.format(size), (540, 40), cv2.FONT_HERSHEY_COMPLEX, 0.5, (233, 100, 25))

    # Display the image
    cv2.imshow('frame',frame)

    if cv2.waitKey(1) & 0xFF == ord('q'):
        break

# Relase the webcam and destroy all windows
cap.release()
cv2.destroyAllWindows()
[视频]
手势识别4
第2部分:将手势控制与应用程序集成。
现在我们已经学习了如何训练一个单一和多目标检测器,让我们移动到有趣的部分,我们通过手势自动化一个游戏和视频播放器。
在博客中,我将控制以下两个应用程序:
首先,我将控制VLC媒体播放器在视频中暂停/播放或前进/后退。然后使用相同的代码,我将控制一个神庙运行游戏。
当然,您也可以随意控制其他应用程序。
那么我们要如何实现这一点呢?
这非常简单,我们将使用pyautogui库。此库允许您以编程方式控制键盘按钮和鼠标光标。你可以在这里了解更多关于这个库的信息。
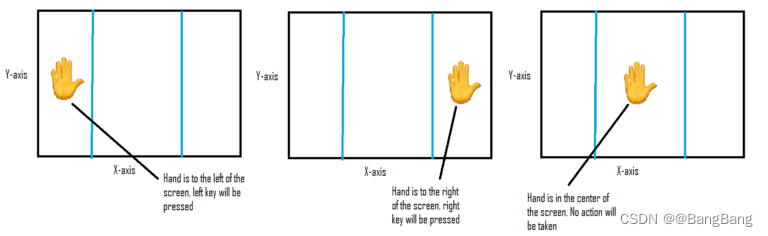
现在我们要做一个程序,当我们把手移到屏幕左边时,pyautogui会按下左边的箭头键当手移到右边时,会按下右边的箭头键。
同样地,如果我们的手离屏幕更近,我们就想按向上键,而手离屏幕更远,我们就想按向下键。
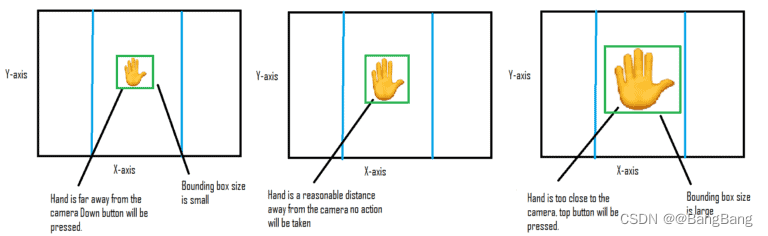
这可以很容易地通过测量手的边框的大小来完成。当手离相机更近或更远时,边框的尺寸会增大或减少。
调整距离阈值
在我们开始控制游戏之前,我们需要设想如何触发按钮,以及我们所定义的阈值是否正确。这个脚本在阈值之间绘制线条,并显示应该按下的按钮。如果这些默认阈值不起作用,那么更改它们,尤其是size_up_th和size_down_th。
# Set these thresholds accordingly.

# If hand size is larger than this then up, button is triggered
size_up_th = 80000

# If hand size is smaller than this then down key is triggered
size_down_th = 25000

# If the center_x location is less than this then left key is triggered
left = 160

# If the center_x location is greater than this then right key is triggered
right = 480

# Load our trained detector
detector = dlib.simple_object_detector('Hand_Detector.svm')

# Set the window to normal
cv2.namedWindow('frame', cv2.WINDOW_NORMAL)

# Initialize webcam
cap = cv2.VideoCapture(0, cv2.CAP_DSHOW)

# Setting the downscaling size, for faster detection
# If you're not getting any detections then you can set this to 1
scale_factor = 2.0

# Initially the size of the hand and its center x point will be 0
size, center_x = 0,0

# Initialize these variables for calculating FPS
fps = 0
frame_counter = 0
start_time = time.time()

# Set the while loop
while(True):

    # Read frame by frame
    ret, frame = cap.read()

    if not ret:
        break

    # Laterally flip the frame
    frame = cv2.flip( frame, 1 )

    # Calculate the Average FPS
    frame_counter += 1
    fps = (frame_counter / (time.time() - start_time))

    # Create a clean copy of the frame
    copy = frame.copy()

    # Downsize the frame.
    new_width = int(frame.shape[1]/scale_factor)
    new_height = int(frame.shape[0]/scale_factor)
    resized_frame = cv2.resize(copy, (new_width, new_height))

    # Detect with detector
    detections = detector(resized_frame)

    # Set Default values
    text = 'No Hand Detected'
    center_x = 0
    size = 0

    # Loop for each detection.
    for detection in (detections):

        # Since we downscaled the image we will need to resacle the coordinates according to the original image.
        x1 = int(detection.left() * scale_factor )
        y1 =  int(detection.top() * scale_factor )
        x2 =  int(detection.right() * scale_factor )
        y2 =  int(detection.bottom()* scale_factor )

        # Calculate size of the hand.
        size = int( (x2 - x1) * (y2-y1) )

        # Extract the center of the hand on x-axis.
        center_x = int(x1 + (x2 - x1) / 2)

        # Draw the bounding box of the detected hand
        cv2.rectangle(frame,(x1,y1),(x2,y2),(0,255,0), 2 )

        # Now based on the size or center_x location set the required text
        if center_x > right:
            text = 'Right'

        elif center_x < left:
            text = 'Left'

        elif size > size_up_th:
            text = 'Up'

        elif size < size_down_th:
            text = 'Down'

        else:
            text = 'Neutral'

    # Now we should draw lines for left/right threshold
    cv2.line(frame, (left,0),(left, frame.shape[0]),(25,25,255), 2)
    cv2.line(frame, (right,0),(right, frame.shape[0]),(25,25,255), 2)

    # Display Center_x value and size.
    cv2.putText(frame, 'Center: {}'.format(center_x), (500, 20), cv2.FONT_HERSHEY_COMPLEX, 0.6, (233, 100, 25), 1)
    cv2.putText(frame, 'size: {}'.format(size), (500, 40), cv2.FONT_HERSHEY_COMPLEX, 0.6, (233, 100, 25))

    # Finally display the text showing which key should be triggered
    cv2.putText(frame, text, (220, 30), cv2.FONT_HERSHEY_COMPLEX, 0.7, (33, 100, 185), 2)

    # Display the image
    cv2.imshow('frame',frame)

    if cv2.waitKey(1) & 0xFF == ord('q'):
        break

# Relase the webcam and destroy all windows
cap.release()
cv2.destroyAllWindows()
[视频]
手势识别5
确保你对上述结果感到满意,并根据你手的位置正确地触发按键,如果不是,那么改变阈值,如果你在检测手时遇到麻烦,那么你必须再次用更多的样本训练检测器。
现在我们已经配置了阈值,我们将制作一个脚本,它将根据这些阈值按下所需的按钮。
Main Function
这是我们的主脚本,它将根据手的运动控制键盘键。现在,通过这个脚本,我已经控制了神庙运行游戏和VLC媒体播放器。
当控制媒体播放器时,我将变量player = True
# Load our trained detector
detector = dlib.simple_object_detector('Hand_Detector.svm')

# Initialize webcam
cap = cv2.VideoCapture(0, cv2.CAP_DSHOW)

# Setting the downscaling size, for faster detection
# If you're not getting any detections then you can set this to 1
scale_factor = 2.0

# Initially the size of the hand and its center x point will be 0
size, center_x = 0,0

# Initialize these variables for calculating FPS
fps = 0
frame_counter = 0
start_time = time.time()

# Set Player = True in order to use this script for the VLC video player
player = True

# This variable is True when we press a key and False when there is no detection.
# It's only used in the video Player
status = False

# We're recording the whole screen to view it later
screen_width, screen_height = tuple(pyg.size())
out = cv2.VideoWriter(r'videorecord.mp4', cv2.VideoWriter_fourcc(*'XVID'), 15.0, (screen_width,screen_height ))

# Set the while loop
while(True):

    try:

        # Read frame by frame
        ret, frame = cap.read()

        if not ret:
            break

        # Laterally flip the frame
        frame = cv2.flip( frame, 1 )

        # Calculate the Average FPS
        frame_counter += 1
        fps = (frame_counter / (time.time() - start_time))

        # Create a clean copy of the frame
        copy = frame.copy()

        # Downsize the frame.
        new_width = int(frame.shape[1]/scale_factor)
        new_height = int(frame.shape[0]/scale_factor)
        resized_frame = cv2.resize(copy, (new_width, new_height))

        # Detect with detector
        detections = detector(resized_frame)

        # Key will initially be None
        key = None

        if len(detections) > 0:

            # Grab the first detection
            detection = detections[0]

            # Since we downscaled the image we will need to resacle the coordinates according to the original image.
            x1 = int(detection.left() * scale_factor )
            y1 =  int(detection.top() * scale_factor )
            x2 =  int(detection.right() * scale_factor )
            y2 =  int(detection.bottom()* scale_factor )

            cv2.rectangle(frame,(x1,y1),(x2,y2),(0,255,0), 2 )
            cv2.putText(frame, 'Hand Detected', (x1, y2+20), cv2.FONT_HERSHEY_COMPLEX, 0.6, (0, 0, 255),2)

            # Calculate size of the hand.
            size = int( (x2 - x1) * (y2-y1) )

            # Extract the center of the hand on x-axis.
            center_x = int(x1 + (x2 - x1) / 2)

            # Press the required button based on center_x location and size
            # The behavior of keys will be different depending upon if we're controlling a game or a video player.
            # The status variable makes sure we do not double press the key in case of a video player.

            if center_x > right:

                key = 'right'
                if player and not status:
                    pyg.hotkey('ctrl', 'right')
                    status = True

            elif center_x < left:

                key = 'left'
                if player and not status:
                    pyg.hotkey('ctrl', 'left')
                    status = True

            elif size > size_up_th:

                key = 'up'
                if player and not status:
                    pyg.press('space')
                    status = True

            elif size < size_down_th:
                key = 'down'

            # Check if we're playing a game then press the required key
            if key is not None and player == False:
                    pyg.press(key)

        # If there wasn't a detection then the status is made False
        else:
            status = False


        # Capture the screen
        image = pyg.screenshot()

        # Convert to BGR, numpy array (Opencv format of image)
        img = cv2.cvtColor(np.array(image), cv2.COLOR_RGB2BGR)

        # Resize the camera frame and attach it to screen.
        resized_frame = cv2.resize(frame, (0,0), fx=0.6, fy=0.6)
        h = resized_frame.shape[0]
        w = resized_frame.shape[1]
        img[0:h, 0:w]  = resized_frame

        # Save the video frame
        out.write(img)

        #time.sleep(0.2)
    except KeyboardInterrupt:
        print('Releasing the Camera and exiting since the program was stopped')
        cap.release()
        out.release()
        sys.exit()
【视频】
手势识别6
现在让我们在一个神庙运行的游戏上运行这个脚本,确保设置player = False。我已经在源代码中包含了这个游戏的链接。
【视频】
手势识别7
我要承认的一件事是,用这种简单的方法玩神庙运行游戏是困难的。这是因为有些游戏对时间非常敏感,你无法用手势取代手指快速连续按压按键的效果。而且你的手很快就会累。我看到的唯一优势是它看起来很酷。
总结
我们学习了如何轻松地使用dlib来训练一个简单的目标检测器,不仅如此,我们还学习了如何自动化烦人的数据收集标注过程。一旦你对图像处理有足够的了解,你就可以想出许多方法,我使用的滑动窗口技术只是其中之一。
我使用的数据采集和标注方法的一个缺点是,最终的检测器在训练背景上过拟合,因此它在不同的背景上表现很差。因此,如果您的意图是拥有一个背景不可知的模型,那么您应该在不同的背景上多次运行数据生成脚本,确保在第一次运行后将clear_images变量设置为False。
我们还学习了如何有效地使用多个检测器与dlib,然后学习手势控制一些应用程序,现在你可以得到真正的创造性和控制各种其他应用程序或游戏。
源代码下载
智能推荐
51单片机的中断系统_51单片机中断篇-程序员宅基地
文章浏览阅读3.3k次,点赞7次,收藏39次。CPU 执行现行程序的过程中,出现某些急需处理的异常情况或特殊请求,CPU暂时中止现行程序,而转去对异常情况或特殊请求进行处理,处理完毕后再返回现行程序断点处,继续执行原程序。void 函数名(void) interrupt n using m {中断函数内容 //尽量精简 }编译器会把该函数转化为中断函数,表示中断源编号为n,中断源对应一个中断入口地址,而中断入口地址的内容为跳转指令,转入本函数。using m用于指定本函数内部使用的工作寄存器组,m取值为0~3。该修饰符可省略,由编译器自动分配。_51单片机中断篇
oracle项目经验求职,网络工程师简历中的项目经验怎么写-程序员宅基地
文章浏览阅读396次。项目经验(案例一)项目时间:2009-10 - 2009-12项目名称:中驰别克信息化管理整改完善项目描述:项目介绍一,建立中驰别克硬件档案(PC,服务器,网络设备,办公设备等)二,建立中驰别克软件档案(每台PC安装的软件,财务,HR,OA,专用系统等)三,能过建立的档案对中驰别克信息化办公环境优化(合理使用ADSL宽带资源,对域进行调整,对文件服务器进行优化,对共享打印机进行调整)四,优化完成后..._网络工程师项目经历
LVS四层负载均衡集群-程序员宅基地
文章浏览阅读1k次,点赞31次,收藏30次。LVS:Linux Virtual Server,负载调度器,内核集成, 阿里的四层SLB(Server Load Balance)是基于LVS+keepalived实现。NATTUNDR优点端口转换WAN性能最好缺点性能瓶颈服务器支持隧道模式不支持跨网段真实服务器要求anyTunneling支持网络private(私网)LAN/WAN(私网/公网)LAN(私网)真实服务器数量High (100)High (100)真实服务器网关lvs内网地址。
「技术综述」一文道尽传统图像降噪方法_噪声很大的图片可以降噪吗-程序员宅基地
文章浏览阅读899次。https://www.toutiao.com/a6713171323893318151/作者 | 黄小邪/言有三编辑 | 黄小邪/言有三图像预处理算法的好坏直接关系到后续图像处理的效果,如图像分割、目标识别、边缘提取等,为了获取高质量的数字图像,很多时候都需要对图像进行降噪处理,尽可能的保持原始信息完整性(即主要特征)的同时,又能够去除信号中无用的信息。并且,降噪还引出了一..._噪声很大的图片可以降噪吗
Effective Java 【对于所有对象都通用的方法】第13条 谨慎地覆盖clone_为继承设计类有两种选择,但无论选择其中的-程序员宅基地
文章浏览阅读152次。目录谨慎地覆盖cloneCloneable接口并没有包含任何方法,那么它到底有什么作用呢?Object类中的clone()方法如何重写好一个clone()方法1.对于数组类型我可以采用clone()方法的递归2.如果对象是非数组,建议提供拷贝构造器(copy constructor)或者拷贝工厂(copy factory)3.如果为线程安全的类重写clone()方法4.如果为需要被继承的类重写clone()方法总结谨慎地覆盖cloneCloneable接口地目的是作为对象的一个mixin接口(详见第20_为继承设计类有两种选择,但无论选择其中的
毕业设计 基于协同过滤的电影推荐系统-程序员宅基地
文章浏览阅读958次,点赞21次,收藏24次。今天学长向大家分享一个毕业设计项目基于协同过滤的电影推荐系统项目运行效果:项目获取:https://gitee.com/assistant-a/project-sharing21世纪是信息化时代,随着信息技术和网络技术的发展,信息化已经渗透到人们日常生活的各个方面,人们可以随时随地浏览到海量信息,但是这些大量信息千差万别,需要费事费力的筛选、甄别自己喜欢或者感兴趣的数据。对网络电影服务来说,需要用到优秀的协同过滤推荐功能去辅助整个系统。系统基于Python技术,使用UML建模,采用Django框架组合进行设
随便推点
你想要的10G SFP+光模块大全都在这里-程序员宅基地
文章浏览阅读614次。10G SFP+光模块被广泛应用于10G以太网中,在下一代移动网络、固定接入网、城域网、以及数据中心等领域非常常见。下面易天光通信(ETU-LINK)就为大家一一盘点下10G SFP+光模块都有哪些吧。一、10G SFP+双纤光模块10G SFP+双纤光模块是一种常规的光模块,有两个LC光纤接口,传输距离最远可达100公里,常用的10G SFP+双纤光模块有10G SFP+ SR、10G SFP+ LR,其中10G SFP+ SR的传输距离为300米,10G SFP+ LR的传输距离为10公里。_10g sfp+
计算机毕业设计Node.js+Vue基于Web美食网站设计(程序+源码+LW+部署)_基于vue美食网站源码-程序员宅基地
文章浏览阅读239次。该项目含有源码、文档、程序、数据库、配套开发软件、软件安装教程。欢迎交流项目运行环境配置:项目技术:Express框架 + Node.js+ Vue 等等组成,B/S模式 +Vscode管理+前后端分离等等。环境需要1.运行环境:最好是Nodejs最新版,我们在这个版本上开发的。其他版本理论上也可以。2.开发环境:Vscode或HbuilderX都可以。推荐HbuilderX;3.mysql环境:建议是用5.7版本均可4.硬件环境:windows 7/8/10 1G内存以上;_基于vue美食网站源码
oldwain随便写@hexun-程序员宅基地
文章浏览阅读62次。oldwain随便写@hexun链接:http://oldwain.blog.hexun.com/ ...
渗透测试-SQL注入-SQLMap工具_sqlmap拖库-程序员宅基地
文章浏览阅读843次,点赞16次,收藏22次。用这个工具扫描其它网站时,要注意法律问题,同时也比较慢,所以我们以之前写的登录页面为例子扫描。_sqlmap拖库
origin三图合一_神教程:Origin也能玩转图片拼接组合排版-程序员宅基地
文章浏览阅读1.5w次,点赞5次,收藏38次。Origin也能玩转图片的拼接组合排版谭编(华南师范大学学报编辑部,广州 510631)通常,我们利用Origin软件能非常快捷地绘制出一张单独的绘图。但是,我们在论文的撰写过程中,经常需要将多种科学实验图片(电镜图、示意图、曲线图等)组合在一张图片中。大多数人都是采用PPT、Adobe Illustrator、CorelDraw等软件对多种不同类型的图进行拼接的。那么,利用Origin软件能否实..._origin怎么把三个图做到一张图上
51单片机智能电风扇控制系统proteus仿真设计( 仿真+程序+原理图+报告+讲解视频)_电风扇模拟控制系统设计-程序员宅基地
文章浏览阅读4.2k次,点赞4次,收藏51次。51单片机智能电风扇控制系统仿真设计( proteus仿真+程序+原理图+报告+讲解视频)仿真图proteus7.8及以上 程序编译器:keil 4/keil 5 编程语言:C语言 设计编号:S0042。_电风扇模拟控制系统设计