caffe源码解读(11)-triplet_loss_layer.cpp_三元组损失 caffe-程序员宅基地
定义
TripletLoss T r i p l e t L o s s 的提出,是在这篇论文中——FaceNet: A Unified Embedding for Face Recognition and Clustering,论文中对 TripletLoss T r i p l e t L o s s 的定义如下:
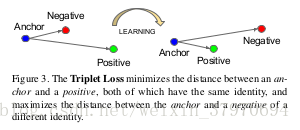
如上图所示, triplet t r i p l e t 是一个三元组,这个三元组是主要构成的:从训练样本中随机选取一个样本,称为 anchor(xa) a n c h o r ( x a ) ,然后再随机分别选取一个和 anchor a n c h o r 类别相同的样本 positive(xp) p o s i t i v e ( x p ) 以及和 anchor a n c h o r 类别不同的样本 negative(xn) n e g a t i v e ( x n ) ,因此构成了[ anchor,positive,negative a n c h o r , p o s i t i v e , n e g a t i v e ]三元组。 TripletLoss T r i p l e t L o s s 的作用就是让特征表达 xa x a 与 xp x p 之间的距离尽可能小,让 xa x a 与 xn x n 的距离尽可能大。
公式
参考博文链接
同时,要让 xa x a 与 xn x n 之间的距离和 xa x a 与 xp之间的距离有一个最小的间隔 x p 之 间 的 距 离 有 一 个 最 小 的 间 隔 α α ,公式化的表示即:
对应的目标函数 L L :这里距离用欧式距离度量, 表示[.]内的值大于0的时候,取该值为损失,小于0的时候,损失为0。
对目标函数 L L 求导:
代码
参数:
anchor−−>bottom[0]:N∗C∗1∗1 a n c h o r − − > b o t t o m [ 0 ] : N ∗ C ∗ 1 ∗ 1
positive−−>bottom[1]:N∗C∗1∗1 p o s i t i v e − − > b o t t o m [ 1 ] : N ∗ C ∗ 1 ∗ 1
negative−−>bottom[2]:N∗C∗1∗1 n e g a t i v e − − > b o t t o m [ 2 ] : N ∗ C ∗ 1 ∗ 1
(1)caffe.proto
层参数定义文件位于src/caffe/proto/caffe.proto
optional TripletLossParameter triplet_loss_param = 6667;message TripletLossParameter {
//margin for negative triplet
optional float margin = 1 [default = 1.0];
}(2)LayerSetUp
 template <typename Dtype>
  void TripletLossLayer<Dtype>::LayerSetUp(
    const vector<Blob<Dtype>*>& bottom, const vector<Blob<Dtype>*>& top) {
    LossLayer<Dtype>::LayerSetUp(bottom, top);
    //输入数据维度保持一致
    CHECK_EQ(bottom[0]->num(), bottom[1]->num());
    CHECK_EQ(bottom[1]->num(), bottom[2]->num());
    CHECK_EQ(bottom[0]->channels(), bottom[1]->channels());
    CHECK_EQ(bottom[1]->channels(), bottom[2]->channels());
    CHECK_EQ(bottom[0]->height(), 1);
    CHECK_EQ(bottom[0]->width(), 1);
    CHECK_EQ(bottom[1]->height(), 1);
    CHECK_EQ(bottom[1]->width(), 1);
    CHECK_EQ(bottom[2]->height(), 1);
    CHECK_EQ(bottom[2]->width(), 1);

    diff_ap_.Reshape(bottom[0]->num(), bottom[0]->channels(), 1, 1);
    diff_an_.Reshape(bottom[0]->num(), bottom[0]->channels(), 1, 1);
    diff_pn_.Reshape(bottom[0]->num(), bottom[0]->channels(), 1, 1);

    diff_sq_ap_.Reshape(bottom[0]->num(), bottom[0]->channels(), 1, 1);
    diff_sq_an_.Reshape(bottom[0]->num(), bottom[0]->channels(), 1, 1);
    dist_sq_ap_.Reshape(bottom[0]->num(), 1, 1, 1);
    dist_sq_an_.Reshape(bottom[0]->num(), 1, 1, 1);
    // vector of ones used to sum along channels
    summer_vec_.Reshape(bottom[0]->channels(), 1, 1, 1);
    for (int i = 0; i < bottom[0]->channels(); ++i)
      summer_vec_.mutable_cpu_data()[i] = Dtype(1);
    dist_binary_.Reshape(bottom[0]->num(), 1, 1, 1);
    for (int i = 0; i < bottom[0]->num(); ++i)
      dist_binary_.mutable_cpu_data()[i] = Dtype(1);
  }
(3)Forward
  template <typename Dtype>
  void TripletLossLayer<Dtype>::Forward_cpu(
    const vector<Blob<Dtype>*>& bottom,
    const vector<Blob<Dtype>*>& top) {
    int count = bottom[0]->count();

    //const Dtype* sampleW = bottom[3]->cpu_data();
    const Dtype sampleW = Dtype(1);
    caffe_sub(
      count,
      bottom[0]->cpu_data(),  // anchor
      bottom[1]->cpu_data(),  // positive
      diff_ap_.mutable_cpu_data());  // a_i-p_i
    caffe_sub(
      count,
      bottom[0]->cpu_data(),  // anchor
      bottom[2]->cpu_data(),  // negative
      diff_an_.mutable_cpu_data());  // a_i-n_i
    caffe_sub(
      count,
      bottom[1]->cpu_data(),  // positive
      bottom[2]->cpu_data(),  // negative
      diff_pn_.mutable_cpu_data());  // p_i-n_i
    const int channels = bottom[0]->channels();
    Dtype margin = this->layer_param_.triplet_loss_param().margin();//参数\alpha

    Dtype loss(0.0);
    for (int i = 0; i < bottom[0]->num(); ++i) {
    //dist_sq_ap_=diff_ap_.cpu_data*diff_ap_.cpu_data
    //即Loss表达式的前半部分
      dist_sq_ap_.mutable_cpu_data()[i] = caffe_cpu_dot(channels,
                                                        diff_ap_.cpu_data() + (i*channels), diff_ap_.cpu_data() + (i*channels));
   //dist_sq_an_=diff_an_.cpu_data*diff_an_.cpu_data
   //即Loss表达式的后半部分
      dist_sq_an_.mutable_cpu_data()[i] = caffe_cpu_dot(channels,
                                                        diff_an_.cpu_data() + (i*channels), diff_an_.cpu_data() + (i*channels));
      Dtype mdist = sampleW*std::max(margin + dist_sq_ap_.cpu_data()[i] - dist_sq_an_.cpu_data()[i], Dtype(0.0));//Loss公式
      loss += mdist;
      if (mdist < Dtype(1e-9)) {
        //dist_binary_.mutable_cpu_data()[i] = Dtype(0);
        //prepare for backward pass
        //对diff_ap_、diff_an_、diff_pn_进行初始化
        caffe_set(channels, Dtype(0), diff_ap_.mutable_cpu_data() + (i*channels));
        caffe_set(channels, Dtype(0), diff_an_.mutable_cpu_data() + (i*channels));
        caffe_set(channels, Dtype(0), diff_pn_.mutable_cpu_data() + (i*channels));
      }
    }
    loss = loss / static_cast<Dtype>(bottom[0]->num()) / Dtype(2);
    top[0]->mutable_cpu_data()[0] = loss;//将loss向前传播输出至top
  }
(4)Backward
template <typename Dtype>
  void TripletLossLayer<Dtype>::Backward_cpu(const vector<Blob<Dtype>*>& top,
                                             const vector<bool>& propagate_down, const vector<Blob<Dtype>*>& bottom) {
    //Dtype margin = this->layer_param_.contrastive_loss_param().margin();
    //const Dtype* sampleW = bottom[3]->cpu_data();
    const Dtype sampleW = Dtype(1);

    for (int i = 0; i < 3; ++i) {
   //3个输入bottom都需要做反向传播
      if (propagate_down[i]) {
        const Dtype sign = (i < 2) ? -1 : 1;
        const Dtype alpha = sign * top[0]->cpu_diff()[0] /
          static_cast<Dtype>(bottom[i]->num());
        int num = bottom[i]->num();
        int channels = bottom[i]->channels();
        for (int j = 0; j < num; ++j) {
          Dtype* bout = bottom[i]->mutable_cpu_diff();
          if (i == 0) {
            //对输入bottom[0]anchor求导
            //caffe_cpu_axpby:Y=aX+bY
            //diff_pn_=alpha*sampleW*diff_pn_
            caffe_cpu_axpby(
              channels,
              alpha*sampleW,
              diff_pn_.cpu_data() + (j*channels),
              Dtype(0.0),
              bout + (j*channels));
          }
          else if (i == 1) {
            //对输入bottom[1]positive求导
            //diff_ap_=alpha*sampleW*diff_ap_
            caffe_cpu_axpby(
              channels,
              alpha*sampleW,
              diff_ap_.cpu_data() + (j*channels),
              Dtype(0.0),
              bout + (j*channels));
          }
          else if (i == 2) {
            // 对输入bottom[2]negative求导
            //diff_an_=alpha*sampleW*diff_an_
            caffe_cpu_axpby(
              channels,
              alpha*sampleW,
              diff_an_.cpu_data() + (j*channels),
              Dtype(0.0),
              bout + (j*channels));
          }
        }
      }
    }
}智能推荐
web表单注册验证过程及源码_注册表单里面性别代码怎么写-程序员宅基地
文章浏览阅读3.1k次。效果图: 第一部分:学习要点:1.核心方法2.option 参数3.工具方法传统的表单提交,需要多次跳转页面,极大的消耗资源也缺乏良好的用户体验。而这款form.js 表单的 Ajax 提交插件将解决这个问题。一.核心方法官方网站:http://ma_注册表单里面性别代码怎么写
OmniGraffle 7 Mac 注册码(仅做记录)_omnigraffle7许可证密钥-程序员宅基地
文章浏览阅读8k次。OmniGraffle 7 Mac 注册码账号:Appked密码:MFWG-GHEB-HYTW-CGHT-CSXU-QCNC-SXU_omnigraffle7许可证密钥
宝塔搭建ECS下载站时Apache httpd访问出现中文路径与文件名乱码问题的解决方法_宝塔 下载文件名乱码-程序员宅基地
文章浏览阅读1k次。宝塔搭建ECS下载站时Apache httpd访问出现路径与文件名乱码问题的解决方法_宝塔 下载文件名乱码
Exception in thread "main" java.net.BindException: 无法指定被请求的地址: Service 'sparkMaster' failed 错误处理_"exception in thread \"main\" java.net.bindexcepti-程序员宅基地
文章浏览阅读3.4k次。1、搭建 Spark 的HA环境时报如下错误Spark Command: /root/training/jdk1.8.0_144/bin/java -cp /root/training/spark-2.1.0-bin-hadoop2.7/conf/:/root/training/spark-2.1.0-bin-hadoop2.7/jars/* -Xmx1g org.apache.spark.dep..._"exception in thread \"main\" java.net.bindexception: 无法指定被请求的地址: ser"
MAC OS真正提权,告别rootless_苹果提权原理-程序员宅基地
文章浏览阅读4.7k次。自从升到OS X 10.11 EI Capitan 以后,mac的root权限就真的变成rootless了。主要是因为苹果在10.11开始弄了个新的安全措施, System Integrity Protection(SIP,但都管它叫rootless =v=)。于是现在就算你使用root用户,也动不了三个系统目录下的东西(当然一般情况下也用不着动这些东西):/System/sbin/us_苹果提权原理
怎样在LaTeX中增加代表通讯作者的信封符号_latex中信封符号怎么打-程序员宅基地
文章浏览阅读8k次,点赞8次,收藏5次。先吐槽两句:昨天提交了一篇论文修改稿,结果过了两个小时被退回来了,说让我在第一页显著标明通讯作者。问题是,我这篇论文已经是三审了,为啥前两次没说呢?不得不说,这些学术期刊的这种手工作坊式的管理真和这个时代脱节太严重,如果我们提交论文有网购或者发顺丰快递时候的体验,也要比现在强得多啊(例如审稿人选定、邀请、审稿、返回都应该更加透明高效一些),我有一篇论文已经审了7个月没动静了,这个行业实在太落后。简单搜了一下,发现了两种方法:https://latex.org/forum/viewtopic.php?t=_latex中信封符号怎么打
随便推点
jsdbc mysql.ocx_JS直接访问数据 -SQLite | 学步园-程序员宅基地
文章浏览阅读146次。JavaScript DataBase ConnectorJSDBC:提供Javascript有效的连接数据库,目前支持MySQL、SQLite、ACCESS,后期会支持更多的数据库;在从事AJAX开发的工程师肯定会希望有一个通过AJAX直接连接数据库的组件,这样,可以省掉后台很多的操作步骤,比如免去了部署JAVA的运行环境,免去了写很多复杂的JDBC调用,不管出于调试的需要还是应用的需要,JSD..._jsdbc
一种巧妙获取Android状态栏高度的办法_getresources().getidentifier("status_bar_height-程序员宅基地
文章浏览阅读1.2k次。这是在我研究相对布局和绝对布局的时候顺带发现的。我们都知道,普通的Android界面如图所示,从上到下依次是statusbar,actionbar,内容,虚拟按键。要获取状态栏高度,一种比较常规的做法是: private int getStatusBarHeight(Context context) { int result = 0; _getresources().getidentifier("status_bar_height
android源码编译记录_android打开编译终端记录-程序员宅基地
文章浏览阅读336次。android源码编译_android打开编译终端记录
docker运行grafana_docker 部署 grafana.ini 配置 root_url-程序员宅基地
文章浏览阅读2.1k次。官方文档:http://docs.grafana.org/docker run -d -p 3000:3000 --name=grafana --network host \-e "GF_SERVER_ROOT_URL=http://grafana.server.name" \-e "GF_SECURITY_ADMIN_PASSWORD=admin" \grafana/grafana..._docker 部署 grafana.ini 配置 root_url
【rocketmq启动nameserver失败】_nameserver:未找到命令-程序员宅基地
文章浏览阅读1.4k次。【rocketmq启动nameserver失败】_nameserver:未找到命令
Unity 打包后 无阴影 阴影不显示_unity打包出来没有阴影了-程序员宅基地
文章浏览阅读1w次,点赞7次,收藏14次。今天工作的时候发现,打包后阴影没办法显示浪费整整两个小时一直以为是代码问题。。。原来是因为默认渲染设置的问题。。。看下图very low 、low、medium默认是不开启阴影的---打开build settings-playersettings。。。如果你的打包设置不显示渲染级别的窗口那就默认会选择low。。。包括第二个选项(Hidden by Default)如果你把打包好的工程给别人之后,默..._unity打包出来没有阴影了