Camunda ServiceTask_camunda service task-程序员宅基地
技术标签: Camunda从入门到实战 serviceTask
一:Java class
Java class实现JavaDelegate接口,只需要配置类的全限定名即可,不需要被Spring容器管理。
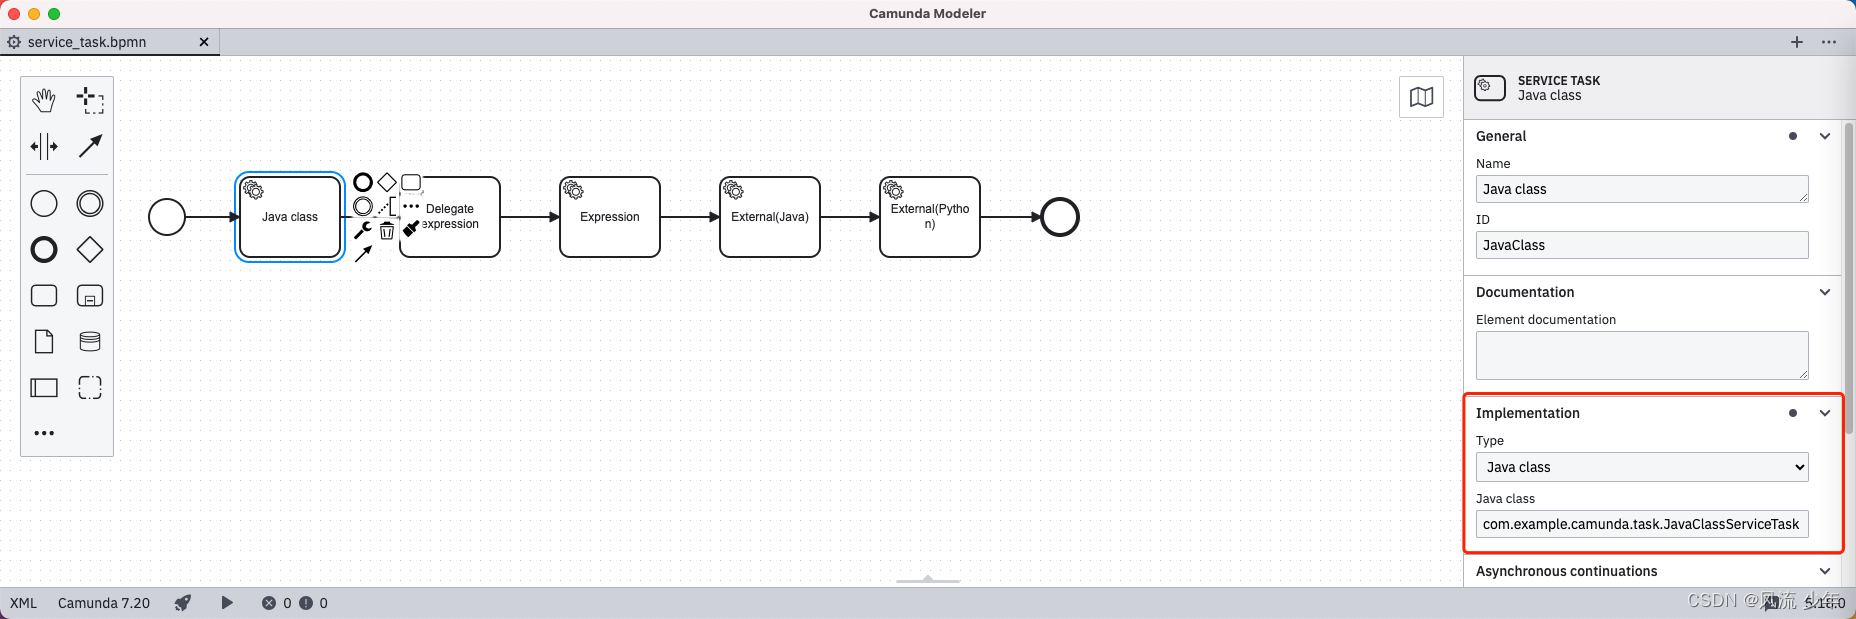
public class JavaClassServiceTask implements JavaDelegate {

    @Override
    public void execute(DelegateExecution execution) throws Exception {

        System.out.println("JavaClassServiceTask");
        String currentActivityId = execution.getCurrentActivityId();
        execution.setVariable(currentActivityId, "ok");
    }
}
二:Delegate expression
实现JavaDelegate接口,配置成Bean的名字即可。
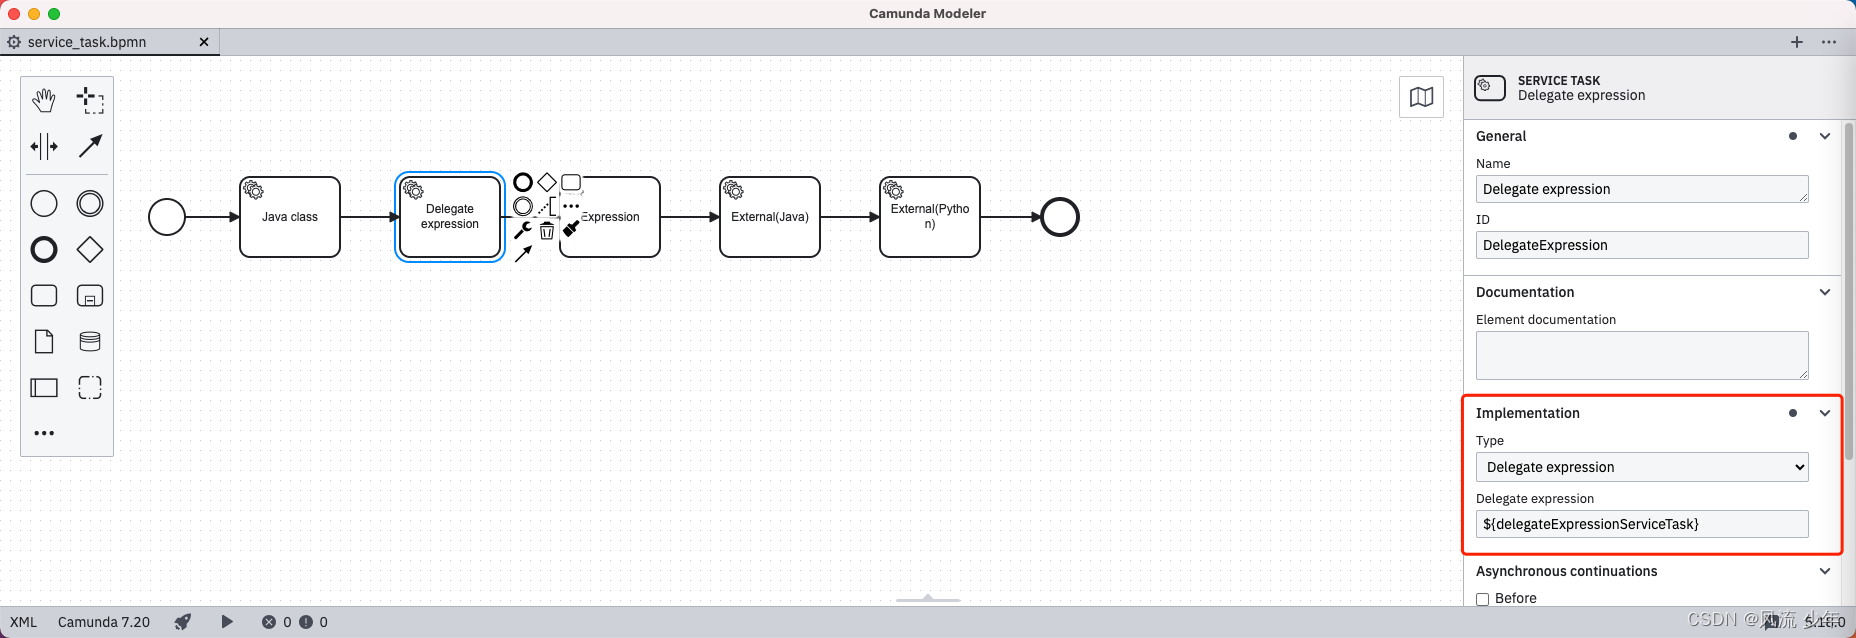
@Service
public class DelegateExpressionServiceTask implements JavaDelegate {

    @Override
    public void execute(DelegateExecution execution) throws Exception {

        System.out.println(execution.getVariable("JavaClass"));
        System.out.println("DelegateExpressionServiceTask");
    }
}
三:Expression
配置成普通的方法调用,可以是任意类的任意方法,方法的返回值会赋值给Result variable变量,该变量可以从下一个节点获取。
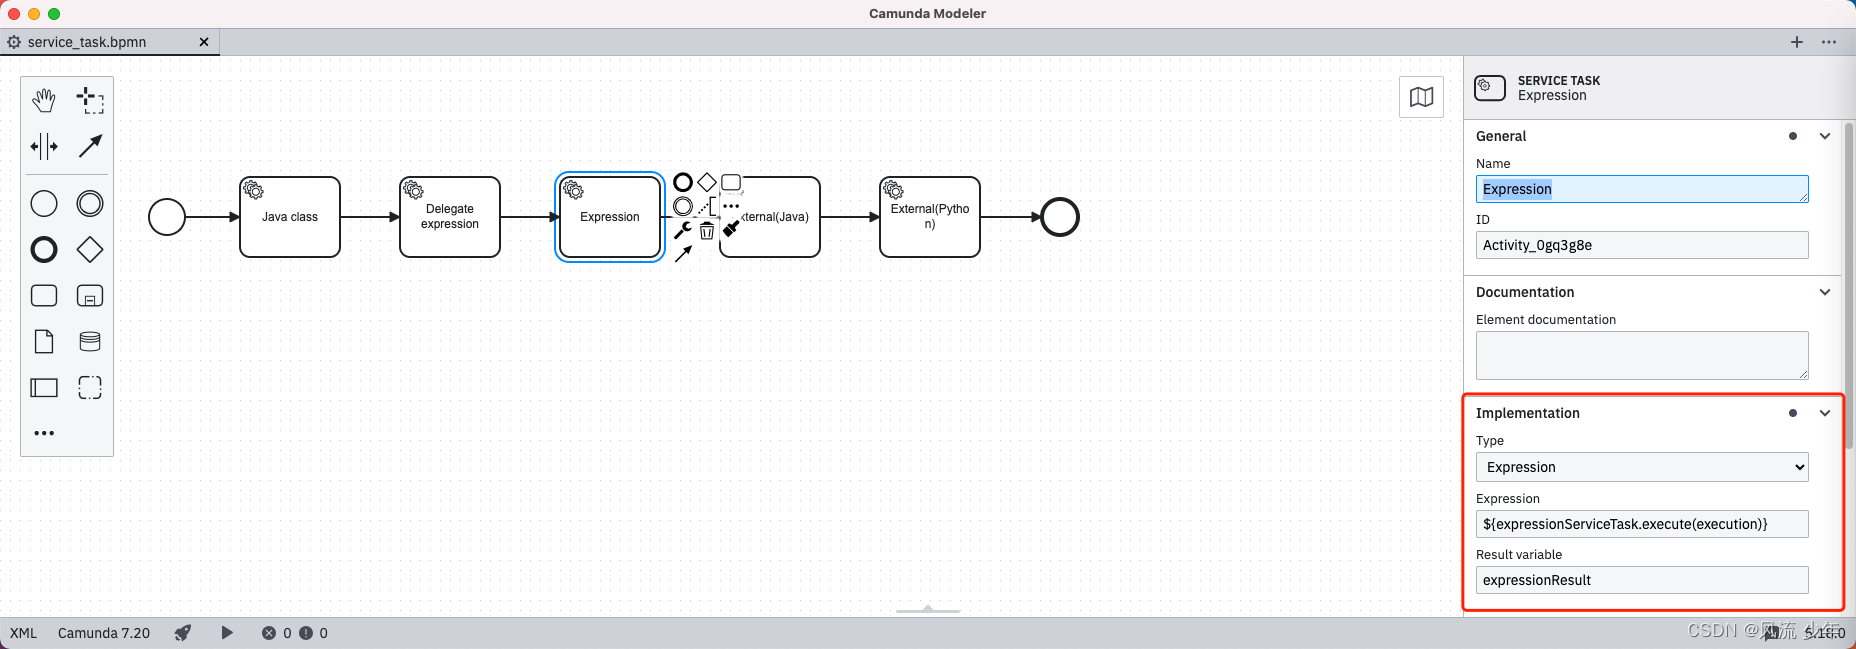
@Service
public class ExpressionServiceTask {


    public boolean execute(DelegateExecution execution) {

        System.out.println("ExpressionServiceTask");
        return true;
    }
}
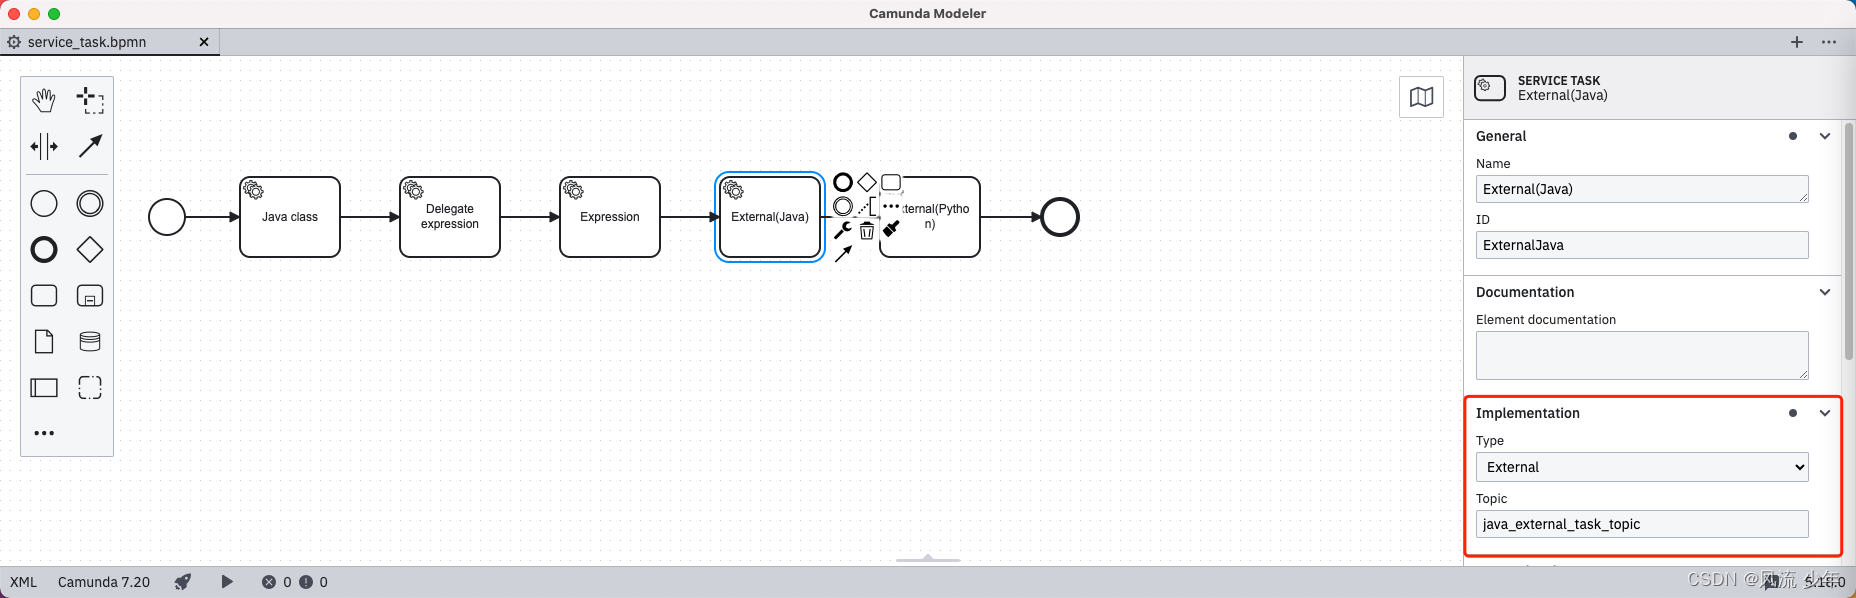
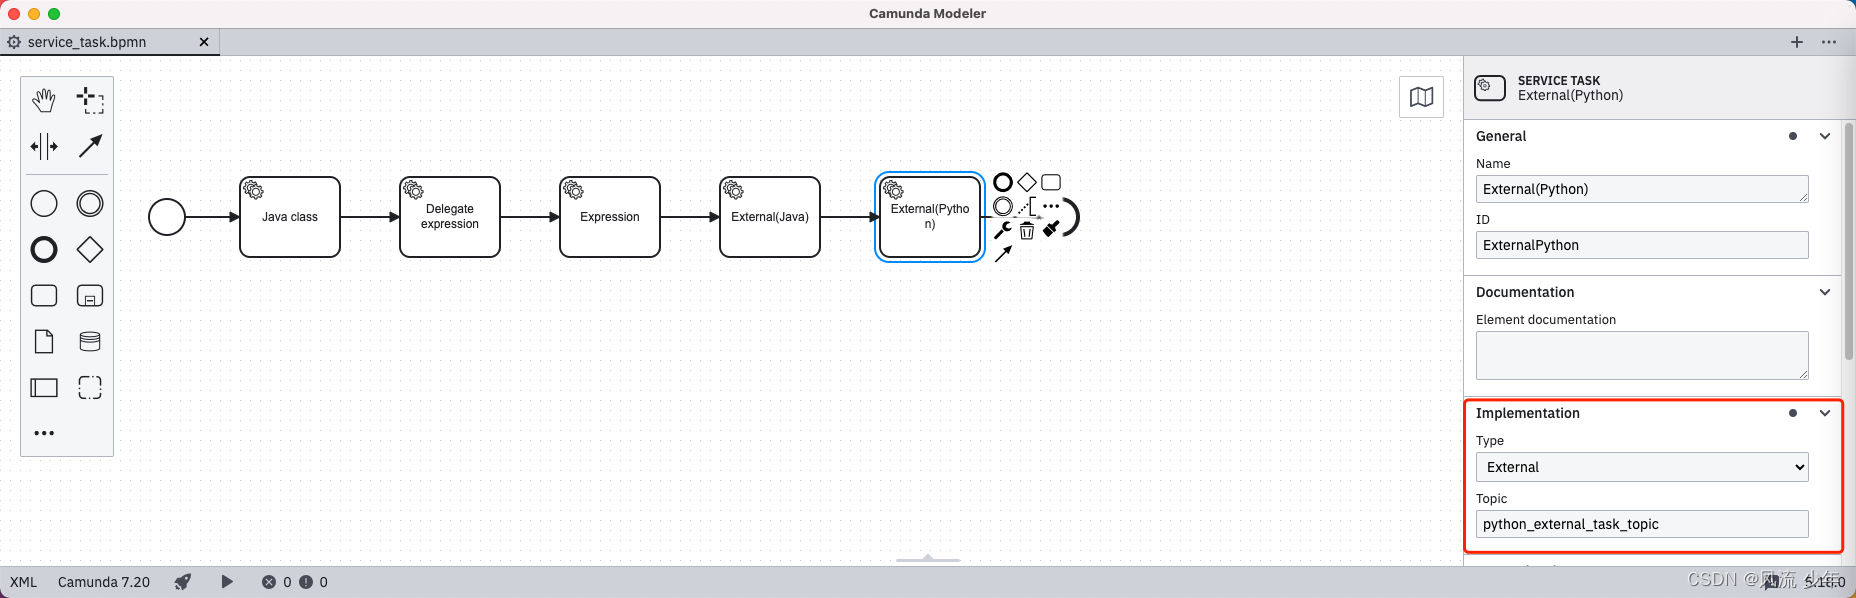
四:External
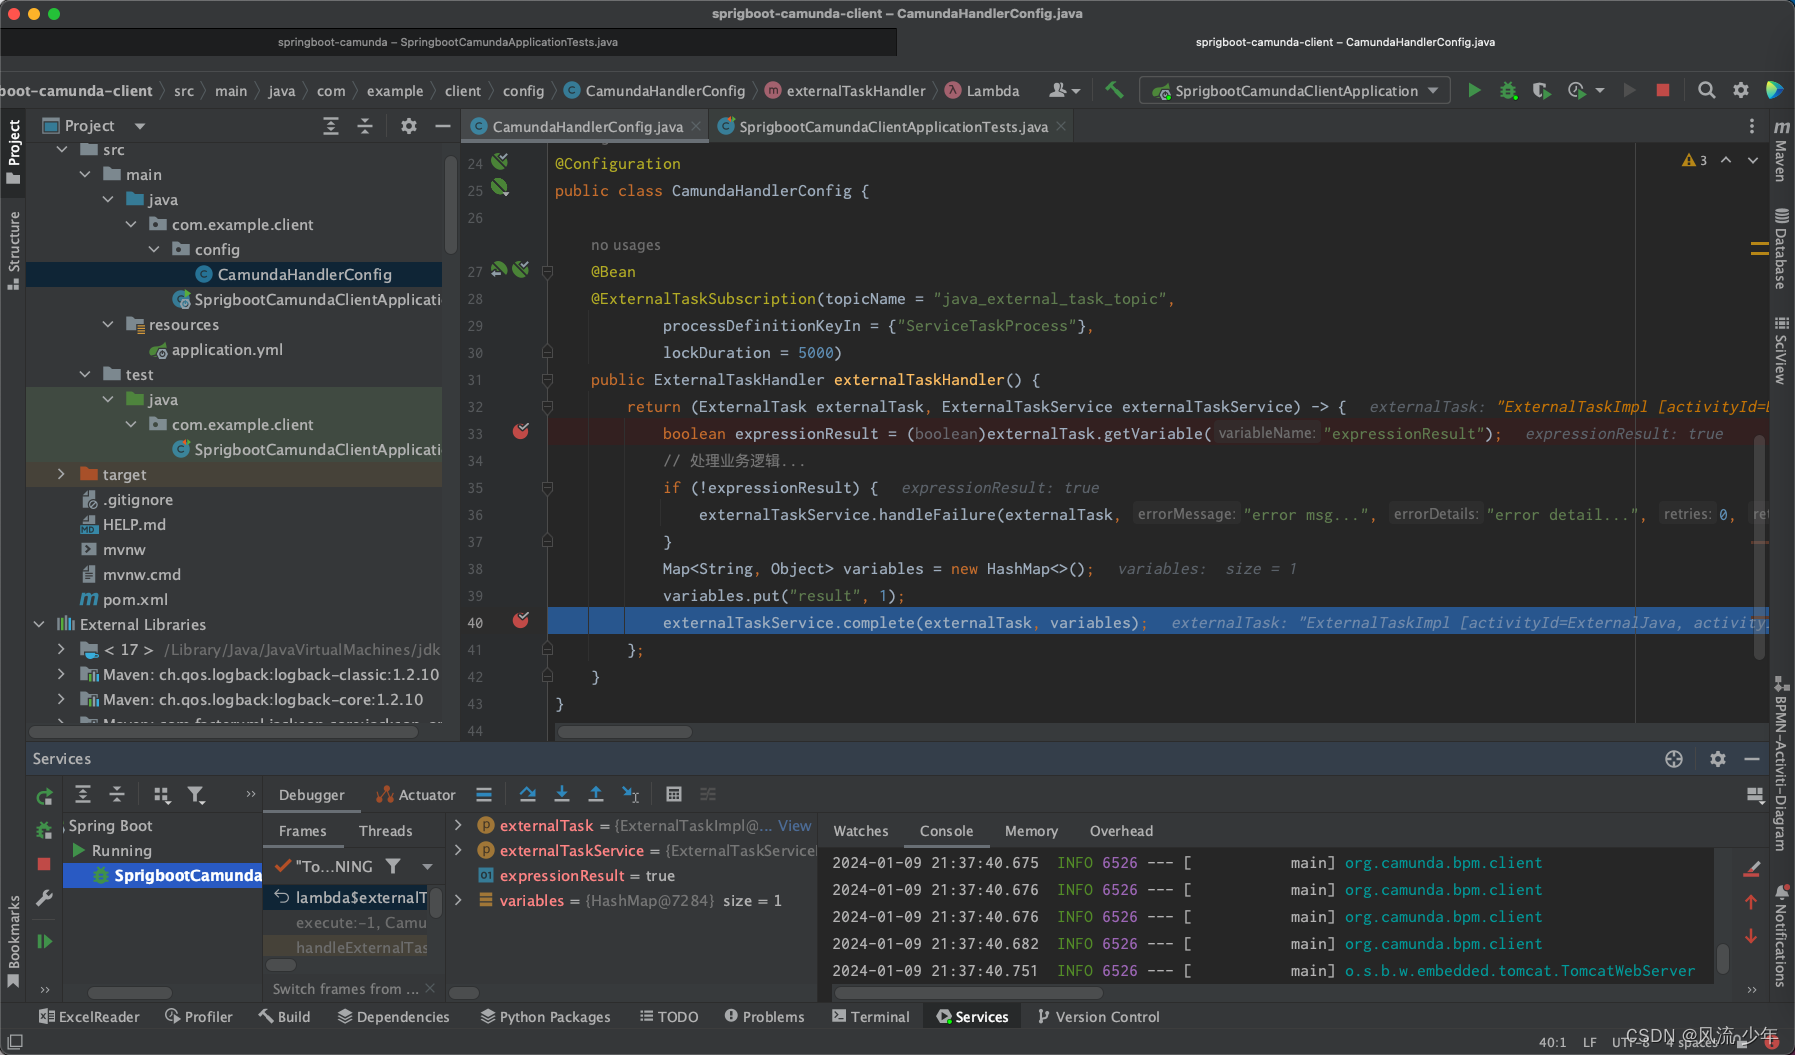
@Configuration
public class CamundaHandlerConfig {


    @Bean
    @ExternalTaskSubscription(topicName = "java_external_task_topic",
            processDefinitionKeyIn = {
    "ServiceTaskProcess"},
            lockDuration = 5000)
    public ExternalTaskHandler externalTaskHandler() {

        return (ExternalTask externalTask, ExternalTaskService externalTaskService) -> {

            boolean expressionResult = (boolean)externalTask.getVariable("expressionResult");
            // 处理业务逻辑...
            if (!expressionResult) {

                externalTaskService.handleFailure(externalTask, "error msg...", "error detail...", 0, 5000);
            }
            Map<String, Object> variables = new HashMap<>();
            variables.put("result", 1);
            externalTaskService.complete(externalTask, variables);
        };
    }
}
# pip3 install camunda-external-task-client-python3
# pip3 install pydantic
from camunda.external_task.external_task import ExternalTask, TaskResult
from camunda.external_task.external_task_worker import ExternalTaskWorker
default_config = {
"maxTasks": 1, # 一次只拉一个任务,这样多实例处理就不会所有任务被一个实例锁住
"lockDuration": 10000, # 锁任务的时间
"asyncResponseTimeout": 30000,
"retries": 0,
"retryTimeout": 5000,
"sleepSeconds": 30000, # 每次拉取的间隔时间
"auth_basic": {
"username": "admin", "password": "123456"}
}
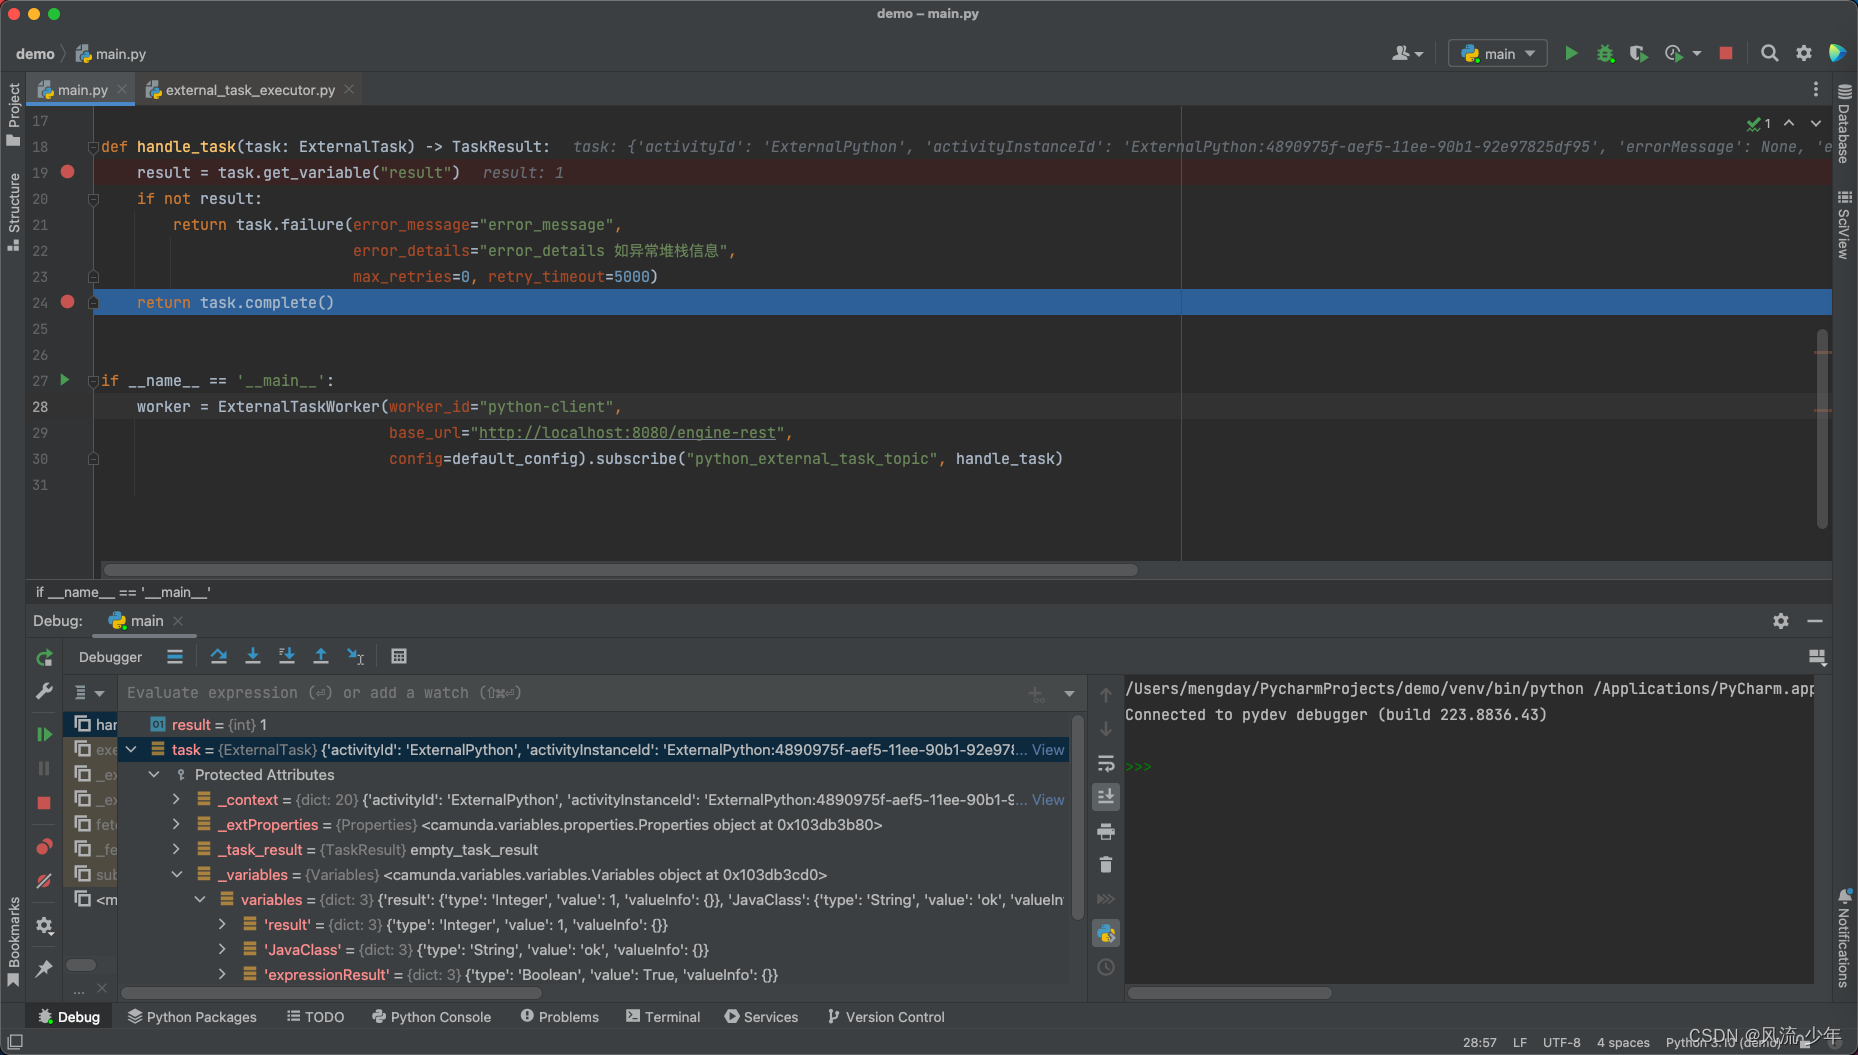
def handle_task(task: ExternalTask) -> TaskResult:
result = task.get_variable("result")
if result:
return task.failure(error_message="error_message",
error_details="error_details 如异常堆栈信息",
max_retries=0, retry_timeout=5000)
return task.complete()
if __name__ == '__main__':
worker = ExternalTaskWorker(worker_id="python-client",
base_url="http://localhost:8080/engine-rest",
config=default_config).subscribe("python_external_task_topic", handle_task)
五:运行
- 启动工作流引擎
- 启动Java客户端
- 启动Python客户端
repositoryService.createDeployment()
       .name("服务任务流程")
       .addClasspathResource("bpmn/service_task.bpmn")
       .deploy();

identityService.setAuthenticatedUserId("huihui");
ProcessInstance processInstance = runtimeService.startProcessInstanceByKey("ServiceTaskProcess");
System.out.println("processInstance=" + processInstance.getId());

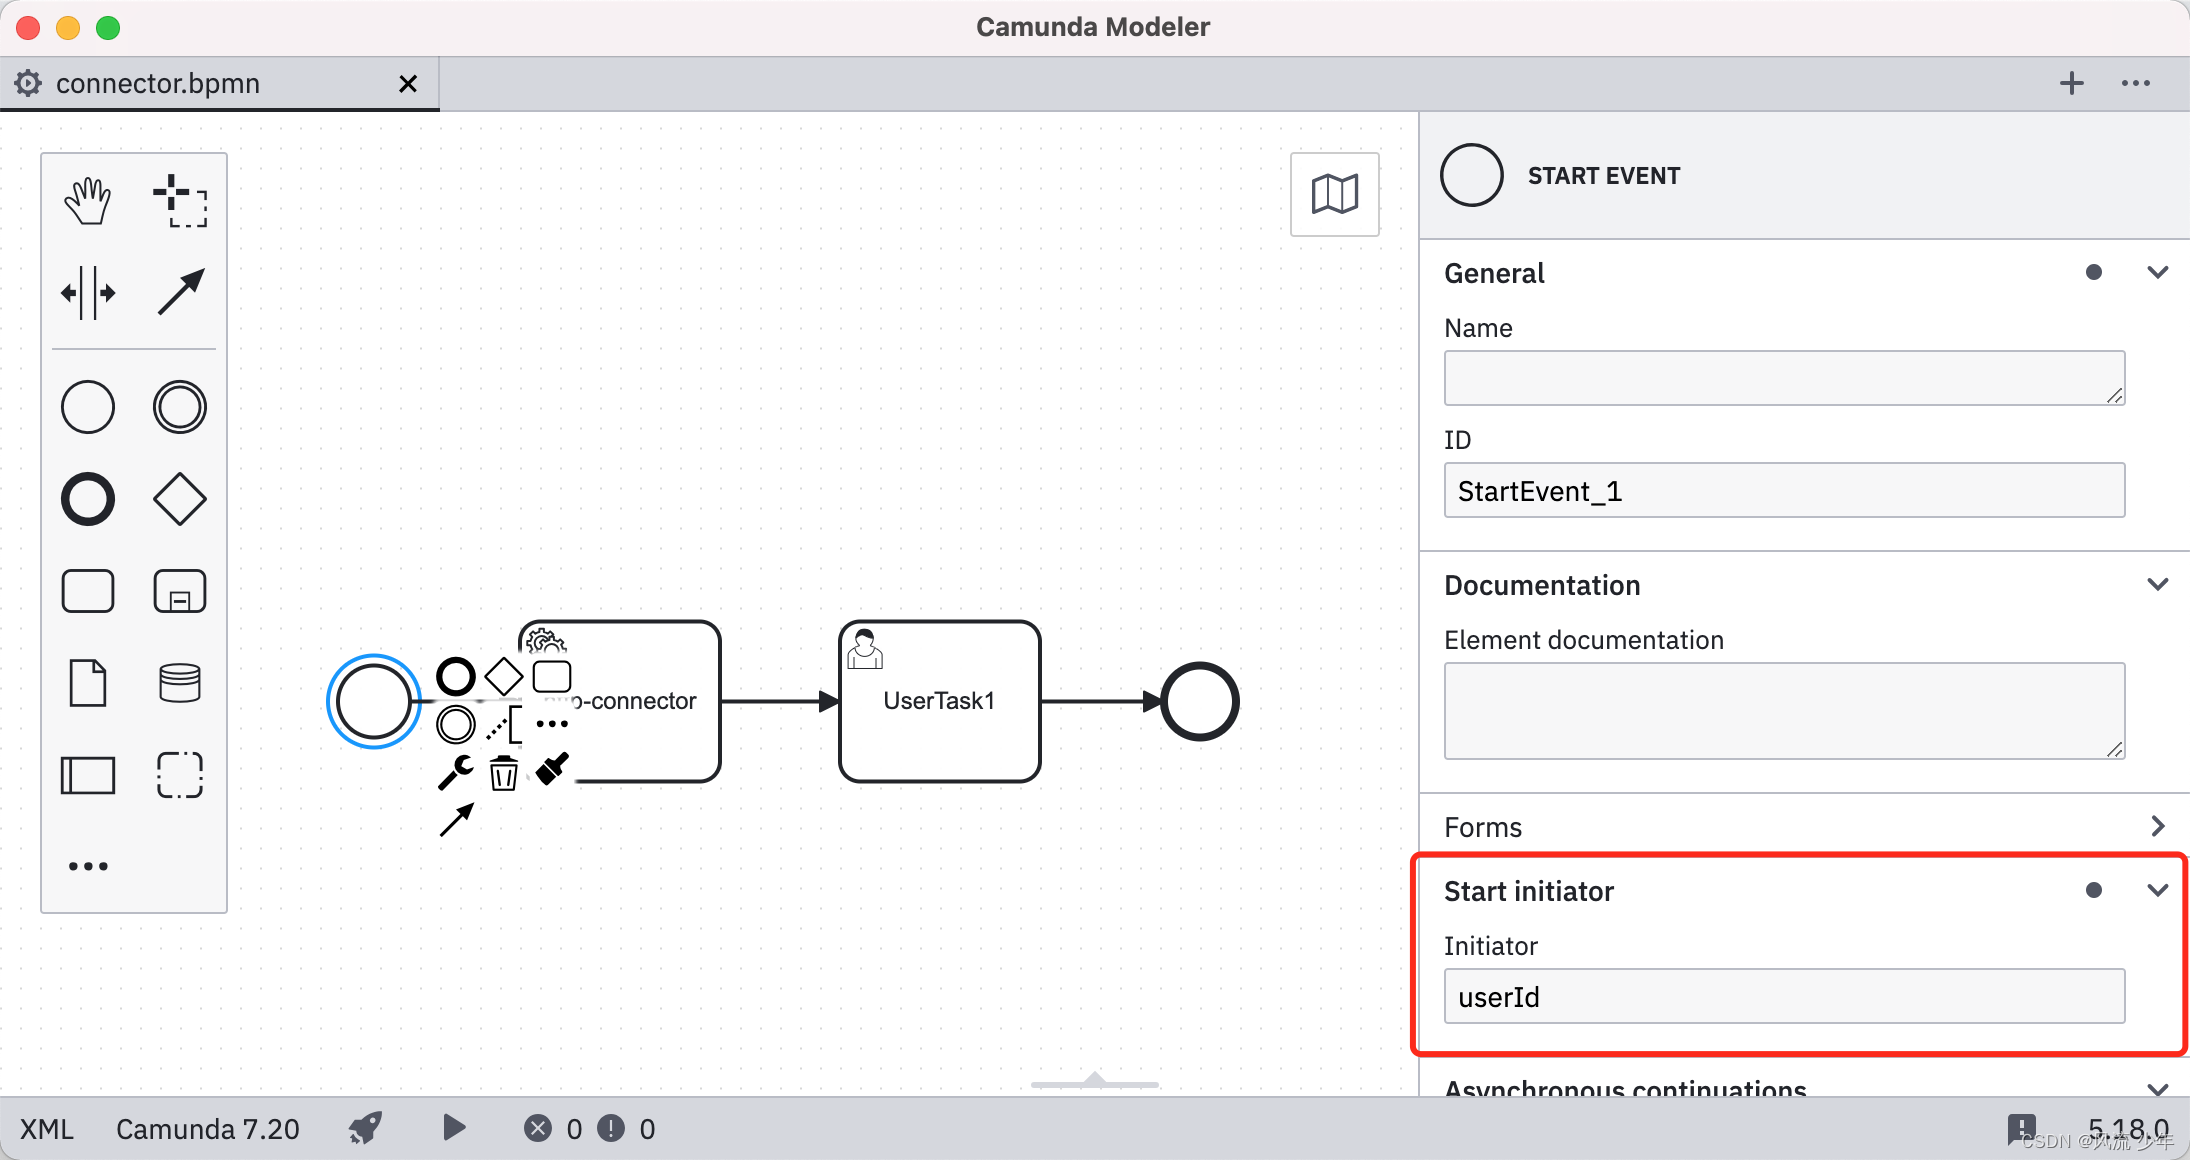
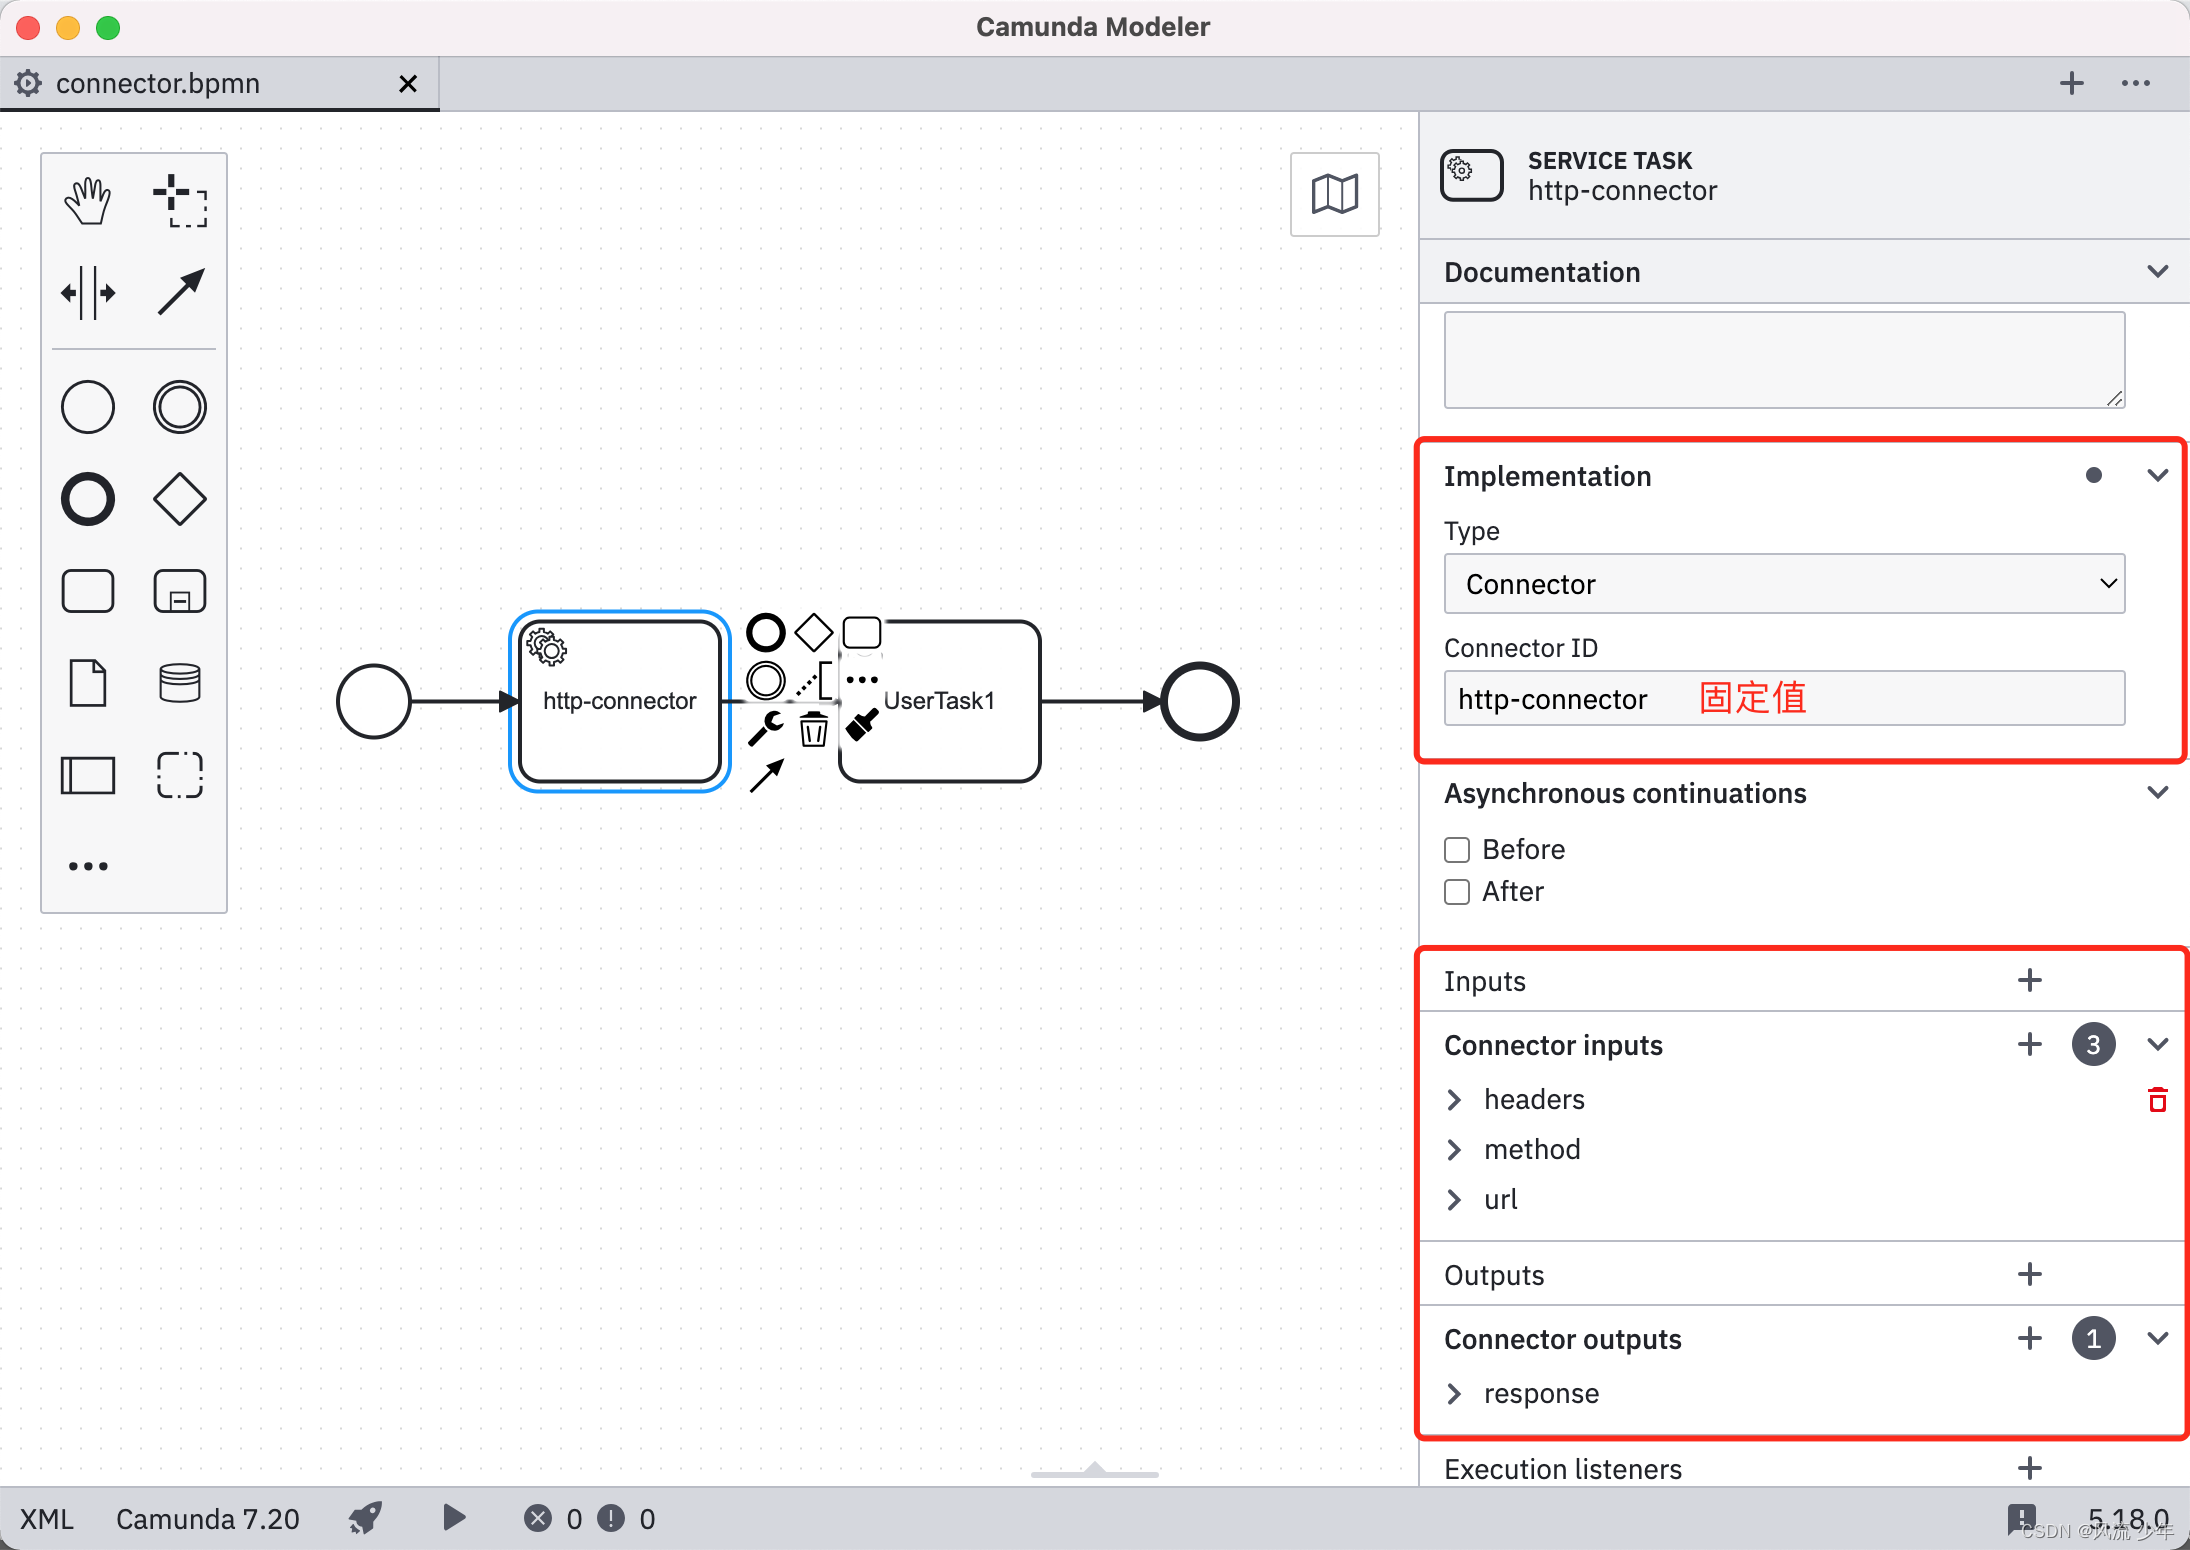
五:连接器 Connector
连接器Connector就是内置apache的http client 就是在执行这个节点时发送一个http请求,对结果进行响应,感觉非常鸡肋的功能,我用UserTask或者其他ServiceTask在代码里调用不香吗,我可以在代码中写复杂的逻辑,组装复杂的请求参数,打印日志,记录请求结果等其它操作,这玩意也就适用最简单的方法调用,有大量参数时光组装参数就没法玩。
5.1 pom.xml
<dependency>
   <groupId>org.camunda.bpm</groupId>
   <artifactId>camunda-engine-plugin-connect</artifactId>
   <version>${camunda.spring-boot.version}</version>
</dependency>
<dependency>
   <groupId>org.camunda.connect</groupId>
   <artifactId>camunda-connect-connectors-all</artifactId>
   <version>1.5.6</version>
</dependency>


<dependency>
    <groupId>org.camunda.bpm</groupId>
    <artifactId>camunda-engine-plugin-spin</artifactId>
    <version>${camunda.spring-boot.version}</version>
</dependency>
<dependency>
    <groupId>org.camunda.spin</groupId>
    <artifactId>camunda-spin-dataformat-json-jackson</artifactId>
    <version>1.17.0</version>
</dependency>
5.2 config
public class HttpConnectorConfigurator implements ConnectorConfigurator<HttpConnector> {

    public Class<HttpConnector> getConnectorClass() {

        return HttpConnector.class;
    }

    public void configure(HttpConnector connector) {

        CloseableHttpClient client = HttpClients.custom()
                .setMaxConnPerRoute(10)
                .setMaxConnTotal(200)
                .build();
        ((AbstractHttpConnector) connector).setHttpClient(client);
    }
}
5.3 SPI
在文件src/main/resources/META-INF/services/org.camunda.connect.spi.ConnectorConfigurator中配置以下完全限制类。
com.example.camunda.config.HttpConnectorConfigurator
5.3 Controller
@RestController
public class UserController {


    @GetMapping("/user/{userId}")
    public Map<String, Object> user(@PathVariable("userId") String userId) {

        Map<String, Object> map = new HashMap<>();
        map.put("code", "200");
        map.put("result", "success");
        map.put("data", userId);
        return map;
    }
}
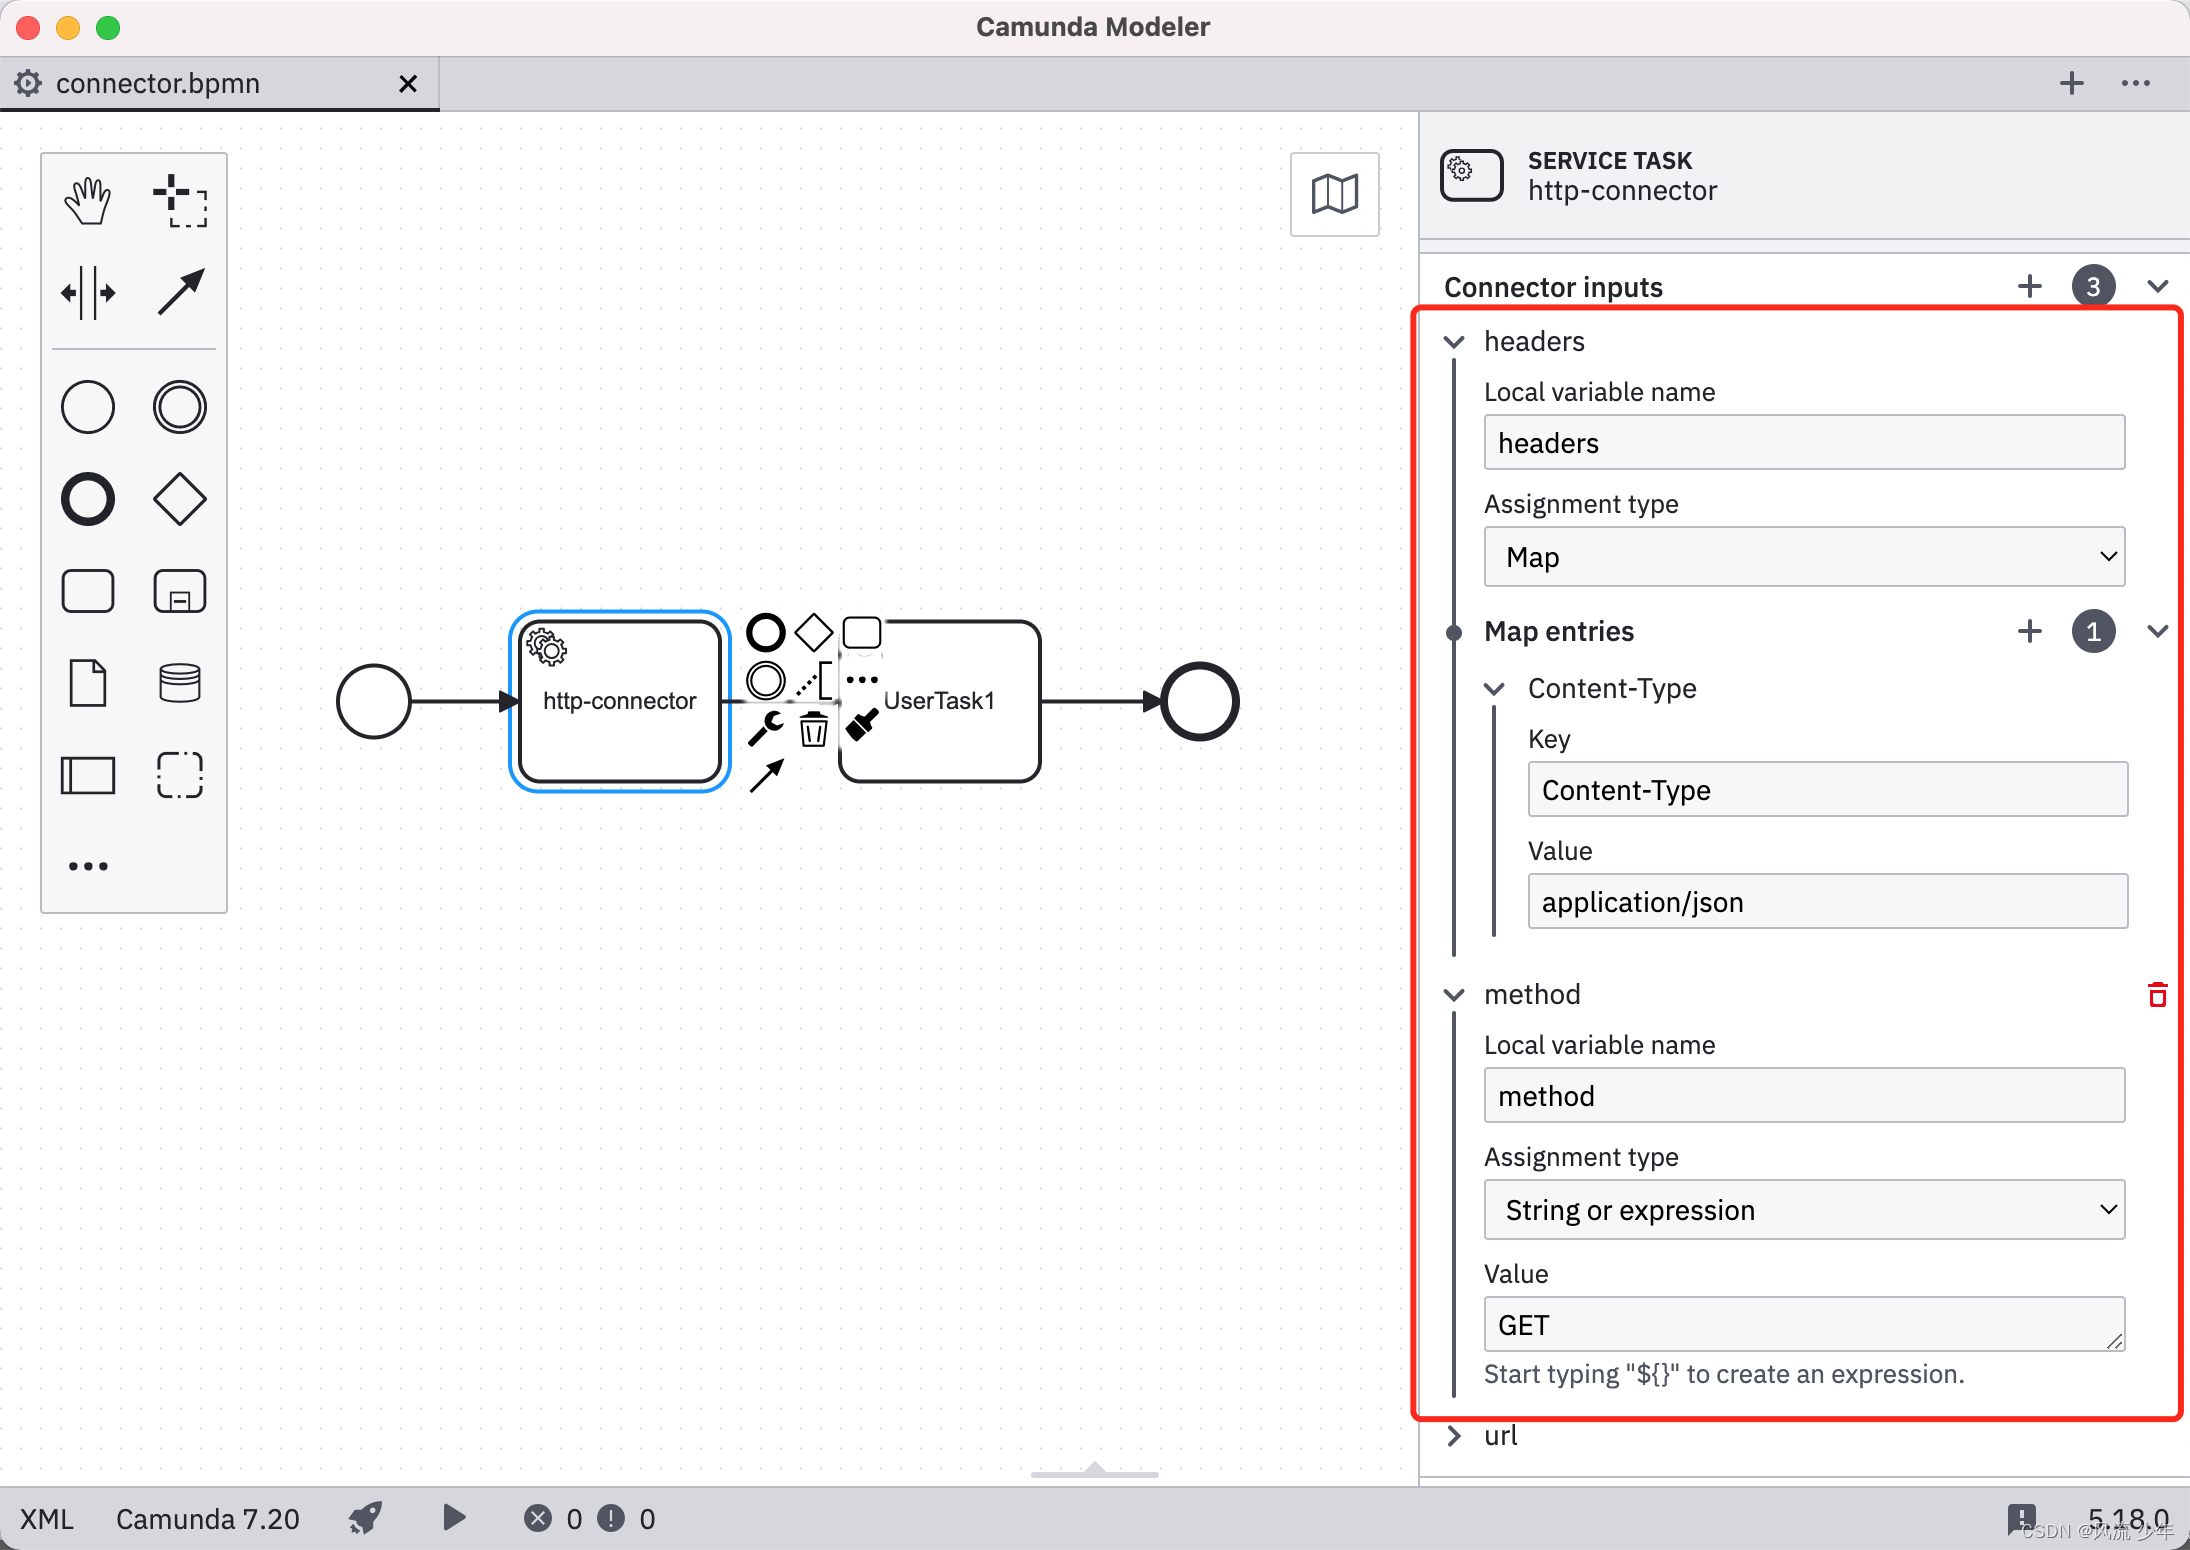
5.5 bpmn

<?xml version="1.0" encoding="UTF-8"?>
<bpmn:definitions xmlns:bpmn="http://www.omg.org/spec/BPMN/20100524/MODEL" xmlns:bpmndi="http://www.omg.org/spec/BPMN/20100524/DI" xmlns:dc="http://www.omg.org/spec/DD/20100524/DC" xmlns:camunda="http://camunda.org/schema/1.0/bpmn" xmlns:di="http://www.omg.org/spec/DD/20100524/DI" xmlns:modeler="http://camunda.org/schema/modeler/1.0" id="Definitions_042u8vr" targetNamespace="http://bpmn.io/schema/bpmn" exporter="Camunda Modeler" exporterVersion="5.18.0" modeler:executionPlatform="Camunda Platform" modeler:executionPlatformVersion="7.20.0">
  <bpmn:process id="ConnectorProcess" name="HttpClient服务" isExecutable="true" camunda:historyTimeToLive="180">
    <bpmn:startEvent id="StartEvent_1" camunda:initiator="userId">
      <bpmn:outgoing>Flow_1q9dey8</bpmn:outgoing>
    </bpmn:startEvent>
    <bpmn:sequenceFlow id="Flow_1q9dey8" sourceRef="StartEvent_1" targetRef="Activity_1nr3626" />
    <bpmn:serviceTask id="Activity_1nr3626" name="http-connector">
      <bpmn:extensionElements>
        <camunda:connector>
          <camunda:inputOutput>
            <camunda:inputParameter name="headers">
              <camunda:map>
                <camunda:entry key="Content-Type">application/json</camunda:entry>
              </camunda:map>
            </camunda:inputParameter>
            <camunda:inputParameter name="method">GET</camunda:inputParameter>
            <camunda:inputParameter name="url">http://localhost:8081/user/${userId}</camunda:inputParameter>
            <camunda:outputParameter name="response">
              <camunda:script scriptFormat="JavaScript">var res = connector.getVariable("response");
res;</camunda:script>
            </camunda:outputParameter>
          </camunda:inputOutput>
          <camunda:connectorId>http-connector</camunda:connectorId>
        </camunda:connector>
      </bpmn:extensionElements>
      <bpmn:incoming>Flow_1q9dey8</bpmn:incoming>
      <bpmn:outgoing>Flow_0bklhmm</bpmn:outgoing>
    </bpmn:serviceTask>
    <bpmn:sequenceFlow id="Flow_0bklhmm" sourceRef="Activity_1nr3626" targetRef="UserTask1" />
    <bpmn:userTask id="UserTask1" name="UserTask1">
      <bpmn:incoming>Flow_0bklhmm</bpmn:incoming>
      <bpmn:outgoing>Flow_1w1qnew</bpmn:outgoing>
    </bpmn:userTask>
    <bpmn:endEvent id="end">
      <bpmn:incoming>Flow_1w1qnew</bpmn:incoming>
    </bpmn:endEvent>
    <bpmn:sequenceFlow id="Flow_1w1qnew" sourceRef="UserTask1" targetRef="end" />
  </bpmn:process>
  <bpmndi:BPMNDiagram id="BPMNDiagram_1">
    <bpmndi:BPMNPlane id="BPMNPlane_1" bpmnElement="ConnectorProcess">
      <bpmndi:BPMNShape id="_BPMNShape_StartEvent_2" bpmnElement="StartEvent_1">
        <dc:Bounds x="179" y="99" width="36" height="36" />
      </bpmndi:BPMNShape>
      <bpmndi:BPMNShape id="Activity_1npa7km_di" bpmnElement="Activity_1nr3626">
        <dc:Bounds x="270" y="77" width="100" height="80" />
      </bpmndi:BPMNShape>
      <bpmndi:BPMNShape id="Activity_1neh381_di" bpmnElement="UserTask1">
        <dc:Bounds x="430" y="77" width="100" height="80" />
        <bpmndi:BPMNLabel />
      </bpmndi:BPMNShape>
      <bpmndi:BPMNShape id="Event_199n12t_di" bpmnElement="end">
        <dc:Bounds x="592" y="99" width="36" height="36" />
      </bpmndi:BPMNShape>
      <bpmndi:BPMNEdge id="Flow_1q9dey8_di" bpmnElement="Flow_1q9dey8">
        <di:waypoint x="215" y="117" />
        <di:waypoint x="270" y="117" />
      </bpmndi:BPMNEdge>
      <bpmndi:BPMNEdge id="Flow_0bklhmm_di" bpmnElement="Flow_0bklhmm">
        <di:waypoint x="370" y="117" />
        <di:waypoint x="430" y="117" />
      </bpmndi:BPMNEdge>
      <bpmndi:BPMNEdge id="Flow_1w1qnew_di" bpmnElement="Flow_1w1qnew">
        <di:waypoint x="530" y="117" />
        <di:waypoint x="592" y="117" />
      </bpmndi:BPMNEdge>
    </bpmndi:BPMNPlane>
  </bpmndi:BPMNDiagram>
</bpmn:definitions>
5.6 test
repositoryService.createDeployment()
       .name("HttpClient服务")
       .addClasspathResource("bpmn/connector.bpmn")
       .deploy();

identityService.setAuthenticatedUserId("huihui");
ProcessInstance processInstance = runtimeService.startProcessInstanceByKey("ConnectorProcess");
5.7 db

智能推荐
PCS7 入门指南 v9.0 SP3 v9.1 中文版 学习资料 (官方公开可用资料)_pcs7v9.1-程序员宅基地
文章浏览阅读1.8w次,点赞13次,收藏82次。链接:https://pan.baidu.com/s/1-p4h_QDL8BN04tnn3vSkOA提取码:nou3PCS7入门指南v9.0含APL(包含PDF和项目文件)官方地址:SIMATIC 过程控制系统 PCS 7 入门指南第1部分 (V9.0,含APL)https://support.industry.siemens.com/cs/document/109756196/simatic-%E8%BF%87%E7%A8%8B%E6%8E%A7%E5%88%B6%E7%B3%BB..._pcs7v9.1
c# 调用非托管代码_c# 声明kernel32 函数-程序员宅基地
文章浏览阅读956次,点赞3次,收藏5次。编程过程中,一般c#调用非托管的代码有两种方式:1.直接调用从DLL中导出的函数。2.调用COM对象上的接口方法。首先说明第1种方式,基本步骤如下:1.使用关键字static,extern声明需要导出的函数。2.把DllImport 属性附加到函数上。3.掌握常用的数据类型传递的对应关系。4.如果需要,为函数的参数和返回值指定自定义数据封送处理信息,这将重写.net framework默认的封送处理。简单举例如下:托管函数原型:DWORD GetShortPathName(LPCTST_c# 声明kernel32 函数
高频交易及化资策与区_hudson river trading-程序员宅基地
文章浏览阅读406次。转 高频交易及量化投资的策略与误区一、高频交易公司和量化投资公司的区别一般来说,高频交易公司和量化投资公司既有联系,又有区别。在美国,人们常说的高频交易公司一般都是自营交易公司,这些公司主要有Getco、Tower Research、Hudson River Trading、SIG、Virtu Financial、Jump Trading、RGM Advisor、Chopper Tradi..._hudson river trading
C语言文件操作相关的函数_c语言与文件处理有关的函数-程序员宅基地
文章浏览阅读865次。文件的打开和关闭文件在读写之前应该先打开文件,在使用结束之后应该关闭文件。在编写程序的时候,在打开文件的同时,都会返回一个FILE*的指针变量指向该文件,也相当于建立了指针和文件 的关系。ANSIC 规定使用fopen函数来打开文件,fclose来关闭文件。FILE * fopen ( const char * filename, const char * mode ); int fcl..._c语言与文件处理有关的函数
java 无法读取文件_java 读取文件,无法显示文件内容,如何解决? 谢谢。-程序员宅基地
文章浏览阅读1.1k次。从来没见过进行文件读取写入时,在写入中需要随机数的,你读取文件就是从一个地方获取输入流,然后将这个输入流写到别的地方,根本不要随机数。给你一个示例://copyafiletoanotherfilebyusingFileReader/FileWriterimportjava.io.*;publicclassTFileRead{publicstaticvoidmain(S..._java复制文件文件没有内容显示
vue引入原生高德地图_前端引入原生地图-程序员宅基地
文章浏览阅读556次,点赞2次,收藏3次。由于工作上的需要,今天捣鼓了半天高德地图。如果定制化开发需求不太高的话,可以用vue-amap,这个我就不多说了,详细就看官网 https://elemefe.github.io/vue-amap/#/zh-cn/introduction/install然而我们公司需要英文版的高德,我看vue-amap中好像没有这方面的配置,而且还有一些其他的定制化开发需求,然后就只用原生的高德。其实原生的引入也不复杂,但是有几个坑要填一下。1. index.html注意,引入的高德js一定要放在头部而_前端引入原生地图
随便推点
优化算法——拟牛顿法之BFGS算法-程序员宅基地
文章浏览阅读6.2w次,点赞25次,收藏188次。一、BFGS算法简介 BFGS算法是使用较多的一种拟牛顿方法,是由Broyden,Fletcher,Goldfarb,Shanno四个人分别提出的,故称为BFGS校正。 同DFP校正的推导公式一样,DFP校正见博文“优化算法——拟牛顿法之DFP算法”。对于拟牛顿方程:可以化简为:令,则可得:在B_bfgs算法
联想RD430服务器的Raid 5阵列+Esxi6.7部署_esxi6 raid m5015-程序员宅基地
文章浏览阅读3.9k次。一、主要解决的问题:(一)硬盘存储总容量提高+读写速率快1、原RD430服务器主板自带阵列卡仅支持Raid 0、Raid 1、Raid 10,主要特点:Raid 0速率快但是某一块硬盘物理故障后,所有数据都将丢失;Raid 1需要一半的硬盘做冗余,容量牺牲较多,速率比Raid 0降一倍。Raid 10容量牺牲一半,速率比Raid1稍快。2、独立阵列卡的Raid 5特点:Raid 5改进的特点:比如8个硬盘做成的阵列,总容量少1块硬盘的空间,某数据分布于不同的7个硬盘上,另1块硬盘进行数据校验,校验_esxi6 raid m5015
Linux安全应用2-程序员宅基地
文章浏览阅读59次。[root@localhost 桌面]# service NetworkManager stop[root@localhost 桌面]# chkconfig NetworkManager off[root@localhost 桌面]# setup[root@localhost 桌面]# vim /etc/udev/rules.d/70-persistent-net.rules..._linux本地安全2
深度篇——人脸识别(一) ArcFace 论文 翻译_arcface论文-程序员宅基地
文章浏览阅读6.6k次,点赞23次,收藏120次。返回主目录返回 目标检测史 目录上一章:深度篇——目标检测史(八)CPTN 论文 翻译论文地址:《ArcFace: Additive Angular Margin Loss for Deep Face Recognition》源码地址:InsightFace: 2D and 3D Face Analysis Project本小节,ArcFace 论文 翻译,下一小节细说 ArcFace文本检测 代码一.ArcFace 论文 翻译1.概述..._arcface论文
台式计算机有没有无线连接模块,台式机能不能连接wifi_台式机怎么连接wifi-程序员宅基地
文章浏览阅读1.2k次。2016-12-30 09:54:26你好!很高兴为你解答,先将无线路由器接通电源,然后插上网线,将另一端插到你电脑上,等网络通了之后,你在IE浏览器上输入:192.168.1.1(这是一般无线路由器的IP,如果有特殊...2016-12-16 11:44:30手机系统问题,可能系统出现了问题,导致连接上了WiFi却无法上网。重启一下路由器试试,或者将路由器恢复一下出厂设置,然后重新拨号上网,并根..._计算机无线模块怎么看
OpenGLES编程思想-程序员宅基地
文章浏览阅读4.8k次。最近在看gles的reference,想多了解一下gles的底层,gles是opengl在khronos在嵌入式设备上的图形硬件的软件访问接口,很多东西和opengl似曾相似,但是和opengl又有很大的不同,最新的标准是gles3.2,标准文档非常长,如果不是写引擎没必要对每个接口烂熟于心,但是为了能够了解他,我对他的编程思想做个总结,最重要的是理解gles的设计思路,然后在使用的时候也必将容易找到相关接口。所以本文基本不会列出gles的每个接口,不会记录讲解每个接口,而是希望能够通过总结gles的设计思_gles