springboot2.0+websocket+nginx_springboot2 websocket nginx-程序员宅基地
技术标签: java
SpringBoot+WebSocket集成
-
- 什么是WebSocket?
- 为什么需要 WebSocket?
- 前言
- maven依赖
- WebSocketConfig
- WebSocketServer
- 消息推送
- 页面发起
- 运行效果
- 后续
- Websocker注入Bean问题
- netty-websocket-spring-boot-starter
- Springboot2+Netty+Websocket
- ServerEndpointExporter错误
- 正式项目的前端WebSocket框架 GoEasy
- `@Component`和`@ServerEndpoint`关于是否单例模式,能否使用static Map等一些问题的解答
- Vue版本的websocket连接
什么是WebSocket?
WebSocket协议是基于TCP的一种新的网络协议。它实现了浏览器与服务器全双工(full-duplex)通信——允许服务器主动发送信息给客户端。
为什么需要 WebSocket?
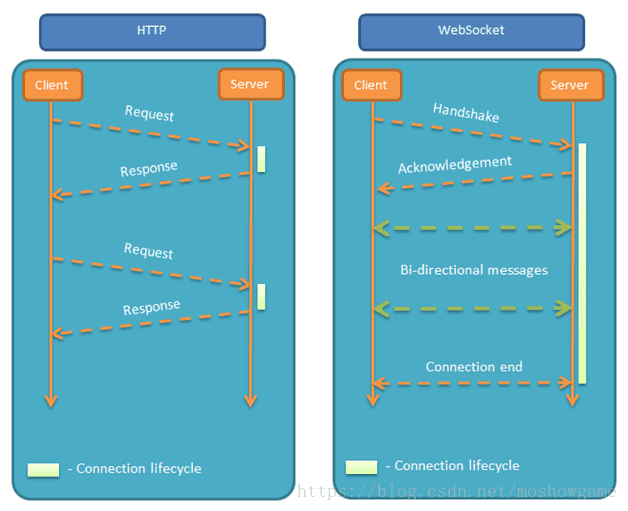
初次接触 WebSocket 的人,都会问同样的问题:我们已经有了 HTTP 协议,为什么还需要另一个协议?它能带来什么好处?
- 答案很简单,因为 HTTP 协议有一个缺陷:通信只能由客户端发起,HTTP 协议做不到服务器主动向客户端推送信息。
举例来说,我们想要查询当前的排队情况,只能是页面轮询向服务器发出请求,服务器返回查询结果。轮询的效率低,非常浪费资源(因为必须不停连接,或者 HTTP 连接始终打开)。因此WebSocket 就是这样发明的。
前言
2020-10-20 教程补充:
- 补充关于
@Component和@ServerEndpoint关于是否单例模式等的解答,感谢大家热心提问和研究。 Vue版本的websocket连接方法
2020-01-05 教程补充:
- 整合了
IM相关的优化 - 优化
开启/关闭连接的处理 - 上传到
开源项目spring-cloud-study-websocket,方便大家下载代码。
感谢大家的支持和留言,14W访问量是满满的动力!接下来还会有websocket+redis集群优化篇针对多ws服务器做简单优化处理,敬请期待!
话不多说,马上进入干货时刻。
maven依赖
SpringBoot2.0对WebSocket的支持简直太棒了,直接就有包可以引入
		<dependency>
           <groupId>org.springframework.boot</groupId>
           <artifactId>spring-boot-starter-websocket</artifactId>
       </dependency>
- 1
- 2
- 3
- 4
WebSocketConfig
启用WebSocket的支持也是很简单,几句代码搞定
import org.springframework.context.annotation.Bean;
import org.springframework.context.annotation.Configuration;
import org.springframework.web.socket.server.standard.ServerEndpointExporter;
/**
-
开启WebSocket支持
-
@author zhengkai.blog.csdn.net
*/
@Configuration
public class WebSocketConfig {@Bean
public ServerEndpointExporter serverEndpointExporter() {
return new ServerEndpointExporter();
}
}
- 1
- 2
- 3
- 4
- 5
- 6
- 7
- 8
- 9
- 10
- 11
- 12
- 13
- 14
- 15
- 16
- 17
WebSocketServer
这就是重点了,核心都在这里。
-
因为WebSocket是类似客户端服务端的形式(采用ws协议),那么这里的WebSocketServer其实就相当于一个ws协议的Controller
-
直接
@ServerEndpoint("/imserver/{userId}")、@Component启用即可,然后在里面实现@OnOpen开启连接,@onClose关闭连接,@onMessage接收消息等方法。 -
新建一个
ConcurrentHashMapwebSocketMap 用于接收当前userId的WebSocket,方便IM之间对userId进行推送消息。单机版实现到这里就可以。 -
集群版(多个ws节点)还需要借助mysql或者redis等进行处理,改造对应的sendMessage方法即可。
package com.softdev.system.demo.config;
import java.io.IOException;
import java.util.concurrent.ConcurrentHashMap;
import javax.websocket.OnClose;
import javax.websocket.OnError;
import javax.websocket.OnMessage;
import javax.websocket.OnOpen;
import javax.websocket.Session;
import javax.websocket.server.PathParam;
import javax.websocket.server.ServerEndpoint;
import com.alibaba.fastjson.JSON;
import com.alibaba.fastjson.JSONObject;
import org.apache.commons.lang.StringUtils;
import org.springframework.stereotype.Component;
import cn.hutool.log.Log;
import cn.hutool.log.LogFactory;
/**
-
@author zhengkai.blog.csdn.net
*/
@ServerEndpoint("/imserver/{userId}")
@Component
public class WebSocketServer {static Log log=LogFactory.get(WebSocketServer.class);
/**静态变量,用来记录当前在线连接数。应该把它设计成线程安全的。/
private static int onlineCount = 0;
/**concurrent包的线程安全Set,用来存放每个客户端对应的MyWebSocket对象。/
private static ConcurrentHashMap<String,WebSocketServer> webSocketMap = new ConcurrentHashMap<>();
/*与某个客户端的连接会话,需要通过它来给客户端发送数据/
private Session session;
/*接收userId/
private String userId="";/**
-
连接建立成功调用的方法*/
@OnOpen
public void onOpen(Session session,@PathParam(“userId”) String userId) {
this.session = session;
this.userId=userId;
if(webSocketMap.containsKey(userId)){
webSocketMap.remove(userId);
webSocketMap.put(userId,this);
//加入set中
}else{
webSocketMap.put(userId,this);
//加入set中
addOnlineCount();
//在线数加1
}log.info(“用户连接:”+userId+",当前在线人数为:" + getOnlineCount());
try {
sendMessage(“连接成功”);
} catch (IOException e) {
log.error(“用户:”+userId+",网络异常!!!");
}
}
/**
- 连接关闭调用的方法
*/
@OnClose
public void onClose() {
if(webSocketMap.containsKey(userId)){
webSocketMap.remove(userId);
//从set中删除
subOnlineCount();
}
log.info(“用户退出:”+userId+",当前在线人数为:" + getOnlineCount());
}
/**
- 收到客户端消息后调用的方法
- @param message 客户端发送过来的消息*/
@OnMessage
public void onMessage(String message, Session session) {
log.info(“用户消息:”+userId+",报文:"+message);
//可以群发消息
//消息保存到数据库、redis
if(StringUtils.isNotBlank(message)){
try {
//解析发送的报文
JSONObject jsonObject = JSON.parseObject(message);
//追加发送人(防止串改)
jsonObject.put(“fromUserId”,this.userId);
String toUserId=jsonObject.getString(“toUserId”);
//传送给对应toUserId用户的websocket
if(StringUtils.isNotBlank(toUserId)&&webSocketMap.containsKey(toUserId)){
webSocketMap.get(toUserId).sendMessage(jsonObject.toJSONString());
}else{
log.error(“请求的userId:”+toUserId+“不在该服务器上”);
//否则不在这个服务器上,发送到mysql或者redis
}
}catch (Exception e){
e.printStackTrace();
}
}
}
/**
*- @param session
- @param error
/
@OnError
public void onError(Session session, Throwable error) {
log.error(“用户错误:”+this.userId+",原因:"+error.getMessage());
error.printStackTrace();
}
/* - 实现服务器主动推送
*/
public void sendMessage(String message) throws IOException {
this.session.getBasicRemote().sendText(message);
}
/**
- 发送自定义消息
- */
public static void sendInfo(String message,@PathParam(“userId”) String userId) throws IOException {
log.info(“发送消息到:”+userId+",报文:"+message);
if(StringUtils.isNotBlank(userId)&&webSocketMap.containsKey(userId)){
webSocketMap.get(userId).sendMessage(message);
}else{
log.error(“用户”+userId+",不在线!");
}
}
public static synchronized int getOnlineCount() {
return onlineCount;
}public static synchronized void addOnlineCount() {
WebSocketServer.onlineCount++;
}public static synchronized void subOnlineCount() {
WebSocketServer.onlineCount–;
}
} -
- 1
- 2
- 3
- 4
- 5
- 6
- 7
- 8
- 9
- 10
- 11
- 12
- 13
- 14
- 15
- 16
- 17
- 18
- 19
- 20
- 21
- 22
- 23
- 24
- 25
- 26
- 27
- 28
- 29
- 30
- 31
- 32
- 33
- 34
- 35
- 36
- 37
- 38
- 39
- 40
- 41
- 42
- 43
- 44
- 45
- 46
- 47
- 48
- 49
- 50
- 51
- 52
- 53
- 54
- 55
- 56
- 57
- 58
- 59
- 60
- 61
- 62
- 63
- 64
- 65
- 66
- 67
- 68
- 69
- 70
- 71
- 72
- 73
- 74
- 75
- 76
- 77
- 78
- 79
- 80
- 81
- 82
- 83
- 84
- 85
- 86
- 87
- 88
- 89
- 90
- 91
- 92
- 93
- 94
- 95
- 96
- 97
- 98
- 99
- 100
- 101
- 102
- 103
- 104
- 105
- 106
- 107
- 108
- 109
- 110
- 111
- 112
- 113
- 114
- 115
- 116
- 117
- 118
- 119
- 120
- 121
- 122
- 123
- 124
- 125
- 126
- 127
- 128
- 129
- 130
- 131
- 132
- 133
- 134
- 135
- 136
- 137
- 138
- 139
- 140
- 141
- 142
- 143
- 144
- 145
- 146
消息推送
至于推送新信息,可以再自己的Controller写个方法调用WebSocketServer.sendInfo();即可
import com.softdev.system.demo.config.WebSocketServer;
import org.springframework.http.ResponseEntity;
import org.springframework.web.bind.annotation.GetMapping;
import org.springframework.web.bind.annotation.PathVariable;
import org.springframework.web.bind.annotation.RequestMapping;
import org.springframework.web.bind.annotation.RestController;
import org.springframework.web.servlet.ModelAndView;
import java.io.IOException;
/**
-
WebSocketController
-
@author zhengkai.blog.csdn.net
*/
@RestController
public class DemoController {@GetMapping(“index”)
public ResponseEntity<String> index(){
return ResponseEntity.ok(“请求成功”);
}@GetMapping(“page”)
public ModelAndView page(){
return new ModelAndView(“websocket”);
}@RequestMapping("/push/{toUserId}")
public ResponseEntity<String> pushToWeb(String message, @PathVariable String toUserId) throws IOException {
WebSocketServer.sendInfo(message,toUserId);
return ResponseEntity.ok(“MSG SEND SUCCESS”);
}
}
- 1
- 2
- 3
- 4
- 5
- 6
- 7
- 8
- 9
- 10
- 11
- 12
- 13
- 14
- 15
- 16
- 17
- 18
- 19
- 20
- 21
- 22
- 23
- 24
- 25
- 26
- 27
- 28
- 29
- 30
- 31
- 32
- 33
- 34
页面发起
页面用js代码调用websocket,当然,太古老的浏览器是不行的,一般新的浏览器或者谷歌浏览器是没问题的。还有一点,记得协议是ws的,如果使用了一些路径类,可以replace(“http”,“ws”)来替换协议。
<!DOCTYPE html>
<html>
<head>
    <meta charset="utf-8">
    <title>websocket通讯</title>
</head>
<script src="https://cdn.bootcss.com/jquery/3.3.1/jquery.js"></script>
<script>
    var socket;
    function openSocket() {

        if(typeof(WebSocket) == "undefined") {

            console.log("您的浏览器不支持WebSocket");
        }else{

            console.log("您的浏览器支持WebSocket");
            //实现化WebSocket对象,指定要连接的服务器地址与端口  建立连接
            //等同于socket = new WebSocket("ws://localhost:8888/xxxx/im/25");
            //var socketUrl="${request.contextPath}/im/"+$("#userId").val();
            var socketUrl="http://localhost:9999/demo/imserver/"+$("#userId").val();
            socketUrl=socketUrl.replace("https","ws").replace("http","ws");
            console.log(socketUrl);
            if(socket!=null){

                socket.close();
                socket=null;
            }
            socket = new WebSocket(socketUrl);
            //打开事件
            socket.onopen = function() {

                console.log("websocket已打开");
                //socket.send("这是来自客户端的消息" + location.href + new Date());
            };
            //获得消息事件
            socket.onmessage = function(msg) {

                console.log(msg.data);
                //发现消息进入    开始处理前端触发逻辑
            };
            //关闭事件
            socket.onclose = function() {

                console.log("websocket已关闭");
            };
            //发生了错误事件
            socket.onerror = function() {

                console.log("websocket发生了错误");
            }
        }
    }
    function sendMessage() {

        if(typeof(WebSocket) == "undefined") {

            console.log("您的浏览器不支持WebSocket");
        }else {

            console.log("您的浏览器支持WebSocket");
            console.log('{"toUserId":"'+$("#toUserId").val()+'","contentText":"'+$("#contentText").val()+'"}');
            socket.send('{"toUserId":"'+$("#toUserId").val()+'","contentText":"'+$("#contentText").val()+'"}');
        }
    }
</script>
<body>
<p>【userId】:<div><input id="userId" name="userId" type="text" value="10"></div>
<p>【toUserId】:<div><input id="toUserId" name="toUserId" type="text" value="20"></div>
<p>【toUserId】:<div><input id="contentText" name="contentText" type="text" value="hello websocket"></div>
<p>【操作】:<div><a onclick="openSocket()">开启socket</a></div>
<p>【操作】:<div><a onclick="sendMessage()">发送消息</a></div>
</body>
</html>
- 1
- 2
- 3
- 4
- 5
- 6
- 7
- 8
- 9
- 10
- 11
- 12
- 13
- 14
- 15
- 16
- 17
- 18
- 19
- 20
- 21
- 22
- 23
- 24
- 25
- 26
- 27
- 28
- 29
- 30
- 31
- 32
- 33
- 34
- 35
- 36
- 37
- 38
- 39
- 40
- 41
- 42
- 43
- 44
- 45
- 46
- 47
- 48
- 49
- 50
- 51
- 52
- 53
- 54
- 55
- 56
- 57
- 58
- 59
- 60
- 61
- 62
- 63
- 64
运行效果
- v20200105,加入开源项目spring-cloud-study-websocket,更新运行效果,更方便理解。
- v1.1的效果,刚刚修复了日志,并且支持指定监听某个端口,代码已经全部更新,现在是这样的效果
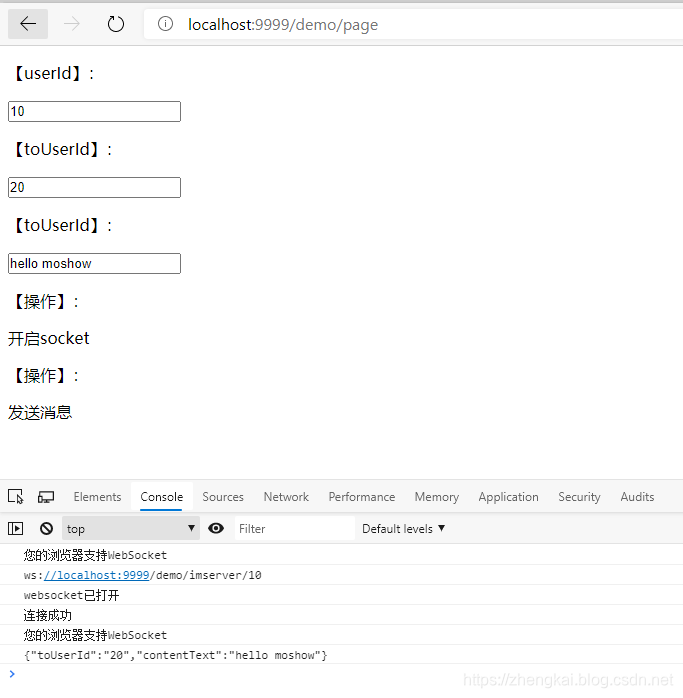
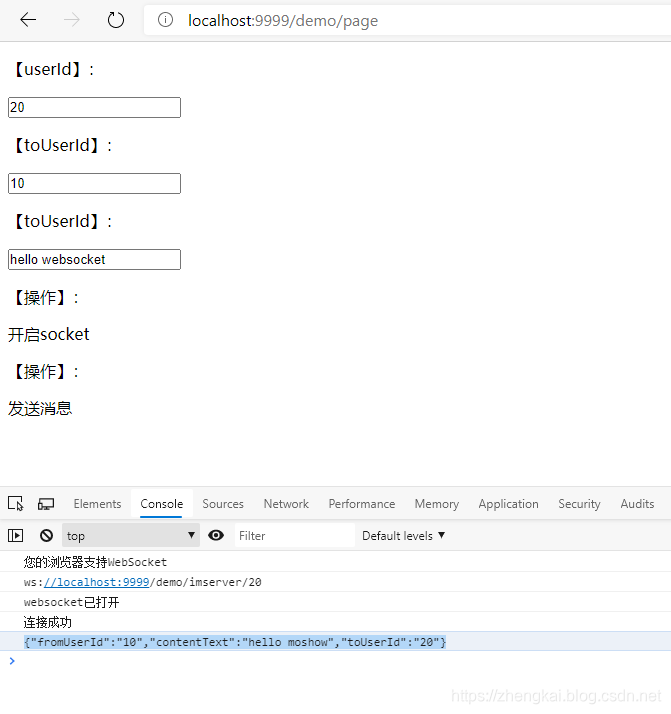
- 打开两个页面,按F12调出控控制台查看测试效果:
| 页面 | 参数 |
|---|---|
| http://localhost:9999/demo/page | fromUserId=10,toUserId=20 |
| http://localhost:9999/demo/page | fromUserId=20,toUserId=10 |
分别开启socket,再发送消息
2. 向前端推送数据:
- http://localhost:9999/demo/push/10?message=123123
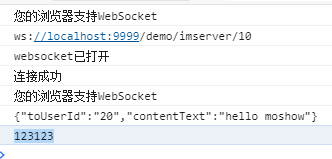
通过调用push api,可以向指定的userId推送信息,当然报文这里乱写,建议规定好格式。
后续
针对简单IM的业务场景,进行了一些优化,可以看后续的文章SpringBoot2+WebSocket之聊天应用实战(优化版本)(v20201005已整合)
主要变动是CopyOnWriteArraySet改为ConcurrentHashMap,保证多线程安全同时方便利用map.get(userId)进行推送到指定端口。
相比之前的Set,Set遍历是费事且麻烦的事情,而Map的get是简单便捷的,当WebSocket数量大的时候,这个小小的消耗就会聚少成多,影响体验,所以需要优化。在IM的场景下,指定userId进行推送消息更加方便。
Websocker注入Bean问题
关于这个问题,可以看最新发表的这篇文章,在参考和研究了网上一些攻略后,项目已经通过该方法注入成功,大家可以参考。
关于controller调用controller/service调用service/util调用service/websocket中autowired的解决方法
netty-websocket-spring-boot-starter
Springboot2构建基于Netty的高性能Websocket服务器(netty-websocket-spring-boot-starter)
只需要换个starter即可实现高性能websocket,赶紧使用吧
Springboot2+Netty+Websocket
Springboot2+Netty实现Websocket,使用官方的netty-all的包,比原生的websocket更加稳定更加高性能,同等配置情况下可以handle更多的连接。
代码样式全部已经更正,也支持websocket连接url带参数功能,另外也感谢大家的阅读和评论,一起进步,谢谢!~~
ServerEndpointExporter错误
org.springframework.beans.factory.BeanCreationException: Error creating bean with name ‘
serverEndpointExporter’ defined in class path resource [com/xxx/WebSocketConfig.class]: Invocation of init method failed; nested exception is java.lang.IllegalStateException: javax.websocket.server.ServerContainer not available
感谢@来了老弟儿 的反馈:
如果tomcat部署一直报这个错,请移除 WebSocketConfig 中@Bean ServerEndpointExporter 的注入 。
ServerEndpointExporter 是由Spring官方提供的标准实现,用于扫描ServerEndpointConfig配置类和@ServerEndpoint注解实例。使用规则也很简单:
- 如果使用默认的嵌入式容器 比如
Tomcat则必须手工在上下文提供ServerEndpointExporter。 - 如果使用
外部容器部署war包,则不需要提供提供ServerEndpointExporter,因为此时SpringBoot默认将扫描服务端的行为交给外部容器处理,所以线上部署的时候要把WebSocketConfig中这段注入bean的代码注掉。
正式项目的前端WebSocket框架 GoEasy
感谢kkatrina的补充,正式的项目中,一般是用第三方websocket框架来做,稳定性、实时性有保证的多,也会包括一些心跳、重连机制。
GoEasy专注于服务器与浏览器,浏览器与浏览器之间消息推送,完美兼容世界上的绝大多数浏览器,包括IE6, IE7之类的非常古老的浏览器。支持Uniapp,各种小程序,react,vue等所有主流Web前端技术。
GoEasy采用 发布/订阅 的消息模式,帮助您非常轻松的实现一对一,一对多的通信。
https://www.goeasy.io/cn/doc/
@Component和@ServerEndpoint关于是否单例模式,能否使用static Map等一些问题的解答
看到大家都在热心的讨论关于是否单例模式这个问题,请大家相信自己的直接,如果websocket是单例模式,还怎么服务这么多session呢。
- websocket是
原型模式,@ServerEndpoint每次建立双向通信的时候都会创建一个实例,区别于spring的单例模式。 - Spring的
@Component默认是单例模式,请注意,默认而已,是可以被改变的。 - 这里的
@Component仅仅为了支持@Autowired依赖注入使用,如果不加则不能注入任何东西,为了方便。 - 什么是
prototype 原型模式? 基本就是你需要从A的实例得到一份与A内容相同,但是又互不干扰的实例B的话,就需要使用原型模式。 - 关于在原型模式下使用static 的
webSocketMap,请注意这是ConcurrentHashMap ,也就是线程安全/线程同步的,而且已经是静态变量作为全局调用,这种情况下是ok的,或者大家如果有顾虑或者更好的想法的化,可以进行改进。 例如使用一个中间类来接收和存放session。 - 为什么每次都@OnOpen都要检查
webSocketMap.containsKey(userId),首先了为了代码强壮性考虑,假设代码以及机制没有问题,那么肯定这个逻辑是废的对吧。但是实际使用的时候发现偶尔会出现重连失败或者其他原因导致之前的session还存在,这里就做了一个清除旧session,迎接新session的功能。
Vue版本的websocket连接
感谢**@GzrStudy**的贡献,供大家参考。
<script> export default { data() { return { socket:null, userId:localStorage.getItem("ms_uuid"), toUserId:'2', content:'3' } }, methods: { openSocket() { if (typeof WebSocket == "undefined") { console.log("您的浏览器不支持WebSocket"); } else { console.log("您的浏览器支持WebSocket"); //实现化WebSocket对象,指定要连接的服务器地址与端口 建立连接 //等同于socket = new WebSocket("ws://localhost:8888/xxxx/im/25"); //var socketUrl="${request.contextPath}/im/"+$("#userId").val(); var socketUrl = "http://localhost:8081/imserver/" + this.userId; socketUrl = socketUrl.replace("https", "ws").replace("http", "ws"); console.log(socketUrl); if (this.socket != null) { this.socket.close(); this.socket = null; } this.socket = new WebSocket(socketUrl); //打开事件 this.socket = new WebSocket(socketUrl); //打开事件 this.socket.onopen = function() { console.log("websocket已打开"); //socket.send("这是来自客户端的消息" + location.href + new Date()); }; //获得消息事件 this.socket.onmessage = function(msg) { console.log(msg.data); //发现消息进入 开始处理前端触发逻辑 }; //关闭事件 this.socket.onclose = function() { console.log("websocket已关闭"); }; //发生了错误事件 this.socket.onerror = function() { console.log("websocket发生了错误"); }; } }, sendMessage() { if (typeof WebSocket == "undefined") { console.log("您的浏览器不支持WebSocket"); } else { console.log("您的浏览器支持WebSocket"); console.log( '{"toUserId":"' + this.toUserId + '","contentText":"' + this.content + '"}' ); this.socket.send( '{"toUserId":"' + this.toUserId + '","contentText":"' + this.content + '"}' );<span class="token punctuation">}</span>
}
- 1
- 2
- 3
- 4
- 5
- 6
- 7
- 8
- 9
- 10
- 11
- 12
- 13
- 14
- 15
- 16
- 17
- 18
- 19
- 20
- 21
- 22
- 23
- 24
- 25
- 26
- 27
- 28
- 29
- 30
- 31
- 32
- 33
- 34
- 35
- 36
- 37
- 38
- 39
- 40
- 41
- 42
- 43
- 44
- 45
- 46
- 47
- 48
- 49
- 50
- 51
- 52
- 53
- 54
- 55
- 56
- 57
- 58
- 59
- 60
- 61
- 62
- 63
- 64
- 65
- 66
- 67
- 68
- 69
- 70
- 71
- 72
智能推荐
Tomcat 弱口令及文件上传漏洞复现_tomcat byte-程序员宅基地
文章浏览阅读2.9k次,点赞5次,收藏12次。目录0x01 漏洞介绍0x02 环境部署:0x03 漏洞复现0x01 漏洞介绍漏洞描述漏洞编号受影响版本0x02 环境部署:搭建一次,复现百次靶机 ip:192.168.30.209kali ip:192.168.30.1820x03 漏洞复现从github下载tomcat8的源码,我们可以查看到tomcat的默认登录名为tomcat,并且密码也为tomcat点击Server Status进行登录弱口令tomcat tomcat 直接登录成功发现文件上传点_tomcat byte
ICML RL4RealLife|聚焦强化学习落地难题,学术与商业巨头齐聚【7月23日,不见不散】...-程序员宅基地
文章浏览阅读432次。深度强化学习实验室官网:http://www.neurondance.com/论坛:http://deeprl.neurondance.com/近年来,强化学习(RL)在游戏界的成功在AI..._强化学习落地为什么这么难
1个网卡设置多个IP作用_一个网卡多个ip作用-程序员宅基地
文章浏览阅读3.1w次。 一个网卡设置多个IP的作用就是连接多个网段。 举个例子: 有两个局域网LAN1(192.168.0.0/24),LAN2(192.168.1.0/24),LAN1和LAN2通过交换机物理相连。因为LAN1的网络号是192.168.0,LAN2的网络号是192.168.1,所以LAN1下的主机和LAN2下的主机无法通讯。如何才能让他们相互通讯呢?有两种方法。【方法一】通过路由器连..._一个网卡多个ip作用
轨道车辆垂向振动Matlab建模与仿真,基于matlab/simulink的车辆建模与故障分析-程序员宅基地
文章浏览阅读1.7k次。随着铁路行业高速发展,列车运行速度逐渐提高,铁路安全越来越受到人们的重视,如何保证铁道车辆运行安全及其故障监测成为一个亟待解决的重大课题。客车车辆在结构上的故障主要有一系弹簧断裂、减振器失效、空气弹簧漏气、高圆弹簧断裂、车轮踏面擦伤、轴承故障以及蛇形减震器故障等等[1],各种故障对车辆运行品质有不同程度的影响,严重情况下可能会威胁到车辆的安全运行。因此,对车辆故障的监测与识别成为了保证车辆安全运行..._列车垂向动力学建模
IP地址的分类及范围详解:A、B、C、D、E五类是如何划分的_a类地址-程序员宅基地
文章浏览阅读10w+次,点赞217次,收藏1k次。IP地址类型 最初设计互联网络时,为了便于寻址以及层次化构造网络,每个IP地址包括两个标识码(ID),即网络ID和主机ID。同一个物理网络上的所有主机都使用同一个网络ID,网络上的一个主机(包括网络上工作站,服务器和路由器等)有一个主机ID与其对应。IP地址根据网络ID的不同分为5种类型,A类地址、B类地址、C类地址、D类地址和E类地址。A类IP地址 一个A类IP地址由1..._a类地址
什么是IOC和DI-程序员宅基地
文章浏览阅读553次。一、IOC是 什么? IOC的英文名字是Inversion of Control,IOC即“控制反转”,不是什么技术,而是一种设计思想。在Java 开发 中,Ioc意味着将你设计好的对象交给容器控制,而不是传统的在你的对象内部直接控制。 ①所谓控制,指的是管理对象的权利; ②所谓反转,指的是由Spring管理而不是开发者管理二、IOC的作用 IoC的其中一个目的是为了解耦合,当将一个对象交给第三方容器管理后,那么对象之间的耦合相较于传统 ne_ioc和di
随便推点
gPRC简介以及Java中使用gPRC实现客户端与服务端通信(附代码下载)_gprc java client ip-程序员宅基地
文章浏览阅读3.1k次。场景ProtoBuf的介绍以及在Java中使用protobuf将对象进行序列化与反序列化:https://blog.csdn.net/BADAO_LIUMANG_QIZHI/article/details/108667427Thrift介绍以及Java中使用Thrift实现RPC示例:https://blog.csdn.net/BADAO_LIUMANG_QIZHI/article/details/108689413之前讲过Protobuf以及Thrift,下面介绍GPRC。注:_gprc java client ip
JavaEE的渊源_java ee还-程序员宅基地
文章浏览阅读502次。JavaEE的渊源1. JavaEE的起源2. JavaEE与Spring的诞生3. JavaEE发展历程(2003-2007)4. JavaEE发展历程(2009-至今)5. Java的Spec数目与网络结构_java ee还
【图像隐藏】基于DCT算法实现数字水印嵌入+检测+攻击含Matlab源码_基于dct算法归一化相关系数nc测试结果-程序员宅基地
文章浏览阅读1.9k次。1 简介介绍了数字水印的产生、发展及其应用,讨论了数字水印的分类,提出了图像的预处理思想,利用MATLAB中的剪切函数、缩放函数,以及调整图像直方图的方法对图像进行预处理,并用MATLAB进行了仿真.实验结果表明:预处理在DCT数字水印算法的前期工作中有较好作用.随着计算机网络的迅猛发展,信息安全越来越受关注.信息隐藏技术是一种重要的信息安全技术,而数字图像水印算法又是信息隐藏技术研究的一个热点.水印加密和水印嵌入是水印算法的关键问题.本文提出一种新的混沌置乱水印加密算法:首先使用Arnold映射._基于dct算法归一化相关系数nc测试结果
Python3 Tkinter 实例教学 (十五)标签Label 设置鼠标悬停样式 cursor_lable鼠标悬浮-程序员宅基地
文章浏览阅读2.8k次。Python3 Tkinter 实例教学 (十五)标签Label 设置鼠标悬停样式 cursor本节介绍如何给一个标签设置边距构造方法:代码实例:运行结果:本节介绍如何给一个标签设置边距Label 作为一个最常用的控件,能够展示一些文本或者图片或者文本和图片的组合使用构造方法:Label(父对象, cursor=样式)代码实例:# -*- coding:utf8 -*-from tkinter import *root = Tk()root.title("Label Demo")r_lable鼠标悬浮
好用的APP_艾拉浏览器-程序员宅基地
文章浏览阅读87次。电脑APPAX Math、Math type 数学公式编辑器oCam:录屏软件Everything:快速查询电脑文件Potplayer:视频播放器Wallpaper Engine:桌面壁纸天若OCR文字识别:通过截屏的方式识别区域文字Snipaste:快速截屏软件手机APP藏书管:万能图书库Vue log:拍Vlog神器艾拉浏览器:免费看各种高质量漫画、竖屏滑动,观看体验满分喵喵折:淘宝购物,对比历史价格计算机二级宝典:计算机二级考试选择题刷题必备剪映:手机剪辑视频._艾拉浏览器
使用Ajax实现简单的增删查改&&前端Ajax传的值,后端如何获取_ajax增删改查-程序员宅基地
文章浏览阅读4k次,点赞3次,收藏40次。实现查询和增删改一、Ajax最基本语法二、增删查改1.查询(Get请求)2.增删改(Post请求)三、后台(MVC/WebForm)1.MVC(Post请求)2.WebForm(Post请求)本人小白一个。其中所说可能有些不足,因为这些是我自己在写项目的过程中所使用的Ajax如有不对的地方,欢迎评论提出建议。一、Ajax最基本语法话不多说,直接上代码$.ajax({ url: "/User/GetUser",(这里写请求路径) type: "g_ajax增删改查