RabbitMQ的使用_rabbitmq system.in.read()-程序员宅基地
目录
RabbitMQ的使用
一.Java连接RabbitMQ
1.1创建Maven项目
pass 。。。。
1.2导入依赖
<dependencies>
    <dependency>
        <groupId>com.rabbitmq</groupId>
        <artifactId>amqp-client</artifactId>
        <version>5.6.0</version>
    </dependency>

    <dependency>
        <groupId>junit</groupId>
        <artifactId>junit</artifactId>
        <version>4.12</version>
    </dependency>
</dependencies>
1.3创建工具类连接RabbitMQ
public class MQConnection {

    public static Connection getConnetion(){
        // 创建Connection工厂
        ConnectionFactory factory = new ConnectionFactory();
        factory.setHost("192.168.247.128");
        factory.setPort(5672);
        factory.setUsername("root");
        factory.setPassword("123");
        factory.setVirtualHost("/root");

        // 创建Connection
        Connection connection =null;
        try {
         connection = factory.newConnection();
        } catch (IOException e) {
            e.printStackTrace();
        } catch (TimeoutException e) {
            e.printStackTrace();
        }

        return connection;
    }
}
二.通讯方式
1.Hello-World
一个生产者,一个默认的交换机,一个队列,一个消费者
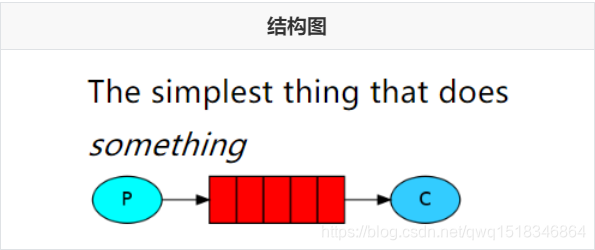
创建生产者,创建一个channel,发布消息到exchange,指定路由规则。
public class publish {
//创建生产者,创建一个channel,发布消息到exchange,指定路由规则。
@Test
public void publish() throws IOException, TimeoutException {
//1. 获取Connection
Connection connetion = MQConnection.getConnetion();
//2. 创建Channel
Channel channel = connetion.createChannel();
//3. 发布消息到exchange,同时指定路由的规则
String msg="Hello-word!666";
// 参数1:指定exchange,使用""。
// 参数2:指定路由的规则,使用具体的队列名称。
// 参数3:指定传递的消息所携带的properties,使用null。
// 参数4:指定发布的具体消息,byte[]类型
channel.basicPublish("","Hello",null,msg.getBytes());
// Ps:exchange是不会帮你将消息持久化到本地的,Queue才会帮你持久化消息。
System.out.println("消息发布成功!加油");
//4. 释放资源
channel.close();
connetion.close();
}
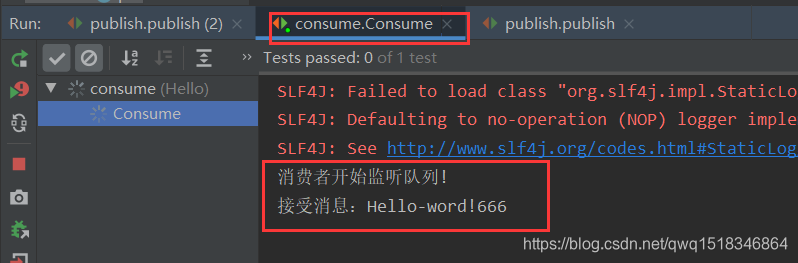
}创建消费者,创建一个channel,创建一个队列,并且去消费当前队列
public class consume {

    @Test
    public void Consume() throws IOException, TimeoutException {

        Connection connetion = MQConnection.getConnetion();

        Channel channel = connetion.createChannel();

        //3. 声明队列-HelloWorld   declare声明
        //参数1:queue - 指定队列的名称
        //参数2:durable - 当前队列是否需要持久化(true)
        //参数3:exclusive - 是否排外(conn.close() - 当前队列会被自动删除,当前队列只能被一个消费者消费)
        //参数4:autoDelete - 如果这个队列没有消费者在消费,队列自动删除
        //参数5:arguments - 指定当前队列的其他信息

        channel.queueDeclare("Hello",true,false,false,null);

        //4. 开启监听Queue
        DefaultConsumer consumer = new DefaultConsumer(channel){
            @Override
            public void handleDelivery(String consumerTag, Envelope envelope, AMQP.BasicProperties properties, byte[] body) throws IOException {
                System.out.println("接受消息:"+new String(body,"utf-8"));
            }
        };

        //参数1:queue - 指定消费哪个队列
        //参数2:autoAck - 指定是否自动ACK (true,接收到消息后,会立即告诉RabbitMQ)
        //参数3:consumer - 指定消费回调
        channel.basicConsume("Hello",true,consumer);

        System.out.println("消费者开始监听队列!");

        System.in.read();
        channel.close();
        connetion.close();

    }
}
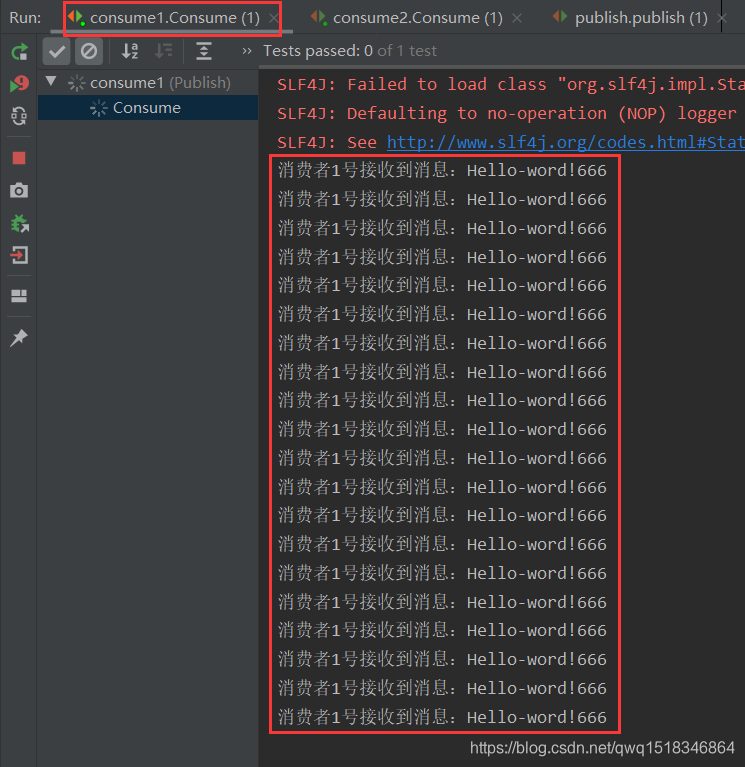
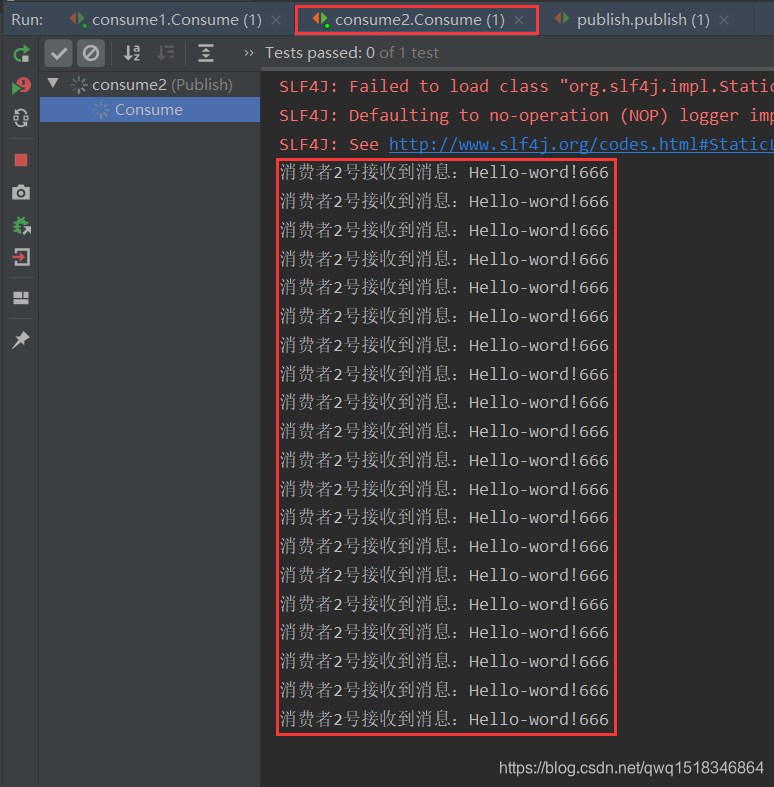
2.Work
一个生产者,一个默认的交换机,一个队列,两个消费者
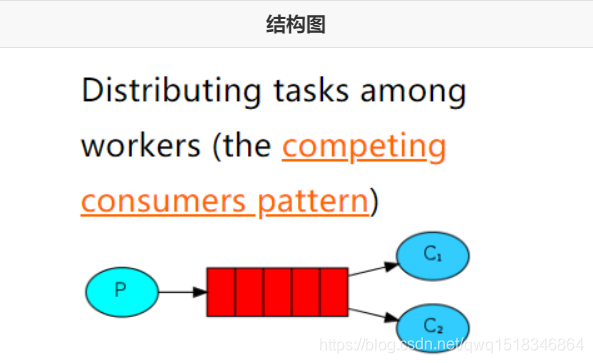
只需要在消费者端,添加Qos能力以及更改为手动ack即可让消费者,根据自己的能力去消费指定的消息,而不是默认情况下由RabbitMQ平均分配了,生产者不变,正常发布消息到默认的exchange,并指定routing
消费者指定Qos和手动ack
public class publish {
        //创建生产者,创建一个channel,发布消息到exchange,指定路由规则。
    @Test
    public void publish() throws IOException, TimeoutException {
        //1. 获取Connection
        Connection connetion = MQConnection.getConnetion();
        //2. 创建Channel
        Channel channel = connetion.createChannel();
        //3. 发布消息到exchange,同时指定路由的规则
        String msg="Hello-word!666";

        // 参数1:指定exchange,使用""。
        // 参数2:指定路由的规则,使用具体的队列名称。
        // 参数3:指定传递的消息所携带的properties,使用null。
        // 参数4:指定发布的具体消息,byte[]类型

        for (int i=0;i<10;i++){
            channel.basicPublish("","Work",null,msg.getBytes());
        }

        // Ps:exchange是不会帮你将消息持久化到本地的,Queue才会帮你持久化消息。
        System.out.println("消息发布成功!加油");
        //4. 释放资源
        channel.close();
        connetion.close();

    }
}
public class consume1 {
@Test
public void Consume() throws IOException, TimeoutException {
Connection connetion = MQConnection.getConnetion();
final Channel channel = connetion.createChannel();
//3. 声明队列-HelloWorld declare声明
//参数1:queue - 指定队列的名称
//参数2:durable - 当前队列是否需要持久化(true)
//参数3:exclusive - 是否排外(conn.close() - 当前队列会被自动删除,当前队列只能被一个消费者消费)
//参数4:autoDelete - 如果这个队列没有消费者在消费,队列自动删除
//参数5:arguments - 指定当前队列的其他信息
channel.queueDeclare("Work",true,false,false,null);
// 指定当前消费者,一次消费多少个消息
channel.basicQos(4);
//4. 开启监听Queue
DefaultConsumer consumer = new DefaultConsumer(channel){
@Override
public void handleDelivery(String consumerTag, Envelope envelope, AMQP.BasicProperties properties, byte[] body) throws IOException {
System.out.println("消费者1号接收到消息:"+new String(body,"utf-8"));
//2. 手动ack
//参数一: 代表了 RabbitMQ 向该 Channel 投递的这条消息的唯一标识 ID,是一个单调递增的正整数,deliveryTag 的范围仅限于 Channel
//参数二:为了减少网络流量,手动确认可以被批处理,当该参数为 true 时,将一次性ack所有小于deliveryTag的消息
channel.basicAck(envelope.getDeliveryTag(),false);
}
};
//参数1:queue - 指定消费哪个队列
//参数2:autoAck - 指定是否自动ACK (true,接收到消息后,会立即告诉RabbitMQ)
//参数3:consumer - 指定消费回调
channel.basicConsume("Work",false,consumer);
System.in.read();
channel.close();
connetion.close();
}
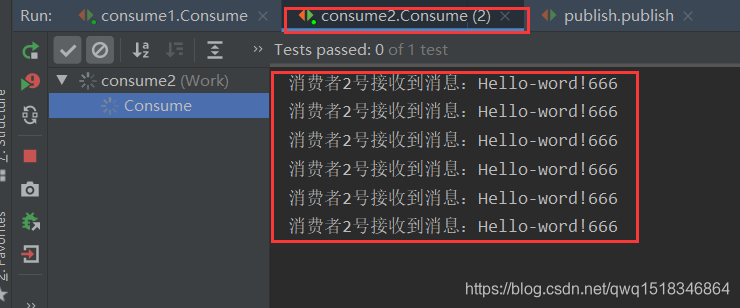
}public class consume2 {
@Test
public void Consume() throws IOException, TimeoutException {
Connection connetion = MQConnection.getConnetion();
final Channel channel = connetion.createChannel();
//3. 声明队列-HelloWorld declare声明
//参数1:queue - 指定队列的名称
//参数2:durable - 当前队列是否需要持久化(true)
//参数3:exclusive - 是否排外(conn.close() - 当前队列会被自动删除,当前队列只能被一个消费者消费)
//参数4:autoDelete - 如果这个队列没有消费者在消费,队列自动删除
//参数5:arguments - 指定当前队列的其他信息
channel.queueDeclare("Work",true,false,false,null);
//4. 开启监听Queue
DefaultConsumer consumer = new DefaultConsumer(channel){
@Override
public void handleDelivery(String consumerTag, Envelope envelope, AMQP.BasicProperties properties, byte[] body) throws IOException {
System.out.println("消费者2号接收到消息:"+new String(body,"utf-8"));
//2. 手动ack
//参数一: 代表了 RabbitMQ 向该 Channel 投递的这条消息的唯一标识 ID,是一个单调递增的正整数,deliveryTag 的范围仅限于 Channel
//参数二:为了减少网络流量,手动确认可以被批处理,当该参数为 true 时,将一次性ack所有小于deliveryTag的消息
channel.basicAck(envelope.getDeliveryTag(),false);
}
};
//参数1:queue - 指定消费哪个队列
//参数2:autoAck - 指定是否自动ACK (true,接收到消息后,会立即告诉RabbitMQ)
//参数3:consumer - 指定消费回调
channel.basicConsume("Work",false,consumer);
System.in.read();
channel.close();
connetion.close();
}
} 
3.Publish/Subscribe
一个生产者,一个交换机,两个队列,两个消费者
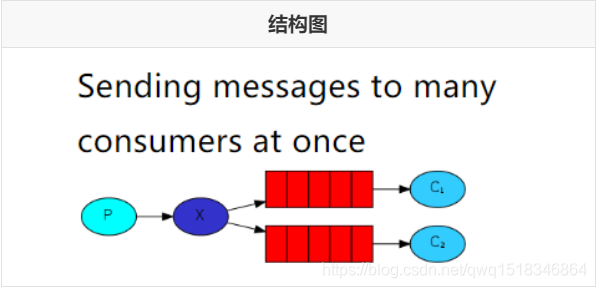
声明一个Fanout类型的exchange,并且将exchange和queue绑定在一起,绑定的方式就是直接绑定。
让生产者创建一个exchange并且指定类型,和一个或多个队列绑定到一起。
public class publish {
        // 声明一个Fanout类型的exchange,并且将exchange和queue绑定在一起,绑定的方式就是直接绑定。
        // 让生产者创建一个exchange并且指定类型,和一个或多个队列绑定到一起。
    @Test
    public void publish() throws IOException, TimeoutException {
        //1. 获取Connection
        Connection connetion = MQConnection.getConnetion();
        //2. 创建Channel
        Channel channel = connetion.createChannel();
        //3. 创建exchange - 绑定某一个队列
        //参数1: exchange的名称
        //参数2: 指定exchange的类型
        channel.exchangeDeclare("pubsub-exchange", BuiltinExchangeType.FANOUT);
        channel.queueBind("pubsub-queue1","pubsub-exchange","");
        channel.queueBind("pubsub-queue2","pubsub-exchange","");
        //4. 发布消息到exchange,同时指定路由的规则
        String msg="Hello-word!666";

        // 参数1:指定exchange,使用""。
        // 参数2:指定路由的规则,使用具体的队列名称。
        // 参数3:指定传递的消息所携带的properties,使用null。
        // 参数4:指定发布的具体消息,byte[]类型

        for (int i=0;i<10;i++){
            channel.basicPublish("pubsub-exchange","",null,msg.getBytes());

        }

        // Ps:exchange是不会帮你将消息持久化到本地的,Queue才会帮你持久化消息。
        System.out.println("消息发布成功!加油");
        //4. 释放资源
        channel.close();
        connetion.close();
    }
}
public class consume1 {
@Test
public void Consume() throws IOException, TimeoutException {
Connection connetion = MQConnection.getConnetion();
final Channel channel = connetion.createChannel();
//3. 声明队列-HelloWorld declare声明
//参数1:queue - 指定队列的名称
//参数2:durable - 当前队列是否需要持久化(true)
//参数3:exclusive - 是否排外(conn.close() - 当前队列会被自动删除,当前队列只能被一个消费者消费)
//参数4:autoDelete - 如果这个队列没有消费者在消费,队列自动删除
//参数5:arguments - 指定当前队列的其他信息
channel.queueDeclare("pubsub-queue1",true,false,false,null);
// 指定当前消费者,一次消费多少个消息
// channel.basicQos(6);
//4. 开启监听Queue
DefaultConsumer consumer = new DefaultConsumer(channel){
@Override
public void handleDelivery(String consumerTag, Envelope envelope, AMQP.BasicProperties properties, byte[] body) throws IOException {
System.out.println("消费者1号接收到消息:"+new String(body,"utf-8"));
//2. 手动ack
//参数一: 代表了 RabbitMQ 向该 Channel 投递的这条消息的唯一标识 ID,是一个单调递增的正整数,deliveryTag 的范围仅限于 Channel
//参数二:为了减少网络流量,手动确认可以被批处理,当该参数为 true 时,将一次性ack所有小于deliveryTag的消息
channel.basicAck(envelope.getDeliveryTag(),false);
}
};
//参数1:queue - 指定消费哪个队列
//参数2:autoAck - 指定是否自动ACK (true,接收到消息后,会立即告诉RabbitMQ)
//参数3:consumer - 指定消费回调
channel.basicConsume("pubsub-queue1",false,consumer);
System.in.read();
channel.close();
connetion.close();
}
}public class consume2 {
@Test
public void Consume() throws IOException, TimeoutException {
Connection connetion = MQConnection.getConnetion();
final Channel channel = connetion.createChannel();
//3. 声明队列-HelloWorld declare声明
//参数1:queue - 指定队列的名称
//参数2:durable - 当前队列是否需要持久化(true)
//参数3:exclusive - 是否排外(conn.close() - 当前队列会被自动删除,当前队列只能被一个消费者消费)
//参数4:autoDelete - 如果这个队列没有消费者在消费,队列自动删除
//参数5:arguments - 指定当前队列的其他信息
channel.queueDeclare("pubsub-queue2",true,false,false,null);
//4. 开启监听Queue
DefaultConsumer consumer = new DefaultConsumer(channel){
@Override
public void handleDelivery(String consumerTag, Envelope envelope, AMQP.BasicProperties properties, byte[] body) throws IOException {
System.out.println("消费者2号接收到消息:"+new String(body,"utf-8"));
//2. 手动ack
//参数一: 代表了 RabbitMQ 向该 Channel 投递的这条消息的唯一标识 ID,是一个单调递增的正整数,deliveryTag 的范围仅限于 Channel
//参数二:为了减少网络流量,手动确认可以被批处理,当该参数为 true 时,将一次性ack所有小于deliveryTag的消息
channel.basicAck(envelope.getDeliveryTag(),false);
}
};
//参数1:queue - 指定消费哪个队列
//参数2:autoAck - 指定是否自动ACK (true,接收到消息后,会立即告诉RabbitMQ)
//参数3:consumer - 指定消费回调
channel.basicConsume("pubsub-queue2",false,consumer);
System.in.read();
channel.close();
connetion.close();
}
}
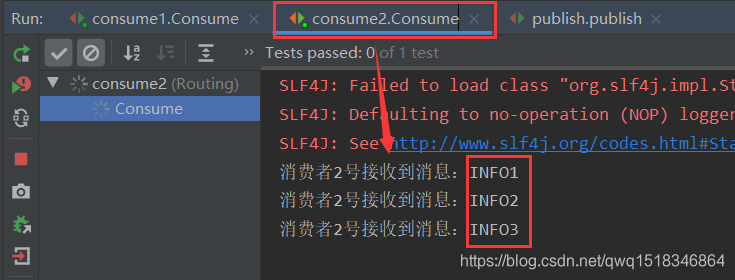
4.Routing
一个生产者,一个交换机,两个队列,两个消费者

生产者在创建DIRECT类型的exchange后,根据RoutingKey去绑定相应的队列,并且在发送消息时,指定消息的具体RoutingKey即可。
public class publish {
//    生产者在创建DIRECT类型的exchange后,根据RoutingKey去绑定相应的队列,
//    并且在发送消息时,指定消息的具体RoutingKey即可。
    @Test
    public void publish() throws IOException, TimeoutException {
        //1. 获取Connection
        Connection connetion = MQConnection.getConnetion();
        //2. 创建Channel
        Channel channel = connetion.createChannel();
        //3. 创建exchange, routing-queue-error,routing-queue-info,
        //参数1: exchange的名称
        //参数2: 指定exchange的类型
        channel.exchangeDeclare("routing-exchange", BuiltinExchangeType.DIRECT);
        channel.queueBind("routing-queue-error","routing-exchange","ERROR");
        channel.queueBind("routing-queue-info","routing-exchange","INFO");
        //4. 发布消息到exchange,同时指定路由的规则
        String msg="Hello-word!666";

        // 参数1:指定exchange,使用""。
        // 参数2:指定路由的规则,使用具体的队列名称。
        // 参数3:指定传递的消息所携带的properties,使用null。
        // 参数4:指定发布的具体消息,byte[]类型

            channel.basicPublish("routing-exchange","ERROR",null,"ERROR".getBytes());
            channel.basicPublish("routing-exchange","INFO",null,"INFO1".getBytes());
            channel.basicPublish("routing-exchange","INFO",null,"INFO2".getBytes());
            channel.basicPublish("routing-exchange","INFO",null,"INFO3".getBytes());

        // Ps:exchange是不会帮你将消息持久化到本地的,Queue才会帮你持久化消息。
        System.out.println("消息发布成功!加油");
        //4. 释放资源
        channel.close();
        connetion.close();

    }
}
public class consume1 {

    @Test
    public void Consume() throws IOException, TimeoutException {

        Connection connetion = MQConnection.getConnetion();

        final Channel channel = connetion.createChannel();

        //3. 声明队列-HelloWorld   declare声明
        //参数1:queue - 指定队列的名称
        //参数2:durable - 当前队列是否需要持久化(true)
        //参数3:exclusive - 是否排外(conn.close() - 当前队列会被自动删除,当前队列只能被一个消费者消费)
        //参数4:autoDelete - 如果这个队列没有消费者在消费,队列自动删除
        //参数5:arguments - 指定当前队列的其他信息

        channel.queueDeclare("routing-queue-error",true,false,false,null);
        // 指定当前消费者,一次消费多少个消息
//        channel.basicQos(6);
        //4. 开启监听Queue
        DefaultConsumer consumer = new DefaultConsumer(channel){
            @Override
            public void handleDelivery(String consumerTag, Envelope envelope, AMQP.BasicProperties properties, byte[] body) throws IOException {

                System.out.println("消费者1号接收到消息:"+new String(body,"utf-8"));

                //2. 手动ack
                //参数一: 代表了 RabbitMQ 向该 Channel 投递的这条消息的唯一标识 ID,是一个单调递增的正整数,deliveryTag 的范围仅限于 Channel
                //参数二:为了减少网络流量,手动确认可以被批处理,当该参数为 true 时,将一次性ack所有小于deliveryTag的消息
                channel.basicAck(envelope.getDeliveryTag(),false);
            }
        };

        //参数1:queue - 指定消费哪个队列
        //参数2:autoAck - 指定是否自动ACK (true,接收到消息后,会立即告诉RabbitMQ)
        //参数3:consumer - 指定消费回调
        channel.basicConsume("routing-queue-error",false,consumer);

        System.in.read();
        channel.close();
        connetion.close();
    }
}
public class consume2 {
@Test
public void Consume() throws IOException, TimeoutException {
Connection connetion = MQConnection.getConnetion();
final Channel channel = connetion.createChannel();
//3. 声明队列-HelloWorld declare声明
//参数1:queue - 指定队列的名称
//参数2:durable - 当前队列是否需要持久化(true)
//参数3:exclusive - 是否排外(conn.close() - 当前队列会被自动删除,当前队列只能被一个消费者消费)
//参数4:autoDelete - 如果这个队列没有消费者在消费,队列自动删除
//参数5:arguments - 指定当前队列的其他信息
channel.queueDeclare("routing-queue-info",true,false,false,null);
//4. 开启监听Queue
DefaultConsumer consumer = new DefaultConsumer(channel){
@Override
public void handleDelivery(String consumerTag, Envelope envelope, AMQP.BasicProperties properties, byte[] body) throws IOException {
System.out.println("消费者2号接收到消息:"+new String(body,"utf-8"));
//2. 手动ack
//参数一: 代表了 RabbitMQ 向该 Channel 投递的这条消息的唯一标识 ID,是一个单调递增的正整数,deliveryTag 的范围仅限于 Channel
//参数二:为了减少网络流量,手动确认可以被批处理,当该参数为 true 时,将一次性ack所有小于deliveryTag的消息
channel.basicAck(envelope.getDeliveryTag(),false);
}
};
//参数1:queue - 指定消费哪个队列
//参数2:autoAck - 指定是否自动ACK (true,接收到消息后,会立即告诉RabbitMQ)
//参数3:consumer - 指定消费回调
channel.basicConsume("routing-queue-info",false,consumer);
System.in.read();
channel.close();
connetion.close();
}
}

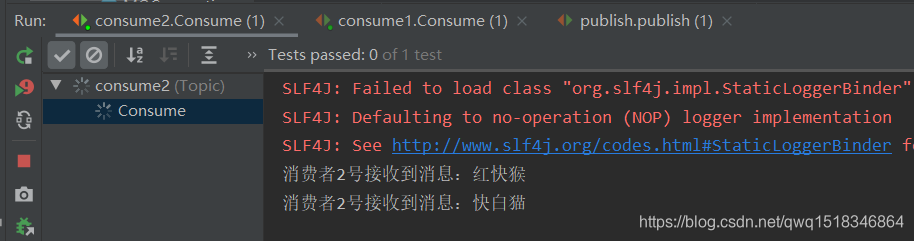
5.Topic
一个生产者,一个交换机,两个队列,两个消费者

生产者创建Topic的exchange并且绑定到队列中,这次绑定可以通过*和#关键字,对指定RoutingKey内容,编写时注意格式 xxx.xxx.xxx去编写, * -> 一个xxx,而# -> 代表多个xxx.xxx,在发送消息时,指定具体的RoutingKey到底是什么。
public class publish {
//   生产者创建Topic的exchange并且绑定到队列中,这次绑定可以通过*和#关键字,对指定RoutingKey内容,
//   编写时注意格式 xxx.xxx.xxx去编写, \* -> 一个xxx,而# -> 代表多个xxx.xxx,在发送消息时,指定具体的RoutingKey到底是什么。
    @Test
    public void publish() throws IOException, TimeoutException {
        //1. 获取Connection
        Connection connetion = MQConnection.getConnetion();
        //2. 创建Channel
        Channel channel = connetion.createChannel();
        //3. 创建exchange并指定绑定方式
        //  fast.red.cat
        //  fast.white.dog
        //  slow.yello.dog
       channel.exchangeDeclare("topic-exchange",BuiltinExchangeType.TOPIC);
       channel.queueBind("topic-queue-1","topic-exchange","*.red.*");
       channel.queueBind("topic-queue-2","topic-exchange","fast.#");
       channel.queueBind("topic-queue-2","topic-exchange","*.*.rabbit");


        //4. 发布消息到exchange,同时指定路由的规则
//        String msg="Hello-word!666";

        // 参数1:指定exchange,使用""。
        // 参数2:指定路由的规则,使用具体的队列名称。
        // 参数3:指定传递的消息所携带的properties,使用null。
        // 参数4:指定发布的具体消息,byte[]类型

        channel.basicPublish("topic-exchange","fast.red.monkey",null,"红快猴".getBytes());
        channel.basicPublish("topic-exchange","slow.black.dog",null,"黑漫狗".getBytes());
        channel.basicPublish("topic-exchange","fast.white.cat",null,"快白猫".getBytes());

        // Ps:exchange是不会帮你将消息持久化到本地的,Queue才会帮你持久化消息。
        System.out.println("消息发布成功!加油");
        //4. 释放资源
        channel.close();
        connetion.close();

    }
}
public class consume1 {
@Test
public void Consume() throws IOException, TimeoutException {
Connection connetion = MQConnection.getConnetion();
final Channel channel = connetion.createChannel();
//3. 声明队列-HelloWorld declare声明
//参数1:queue - 指定队列的名称
//参数2:durable - 当前队列是否需要持久化(true)
//参数3:exclusive - 是否排外(conn.close() - 当前队列会被自动删除,当前队列只能被一个消费者消费)
//参数4:autoDelete - 如果这个队列没有消费者在消费,队列自动删除
//参数5:arguments - 指定当前队列的其他信息
channel.queueDeclare("topic-queue-1",true,false,false,null);
// 指定当前消费者,一次消费多少个消息
// channel.basicQos(6);
//4. 开启监听Queue
DefaultConsumer consumer = new DefaultConsumer(channel){
@Override
public void handleDelivery(String consumerTag, Envelope envelope, AMQP.BasicProperties properties, byte[] body) throws IOException {
System.out.println("消费者1号接收到消息:"+new String(body,"utf-8"));
//2. 手动ack
//参数一: 代表了 RabbitMQ 向该 Channel 投递的这条消息的唯一标识 ID,是一个单调递增的正整数,deliveryTag 的范围仅限于 Channel
//参数二:为了减少网络流量,手动确认可以被批处理,当该参数为 true 时,将一次性ack所有小于deliveryTag的消息
channel.basicAck(envelope.getDeliveryTag(),false);
}
};
//参数1:queue - 指定消费哪个队列
//参数2:autoAck - 指定是否自动ACK (true,接收到消息后,会立即告诉RabbitMQ)
//参数3:consumer - 指定消费回调
channel.basicConsume("topic-queue-1",false,consumer);
System.in.read();
channel.close();
connetion.close();
}
}public class consume2 {
@Test
public void Consume() throws IOException, TimeoutException {
Connection connetion = MQConnection.getConnetion();
final Channel channel = connetion.createChannel();
//3. 声明队列-HelloWorld declare声明
//参数1:queue - 指定队列的名称
//参数2:durable - 当前队列是否需要持久化(true)
//参数3:exclusive - 是否排外(conn.close() - 当前队列会被自动删除,当前队列只能被一个消费者消费)
//参数4:autoDelete - 如果这个队列没有消费者在消费,队列自动删除
//参数5:arguments - 指定当前队列的其他信息
channel.queueDeclare("topic-queue-2",true,false,false,null);
//4. 开启监听Queue
DefaultConsumer consumer = new DefaultConsumer(channel){
@Override
public void handleDelivery(String consumerTag, Envelope envelope, AMQP.BasicProperties properties, byte[] body) throws IOException {
System.out.println("消费者2号接收到消息:"+new String(body,"utf-8"));
//2. 手动ack
//参数一: 代表了 RabbitMQ 向该 Channel 投递的这条消息的唯一标识 ID,是一个单调递增的正整数,deliveryTag 的范围仅限于 Channel
//参数二:为了减少网络流量,手动确认可以被批处理,当该参数为 true 时,将一次性ack所有小于deliveryTag的消息
channel.basicAck(envelope.getDeliveryTag(),false);
}
};
//参数1:queue - 指定消费哪个队列
//参数2:autoAck - 指定是否自动ACK (true,接收到消息后,会立即告诉RabbitMQ)
//参数3:consumer - 指定消费回调
channel.basicConsume("topic-queue-2",false,consumer);
System.in.read();
channel.close();
connetion.close();
}
}

智能推荐
c# 调用c++ lib静态库_c#调用lib-程序员宅基地
文章浏览阅读2w次,点赞7次,收藏51次。四个步骤1.创建C++ Win32项目动态库dll 2.在Win32项目动态库中添加 外部依赖项 lib头文件和lib库3.导出C接口4.c#调用c++动态库开始你的表演...①创建一个空白的解决方案,在解决方案中添加 Visual C++ , Win32 项目空白解决方案的创建:添加Visual C++ , Win32 项目这......_c#调用lib
deepin/ubuntu安装苹方字体-程序员宅基地
文章浏览阅读4.6k次。苹方字体是苹果系统上的黑体,挺好看的。注重颜值的网站都会使用,例如知乎:font-family: -apple-system, BlinkMacSystemFont, Helvetica Neue, PingFang SC, Microsoft YaHei, Source Han Sans SC, Noto Sans CJK SC, W..._ubuntu pingfang
html表单常见操作汇总_html表单的处理程序有那些-程序员宅基地
文章浏览阅读159次。表单表单概述表单标签表单域按钮控件demo表单标签表单标签基本语法结构<form action="处理数据程序的url地址“ method=”get|post“ name="表单名称”></form><!--action,当提交表单时,向何处发送表单中的数据,地址可以是相对地址也可以是绝对地址--><!--method将表单中的数据传送给服务器处理,get方式直接显示在url地址中,数据可以被缓存,且长度有限制;而post方式数据隐藏传输,_html表单的处理程序有那些
PHP设置谷歌验证器(Google Authenticator)实现操作二步验证_php otp 验证器-程序员宅基地
文章浏览阅读1.2k次。使用说明:开启Google的登陆二步验证(即Google Authenticator服务)后用户登陆时需要输入额外由手机客户端生成的一次性密码。实现Google Authenticator功能需要服务器端和客户端的支持。服务器端负责密钥的生成、验证一次性密码是否正确。客户端记录密钥后生成一次性密码。下载谷歌验证类库文件放到项目合适位置(我这边放在项目Vender下面)https://github.com/PHPGangsta/GoogleAuthenticatorPHP代码示例://引入谷_php otp 验证器
【Python】matplotlib.plot画图横坐标混乱及间隔处理_matplotlib更改横轴间距-程序员宅基地
文章浏览阅读4.3k次,点赞5次,收藏11次。matplotlib.plot画图横坐标混乱及间隔处理_matplotlib更改横轴间距
docker — 容器存储_docker 保存容器-程序员宅基地
文章浏览阅读2.2k次。①Storage driver 处理各镜像层及容器层的处理细节,实现了多层数据的堆叠,为用户 提供了多层数据合并后的统一视图②所有 Storage driver 都使用可堆叠图像层和写时复制(CoW)策略③docker info 命令可查看当系统上的 storage driver主要用于测试目的,不建议用于生成环境。_docker 保存容器
随便推点
网络拓扑结构_网络拓扑csdn-程序员宅基地
文章浏览阅读834次,点赞27次,收藏13次。网络拓扑结构是指计算机网络中各组件(如计算机、服务器、打印机、路由器、交换机等设备)及其连接线路在物理布局或逻辑构型上的排列形式。这种布局不仅描述了设备间的实际物理连接方式,也决定了数据在网络中流动的路径和方式。不同的网络拓扑结构影响着网络的性能、可靠性、可扩展性及管理维护的难易程度。_网络拓扑csdn
JS重写Date函数,兼容IOS系统_date.prototype 将所有 ios-程序员宅基地
文章浏览阅读1.8k次,点赞5次,收藏8次。IOS系统Date的坑要创建一个指定时间的new Date对象时,通常的做法是:new Date("2020-09-21 11:11:00")这行代码在 PC 端和安卓端都是正常的,而在 iOS 端则会提示 Invalid Date 无效日期。在IOS年月日中间的横岗许换成斜杠,也就是new Date("2020/09/21 11:11:00")通常为了兼容IOS的这个坑,需要做一些额外的特殊处理,笔者在开发的时候经常会忘了兼容IOS系统。所以就想试着重写Date函数,一劳永逸,避免每次ne_date.prototype 将所有 ios
如何将EXCEL表导入plsql数据库中-程序员宅基地
文章浏览阅读5.3k次。方法一:用PLSQL Developer工具。 1 在PLSQL Developer的sql window里输入select * from test for update; 2 按F8执行 3 打开锁, 再按一下加号. 鼠标点到第一列的列头,使全列成选中状态,然后粘贴,最后commit提交即可。(前提..._excel导入pl/sql
Git常用命令速查手册-程序员宅基地
文章浏览阅读83次。Git常用命令速查手册1、初始化仓库git init2、将文件添加到仓库git add 文件名 # 将工作区的某个文件添加到暂存区 git add -u # 添加所有被tracked文件中被修改或删除的文件信息到暂存区,不处理untracked的文件git add -A # 添加所有被tracked文件中被修改或删除的文件信息到暂存区,包括untracked的文件...
分享119个ASP.NET源码总有一个是你想要的_千博二手车源码v2023 build 1120-程序员宅基地
文章浏览阅读202次。分享119个ASP.NET源码总有一个是你想要的_千博二手车源码v2023 build 1120
【C++缺省函数】 空类默认产生的6个类成员函数_空类默认产生哪些类成员函数-程序员宅基地
文章浏览阅读1.8k次。版权声明:转载请注明出处 http://blog.csdn.net/irean_lau。目录(?)[+]1、缺省构造函数。2、缺省拷贝构造函数。3、 缺省析构函数。4、缺省赋值运算符。5、缺省取址运算符。6、 缺省取址运算符 const。[cpp] view plain copy_空类默认产生哪些类成员函数