一文解决scrapy带案例爬取当当图书_scrapy爬虫当当网-程序员宅基地
技术标签: python # python爬虫 mysql
Scrapy框架
简介
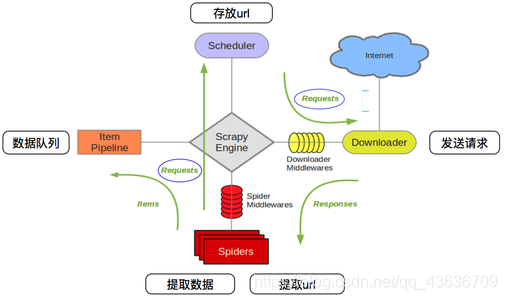
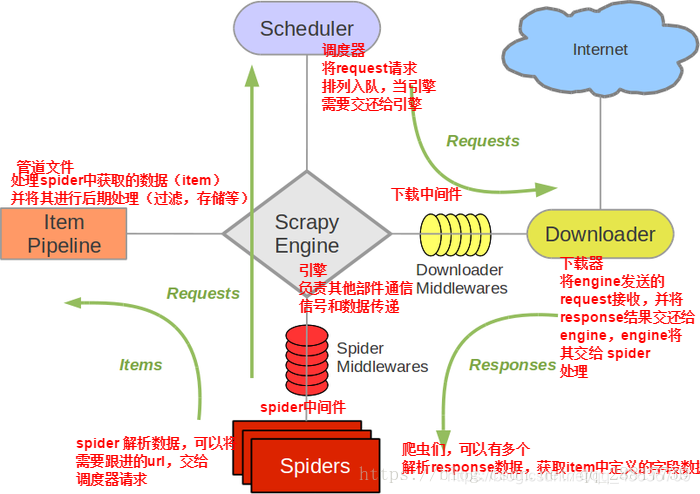
Scrapy的五大组件
Spiders(爬虫):
它负责处理所有Responses,从中分析提取数据,获取Item字段需要的数据,并将需要跟进的URL提交给引擎,再次进入Scheduler(调度器)
Engine(引擎):
负责Spider、ItemPipeline、Downloader、Scheduler中间的通讯,信号、数据传递等。
Scheduler(调度器):
它负责接受引擎发送过来的Request请求,并按照一定的方式进行整理排列,入队,当引擎需要时,交还给引擎。
Downloader(下载器):
负责下载Scrapy Engine(引擎)发送的所有Requests请求,并将其获取到的Responses交还Scrapy Engine(引擎),由引擎交给Spider来处理
ItemPipeline(管道):
它负责处理Spider中获取到的Item,并进行进行后期处理(详细分析、过滤、存储等)的地方.
Downloader Middlewares(下载中间件):
你可以当作是一个可以自定义扩展下载功能的组件。
Spider Middlewares(Spider中间件):
你可以理解为是一个可以自定扩展和操作引擎和Spider中间
通信的功能组件(比如进入Spider的Responses;和从Spider出去的Requests)
scrapy的数据流图:
绿线是数据流
安装:
pip install scrapy
scrapy几条命令
创建项目:scrapy startproject xxx
进入项目:cd xxx
基本爬虫:scrapy genspider xxx(爬虫名) xxx.com (爬取域)
还有一条是规则爬虫的命令,只是这条有变化,前俩条不变
规则爬虫:scrapy genspider -t crawl xxx(爬虫名) xxx.com (爬取域)
运行命令:scrapy crawl xxx
建立项目
(1).建立一个文件夹 scrapyDemo1
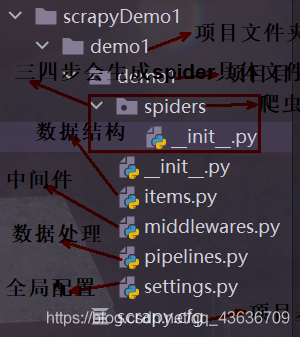
(2).在该文件夹下面打开命令行窗口 scrapy startproject demo1 则会在文件夹scrapyDemo1下面建立scrapy项目文件夹demo1,包括scrapy的各个组件子文件
(3).进入到项目文件夹demo1下 cd demo1
(4).scrapy genspider 爬虫名 域名 e.g:scrapy genspider demo1spider baidu.com
(5).scrapy crawl 爬虫名 用于运行爬虫 一般该命令在命令行使用 而且输出许多信息 很不方便 所以专门写个run.py来执行程序且内容几乎固定,和scrapy.cfg同级
run.py
from scrapy import cmdline
cmdline.execute('scrapy crawl demo1spider --nolog'.split())#--nolog   控制台不输出日志
e.g:scrapy crawl demo1spider
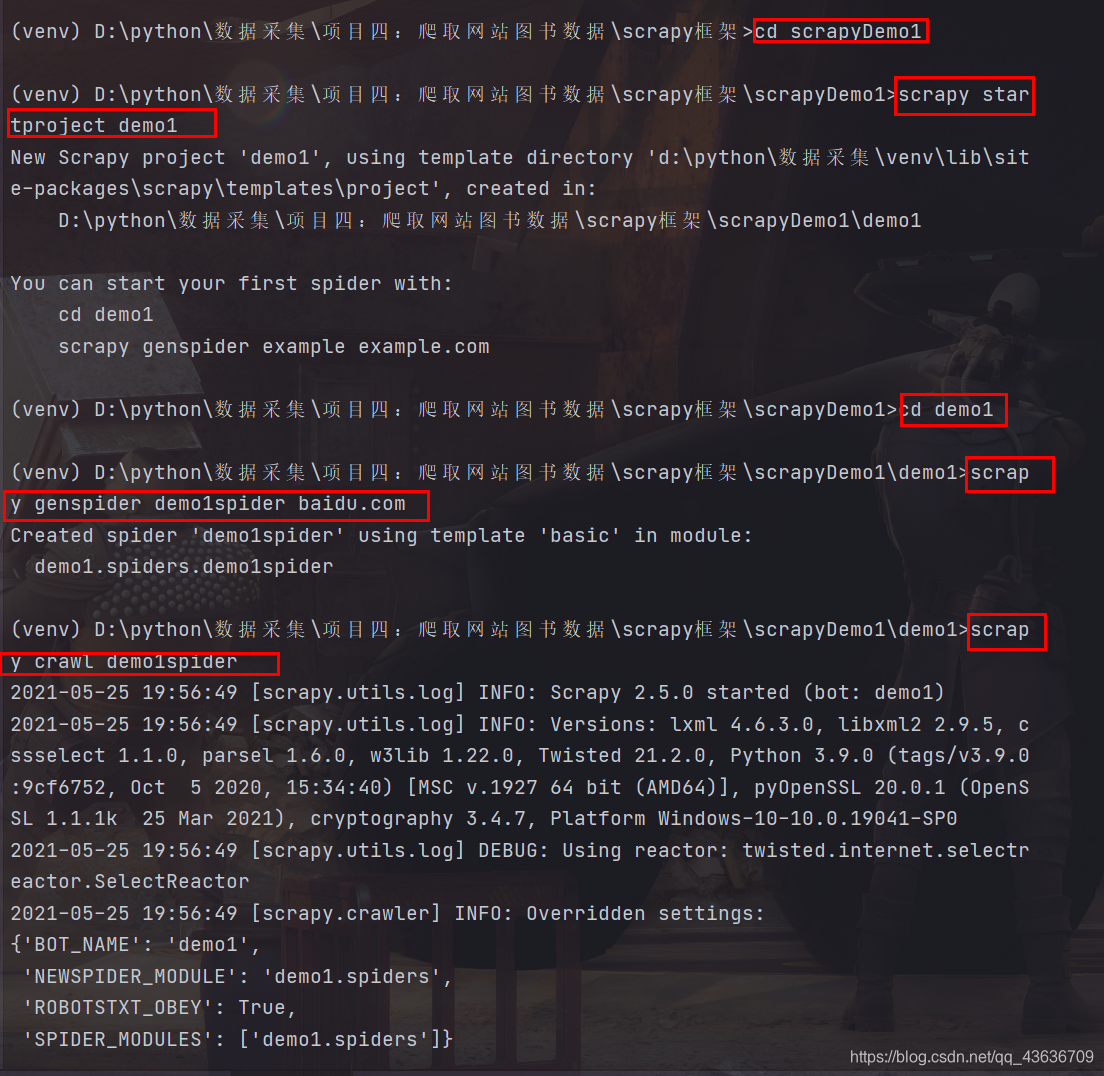
执行三四之后相当于建立一个爬虫项目,并启动这个项目,一般在第三步骤之后就要进行相应的代码编写和配置更改
scrapy框架文件的简单配置使用介绍
setting.py 进行全局配置
项目名 User-Agent 机器人规则 并发数 延迟 cookies 默认请求头 项目管道优先级配置
主要注意注释介绍,几个常用的
# Scrapy settings for demo1 project
#
# For simplicity, this file contains only settings considered important or
# commonly used. You can find more settings consulting the documentation:
#
#     https://docs.scrapy.org/en/latest/topics/settings.html
#     https://docs.scrapy.org/en/latest/topics/downloader-middleware.html
#     https://docs.scrapy.org/en/latest/topics/spider-middleware.html

BOT_NAME = 'demo1'  #项目名

SPIDER_MODULES = ['demo1.spiders']    #
NEWSPIDER_MODULE = 'demo1.spiders'


# Crawl responsibly by identifying yourself (and your website) on the user-agent
#USER_AGENT = 'demo1 (+http://www.yourdomain.com)'    #这个可以浏览器抓包查看值 比较重要 一般都要带的

# Obey robots.txt rules
ROBOTSTXT_OBEY = False   # 机器人规则 默认是true  一般都要修改为false  否则几乎爬不了太多东西

# Configure maximum concurrent requests performed by Scrapy (default: 16)
#CONCURRENT_REQUESTS = 32  #最大并发数 可以开启的爬虫线程数

# Configure a delay for requests for the same website (default: 0)
# See https://docs.scrapy.org/en/latest/topics/settings.html#download-delay
# See also autothrottle settings and docs
#DOWNLOAD_DELAY = 1   #下载延迟时间,单位是秒,默认是3秒,即爬一个停3秒,设置为1秒性价比较高,如果要爬取的文件较多,写零点几秒也行
# The download delay setting will honor only one of:
#CONCURRENT_REQUESTS_PER_DOMAIN = 16
#CONCURRENT_REQUESTS_PER_IP = 16

# Disable cookies (enabled by default)
#COOKIES_ENABLED = False   #是否保存COOKIES,默认关闭,开机可以记录爬取过程中的COKIE,非常好用的一个参数

# Disable Telnet Console (enabled by default)
#TELNETCONSOLE_ENABLED = False

# Override the default request headers:
#DEFAULT_REQUEST_HEADERS = {

#   'Accept': 'text/html,application/xhtml+xml,application/xml;q=0.9,*/*;q=0.8',
#   'Accept-Language': 'en',
#}     #默认请求头,上面写了一个USER_AGENT,其实这个东西就是放在请求头里面的,这个东西可以根据你爬取的内容做相应设置。

# Enable or disable spider middlewares
# See https://docs.scrapy.org/en/latest/topics/spider-middleware.html
#SPIDER_MIDDLEWARES = {

#    'demo1.middlewares.Demo1SpiderMiddleware': 543,
#}

# Enable or disable downloader middlewares
# See https://docs.scrapy.org/en/latest/topics/downloader-middleware.html
#DOWNLOADER_MIDDLEWARES = {

#    'demo1.middlewares.Demo1DownloaderMiddleware': 543,
#}

# Enable or disable extensions
# See https://docs.scrapy.org/en/latest/topics/extensions.html
#EXTENSIONS = {

#    'scrapy.extensions.telnet.TelnetConsole': None,
#}

# Configure item pipelines
# See https://docs.scrapy.org/en/latest/topics/item-pipeline.html
#ITEM_PIPELINES = {

    #'demo1.pipelines.Demo1Pipeline': 300,
    #'demo1.pipelines.Demo1MySqlPipeline' : 200,
#}  #项目管道,300为优先级,越低爬取的优先度越高 pipelines.py里面写了两个管道,一个爬取网页的管道,一个存数据库的管道,我调整了他们的优先级,如果有爬虫数据,优先执行存库操作。


# Enable and configure the AutoThrottle extension (disabled by default)
# See https://docs.scrapy.org/en/latest/topics/autothrottle.html
#AUTOTHROTTLE_ENABLED = True
# The initial download delay
#AUTOTHROTTLE_START_DELAY = 5
# The maximum download delay to be set in case of high latencies
#AUTOTHROTTLE_MAX_DELAY = 60
# The average number of requests Scrapy should be sending in parallel to
# each remote server
#AUTOTHROTTLE_TARGET_CONCURRENCY = 1.0
# Enable showing throttling stats for every response received:
#AUTOTHROTTLE_DEBUG = False

# Enable and configure HTTP caching (disabled by default)
# See https://docs.scrapy.org/en/latest/topics/downloader-middleware.html#httpcache-middleware-settings
#HTTPCACHE_ENABLED = True
#HTTPCACHE_EXPIRATION_SECS = 0
#HTTPCACHE_DIR = 'httpcache'
#HTTPCACHE_IGNORE_HTTP_CODES = []
#HTTPCACHE_STORAGE = 'scrapy.extensions.httpcache.FilesystemCacheStorage'
日志配置
相关变量
LOG_LEVEL= ""

LOG_FILE="日志名.log"
在运行时后面加上–nolog,控制台就不会输出日志信息了:
scrapy crawl demo1spider --nolog
日志等级
1.DEBUG 调试信息
2.INFO 一般信息
3.WARNING 警告
4.ERROR 普通错误
5.CRITICAL 严重错误
如果设置:
LOG_LEVEL="WARNING",就只会WARNING等级之下的ERROR和CRITICAL
默认等级是1
导出为几种格式
执行爬虫文件时添加-o选项即可
json格式,默认为Unicode编码
scrapy crawl 项目名 -o 项目名.json
json lines格式,默认为Unicode编码
scrapy crawl 项目名 -o 项目名.jsonlines
csv 逗号表达式,可用Excel打开
scrapy crawl 项目名 -o 项目名.csv
xml格式
scrapy crawl 项目名 -o 项目名.xml
对于json文件,在setting.js文件里添加,设置编码格式,否则会乱码:
FEED_EXPORT_ENCODING='utf-8'
xpath
选择查找类
1.from scrapy.selector import Selector:引入选择查找类
2.selector = Selector(text=htmlText):装载Html文档 形成Selector对象 可以使用Xpath方法
3.Xpath可以连续调用 返回的是selector列表 则这个列表可以连续调用Xpath
Xpath查找Html元素
1.“//”表示文档下面所有节点元素,“/”表示当前节点的下一级节点元素,“.”表示当前节点元素
2.如果Xpath返回Selector对象,调用extract()函数会得到这些对象元素文本的列表,extract_first()获取列表中的第一个元素,如果列表为空,返回None,对于单一的Selector对象没有extract_first()函数
3.“/@attrName”得到一个Selector元素的attrName属性节点对象,也是一个Selector对象
4.“/text()”得到一个Selector元素包含的文本值,文本值节点对象也是一个Selector对象,通过extract()函数获取文本值
5.“tag[condition1 and condition2...]”来限定一个tag元素,condition是这个tag的属性
6.Xpath可以使用position()来确定其中一个元素的限制,选择序号从1开始
s = selector.xpath("//book[position()=1]/title").extract_first()
7.“*”代表任何元素节点,不包括text和comment
8.“@*”代表任何属性
9.“element/parent::*”选择element的父节点,该节点只有一个
10.“element/following-sibling::*”搜索element后面同级的所有兄弟节点,“element/following-sibling::[position()=1]”搜索element后面的同级的第一个兄弟节点
11.“element/preceding-sibling::*”搜索element前面同级的所有兄弟节点
yield函数
1.yield类似于return,但它是生成器的一部分
生成器详解
首先,如果你还没有对yield有个初步分认识,那么你先把yield看做“return”,这个是直观的,它首先是个return,普通的return是什么意思,就是在程序中返回某个值,返回之后程序就不再往下运行了。看做return之后再把它看做一个是生成器(generator)的一部分(带yield的函数才是真正的迭代器)
2.yield与return
带yield的函数是一个生成器,而不是一个函数了,这个生成器有一个函数就是next函数,next就相当于“下一步”生成哪个数,这一次的next开始的地方是接着上一次的next停止的地方执行的,所以调用next的时候,生成器并不会从foo函数的开始执行,只是接着上一步停止的地方开始,然后遇到yield后,return出要生成的数,此步就结束。
实例
爬取当当网站图书数据并保存到mysql中
基础就在demo1上进行
观查网页
当当图书网:http://search.dangdang.com
输入python,网址变化成:http://search.dangdang.com/?key=python&act=input
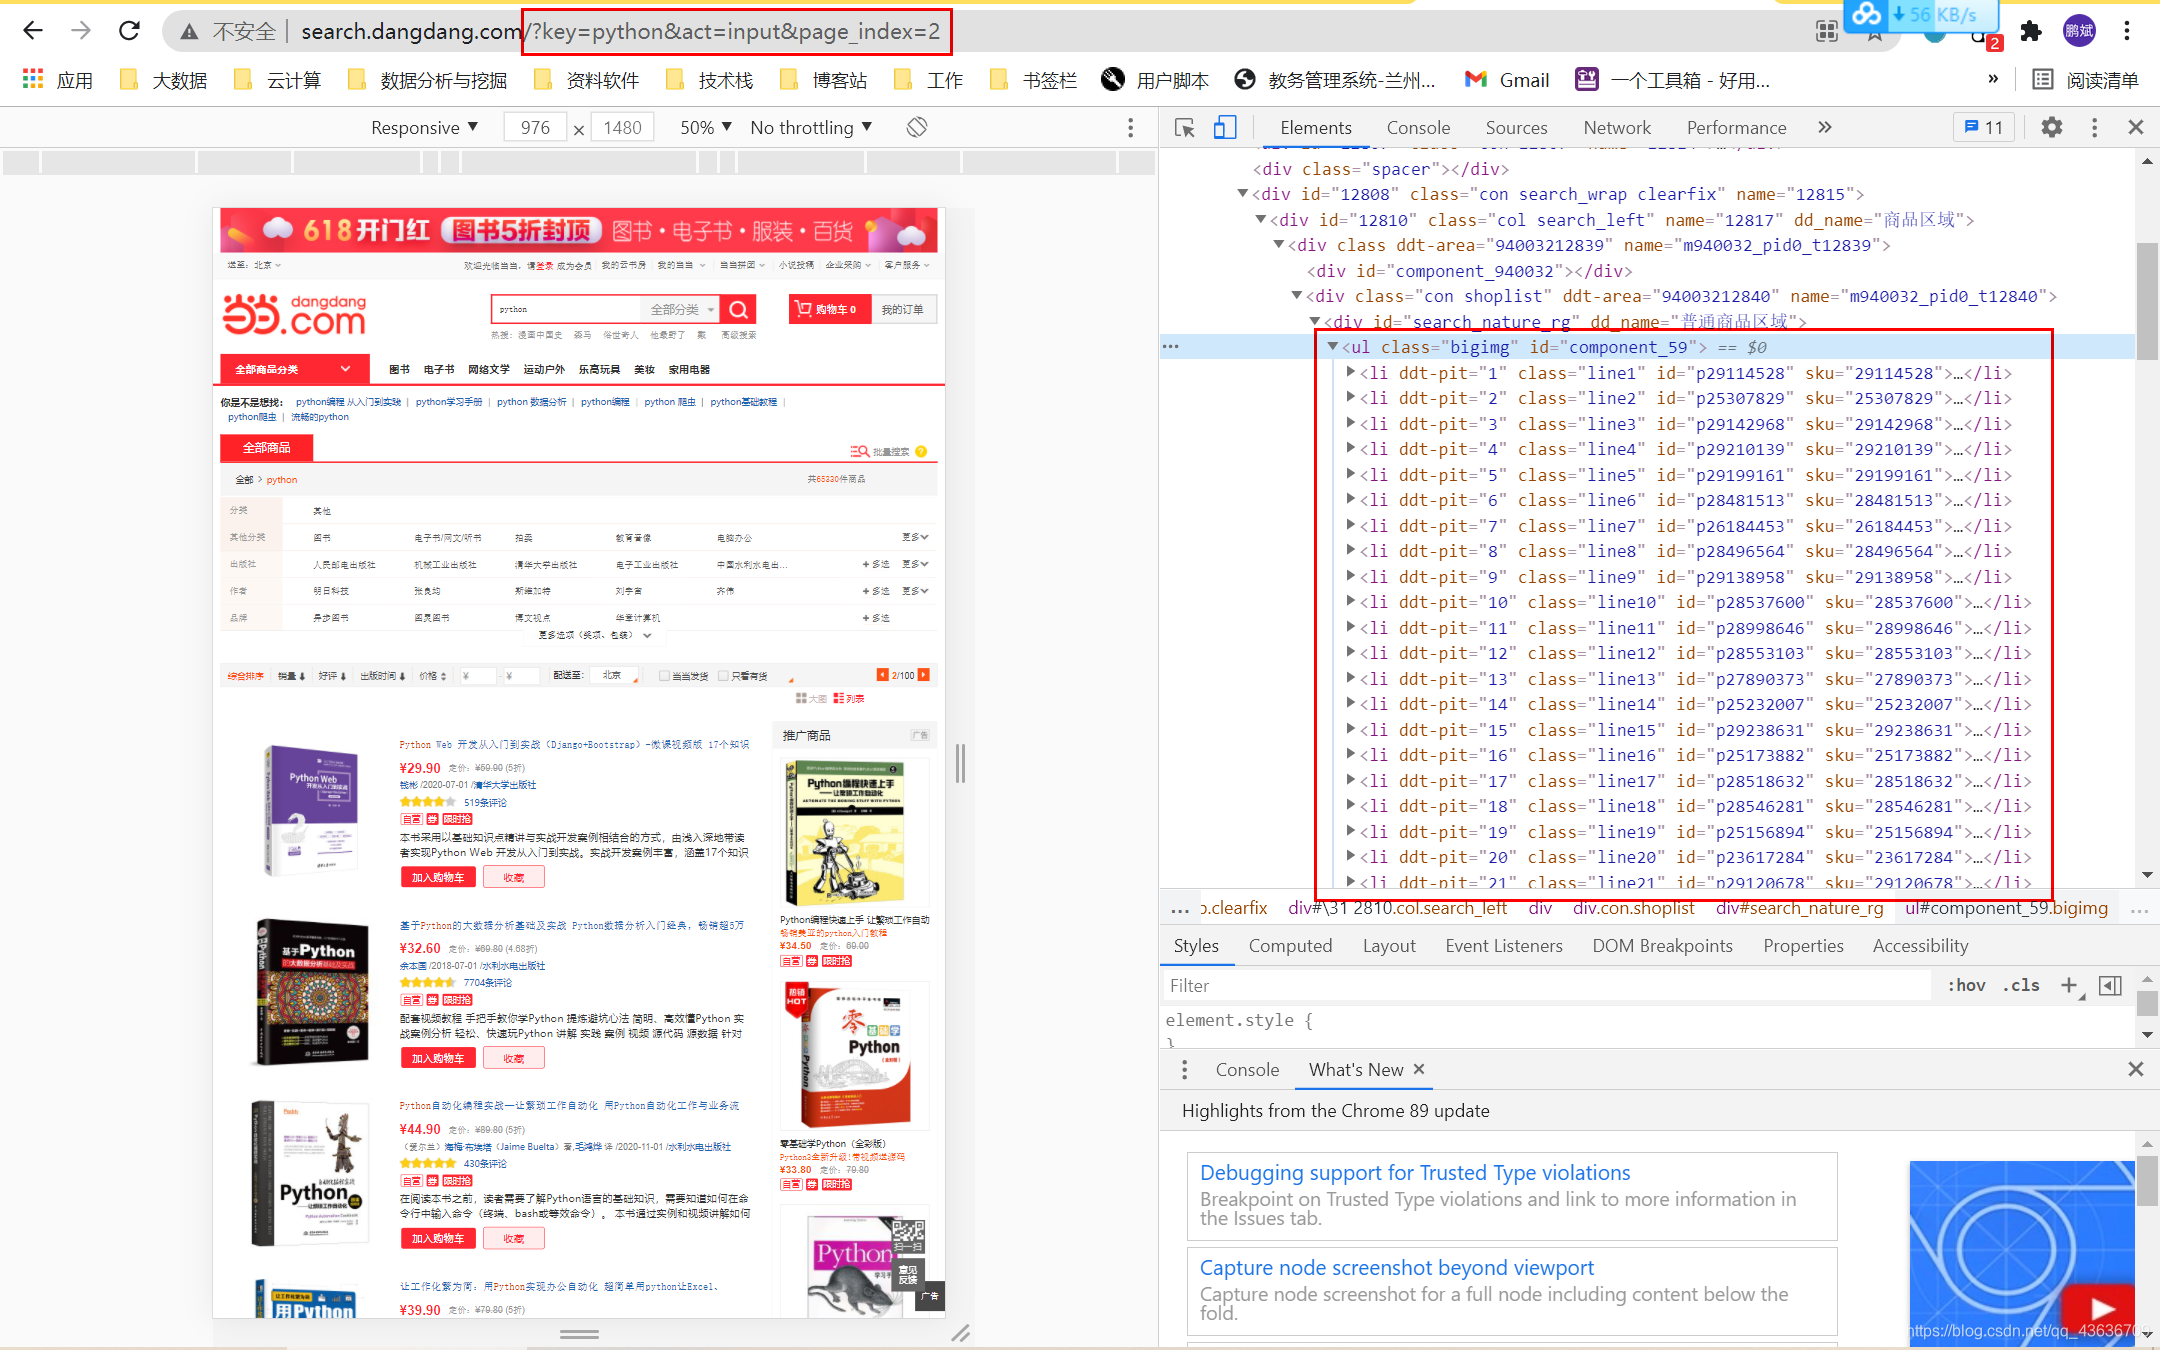
翻到下一页或者第二页:http://search.dangdang.com/?key=python&act=input&page_index=2
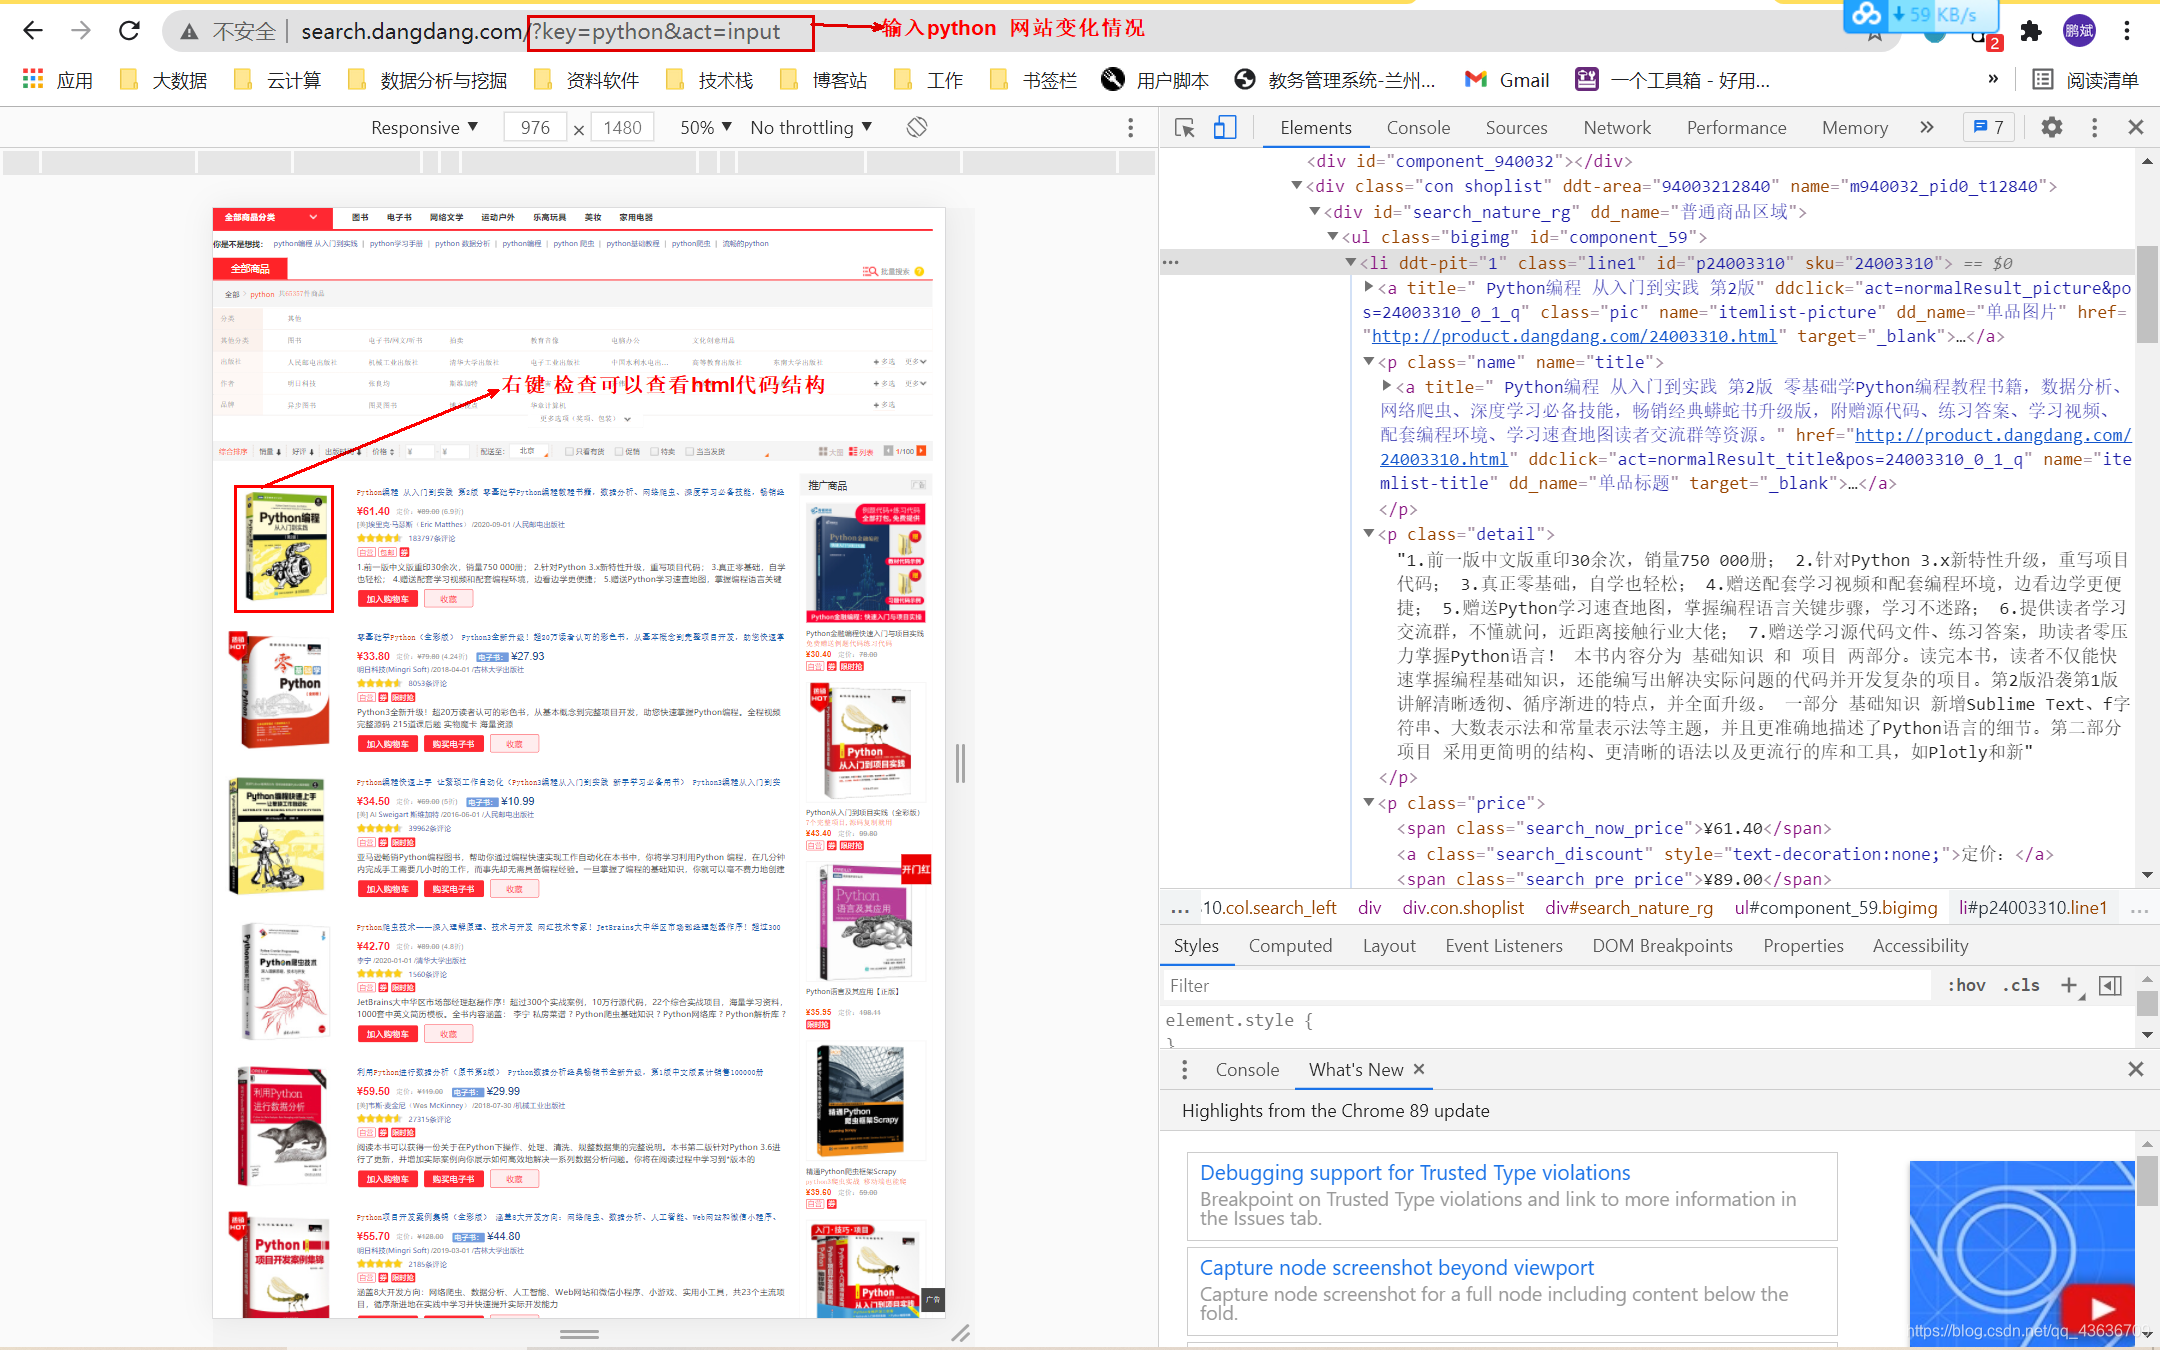
确定爬取的信息:
title 标题
author 作者
date 发布日期
publisher 出版社
detail 细节介绍
price 价格
mysql中建立相应数据库和表:
show databases ;


create database ddbookdb;


use ddbookdb;

create table books(
    btitle varchar(512) primary key ,
    bauthor varchar(256),
    bpublisher varchar(256),
    bdate varchar(32),
    bprice varchar(16),
    bdetail text
);
select * from books;
编写运行run.py文件:
from scrapy import cmdline
cmdline.execute('scrapy crawl demo1spider --nolog'.split())#--nolog   控制台不输出日志
编写items.py数据项目类Demo1Item:
# Define here the models for your scraped items
#
# See documentation in:
# https://docs.scrapy.org/en/latest/topics/items.html

import scrapy

class Demo1Item(scrapy.Item):
    # define the fields for your item here like:
    # name = scrapy.Field()
    title = scrapy.Field()#标题
    author = scrapy.Field()#作者
    date = scrapy.Field()#发布日期
    publisher = scrapy.Field()#出版社
    detail = scrapy.Field()#细节介绍
    price = scrapy.Field()#价格
    #pass
编写pipelines.py文件,写连接和关闭mysql数据库的两个函数,将数据项传输过来的数据输出到控制台并存入到mysql数据库中,使用count变量统计爬取的书籍数量:
# Define your item pipelines here
#
# Don't forget to add your pipeline to the ITEM_PIPELINES setting
# See: https://docs.scrapy.org/en/latest/topics/item-pipeline.html


# useful for handling different item types with a single interface
from itemadapter import ItemAdapter
import pymysql

class Demo1Pipeline:
    def open_spider(self,spider):
        print("opened")

        try:
            self.con =pymysql.connect(host="127.0.0.1", port=3306, user="root", passwd="lzyft1030", db="ddbookdb", charset="utf8")
            self.cursor = self.con.cursor(pymysql.cursors.DictCursor)#创建游标
            self.cursor.execute("delete from books")
            self.opend = True
            self.count = 0
        except Exception as err:
            print(err)
            self.opend = False

    def close_spider(self,spider):
        if self.opend:
            self.con.commit()#提交
            self.con.close()#关闭
            self.opend = False
        print("closed")
        print("总共爬取",self.count,"本书籍")

    def process_item(self, item, spider):
        #查看传输过来的数据
        try:
            #把数据存入到mysql中
            if self.opend:
                self.cursor.execute("insert into books(btitle, bauthor, bpublisher, bdate, bprice, bdetail) values(%s, %s, %s ,%s ,%s, %s)", \
                            (item["title"], item["author"], item["publisher"], item["date"], item["price"], item["detail"]))
                #计算书籍数量
                self.count+= 1
        except Exception as err:
            print(err)

        return item
修改setting.py文件【修改机器人规则, 加入User-Agent, 打开 ITEM_PIPELINES 将数据传输过来送到 demo1Pipeline 类中然后存到mysql中】:
# Scrapy settings for demo1 project
#
# For simplicity, this file contains only settings considered important or
# commonly used. You can find more settings consulting the documentation:
#
#     https://docs.scrapy.org/en/latest/topics/settings.html
#     https://docs.scrapy.org/en/latest/topics/downloader-middleware.html
#     https://docs.scrapy.org/en/latest/topics/spider-middleware.html

BOT_NAME = 'demo1'  #项目名

SPIDER_MODULES = ['demo1.spiders']    #
NEWSPIDER_MODULE = 'demo1.spiders'


# Crawl responsibly by identifying yourself (and your website) on the user-agent
#USER_AGENT = 'demo1 (+http://www.yourdomain.com)'    #这个可以浏览器抓包查看值 比较重要 一般都要带的

# Obey robots.txt rules
ROBOTSTXT_OBEY = False   # 机器人规则 默认是true  一般都要修改为false  否则几乎爬不了太多东西

# Configure maximum concurrent requests performed by Scrapy (default: 16)
#CONCURRENT_REQUESTS = 32  #最大并发数 可以开启的爬虫线程数

# Configure a delay for requests for the same website (default: 0)
# See https://docs.scrapy.org/en/latest/topics/settings.html#download-delay
# See also autothrottle settings and docs
DOWNLOAD_DELAY = 1   #下载延迟时间,单位是秒,默认是3秒,即爬一个停3秒,设置为1秒性价比较高,如果要爬取的文件较多,写零点几秒也行
# The download delay setting will honor only one of:
#CONCURRENT_REQUESTS_PER_DOMAIN = 16
#CONCURRENT_REQUESTS_PER_IP = 16

# Disable cookies (enabled by default)
#COOKIES_ENABLED = False   #是否保存COOKIES,默认关闭,开机可以记录爬取过程中的COKIE,非常好用的一个参数

# Disable Telnet Console (enabled by default)
#TELNETCONSOLE_ENABLED = False

# Override the default request headers:
#DEFAULT_REQUEST_HEADERS = {

#   'Accept': 'text/html,application/xhtml+xml,application/xml;q=0.9,*/*;q=0.8',
#   'Accept-Language': 'en',
#}     #默认请求头,上面写了一个USER_AGENT,其实这个东西就是放在请求头里面的,这个东西可以根据你爬取的内容做相应设置。

# Enable or disable spider middlewares
# See https://docs.scrapy.org/en/latest/topics/spider-middleware.html
#SPIDER_MIDDLEWARES = {

#    'demo1.middlewares.Demo1SpiderMiddleware': 543,
#}

# Enable or disable downloader middlewares
# See https://docs.scrapy.org/en/latest/topics/downloader-middleware.html
#DOWNLOADER_MIDDLEWARES = {

#    'demo1.middlewares.Demo1DownloaderMiddleware': 543,
#}

# Enable or disable extensions
# See https://docs.scrapy.org/en/latest/topics/extensions.html
#EXTENSIONS = {

#    'scrapy.extensions.telnet.TelnetConsole': None,
#}

# Configure item pipelines
# See https://docs.scrapy.org/en/latest/topics/item-pipeline.html
ITEM_PIPELINES = {

    'demo1.pipelines.Demo1Pipeline': 300,
    #'demo1.pipelines.Demo1MySqlPipeline' : 200,
}  #项目管道,300为优先级,越低爬取的优先度越高 pipelines.py里面写了两个管道,一个爬取网页的管道,一个存数据库的管道,我调整了他们的优先级,如果有爬虫数据,优先执行存库操作。


# Enable and configure the AutoThrottle extension (disabled by default)
# See https://docs.scrapy.org/en/latest/topics/autothrottle.html
#AUTOTHROTTLE_ENABLED = True
# The initial download delay
#AUTOTHROTTLE_START_DELAY = 5
# The maximum download delay to be set in case of high latencies
#AUTOTHROTTLE_MAX_DELAY = 60
# The average number of requests Scrapy should be sending in parallel to
# each remote server
#AUTOTHROTTLE_TARGET_CONCURRENCY = 1.0
# Enable showing throttling stats for every response received:
#AUTOTHROTTLE_DEBUG = False

# Enable and configure HTTP caching (disabled by default)
# See https://docs.scrapy.org/en/latest/topics/downloader-middleware.html#httpcache-middleware-settings
#HTTPCACHE_ENABLED = True
#HTTPCACHE_EXPIRATION_SECS = 0
#HTTPCACHE_DIR = 'httpcache'
#HTTPCACHE_IGNORE_HTTP_CODES = []
#HTTPCACHE_STORAGE = 'scrapy.extensions.httpcache.FilesystemCacheStorage'
修改demo1spider.py文件,进行具体的爬虫操作:
import scrapy
from bs4 import UnicodeDammit
from bs4 import BeautifulSoup
from ..items import Demo1Item
#重写start_requests方法
class Demo1spiderSpider(scrapy.Spider):
name = 'demo1spider'
#allowed_domains = ['baidu.com']
#start_urls = ['http://baidu.com/'] #入口地址
key = "python"
source_url = "http://search.dangdang.com/"
def start_requests(self):#入口函数 可以用入口地址代替 入口地址可以有多个 是个列表
url = Demo1spiderSpider.source_url+"?key=" + Demo1spiderSpider.key
yield scrapy.Request(url=url, callback=self.parse)
def parse(self, response):#回调函数
#一般网址response返回的是二进制 可以response.body.decode()转为文本
try:
#采用bs4里面的方法来处理编码问题
dammit = UnicodeDammit(response.body, ['utf-8','gbk'])
data = dammit.unicode_markup
#建立选择查找类Selector对象 调用xpath方法
selector = scrapy.Selector(text=data)
lis = selector.xpath("//li['@ddt-pit'][starts-with(@class,'line')]")
#print(lis)
for li in lis:
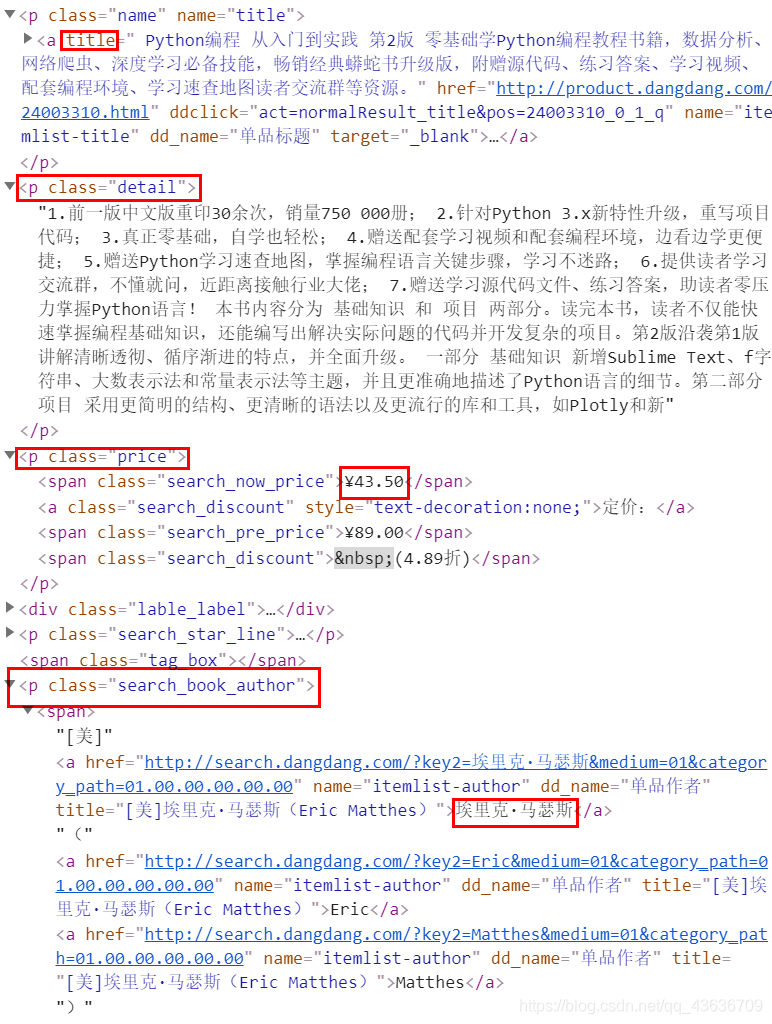
title = li.xpath("./a[position()=1]/@title").extract_first()
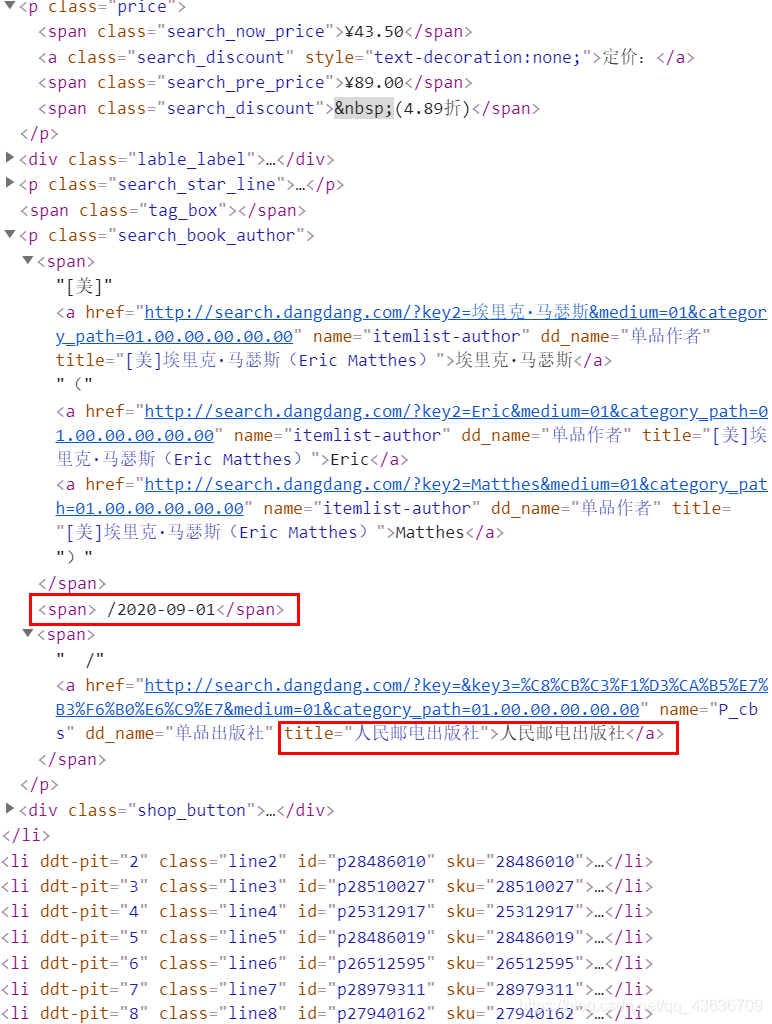
price = li.xpath("./p[@class='price']/span[@class='search_now_price']/text()").extract_first()
author = li.xpath("./p[@class='search_book_author']/span/a/@title").extract_first()
date = li.xpath("./p[@class='search_book_author']/span[position()=2]/text()").extract_first()
publisher = li.xpath("./p[@class='search_book_author']/span[position()=3]/a/@title").extract_first()
detail = li.xpath("./p[@class='detail']/text()").extract_first()#有时为空 None
item = Demo1Item()
item['title'] = title.strip() if title else ""
item['author'] = author.strip() if author else ""
item['date'] = date.strip()[1:] if date else ""
item['publisher'] = publisher.strip() if publisher else ""
item['price'] = price.strip() if price else ""
item['detail'] = detail.strip() if detail else ""
yield item
#最后一页时link为none
link = selector.xpath("//div[@class='paging']/ul[@name='Fy']/li[@class='next']/a/@href").extract_first()
if link:
url = response.urljoin(link)
yield scrapy.Request(url=url, callback=self.parse)
except Exception as err:
print(err)
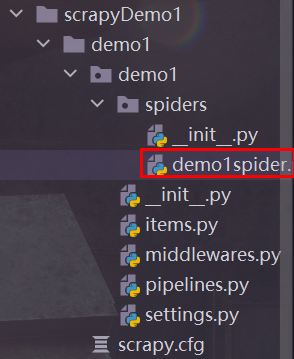
如果导入 from …items import Demo1Item 不合适 可以按一下操作
把项目的根目录设置为源路径:选中项目根目录,该项目根目录是第一个demo1,按图操作 语句写成上面的格式就欧克了

智能推荐
机器学习之支持向量机
支持向量机的主要任务就是从样本空间中找到合适的划分超平面,将属于不同类别的样本分开。我们希望找到的决策边界距离两个类别中位于边界上的点最远。
缓存神器-JetCache
今天和大家聊聊阿里的一款缓存神器 JetCache。
02.Scala简单演示
*******
盒子垂直水平居中方法_js水平垂直居中盒子怎么设置-程序员宅基地
文章浏览阅读322次。盒子垂直水平居中方法_js水平垂直居中盒子怎么设置
安全作业-1
如果密码匹配,认证成功,用户得以登录系统。一旦用户通过身份验证,系统会根据用户的权限对其进行授权,确定用户可以访问的资源和执行的操作。LMhash是早期Windows系统使用的加密方式,但由于其安全性较低,新的Windows系统版本中默认禁用了LMhash,转而使用更安全的NThash。hashdump工具在提取Windows系统中存储的用户密码散列时,会区分这两种不同的散列类型。这两个模块的加密算法指的是LMhash和NThash所采用的加密方式,它们在加密算法和加密过程上存在显著不同。
【Unity Consoler Redirection】Unity Log 跳转重定向
Hello大家好,这里VimalaEric,今天给大家介绍一个实用脚本 UnityConsoler 跳转重定向。
随便推点
Github 2024-03-15 Java开源项目日报 Top10_2024java有趣的开源项目-程序员宅基地
文章浏览阅读1.2k次,点赞42次,收藏20次。根据Github Trendings的统计,今日(2024-03-15统计)共有10个项目上榜。_2024java有趣的开源项目
centos7内核默认包含在操作系统镜像中_VMware 镜像安装最新版RHEL8操作系统-程序员宅基地
文章浏览阅读354次。Linux是一种操作系统!——曾经被Microsoft视为最大的威胁——而今成为互联网领域幕后的老大Linux创始人——Linus Torwalds(李纳斯•托瓦兹)——1991年底,Linus Torvalds 公开了Linux内核源码0.02版(第一个公开版)——1993年,Linux 1.0版发行2000年后,Linux系统日趋成熟,涌现大量基于Linux服务器平台的应用,并广泛应用于基于A..._use windows and workspaces
java---Swing界面开发总结-程序员宅基地
文章浏览阅读452次,点赞2次,收藏3次。一、java的图形界面1.awt java.awtjdk1.4之前推出的图形界面,用c/c++编写,跨平台性不好2.swing javax.swingjdk1.4时推出的图形界面,跨平台性好二、常用的组件1.容器组件JFrame 窗体类 最顶级的容器(默认布局为边框布局,不能自己互相添加)JPanel 面板类 最灵活的容器(可以自己互相添加)..._java-swing画界面的思路
oracle在分组内排序的方法,oracle 在分组内排序的方法(转载)-程序员宅基地
文章浏览阅读3.9k次。oracle分析函数十分强大,我们只要掌握这些方法,更直接的说法就是知道这些分析函数的作用就能完成很多工作。下边贴出这些函数,及简单应用。其中我想对lag()和lead()函数坐下说明:lag()本身是延后的意思也就是延后出现某列的数,而lead()有引领、领先的意思也就是提前几行显示某列数据RANK()dense_rank()【语法】RANK ( ) OVER ( [query_partitio..._oracle分组排序
安卓手机卡顿怎么解决_安卓手机卡顿的问题,终于解决了-程序员宅基地
文章浏览阅读141次。两个人同一台安卓手机,同样的配置,很有可能出现一个人使用起来很流畅,另一个人则抱怨手机卡顿难用。相信有很多小伙伴把安卓手机的卡顿怪到Android系统上。其实嘛谷歌已经不断地对Android进行优化,以后的Android系统只会越来越流畅。那谁才是安卓手机卡顿的罪魁祸首呢。现在的安卓手机配置已经很高了,抛开硬件,鱼龙混杂的应用生态才是导致Android系统卡顿的元凶。安卓有不少第三方应用市场,与P..._卡顿怪手。
python缺requests及其他依赖包_>>> import requests traceback (most recent call la-程序员宅基地
文章浏览阅读1.9k次。>>> import requestsTraceback (most recent call last): File "<stdin>", line 1, in <module>ImportError: No module named requests需要安装requests插件pip install requests报 -bash: pip: command not found需要安装pip第一种方._>>> import requests traceback (most recent call last): file "", line