【教程】-在rknn-toolkit2模拟器中验证测试语义分割模型Yolov5-seg_rknn inference输出-程序员宅基地
技术标签: YOLO RK开发板 python segmentfault 深度学习
引言
为了以后能够顺利的将模型部署在rk3568开发板中,我们首先要在rknn-toolkit2提供的模拟器环境中进行运行测试,从而保证所选模型能够在开发板上进行部署,测试环境是Ubuntu20.04。
yolov5下载地址:ultralytics/yolov5 at v7.0 (github.com)
训练和如何导出ONNX这里就不说了,yolov5已经是非常成熟的算法了,网上有其数不清的教程,所以这里就不重复说了。
一、ONNX结构
要对yolov5-seg做部署测试,那必然要对其onnx的输出有所了解,yolov5-seg的输出如下:
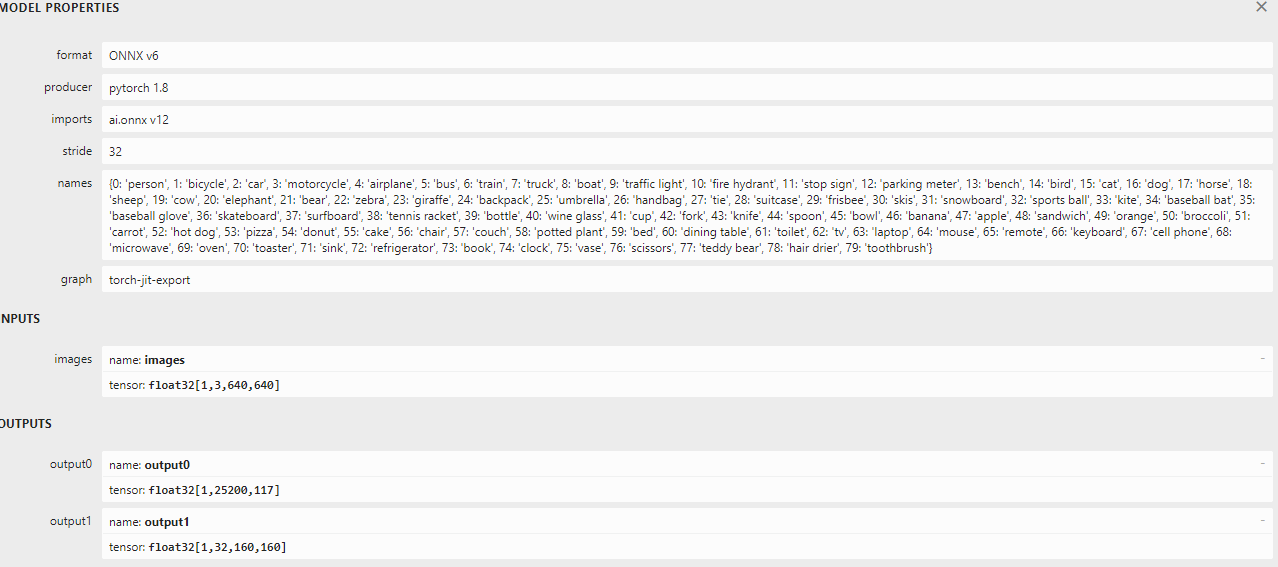
上图可以看出onnx的输出有两个,分别是output0和output1。我们一个个来解释:
output0 : [1, 25200, 117] 其中,1代表批处理的数量;25200表示预测框的数量,也就是模型在输入图像中检测到的物体数量;117表示每个预测框的信息维度,具体来说117 = 4(检测框坐标) + 1(置信度)+ 80(类别数量)+ 32(mask信息)。
output1 : [1, 32, 160, 160],这个输出主要描述了模型对输入图像进行语义分割后得到的预测结果。
二、推理代码
1、老样子,转换并且加载我们的onnx模型,注意好onnx的输出名称,需要对应上。
    rknn = RKNN()

    # Load ONNX model
    print("--> Loading model")
    # ret = rknn.load_rknn(RKNN_MODEL)
    # rknn.config(mean_values=[82.9835, 93.9795, 82.1893], std_values=[54.02, 54.804, 54.0225], target_platform='rk3568')
    rknn.config(mean_values=[0, 0, 0], std_values=[255, 255, 255], target_platform='rk3568')
    ret = rknn.load_onnx(model=ONNX_MODEL, outputs=['output0', 'output1'])  # 这里一定要根据onnx模型修改
    ret = rknn.build(do_quantization=False, dataset='./dataset.txt')
    if ret != 0:
        print("Load rknn model failed!")
        exit(ret)
    print("done")
    # init runtime environment
    print("--> Init runtime environment")
    ret = rknn.init_runtime(target=None)
    if ret != 0:
        print("Init runtime environment failed")
        exit(ret)
    print("done")
2、图像预处理阶段:
# (1) 设置输入期望的高度和宽度、加载图像、获取图像的高度、宽度和通道数;
input_h, input_w = 640, 640
frame = cv2.imread("/home/zw/Prg/Pycharm/file/RKNN3568/onnx/yolov5-seg/bus.jpg")
fh, fw, fc = frame.shape
# (2) 调用letterbox将图像调整为模型的输入尺寸(640x640),letterbox是一个自定义函数,可能是用于缩放和填充图像的工具函数。
im, r, (dw, dh) = letterbox(frame, new_shape=(input_h, input_w), auto=False)  # Resize to new shape by letterbox
# (3) 将图像从 OpenCV 默认的通道顺序BGR转化为RGB。同时,将通道维度从 HWC变为 CHW。
blob1 = im.transpose((2, 0, 1))[::-1]
# (4) 创建一个高效的数组来存储图像数组(浮点类型),并且添加一个维度,将单张图像转换为模型推理所需的批次维度。这样,输入张量的形状将变为(1, C, H, W)
blob2 = np.ascontiguousarray(blob1)
blob3 = np.float32(blob2)
blob = blob3[None]
3、 执行推理测试:
# rknn推理
outputs = rknn.inference(inputs=[blob],data_format='nchw')
# pred = [1,25200,38]  proto = [1,32,160,160]
pred, proto = outputs[0], outputs[1]
# 将预测结果 pred 转换为 PyTorch 的张量形式。
preds = torch.tensor(pred)
# 使用非极大值抑制(NMS)函数 non_max_suppression 对预测结果 preds 进行处理,以获取过滤后的预测。
pred = non_max_suppression(preds, nm=32)[0].numpy()
# 将 pred 数组按列切分,分别提取出边界框、置信度、类别标签和物体掩码。
bboxes, confs, class_ids, masks = pred[:, :4], pred[:, 4], pred[:, 5], pred[:, 6:]
# 删除维度为1的维度 (1,32,160,160) ---> (32,160,160)
proto = np.squeeze(proto)
# 将原型张量重新调整形状为 (32,25600),将后两维展平。(32,160,160) ---> (32,25600)
proto = np.reshape(proto, (32, -1))
# 将物体掩码 masks 与原型张量 proto 进行矩阵相乘,得到目标的掩码信息。(1,32) (32,25600)
obj_masks = np.matmul(masks, proto)
# 将这些掩码信息应用 sigmoid 函数,并将其重新调整形状为 (n, 160, 160)
obj_masks = np.reshape(sigmoid(obj_masks), (-1, 160, 160))
4、后处理:
# 遍历每个目标的掩码和边界框,根据边界框的尺寸从目标掩码中提取对应的区域添加masks_roi 列表中。
masks_roi = []
for obj_mask, bbox in zip(obj_masks, bboxes):
   mx1 = max(0, np.int32((bbox[0] * 0.25)))
   my1 = max(0, np.int32((bbox[1] * 0.25)))
   mx2 = max(0, np.int32((bbox[2] * 0.25)))
   my2 = max(0, np.int32((bbox[3] * 0.25)))
   masks_roi.append(obj_mask[my1:my2, mx1:mx2])
# 使用 rescale_coords 函数将边界框的坐标恢复到原始图像的尺寸,然后将坐标转换为整数类型。
bboxes = rescale_coords(r[0], (dh, dw), bboxes).astype(int)
# 创建颜色掩码和黑色掩码,用于在原始图像上绘制物体掩码。
color_mask = np.zeros((fh, fw, 3), dtype=np.uint8)
black_mask = np.zeros((fh, fw), dtype=np.float32)
# 将颜色掩码 color_mask 拆分为三个通道,得到 mv,它是一个包含 R、G、B 通道的列表。
mv = cv2.split(color_mask)
for bbox, conf, class_id, mask_roi in zip(bboxes, confs, class_ids, masks_roi):
   x1, y1, x2, y2 = bbox[0], bbox[1], bbox[2], bbox[3]
   # Draw Mask  把映射回去的预测框在原图上绘画出来
   # color = colors[int(class_id) % len(colors)]
   # cv2.rectangle(frame, (x1, y1), (x2, y2), color, 2)
   # color = colors[int(class_id) % len(colors)]
   # cv2.rectangle(frame, (x1, y1 - 20), (x2, y1), (0, 0, 255), -1)   object classs
   # Draw mask of the detected objects
   result_mask = cv2.resize(mask_roi, (bbox[2] - bbox[0], bbox[3] - bbox[1]))
   result_mask[result_mask > 0.5] = 1.0
   result_mask[result_mask <= 0.5] = 0.0
   rh, rw = result_mask.shape
   if (y1 + rh) >= fh:
      rh = fh - y1
   if (x1 + rw) >= fw:
      rw = fw - x1
   black_mask[y1:y1 + rh, x1:x1 + rw] = result_mask[0:rh, 0:rw]
   mv[2][black_mask == 1], mv[1][black_mask == 1], mv[0][black_mask == 1] = \
       [np.random.randint(0, 256), np.random.randint(0, 256), np.random.randint(0, 256)]
5、显示结果:
# 使用 cv2.merge() 函数将分离的 R、G、B 通道重新合并为一个彩色图像
color_mask = cv2.merge(mv)
# 使用 cv2.addWeighted() 函数将原始图像和带有彩色掩码的图像进行加权叠加
dst = cv2.addWeighted(frame, 0.5, color_mask, 0.5, 0)
cv2.imshow('bus', dst)
cv2.waitKey(0)
cv2.destroyAllWindows()
三、测试结果如下:

附上完整的代码:
import numpy
import numpy as np
import cv2, torch, torchvision, yaml
# from openvino.runtime import Core
# import matplotlib.pyplot as plt
import time
from rknn.api import RKNN

ONNX_MODEL = '/home/zw/Prg/Pycharm/file/RKNN3568/onnx/yolov5-seg/yolov5s-seg.onnx'


def xywh2xyxy(x):
    y = x.clone() if isinstance(x, torch.Tensor) else np.copy(x)
    y[:, 0] = x[:, 0] - x[:, 2] / 2  # top left x
    y[:, 1] = x[:, 1] - x[:, 3] / 2  # top left y
    y[:, 2] = x[:, 0] + x[:, 2] / 2  # bottom right x
    y[:, 3] = x[:, 1] + x[:, 3] / 2  # bottom right y
    return y


def box_iou(box1, box2, eps=1e-7):
    (a1, a2), (b1, b2) = box1.unsqueeze(1).chunk(2, 2), box2.unsqueeze(0).chunk(2, 2)
    inter = (torch.min(a2, b2) - torch.max(a1, b1)).clamp(0).prod(2)
    return inter / ((a2 - a1).prod(2) + (b2 - b1).prod(2) - inter + eps)


def non_max_suppression(
        prediction,
        conf_thres=0.25,
        iou_thres=0.45,
        classes=None,
        agnostic=False,
        multi_label=False,
        labels=(),
        max_det=300,
        nm=0,  # number of masks
):
    """Non-Maximum Suppression (NMS) on inference results to reject overlapping detections

    Returns:
         list of detections, on (n,6) tensor per image [xyxy, conf, cls]
    """

    if isinstance(prediction, (list, tuple)):  # YOLOv5 model in validation model, output = (inference_out, loss_out)
        prediction = prediction[0]  # select only inference output

    device = prediction.device
    mps = 'mps' in device.type  # Apple MPS
    if mps:  # MPS not fully supported yet, convert tensors to CPU before NMS
        prediction = prediction.cpu()
    bs = prediction.shape[0]  # batch size
    nc = prediction.shape[2] - nm - 5  # number of classes
    xc = prediction[..., 4] > conf_thres  # candidates

    # Checks
    assert 0 <= conf_thres <= 1, f'Invalid Confidence threshold {conf_thres}, valid values are between 0.0 and 1.0'
    assert 0 <= iou_thres <= 1, f'Invalid IoU {iou_thres}, valid values are between 0.0 and 1.0'

    # Settings
    # min_wh = 2  # (pixels) minimum box width and height
    max_wh = 7680  # (pixels) maximum box width and height
    max_nms = 30000  # maximum number of boxes into torchvision.ops.nms()
    time_limit = 0.5 + 0.05 * bs  # seconds to quit after
    redundant = True  # require redundant detections
    multi_label &= nc > 1  # multiple labels per box (adds 0.5ms/img)
    merge = False  # use merge-NMS

    t = time.time()
    mi = 5 + nc  # mask start index
    output = [torch.zeros((0, 6 + nm), device=prediction.device)] * bs
    for xi, x in enumerate(prediction):  # image index, image inference
        # Apply constraints
        # x[((x[..., 2:4] < min_wh) | (x[..., 2:4] > max_wh)).any(1), 4] = 0  # width-height
        x = x[xc[xi]]  # confidence

        # Cat apriori labels if autolabelling
        if labels and len(labels[xi]):
            lb = labels[xi]
            v = torch.zeros((len(lb), nc + nm + 5), device=x.device)
            v[:, :4] = lb[:, 1:5]  # box
            v[:, 4] = 1.0  # conf
            v[range(len(lb)), lb[:, 0].long() + 5] = 1.0  # cls
            x = torch.cat((x, v), 0)

        # If none remain process next image
        if not x.shape[0]:
            continue

        # Compute conf
        x[:, 5:] *= x[:, 4:5]  # conf = obj_conf * cls_conf

        # Box/Mask
        box = xywh2xyxy(x[:, :4])  # center_x, center_y, width, height) to (x1, y1, x2, y2)
        mask = x[:, mi:]  # zero columns if no masks

        # Detections matrix nx6 (xyxy, conf, cls)
        if multi_label:
            i, j = (x[:, 5:mi] > conf_thres).nonzero(as_tuple=False).T
            x = torch.cat((box[i], x[i, 5 + j, None], j[:, None].float(), mask[i]), 1)
        else:  # best class only
            conf, j = x[:, 5:mi].max(1, keepdim=True)
            x = torch.cat((box, conf, j.float(), mask), 1)[conf.view(-1) > conf_thres]

        # Filter by class
        if classes is not None:
            x = x[(x[:, 5:6] == torch.tensor(classes, device=x.device)).any(1)]

        # Apply finite constraint
        # if not torch.isfinite(x).all():
        #     x = x[torch.isfinite(x).all(1)]

        # Check shape
        n = x.shape[0]  # number of boxes
        if not n:  # no boxes
            continue
        elif n > max_nms:  # excess boxes
            x = x[x[:, 4].argsort(descending=True)[:max_nms]]  # sort by confidence
        else:
            x = x[x[:, 4].argsort(descending=True)]  # sort by confidence

        # Batched NMS
        c = x[:, 5:6] * (0 if agnostic else max_wh)  # classes
        boxes, scores = x[:, :4] + c, x[:, 4]  # boxes (offset by class), scores
        i = torchvision.ops.nms(boxes, scores, iou_thres)  # NMS
        if i.shape[0] > max_det:  # limit detections
            i = i[:max_det]
        if merge and (1 < n < 3E3):  # Merge NMS (boxes merged using weighted mean)
            # update boxes as boxes(i,4) = weights(i,n) * boxes(n,4)
            iou = box_iou(boxes[i], boxes) > iou_thres  # iou matrix
            weights = iou * scores[None]  # box weights
            x[i, :4] = torch.mm(weights, x[:, :4]).float() / weights.sum(1, keepdim=True)  # merged boxes
            if redundant:
                i = i[iou.sum(1) > 1]  # require redundancy

        output[xi] = x[i]
        if mps:
            output[xi] = output[xi].to(device)

    return output

def letterbox(im, new_shape=(640, 640), color=(114, 114, 114), auto=True, scaleFill=False, scaleup=True, stride=32):
    shape = im.shape[:2]  # current shape [height, width]
    if isinstance(new_shape, int):
        new_shape = (new_shape, new_shape)
    # Scale ratio (new / old)
    r = min(new_shape[0] / shape[0], new_shape[1] / shape[1])
    if not scaleup:  # only scale down, do not scale up (for better val mAP)
        r = min(r, 1.0)
    # Compute padding
    ratio = r, r  # width, height ratios
    new_unpad = int(round(shape[1] * r)), int(round(shape[0] * r))
    dw, dh = new_shape[1] - new_unpad[0], new_shape[0] - new_unpad[1]  # wh padding
    if auto:  # minimum rectangle
        dw, dh = np.mod(dw, stride), np.mod(dh, stride)  # wh padding
    elif scaleFill:  # stretch
        dw, dh = 0.0, 0.0
        new_unpad = (new_shape[1], new_shape[0])
        ratio = new_shape[1] / shape[1], new_shape[0] / shape[0]  # width, height ratios

    dw /= 2  # divide padding into 2 sides
    dh /= 2

    if shape[::-1] != new_unpad:  # resize
        im = cv2.resize(im, new_unpad, interpolation=cv2.INTER_LINEAR)
    top, bottom = int(round(dh - 0.1)), int(round(dh + 0.1))
    left, right = int(round(dw - 0.1)), int(round(dw + 0.1))
    im = cv2.copyMakeBorder(im, top, bottom, left, right, cv2.BORDER_CONSTANT, value=color)  # add border
    return im, ratio, (dw, dh)


def sigmoid(x):
    return 1.0 / (1 + np.exp(-x))


def rescale_coords(ratio, pad, coords):
    # Rescale coords (xyxy) from according to r and (dh, dw) from letterbox
    coords[:, [1, 3]] -= pad[0]  # H padding
    coords[:, [0, 2]] -= pad[1]  # W padding
    coords[:, :4] /= ratio
    return coords

if __name__ == "__main__":
    rknn = RKNN()

    # Load ONNX model
    print("--> Loading model")
    # ret = rknn.load_rknn(RKNN_MODEL)
    # rknn.config(mean_values=[82.9835, 93.9795, 82.1893], std_values=[54.02, 54.804, 54.0225], target_platform='rk3568')
    rknn.config(mean_values=[0, 0, 0], std_values=[255, 255, 255], target_platform='rk3568')
    ret = rknn.load_onnx(model=ONNX_MODEL, outputs=['output0', 'output1'])  # 这里一定要根据onnx模型修改
    ret = rknn.build(do_quantization=False, dataset='./dataset.txt')
    if ret != 0:
        print("Load rknn model failed!")
        exit(ret)
    print("done")
    # init runtime environment
    print("--> Init runtime environment")
    ret = rknn.init_runtime(target=None)
    if ret != 0:
        print("Init runtime environment failed")
        exit(ret)
    print("done")

    input_h, input_w = 640, 640

    frame = cv2.imread("/home/zw/Prg/Pycharm/file/RKNN3568/onnx/yolov5-seg/bus.jpg")
    fh, fw, fc = frame.shape
    im, r, (dw, dh) = letterbox(frame, new_shape=(input_h, input_w), auto=False)  # Resize to new shape by letterbox
    blob1 = im.transpose((2, 0, 1))[::-1]  # HWC to CHW, BGR to RGB
    blob2 = np.ascontiguousarray(blob1)
    # blob3 = np.float32(blob2) / 255.0  # 0 - 255 to 0.0 - 1.0 ourfunction is limit it to 0 - 255, no 0-1
    blob3 = np.float32(blob2)  # 0 - 255 to 0.0 - 1.0
    blob = blob3[None]  # expand for batch dim


    outputs = rknn.inference(inputs=[blob],data_format='nchw')

    # [1,25200,38]   [1,32,160,160]
    pred, proto = outputs[0], outputs[1]
    # Step5: Postprocess the inference result and visulize it.
    preds = torch.tensor(pred)
    # [1,25200,38]>>>>>[1,38]
    pred = non_max_suppression(preds, nm=32)[0].numpy() # (n,38) tensor per image [xyxy, conf, cls, masks]
    # (n,38) tensor per image [xyxy, conf, cls, masks]
    bboxes, confs, class_ids, masks = pred[:, :4], pred[:, 4], pred[:, 5], pred[:, 6:]
    # Extract the mask of the detected object
    proto = np.squeeze(proto)  # 删除维度为1的维度 (1,32,160,160) >>>(32,160,160)
    proto = np.reshape(proto, (32, -1))  # (32,160,160) >>>(32,25600)
    obj_masks = np.matmul(masks, proto)  # 两个矩阵相乘(1,32) (32,25600)
    obj_masks = np.reshape(sigmoid(obj_masks), (-1, 160, 160))


    masks_roi = []
    for obj_mask, bbox in zip(obj_masks, bboxes):
        mx1 = max(0, np.int32((bbox[0] * 0.25)))
        my1 = max(0, np.int32((bbox[1] * 0.25)))
        mx2 = max(0, np.int32((bbox[2] * 0.25)))
        my2 = max(0, np.int32((bbox[3] * 0.25)))
        masks_roi.append(obj_mask[my1:my2, mx1:mx2])
    # 得到的masks_roi是带有mask的目标区域
    bboxes = rescale_coords(r[0], (dh, dw), bboxes).astype(int)
    color_mask = np.zeros((fh, fw, 3), dtype=np.uint8)
    black_mask = np.zeros((fh, fw), dtype=np.float32)
    mv = cv2.split(color_mask)
    for bbox, conf, class_id, mask_roi in zip(bboxes, confs, class_ids, masks_roi):
        x1, y1, x2, y2 = bbox[0], bbox[1], bbox[2], bbox[3]
        # Draw Mask  把映射回去的预测框在原图上绘画出来
        # color = colors[int(class_id) % len(colors)]
        # cv2.rectangle(frame, (x1, y1), (x2, y2), color, 2)
        # color = colors[int(class_id) % len(colors)]
        # cv2.rectangle(frame, (x1, y1 - 20), (x2, y1), (0, 0, 255), -1)   object classs
        # Draw mask of the detected objects
        result_mask = cv2.resize(mask_roi, (bbox[2] - bbox[0], bbox[3] - bbox[1]))
        result_mask[result_mask > 0.5] = 1.0
        result_mask[result_mask <= 0.5] = 0.0
        rh, rw = result_mask.shape
        if (y1 + rh) >= fh:
            rh = fh - y1
        if (x1 + rw) >= fw:
            rw = fw - x1
        black_mask[y1:y1 + rh, x1:x1 + rw] = result_mask[0:rh, 0:rw]
        mv[2][black_mask == 1], mv[1][black_mask == 1], mv[0][black_mask == 1] = \
            [np.random.randint(0, 256), np.random.randint(0, 256), np.random.randint(0, 256)]


    color_mask = cv2.merge(mv)
    dst = cv2.addWeighted(frame, 0.5, color_mask, 0.5, 0)
    cv2.imshow('bus', dst)
    cv2.waitKey(0)
    cv2.destroyAllWindows()

智能推荐
c# 调用c++ lib静态库_c#调用lib-程序员宅基地
文章浏览阅读2w次,点赞7次,收藏51次。四个步骤1.创建C++ Win32项目动态库dll 2.在Win32项目动态库中添加 外部依赖项 lib头文件和lib库3.导出C接口4.c#调用c++动态库开始你的表演...①创建一个空白的解决方案,在解决方案中添加 Visual C++ , Win32 项目空白解决方案的创建:添加Visual C++ , Win32 项目这......_c#调用lib
deepin/ubuntu安装苹方字体-程序员宅基地
文章浏览阅读4.6k次。苹方字体是苹果系统上的黑体,挺好看的。注重颜值的网站都会使用,例如知乎:font-family: -apple-system, BlinkMacSystemFont, Helvetica Neue, PingFang SC, Microsoft YaHei, Source Han Sans SC, Noto Sans CJK SC, W..._ubuntu pingfang
html表单常见操作汇总_html表单的处理程序有那些-程序员宅基地
文章浏览阅读159次。表单表单概述表单标签表单域按钮控件demo表单标签表单标签基本语法结构<form action="处理数据程序的url地址“ method=”get|post“ name="表单名称”></form><!--action,当提交表单时,向何处发送表单中的数据,地址可以是相对地址也可以是绝对地址--><!--method将表单中的数据传送给服务器处理,get方式直接显示在url地址中,数据可以被缓存,且长度有限制;而post方式数据隐藏传输,_html表单的处理程序有那些
PHP设置谷歌验证器(Google Authenticator)实现操作二步验证_php otp 验证器-程序员宅基地
文章浏览阅读1.2k次。使用说明:开启Google的登陆二步验证(即Google Authenticator服务)后用户登陆时需要输入额外由手机客户端生成的一次性密码。实现Google Authenticator功能需要服务器端和客户端的支持。服务器端负责密钥的生成、验证一次性密码是否正确。客户端记录密钥后生成一次性密码。下载谷歌验证类库文件放到项目合适位置(我这边放在项目Vender下面)https://github.com/PHPGangsta/GoogleAuthenticatorPHP代码示例://引入谷_php otp 验证器
【Python】matplotlib.plot画图横坐标混乱及间隔处理_matplotlib更改横轴间距-程序员宅基地
文章浏览阅读4.3k次,点赞5次,收藏11次。matplotlib.plot画图横坐标混乱及间隔处理_matplotlib更改横轴间距
docker — 容器存储_docker 保存容器-程序员宅基地
文章浏览阅读2.2k次。①Storage driver 处理各镜像层及容器层的处理细节,实现了多层数据的堆叠,为用户 提供了多层数据合并后的统一视图②所有 Storage driver 都使用可堆叠图像层和写时复制(CoW)策略③docker info 命令可查看当系统上的 storage driver主要用于测试目的,不建议用于生成环境。_docker 保存容器
随便推点
网络拓扑结构_网络拓扑csdn-程序员宅基地
文章浏览阅读834次,点赞27次,收藏13次。网络拓扑结构是指计算机网络中各组件(如计算机、服务器、打印机、路由器、交换机等设备)及其连接线路在物理布局或逻辑构型上的排列形式。这种布局不仅描述了设备间的实际物理连接方式,也决定了数据在网络中流动的路径和方式。不同的网络拓扑结构影响着网络的性能、可靠性、可扩展性及管理维护的难易程度。_网络拓扑csdn
JS重写Date函数,兼容IOS系统_date.prototype 将所有 ios-程序员宅基地
文章浏览阅读1.8k次,点赞5次,收藏8次。IOS系统Date的坑要创建一个指定时间的new Date对象时,通常的做法是:new Date("2020-09-21 11:11:00")这行代码在 PC 端和安卓端都是正常的,而在 iOS 端则会提示 Invalid Date 无效日期。在IOS年月日中间的横岗许换成斜杠,也就是new Date("2020/09/21 11:11:00")通常为了兼容IOS的这个坑,需要做一些额外的特殊处理,笔者在开发的时候经常会忘了兼容IOS系统。所以就想试着重写Date函数,一劳永逸,避免每次ne_date.prototype 将所有 ios
如何将EXCEL表导入plsql数据库中-程序员宅基地
文章浏览阅读5.3k次。方法一:用PLSQL Developer工具。 1 在PLSQL Developer的sql window里输入select * from test for update; 2 按F8执行 3 打开锁, 再按一下加号. 鼠标点到第一列的列头,使全列成选中状态,然后粘贴,最后commit提交即可。(前提..._excel导入pl/sql
Git常用命令速查手册-程序员宅基地
文章浏览阅读83次。Git常用命令速查手册1、初始化仓库git init2、将文件添加到仓库git add 文件名 # 将工作区的某个文件添加到暂存区 git add -u # 添加所有被tracked文件中被修改或删除的文件信息到暂存区,不处理untracked的文件git add -A # 添加所有被tracked文件中被修改或删除的文件信息到暂存区,包括untracked的文件...
分享119个ASP.NET源码总有一个是你想要的_千博二手车源码v2023 build 1120-程序员宅基地
文章浏览阅读202次。分享119个ASP.NET源码总有一个是你想要的_千博二手车源码v2023 build 1120
【C++缺省函数】 空类默认产生的6个类成员函数_空类默认产生哪些类成员函数-程序员宅基地
文章浏览阅读1.8k次。版权声明:转载请注明出处 http://blog.csdn.net/irean_lau。目录(?)[+]1、缺省构造函数。2、缺省拷贝构造函数。3、 缺省析构函数。4、缺省赋值运算符。5、缺省取址运算符。6、 缺省取址运算符 const。[cpp] view plain copy_空类默认产生哪些类成员函数