Android studio实现财务记账系统软件android studio开发课程设计_android studio课程设计-程序员宅基地
技术标签: 经验分享 java sqlite 实验 android android studio addroid开发 源码软件
android 开发一个记账系统
Android 开发一个理财记账系统软件(app)的详细实验步骤,内附有源码,小白也能轻松上手自己的软件开发项目学生可当课程设计学习使用。
文章目录
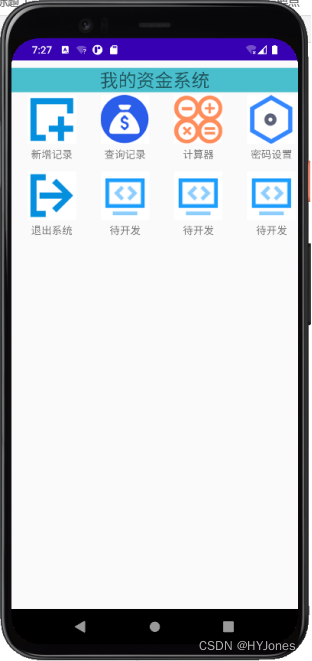
一、app功能预览介绍
-
系统登录/退出
-
设置/修改密码
-
主活动页面设计

-
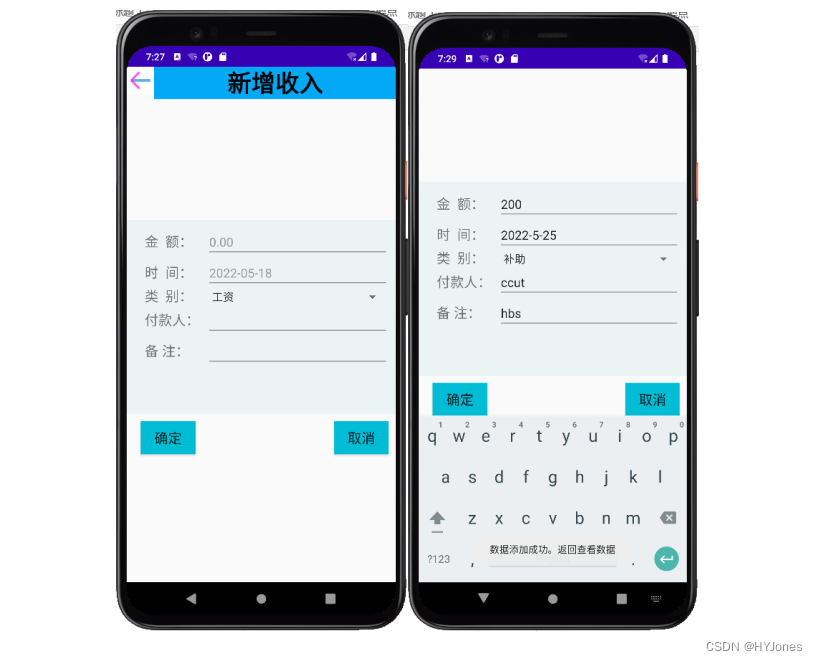
增加收入记录页面
-
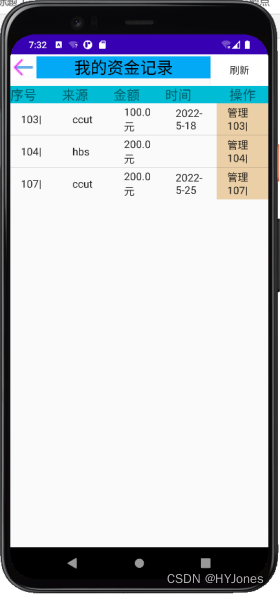
查看收入记录页面
-
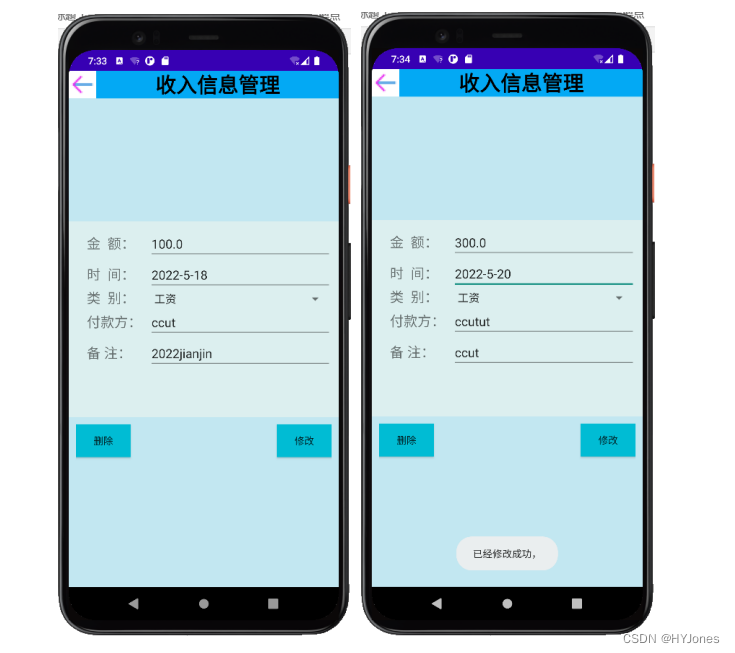
修改和删除记录页面
二、app 制作实验步骤报告
实验一、数据库的创建
1、实验名称
数据库的创建
2.实验目的
学习创建android 项目文件的方法,并且掌握Android的文档结构,熟悉Android的语法规则。
3.实验内容
本次实验旨在Windows环境下Idea开发环境中,新建APP空项目。构建DBOpenHelper类。DBOpenHelper类是SQLiteOpenHelper的父类。在该类中构建数据库User.db,且创建表pwd_tb和user_tb。表结构如下表1与表2所示。在表中增加数据行。Tb_pwd表只有一条记录,是进入系统的唯一密码。Tb_User表中有多条记录。用Navicat软件打开下载的SqLite数据库进行查看。
3.1、程序清单
(1)MyDbProject项目
(2)DbContent.java
(3)Navicat软件
3.2 程序思想
构建DbContent类继承SQLiteOpenHelper类,重写它的2个抽象方法onCreate和onUpgrade()。根据表1,得到创建tb_pwd的表SQL句:create table pwd_tb (pwd varchar(20) primary key)");根据表2,得到创建user_tb表的SQL语句:create table user_tb(id integer primary key autoincrement, money decimal, time varchar(10),type varchar(10),payer varchar(100),note varchar(200)。在onCreate方法中创建两个表。在onUpgrade()方法中删除两个表后,再构建两个表。
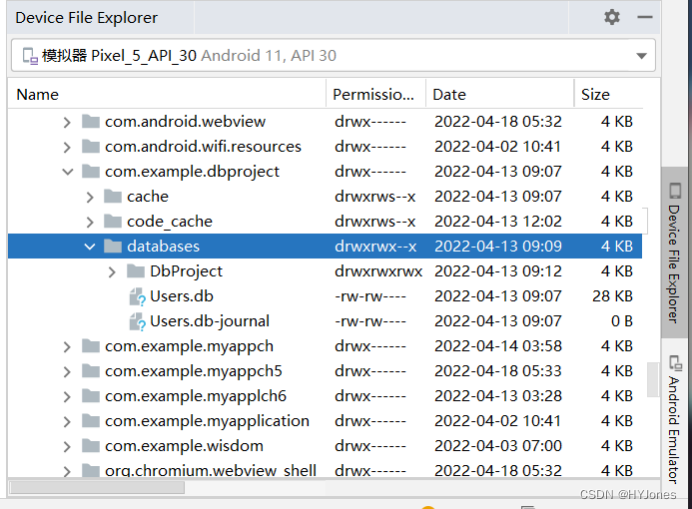
在Intellij idea软件中,找到Device File Explorer窗口,在窗口中找data data com.example.DbProject databases目录。在该目录下有创建的数据库文件。鼠标右键打开文件查看数据库文件或者
下载数据库用Navicat打开,修改完数据后,上传到指定位置即可。
表1 pwd_tb表

表2 user_tb表
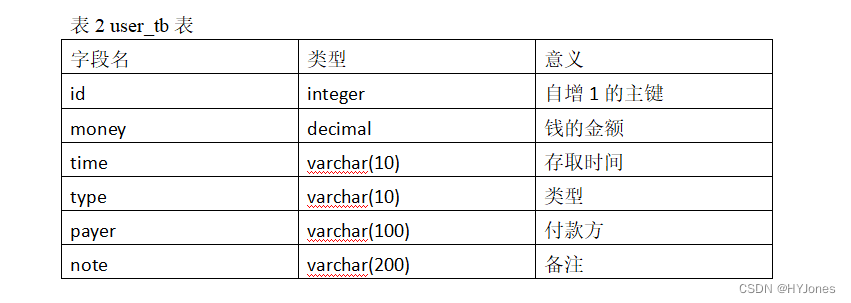
图1.1 数据库结构字段图
3.3 程序代码
DbContent.java
package com.example.dbproject;
import android.content.Context;
import android.database.sqlite.SQLiteDatabase;
import android.database.sqlite.SQLiteOpenHelper;
import android.widget.Toast;
public class DbContect extends SQLiteOpenHelper {

    private static final int VERSION=1;
    private static final String DBNAME="Users.db";   //  创建数据库名叫 Users
    private Context mContext;
    public DbContect(Context context){

        super(context,DBNAME,null,VERSION);
        mContext = context;
    }
    //创建数据库
    public void onCreate(SQLiteDatabase db){

        //创建密码表  pwd_tb
        db.execSQL("create table pwd_tb (rootpwd varchar(20) primary key)");
        //创建收入表    user_tb
        db.execSQL("create table user_tb(id integer primary key autoincrement, money decimal," +
                " time varchar(10),type varchar(10),payer varchar(100),note varchar(200))");
    }
    //数据库版本更新
    public void onUpgrade(SQLiteDatabase db,int oldVersion,int newVersion)
    {

        db.execSQL("drop table if exists pwd_tb");
        db.execSQL("drop table if exists user_tb");
        onCreate(db);
    }
}
CreateDbActivity.java
package com.example.dbproject;

import android.database.sqlite.SQLiteDatabase;
import android.view.View;
import android.widget.Button;
import androidx.appcompat.app.AppCompatActivity;
import android.os.Bundle;

public class CreateDbActivity extends AppCompatActivity {

    DbContect helper;
    @Override
    protected void onCreate(Bundle savedInstanceState) {

        super.onCreate(savedInstanceState);
        setContentView(R.layout.activity_create_db);

            helper=new DbContect(  CreateDbActivity.this);
            Button btn=findViewById(R.id.create);
            btn.setOnClickListener(new View.OnClickListener() {

                @Override
                public void onClick(View V) {

                    SQLiteDatabase db=helper.getWritableDatabase();
                }
            });
        }
    }
activity_create_db.xml
<?xml version="1.0" encoding="utf-8"?>
<androidx.constraintlayout.widget.ConstraintLayout
        xmlns:android="http://schemas.android.com/apk/res/android"
        xmlns:tools="http://schemas.android.com/tools"
        xmlns:app="http://schemas.android.com/apk/res-auto"
        android:layout_width="match_parent"
        android:layout_height="match_parent"
        tools:context=".CreateDbActivity">
    <LinearLayout android:layout_width="match_parent"
                  android:layout_height="match_parent">
        <Button
                android:id="@+id/create"
                android:layout_width="match_parent"
                android:layout_height="wrap_content"
                android:background="#00BCD4"
                android:textSize="22dp"
                android:text="点击创建Users数据库"
        >
        </Button>
    </LinearLayout>
</androidx.constraintlayout.widget.ConstraintLayout>
3.4 实验截图
通过Intellij idea创建空项目Dbproject,项目文件结构如下图1.1所示。使用idea内置数据库工具打开数据库User.db或者用Navicat打开的数据库User.db如图1.2所示。
图1.1 新建项目截图
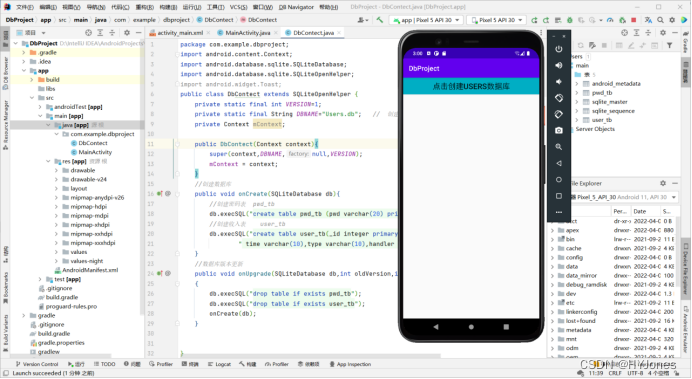
图1.2 Navicat打开数据库截图
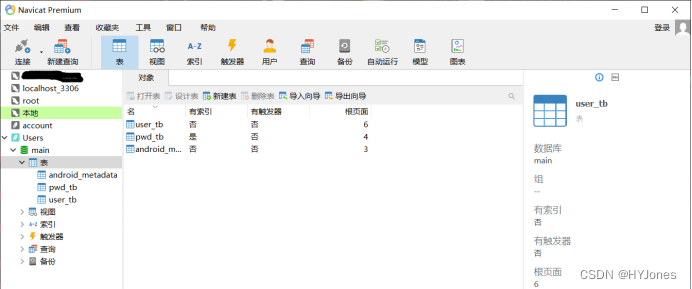
图1-3数据库下载页面截图
4、问题及解决方法
本实验主要遇到的问题是寻找数据库文件,需要仔细查找,查找过程中要看的是包名并不是我们的项目名称,在包名与项目名不一样的时候需要注意。
数据库文件的查找
视图——工具——Devicve File Explorer
查看手机内部文件视图 寻找data——data——要寻找的软件包——databases
数据库文件可视化
a、使用Intellij idea 专业版软件编写android项目,使用内部数据库功能打开数据库文件
b、使用navicat 查看数据库文件 将数据库文件保存到方便寻找的文件夹(数据库非实时状态,不方便不推荐)
实验二、实体类的创建
1、实验名称
实体的创建
2、实验目的
1、要求学生掌握Android程序结构。
2、要求学生掌握Android程序中创建Java类。
3、要求学生掌握Android程序基本调试工具。
3、实验工具
计算机操作系统采用Windows 7 等以上版本操作系统,Intellij idea开发环境。
4、实验内容
构建完成Java实体类:pwd_tb与user_tb。运行测试成功,没有语法错误。实体类的UML表述如下图2-1所示。在实验报告中记录实验过程中出现的问题与解决方法,程序的运行结果和程序代码。
4.1、程序清单
Tb_pwd.java
Tb_user.java
4.2、程序思想
新建两个实体类Tb_pd类和Tb_usert类以管理对应实体的数据。Tb_pwd类是数据实体类,用以存放“密码”数据,在其中构建两个构造函数,一个无参数一个有参数,在有参构造函数中每一个数据成员都有set和get方法;Tb_user类也是数据实体类,操作类RootpwdDAO用来构建数据库的对象,并用其执行SQL语句,从而实现增、删、改、查。
4.3、实验图示
图2-1 UML表述Tb_pwd与Tb_user实体类示意图
图2-2 UML表述实体类与其它类关系
4.4、程序代码
Tb_pwd.java
package com.example.dbproject;
//  Tb_pwd 实体类
public class Tb_pwd {

    private String rootpwd;
    public Tb_pwd() {

        super();
    }
    public Tb_pwd(String rootpwd) {

        super();
        this.rootpwd = rootpwd;
    }
    public String getRootpwd() {

        return this.rootpwd;
    }
    public void setRootpwdwd(String rootpwd) {

        this.rootpwd = rootpwd;
    }
}
Tb_user.java
package com.example.dbproject;
public class Tb_user {

    private int id;     //  id 主键 自增
    private double money;   // 金额
    private String time;    // 时间
    private String type;     // 类型
    private String payer;   // 付款方
    private String note;      // 来源
    public Tb_user(){

        super();
    }
    public Tb_user(int id,double money,String time,String type,String payer,String note){

        super();
        this.id=id;
        this.money=money;
        this.time=time;
        this.payer=payer;
        this.note=note;
    }
    public int getId(){

        return this.id;
    }
    public void setId(int id) {

        this.id = id;
    }
    public double getMoney(){

        return this.money;
    }
    public void setMoney(double money) {

        this.money = money;
    }
    public String getTime(){

        return  this.time;
    }
    public void setTime(String time){

        this.time=time;
    }
    public String getType(){

        return this.payer;
    }
    public void setType(String type){

        this.type=type;
    }
    public String getPayer(){

        return this.payer;
    }
    public void setPayer(String payer){

        this.payer=payer;
    }
    public String getNote(){

        return this.note;
    }
    public void setNote(String notes){

        this.note=notes;
    }
}
RootpwdDAO.java
package com.example.dbproject;
import android.content.Context;
import android.database.Cursor;
import android.database.sqlite.SQLiteDatabase;
public class RootpwdDAO {

    DbContect contect;
    SQLiteDatabase db;
    // 函数构造
    public RootpwdDAO(Context context){

        contect = new DbContect(context);
    }
    // 查询密码
    public String find(){

        db = contect.getWritableDatabase();
        Cursor cursor = db.rawQuery("select rootpwd from pwd_tb",null);
        // 返回查询的结果
        while(cursor.moveToNext()){

            return cursor.getString(0);
        }
        // 无结果返回null
        return null;
    }
    // 获取查询的结果数量
    public long getCount(){

        db = contect.getWritableDatabase();
        Cursor cursor = db.rawQuery("select count(rootpwd)from pwd_tb",null);
        //  返回结果
        if(cursor.moveToNext()){

            return cursor.getLong(0);
        }
        // 无结果返回
        return 0;
    }
//    增加密码
    public void AddData(Tb_pwd pwd_tb){

        db = contect.getWritableDatabase();
        db.execSQL("insert into pwd_tb (rootpwd) values(?)",new Object[]{
    pwd_tb.getRootpwd()});
    }
    // 修改密码
    public  void update(Tb_pwd pwd_tb){

        db = contect.getWritableDatabase();
        db.execSQL("update pwd_tb set rootpwd=?",new Object[]{
    pwd_tb.getRootpwd()});
    }
}
5、问题及解决方法
本实验未遇到调试上的问题,总结本实验中使用的方法和重点总结
UML图的生成
将数据库导入navicat,使用navicat的UML生成功能自动生成UML 图
使用画图工具画出UML 图 ,使用软件 Visio 、drawio
实体类:类中必须提供两个方法:
getXxx(),用来获取属性xxx。
setXxx(),用来修改属性xxx。
也就是方法的名字用get或set为前缀,后缀是将属性(成员变量)名字的首字母大写的字符序列。
类中定义的方法的访问权限都必须是public的。
类中必须有一个构造方法是 public、无参数的。
实验三、操作类的创建
1、实验名称
操作类的创建
2、实验目的
1、要求学生掌握Java类的创建。
2、要求学生掌握类间的引用关系。
3、要求学生掌握窗体类与操作类间调用关系。
3、实验工具
计算机操作系统采用Windows 7 等以上版本操作系统,Intellij idea开发环境。
4、实验内容
完成操作类PwdDAO与UserDAO的构建。操作类的UML表述如下图3-1所示。在实验报告中记录实验过程中出现的问题与解决方法,并把程序的运行结果和程序代码记录到实验报告中。
4.1、程序清单
RootpwdDAO.java
UserDAO.java
4.2、程序思想
新建一个java的UserDAO.java操作类,对实体类user_tb进行增删改查的操作。
通过add方法实现增加记录、对数据库操作的语句为:insert into tb_user (id,money,type,payer,mark) values(?,?,?,?,?);用update方法修改更新记录、通过update tb_user set user=?,money=?,type=?,payer=?,mark=? where id=?语句对数据库进行相关操作,用find方法从数据库中获取数据、用"select id,money,type payer,mark from user_tb where id=?“语句对数据库进行相关操作,用deleteId方法删除一条记录,用"delete from user_tb where id in(”+sb+")"语句对数据库进行相关操作
4.3、实验图示
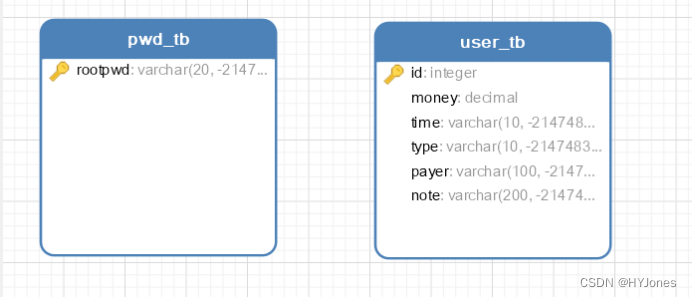
图2-1 UML表述RootpwdDAO与UserDAO操作类示意图
图3-2 UML表述操作类与其它类关系
4.4、实验代码
RootpwdDAO.java
package com.example.dbproject;
import android.content.Context;
import android.database.Cursor;
import android.database.sqlite.SQLiteDatabase;
public class RootpwdDAO {

    DbContect contect;
    SQLiteDatabase db;
    // 函数构造
    public RootpwdDAO(Context context){

        contect = new DbContect(context);
    }
    // 查询密码
    public String find(){

        db = contect.getWritableDatabase();
        Cursor cursor = db.rawQuery("select rootpwd from pwd_tb",null);
        // 返回查询的结果
        while(cursor.moveToNext()){

            return cursor.getString(0);
        }
        // 无结果返回null
        return null;
    }
    // 获取查询的结果数量
    public long getCount(){

        db = contect.getWritableDatabase();
        Cursor cursor = db.rawQuery("select count(rootpwd)from pwd_tb",null);
        //  返回结果
        if(cursor.moveToNext()){

            return cursor.getLong(0);
        }
        // 无结果返回
        return 0;
    }
//    增加密码
    public void AddData(Tb_pwd pwd_tb){

        db = contect.getWritableDatabase();
        db.execSQL("insert into pwd_tb (rootpwd) values(?)",new Object[]{
    pwd_tb.getRootpwd()});
    }
    // 修改密码
    public  void update(Tb_pwd pwd_tb){

        db = contect.getWritableDatabase();
        db.execSQL("update pwd_tb set rootpwd=?",new Object[]{
    pwd_tb.getRootpwd()});
    }
}
UserDAO.java
package com.example.dbproject;
import android.annotation.SuppressLint;
import android.content.Context;
import android.database.Cursor;
import android.database.sqlite.SQLiteDatabase;

import java.util.ArrayList;
import java.util.List;

public class UsersDAO {

    DbContect contect;
    SQLiteDatabase db;
    public UsersDAO(Context context) {

        contect = new DbContect(context);
    }

    //    增加收入信息
    public void add(Tb_user user_tb) {

        db = contect.getWritableDatabase();
        db.execSQL("insert into user_tb(money,time,type,payer,note) values(?,?,?,?,?)",
                new Object[]{

                        user_tb.getMoney(),
                        user_tb.getTime(),
                        user_tb.getType(),
                        user_tb.getPayer(),
                        user_tb.getNote()
                });
    }
    // 更新收入信息
    public void update(Tb_user user_tb) {

        db.execSQL("update user_tb set money=?,time=?,type=?,payer=?,note=? where id=?",
                new Object[]{

                        user_tb.getMoney(),
                        user_tb.getTime(),
                        user_tb.getType(),
                        user_tb.getPayer(),
                        user_tb.getNote(),
                        user_tb.getId()
                });
    }
    // 查询收入信息
    @SuppressLint("Range")
    public Tb_user find(int id) {

        db = contect.getWritableDatabase();
        Cursor cursor = db.rawQuery("select id,money,time,type,payer,note from user_tb where id=?",
                new String[]{

                        String.valueOf(id)
                });
//        返回结果
        if (cursor.moveToNext()) {

            return new Tb_user(cursor.getInt(cursor.getColumnIndex("id")),
                    cursor.getDouble(cursor.getColumnIndex("money")),
                    cursor.getString(cursor.getColumnIndex("time")),
                    cursor.getString(cursor.getColumnIndex("type")),
                    cursor.getString(cursor.getColumnIndex("payer")),
                    cursor.getString(cursor.getColumnIndex("note"))
            );
        }
        // 无结果返回
        return null;
    }
    // 删除信息
    public void delete(int[] ids) {

        if (ids.length > 0) {

            StringBuffer sb = new StringBuffer();
            Object[] temps = new Object[]{
    };
            for (int i = 0; i < ids.length; i++) {

                sb.append("?").append(",");
                temps[i] = ids[i];
            }
            sb.deleteCharAt(sb.length() - 1);
            db = contect.getWritableDatabase();
            db.execSQL("delete from user_tb where id in(" + sb + ")", temps);
        }
    }
    public void deleteId(int id) {

        db = contect.getWritableDatabase();
        db.execSQL("delete from user_tb where id=?", new Object[]{
    id});
    }
    // 获取分页信息
    @SuppressLint("Range")
    public List<Tb_user> getScrollData(int start, int count) {

        List<Tb_user> user_tbs = new ArrayList<>();
        db = contect.getWritableDatabase();
        Cursor cursor = db.rawQuery("select * from user_tb limit ?,?",
                new String[]{
    String.valueOf(start), String.valueOf(count)});
        while (cursor.moveToNext()) {

            user_tbs.add(new Tb_user(
                    cursor.getInt(cursor.getColumnIndex("id")),
                    cursor.getDouble(cursor.getColumnIndex("money")),
                    cursor.getString(cursor.getColumnIndex("time")),
                    cursor.getString(cursor.getColumnIndex("type")),
                    cursor.getString(cursor.getColumnIndex("payer")),
                    cursor.getString(cursor.getColumnIndex("note"))
            ));
        }
        return user_tbs;
    }
    // 获取总记录
    public long getCount(){

        db = contect.getWritableDatabase();
        Cursor cursor = db.rawQuery("select max(id) from user_tb",null);
        if(cursor.moveToNext()){


            return cursor.getLong(0);
        }
        return 0;
    }
    // 获取收入最大编号
    public int getMaxId()
    {

        db =  contect.getWritableDatabase();
        Cursor cursor = db.rawQuery("select max(id) from user_tb",null);
        while(cursor.moveToNext()){

            return cursor.getInt(0);
        }
        return 0;
    }
}
5、问题及解决方法、实验总结
本实验可以总结以下几点重点内容
Sqllist 数据库的连接和使用
1、查询数据可使用游标
Cursor cursor = db.rawQuery(“ sql语句”)
2、更新,添加数据使用
db.execSQL(“sql 语句”)
实验四、登录活动页
1、实验名称
登录活动页创建
2、实验目的
1、要求学生掌握TextView的使用方法。
2、要求学生掌握Button
的使用方法。
3、要求学生掌握EditText的使用方法。
3、实验工具
计算机操作系统采用Windows 7 等以上版本操作系统,Intellij idea开发环境。
4、实验内容
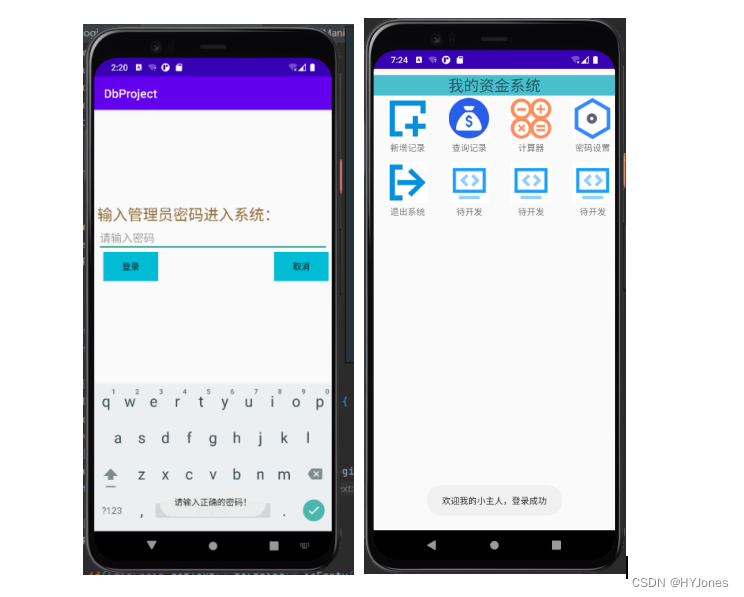
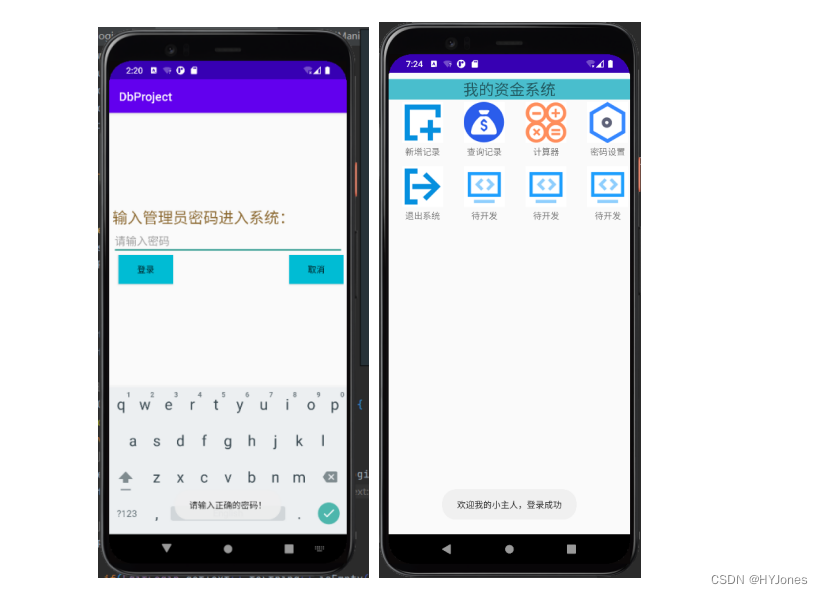
完成登录活动页的搭建,实现输入密码,判断密码与User.db数据库pwd_tb表数据是否匹配。如果输入密码与存储的密码相同,则进入APP主页面。如果输入密码错误,则提示错误 ,不进入主页面。要求活动名称与例子不同,控件名称与例子不同。在实验报告中记录实验过程中出现的问题与解决方法,并把程序的运行结果和编写的程序代码记录到实验报告中。
4.1、程序清单
LoginActivity.java
activity_login.xml
4.2、程序思想
在activity_login.xml中搭建登录活动页,一个TextView显示“请输入密码:”;一个EditText做输入密码并提;两个Button做登录和取消。在LoginActivity.java文件中实现登陆过程中的密码和账户的判断等一系列的操作。
4.3、实验效果
4.4、实验代码
LoginActivity.java
package com.example.dbproject;

import androidx.appcompat.app.AppCompatActivity;
import android.os.Bundle;
import android.content.Intent;
import android.view.View;
import android.widget.Button;
import android.widget.EditText;
import android.widget.Toast;
public class LoginActivity extends AppCompatActivity{

    EditText EditLogin;
    Button Login,Close;
    private static final String TAG = "LoginActivity";
    @Override
    protected void onCreate(Bundle savedInstanceState) {

        super.onCreate(savedInstanceState);
        setContentView(R.layout.activity_login);

            //获取控件
            EditLogin = (EditText)findViewById(R.id.editLogin);
            Login = (Button)findViewById(R.id.Login);
            Close = (Button)findViewById(R.id.Close);

            //设置登录按钮监听
            Login.setOnClickListener(new View.OnClickListener() {

                @Override
                public void onClick(View v) {

                    //创建对象
                    Intent  intent = new Intent(LoginActivity.this, HomePageActivity.class);
                    RootpwdDAO RootpwdDAO = new RootpwdDAO(LoginActivity.this);

                    //判断密码,数据库中无密码
                    if(RootpwdDAO.getCount() == 0 )
                    {

                        if(EditLogin.getText().toString().isEmpty()){

                            //在数据库中没有密码记录,进入主界面
                            startActivity(intent);
                        }
                        else {

                            TostMsg("请不要输入任何密码登录系统。");
                        }
                    }
                    else{

                        //判断输入的密码是否与数据库中的密码一致
                        if(RootpwdDAO.find().equals(EditLogin.getText().toString())){

                            startActivity(intent);
                            TostMsg("欢迎我的小主人,登录成功");
                        }
                        else{

                            TostMsg("请输入正确的密码!");
                        }

                    }
                    //清空密码文本输入框
                    EditLogin.setText("");
                }
            });
            //取消按钮设置监听
            Close.setOnClickListener(new View.OnClickListener() {

                @Override
                public void onClick(View v) {

                    //退出当前程序
                    finish();
                }
            });
    }
    // 信息提示类
    public void TostMsg(String msg){

        Toast.makeText(LoginActivity.this,msg,Toast.LENGTH_LONG).show();
    }
}
activity_login.xml
<?xml version="1.0" encoding="utf-8"?>
<androidx.constraintlayout.widget.ConstraintLayout
        xmlns:android="http://schemas.android.com/apk/res/android"
        xmlns:tools="http://schemas.android.com/tools"
        xmlns:app="http://schemas.android.com/apk/res-auto"
        android:layout_width="match_parent"
        android:layout_height="match_parent"
        tools:context=".LoginActivity">
    <RelativeLayout
            android:layout_marginTop="150dp"
            android:layout_width="match_parent"
            android:layout_height="match_parent"
            android:padding="5dp"
            tools:layout_editor_absoluteX="38dp"
            tools:layout_editor_absoluteY="107dp">

        <TextView
                android:id="@+id/textLogin"
                android:layout_width="match_parent"
                android:layout_height="wrap_content"
                android:layout_gravity="left"
                android:text="输入管理员密码进入系统:"
                android:textColor="#8c6931"
                android:textSize="25dp" />

        <EditText
                android:id="@+id/editLogin"
                android:layout_width="match_parent"
                android:layout_height="wrap_content"
                android:layout_below="@id/textLogin"
                android:inputType="textPassword"
                android:hint="请输入密码">

        </EditText>

        <Button
                android:background="#00BCD4"
                android:id="@+id/Close"
                android:layout_height="wrap_content"
                android:layout_width="90dp"
                android:layout_below="@id/editLogin"
                android:layout_alignParentRight="true"
                android:layout_marginLeft="10dp"
                android:text="取消"
        >

        </Button>
        <Button
                android:background="#00BCD4"
                android:id="@+id/Login"
                android:layout_height="wrap_content"
                android:layout_width="90dp"
                android:layout_below="@id/editLogin"
                android:layout_marginLeft="10dp"
                android:text="登录"
        >
        </Button>
    </RelativeLayout>
</androidx.constraintlayout.widget.ConstraintLayout>
5、问题及解决方法
本实验可以总结一些实验中使用的知识点和重点内容
布局适应各种类型手机
LinearLayout 线性布局
布局排列方式
android:orientation=“vertical/horizontal” 垂直排列/水平排列
使用
android:layout_weight=“数值” 调整控件所占空间比列
避免layout_width和layout_height 属性使用绝对大小参数,否者将不能匹配其他类型手机型号布局
按钮优化
为按钮插图标
android:drawableTop="" 顶部
android:drawableRight="" 靠右
android:drawableLeft="" 靠左
android:drawableBottom="" 靠下
按钮监听
Button.setOnClickListener(new View.OnClickListener() {
@Override
public void onClick(View v) {
}
判断字符串是否相等equals
RootpwdDAO.find().equals(EditLogin.getText().toString()
实验五、修改密码活动页
1、实验名称
创建修改密码活动也
2、实验目的
1、要求学生掌握EditText与Button的使用方法。
2、要求学生掌握结束活动的使用方法。
3、要求学生掌握活动与SQLiteDatabase交互的方法。
3、实验工具
计算机操作系统采用Windows 7 等以上版本操作系统,Intellij idea开发环境。
4、实验内容
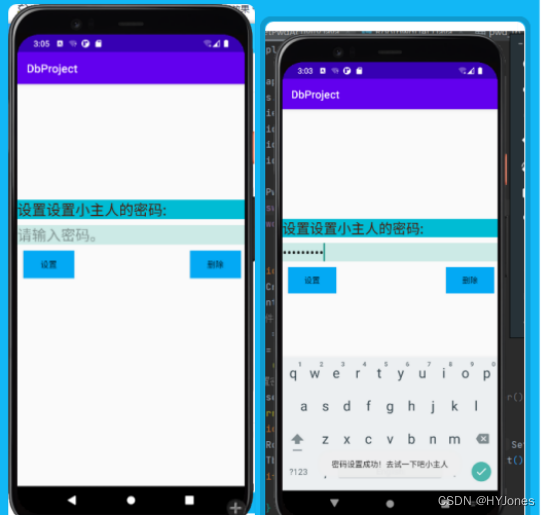
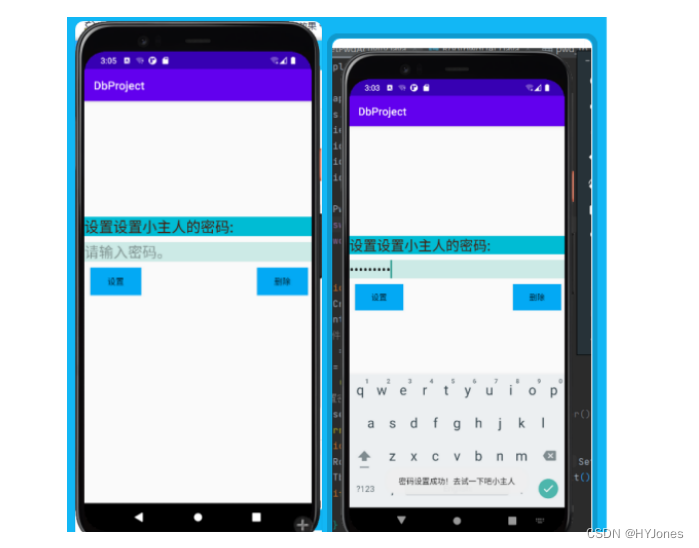
完成修改密码活动页的搭建,把输入的密码成功修改到User.db数据库pwd_tb表指定记录中。如果密码修改成功,则Toast弹窗提示。如果密码修改不成功,则Toast弹窗提示错误。要求活动名称与例子不同,控件名称与例子不同。在实验报告中记录实验过程,程序的运行结果和程序代码。
4.1、程序清单
SetPwdActivity.java
activity_pwd.xml
4.2、程序思想
在实际操作过程中需要进行密码的修改操作,通过SetPwdDAO.java文件中要获得activity_pwd.xml文件中控件的控制权并对两个按钮“设置”和“取消”设置监听。在获取文本框中输入的密码的同时将密码重新写到数据库中来实现密码修改的功能。
4.3、实验效果
4.4、实验代码
SetPwdActivity.java
package com.example.dbproject;

import androidx.appcompat.app.AppCompatActivity;
import android.os.Bundle;
import android.view.View;
import android.widget.Button;
import android.widget.EditText;
import android.widget.Toast;

public class SetPwdActivity extends AppCompatActivity {

    EditText password;
    Button set_pwd,Cancel;
    @Override
    protected void onCreate(Bundle savedInstanceState) {

        super.onCreate(savedInstanceState);
        setContentView(R.layout.activity_pwd);
        // 获取控件
        password = (EditText)findViewById(R.id.password);
        set_pwd = (Button)findViewById(R.id.set_pwd);
        Cancel = (Button)findViewById(R.id.Cancel);
// 设置按钮监听 设置密码确定按钮
        set_pwd.setOnClickListener(new View.OnClickListener(){

            @Override
            public void onClick(View v){

                RootpwdDAO pwdDAO = new RootpwdDAO(SetPwdActivity.this);
                Tb_pwd pwd_tb = new Tb_pwd(password.getText().toString());
                if(pwdDAO.getCount()==0){

                    pwdDAO.AddData(pwd_tb);
                }
                else{

                    pwdDAO.update(pwd_tb);
                }
                ToastMsg("密码设置成功!去试一下吧小主人");
            }
        });
        Cancel.setOnClickListener(new View.OnClickListener() {

            @Override
            public void onClick(View v) {

                password.setText("");
                password.setHint("请输入密码。");
            }
        });
    }
// 消息提示类
    public  void  ToastMsg(String msg){

        Toast.makeText(this,msg,Toast.LENGTH_SHORT).show();
  }
}
activity_pwd.xml
<?xml version="1.0" encoding="utf-8"?>
<androidx.constraintlayout.widget.ConstraintLayout
        xmlns:android="http://schemas.android.com/apk/res/android"
        xmlns:tools="http://schemas.android.com/tools"
        xmlns:app="http://schemas.android.com/apk/res-auto"
        android:layout_width="match_parent"
        android:layout_height="match_parent"
        tools:context=".SetPwdActivity">
    <LinearLayout
            android:layout_width="match_parent"
            android:layout_height="wrap_content"
            tools:ignore="MissingConstraints"
            android:orientation="vertical">
        <LinearLayout
                android:layout_marginTop="200dp"
                android:layout_weight="1"
                android:orientation="vertical"
                android:layout_width="match_parent"
                android:layout_height="wrap_content">
            <TextView
                    android:background="#00BCD4"
                    android:text="设置设置小主人的密码:"
                    android:textSize="25dp"
                    android:textColor="#501705"
                    android:layout_width="match_parent"
                    android:layout_height="wrap_content">
            </TextView>
            <EditText
                    android:layout_marginTop="10dp"
                    android:id="@+id/password"
                    android:textSize="25dp"
                    android:background="#CCEAE6"
                    android:inputType="textPassword"
                    android:layout_width="match_parent"
                    android:layout_height="wrap_content">
            </EditText>
        </LinearLayout>
        <LinearLayout
                android:layout_marginTop="10dp"
                android:layout_weight="1"
                android:orientation="horizontal"
                android:layout_width="match_parent"
                android:layout_height="wrap_content">
            <Button
                    android:layout_marginLeft="10dp"
                    android:background="#03A9F4"
                    android:id="@+id/set_pwd"
                    android:text="设置"
                    android:layout_width="wrap_content"
                    android:layout_height="wrap_content">
            </Button>
            <Button
                    android:layout_marginLeft="200dp"
                    android:background="#03A9F4"
                    android:id="@+id/Cancel"
                    android:text="删除"
                    android:layout_width="wrap_content"
                    android:layout_height="wrap_content">
            </Button>
        </LinearLayout>
    </LinearLayout>
</androidx.constraintlayout.widget.ConstraintLayout>
5、问题及解决方法
编辑框输入隐藏密码
使用隐藏文本类型inputType =”textPassword”
实验六、主活动页
1、实验名称
创建主活动页
2、实验目的
1、要求学生掌握Button的使用方法。
2、要求学生掌握图片的存储与使用方法。
3、实验工具
计算机操作系统采用Windows 7 等以上版本操作系统,Intellij idea开发环境。
4、实验内容
完成主活动页的搭建,在主活动页中构建图片按钮。按钮形式可与例子不同。可以是经典形式的按钮,也可以是框线按钮,还可以是带图片按钮。点击不同按钮,进入不同的活动页面。要求活动名称与例子不同,控件名称与例子不同。在实验报告中记录实验过程,程序的运行结果和程序代码。
4.1、程序清单
HomePageActivity.java
activity_home.xml
4.2、程序思想
在实际操作中需要一个主要的活动页面将其他各个活动页面连接起来,这就需要在activity_home.xml文件中设置相关的控件,通过在HomePageActivity.java文件中将各个页面进行连接起来,同时实现各个页面之间的跳转功能。
4.3、实验效果
4.4、实验代码
HomePageActivity.java
package com.example.dbproject;
import android.widget.Button;
import androidx.appcompat.app.AppCompatActivity;
import android.os.Bundle;
import android.content.Intent;
import android.view.View;
import android.widget.AdapterView;
import android.widget.GridView;
public class HomePageActivity extends AppCompatActivity {

    Button add,salray,set,quit;
    @Override
    protected void onCreate(Bundle savedInstanceState) {

        super.onCreate(savedInstanceState);
        setContentView(R.layout.activity_home);

        add = findViewById(R.id.add);
        salray =findViewById(R.id.see);
        set =findViewById(R.id.set);
        quit=findViewById(R.id.quit);

        add.setOnClickListener(new View.OnClickListener() {

            @Override
            public void onClick(View view) {

                Intent intent=new Intent(HomePageActivity.this,AddMsgActivity.class);
                startActivity(intent);
            }
        });
        salray.setOnClickListener(new View.OnClickListener() {

            @Override
            public void onClick(View view) {

                Intent intent=new Intent(HomePageActivity.this,QueryMsgActivity.class);
                startActivity(intent);
            }
        });
        set.setOnClickListener(new View.OnClickListener() {

            @Override
            public void onClick(View view) {

                Intent intent=new Intent(HomePageActivity.this,SetPwdActivity.class);
                startActivity(intent);
            }
        });
        add.setOnClickListener(new View.OnClickListener() {

            @Override
            public void onClick(View view) {

                finish();
            }
        });
        }
activity_home_page.xml
<LinearLayout
        android:orientation="horizontal"
        android:layout_width="match_parent"
        android:layout_height="wrap_content">
    <Button
            android:id="@+id/add"
            android:text="添加记录"
            android:drawableTop="@drawable/add"
            android:layout_width="wrap_content"
            android:layout_height="match_parent">

    </Button>
    <Button
            android:id="@+id/see"
            android:text="添加记录"
            android:drawableTop="@drawable/salary"
            android:layout_width="wrap_content"
            android:layout_height="match_parent">

    </Button>
    <Button
            android:id="@+id/set1"
            android:text="添加记录"
            android:drawableTop="@drawable/set"
            android:layout_width="wrap_content"
            android:layout_height="match_parent">

    </Button>
    <Button
            android:id="@+id/tuichu"
            android:text="添加记录"
            android:drawableTop="@drawable/quit"
            android:layout_width="wrap_content"
            android:layout_height="match_parent">

    </Button>

</LinearLayout>
5、问题及解决办法
页面跳转
1、获取控件
Button add,salray,set,quit;
add = findViewById(R.id.add);
salray =findViewById(R.id.see);
set =findViewById(R.id.set);
quit=findViewById(R.id.quit);
add.setOnClickListener(new View.OnClickListener() {
@Override
public void onClick(View view) {
Intent intent=new Intent(HomePageActivity.this,AddMsgActivity.class);
startActivity(intent);
2、为控件设置监听
3、 add.setOnClickListener(new View.OnClickListener()
4、监听后的相关操作
Intent intent=new Intent(HomePageActivity.this,AddMsgActivity.class);
按钮布局
线性布局中的排列相关问题
android:orientation=“horizontal” // 水平排列 从左向右排列
android:orientation=“vertical” // 垂直排列 从上至下的方向排列
实验七、新增收入活动页
1、实验名称
创建新增收入活动页
2、实验目的
1、要求学生掌握匿名内部类监听方法。
2、要求学生掌握时间与字符串的转换方法。
3、要求学生掌握在SQLiteDatabase数据库表中增加记录的方法。
3、实验工具
计算机操作系统采用Windows 7 等以上版本操作系统,Intellij idea开发环境。
4、实验内容
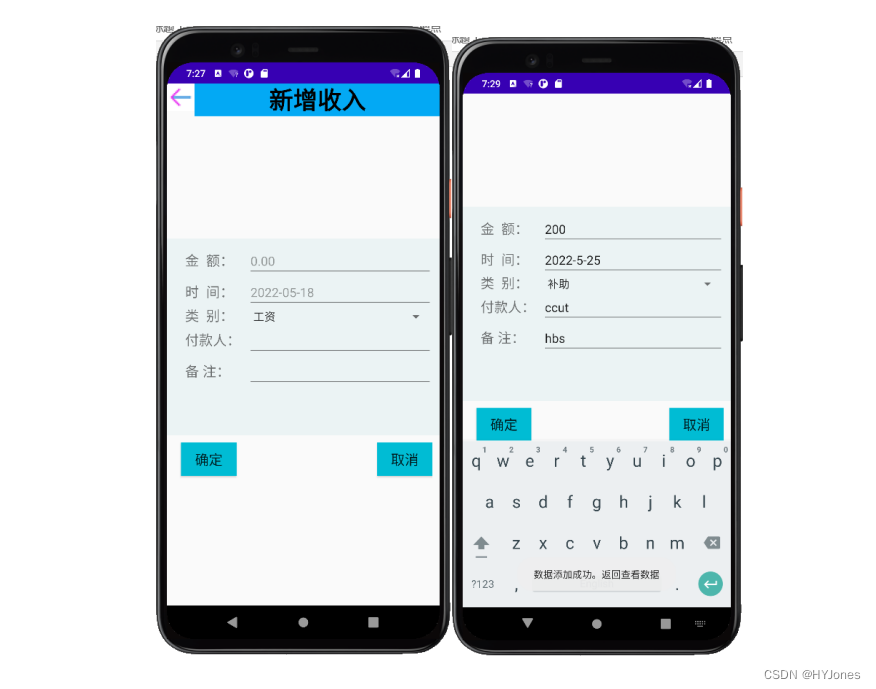
完成新增收入活动页的搭建,实现数据成功写入User.db数据库user_tb表中。如果写入数据库成功,则Toast弹窗提示。如果出现错误,则Toast弹窗提示错误。要求活动名称与例子不同,控件名称与例子不同。在实验报告中记录实验过程,程序的运行结果和程序代码。
4.1、程序清单
AddMsgActivity.java
activity_add_account.xml
4.2、程序思想
通过activity_add_account.xml显示新增收入的页面,通过TextView和EditText来实现金额、时间、类别、付款方、备注的布局构建。AddMsgActivity.java文件将EditText中的内容写进从数据库中,完成插入数据的工作。
4.3、实验效果
4.4、实验代码
AddMsgActivity.java
package com.example.dbproject;

import android.content.Intent;
import android.widget.*;
import androidx.appcompat.app.AppCompatActivity;
import android.os.Bundle;
import android.view.View;

public class AddMsgActivity extends AppCompatActivity {


    protected static final int DATE_DIALOG_ID=0;
    EditText InputMoney,InputTime,InputPayer,InputNote;
    Spinner SpType;
    Button EnsureSave,Cancel;
    ImageButton Back;
    @Override
    protected void onCreate(Bundle savedInstanceState) {

        super.onCreate(savedInstanceState);
        setContentView(R.layout.activity_add_inaccount);
// 获取控件
        InputMoney   = (EditText)findViewById(R.id.InputMoney);
        InputTime    = (EditText)findViewById(R.id.InputTime);
        InputPayer = (EditText)findViewById(R.id.InputPayer);
        InputNote    = (EditText)findViewById(R.id.InputNote);
        SpType     = (Spinner)findViewById(R.id.SpType);
        EnsureSave    = (Button)findViewById(R.id.EnsureSave);
        Cancel  = (Button)findViewById(R.id.Cancel);

        Back =findViewById(R.id.back);
// 返回主页
        Back.setOnClickListener(new View.OnClickListener() {

            @Override
            public void onClick(View view) {

                Intent intent =new Intent();
                intent.setClass(AddMsgActivity.this,HomePageActivity.class);
                startActivity(intent);
            }
        });
//  清空信息
        Cancel.setOnClickListener(new View.OnClickListener(){

            @Override
            public void onClick(View v){

                InputMoney.setText("");
                InputMoney.setHint("0.00");
                InputTime.setText("");
                InputTime.setHint("2022-05-18");
                InputPayer.setText("");
                InputNote.setText("");
                SpType.setSelection(0);
            }
        });

// 确定保存操作
        EnsureSave.setOnClickListener(new View.OnClickListener() {

            @Override
        public void onClick(View v) {

            String strMoney = InputMoney.getText().toString();
            if(!strMoney.isEmpty()){

                UsersDAO UsersDAO = new UsersDAO(AddMsgActivity.this);
                Tb_user user_tb = new Tb_user(
                        UsersDAO.getMaxId()+1,
                        Double.parseDouble(
                                InputMoney.getText().toString()),
                                InputTime.getText().toString(),
                                SpType.getSelectedItem().toString(),
                                InputPayer.getText().toString(),
                                InputNote.getText().toString());
                UsersDAO.add(user_tb);
                ToastMsg("数据添加成功。返回查看数据");
 //设置数据初始状态
//                InputMoney.setText("");
//                InputMoney.setHint("0.00");
//                InputTime.setText("");
//                InputTime.setHint("2022-05-18");
//                InputPayer.setText("");
//                InputNote.setText("");
//                SpType.setSelection(0);
            }
            else{

                ToastMsg("请输入你的金额");
            }
        }
        });
    }

    //  信息提示类
    public void ToastMsg(String msg){

        Toast.makeText(this,msg,Toast.LENGTH_SHORT).show();

    }
}
activity_add_inaccount.xml
<?xml version="1.0" encoding="utf-8"?>
<androidx.constraintlayout.widget.ConstraintLayout
        xmlns:android="http://schemas.android.com/apk/res/android"
        xmlns:tools="http://schemas.android.com/tools"
        xmlns:app="http://schemas.android.com/apk/res-auto"
        android:layout_width="match_parent"
        android:layout_height="match_parent"
        tools:context=".AddMsgActivity">

    <LinearLayout
            android:layout_width="match_parent"
            android:layout_height="match_parent"
            android:orientation="vertical"
            android:id="@+id/initem">
        <LinearLayout
                android:orientation="horizontal"
                android:layout_width="match_parent"
                android:layout_height="wrap_content"
                android:layout_weight="3">
            <ImageButton
                    android:id="@+id/back"
                    android:background="@color/white"
                    android:src="@mipmap/back"

                    android:layout_width="wrap_content"
                    android:layout_height="wrap_content">

            </ImageButton>
            <TextView
                    android:text="新增收入"
                    android:background="#03A9F4"
                    android:layout_width="match_parent"
                    android:layout_height="wrap_content"
                    android:layout_gravity="center_horizontal"
                    android:gravity="center"
                    android:textSize="35sp"
                    android:textColor="#000000"
                    android:textStyle="bold"
            >

            </TextView>
        </LinearLayout>
        <LinearLayout
                android:background="#EBF3F4"
                android:layout_width="wrap_content"
                android:layout_height="wrap_content"
                android:orientation="vertical"
                android:layout_weight="1">
            <RelativeLayout
                    android:layout_width="match_parent"
                    android:layout_height="match_parent"
                    android:padding="10dp">
                <TextView
                        android:id="@+id/Money"
                        android:layout_width="90dp"
                        android:textSize="20sp"
                        android:text="金  额:"
                        android:layout_height="wrap_content"
                        android:layout_alignBaseline="@id/InputMoney"
                        android:layout_alignBottom="@id/InputMoney"
                        android:layout_alignParentLeft="true"
                        android:layout_marginLeft="16dp">
                </TextView>
                <EditText
                        android:id="@+id/InputMoney"
                        android:layout_width="match_parent"
                        android:layout_height="wrap_content"
                        android:layout_toRightOf="@id/Money"
                        android:inputType="numberDecimal"
                        android:numeric="decimal"
                        android:maxLength="9"
                        android:hint="0.00"
                        android:layout_marginLeft="0dp">
                </EditText>
                <TextView

                        android:id="@+id/Time"
                        android:textSize="20sp"
                        android:text="时  间:"
                        android:layout_width="90dp"
                        android:layout_height="wrap_content"
                        android:layout_alignBaseline="@id/InputTime"
                        android:layout_alignBottom="@id/InputTime"
                        android:layout_alignParentLeft="true"
                        android:layout_marginLeft="16dp">
                </TextView>
                <EditText
                        android:id="@+id/InputTime"
                        android:layout_width="match_parent"
                        android:layout_height="wrap_content"
                        android:layout_below="@id/InputMoney"
                        android:layout_toRightOf="@id/Time"
                        android:inputType="datetime"
                        android:hint="2022-05-18">
                </EditText>
                <TextView
                        android:layout_width="90dp"
                        android:id="@+id/Type"
                        android:textSize="20sp"
                        android:text="类  别:"
                        android:layout_height="wrap_content"
                        android:layout_alignBaseline="@id/SpType"
                        android:layout_alignBottom="@id/SpType"
                        android:layout_alignParentLeft="true"
                        android:layout_marginLeft="16dp">
                </TextView>
                <Spinner
                        android:id="@+id/SpType"
                        android:layout_width="match_parent"
                        android:layout_height="wrap_content"
                        android:layout_toRightOf="@id/Type"
                        android:layout_below="@id/InputTime"
                        android:entries="@array/Type">
                </Spinner>
                <TextView
                        android:layout_width="90dp"
                        android:id="@+id/Handler"
                        android:textSize="20sp"
                        android:text="付款人:"
                        android:layout_height="wrap_content"
                        android:layout_alignBaseline="@id/InputPayer"
                        android:layout_alignBottom="@id/InputPayer"
                        android:layout_alignParentLeft="true"
                        android:layout_marginLeft="16dp">
                </TextView>
                <EditText
                        android:id="@+id/InputPayer"
                        android:layout_width="match_parent"
                        android:layout_height="wrap_content"
                        android:layout_below="@id/SpType"
                        android:layout_toRightOf="@id/Handler"
                        android:singleLine="true">
                </EditText>
                <TextView
                        android:layout_width="90dp"
                        android:id="@+id/Mark"
                        android:textSize="20sp"
                        android:text="备 注:"
                        android:layout_height="wrap_content"
                        android:layout_alignBaseline="@id/InputNote"
                        android:layout_alignTop="@id/InputNote"
                        android:layout_alignParentLeft="true"
                        android:layout_marginLeft="16dp">
                </TextView>
                <EditText
                        android:id="@+id/InputNote"
                        android:layout_width="match_parent"
                        android:layout_height="wrap_content"
                        android:layout_below="@id/InputPayer"
                        android:layout_toRightOf="@id/Mark"
                        android:singleLine="true">
                </EditText>
            </RelativeLayout>
        </LinearLayout>
        <LinearLayout
                android:orientation="vertical"
                android:layout_width="match_parent"
                android:layout_height="wrap_content"
                android:layout_weight="3">
            <RelativeLayout
                    android:layout_width="match_parent"
                    android:layout_height="match_parent"
                    android:padding="10dp">
                <Button
                        android:background="#00BCD4"
                        android:id="@+id/EnsureSave"
                        android:layout_width="80dp"
                        android:layout_height="wrap_content"
                        android:layout_alignParentLeft="true"
                        android:layout_marginLeft="10dp"
                        android:text="确定"
                        android:textSize="20dp"
                >
                </Button>
                <Button
                        android:id="@+id/Cancel"
                        android:layout_width="80dp"
                        android:layout_height="wrap_content"
                        android:layout_alignParentRight="true"
                        android:layout_marginLeft="10dp"
                        android:text="取消"
                        android:textSize="20dp"
                        android:background="#00BCD4"
                >
                </Button>

            </RelativeLayout>
        </LinearLayout>
    </LinearLayout>

</androidx.constraintlayout.widget.ConstraintLayout>
5、问题及解决办法
添加信息后返回页面自动刷新
使用页面返回跳转页面
主要代码
Intent intent =new Intent();
intent.setClass(AddMsgActivity.this,HomePageActivity.class);
startActivity(intent);
刷新原理:在跳转过程中相当于重新打开页面实现刷新数据效果
获取控件文本内容
控件名.getText().toString()
实验八、显示收入活动页
1、实验名称
创建显示收入活动页
2、实验目的
1、要求学生掌握ListView构建与使用方法。
2、要求学生掌握SQLiteDatabase数据库表中查询记录的方法。
3、要求学生掌握显示查询结果的方法。
3、实验工具
计算机操作系统采用Windows 7 等以上版本操作系统,Intellij idea开发环境。
4、实验内容
完成显示收入列表活动页的搭建,实现把User.db数据库user_tb表中数据读取出来,并用ListView显示表格数据。要求活动名称与例子不同,控件名称与例子不同。在实验报告中记录实验过程,程序的运行结果和程序代码。
4.1、程序清单
QueryMsgActivity.java
activity_infoaccount.xml
4.2、程序思想
在activity_info_inaccount.xml中搭建新增收入活动页,通过编写QueryMsgActivity活动类,查询数据库中的相关数据表,并将数据显示出来。
4.3、实验效果
4.4、实验代码
QueryMsgActivity.java
package com.example.dbproject;

import android.widget.*;
import androidx.appcompat.app.AppCompatActivity;
import android.os.Bundle;
import android.content.Intent;
import android.view.View;

import java.util.List;
public class QueryMsgActivity extends AppCompatActivity {


    public static final String FLAG="id";
    ListView lvInfo;
    ListView lvInfo1;
    ListView lvInfo2;
    ListView lvInfo3;
    ListView lvInfo4;
    String strType;          //管理类型
    ImageButton Back;
    Button refresh;

    @Override
    protected void onCreate(Bundle savedInstanceState) {

        super.onCreate(savedInstanceState);
        setContentView(R.layout.activity_info_inaccount);

        lvInfo = findViewById(R.id.lvInaccountInfo);
        ShowInfo();
        lvInfo1 = findViewById(R.id.lvInaccountInfo1);
        ShowInfo1();
        lvInfo2 = findViewById(R.id.lvInaccountInfo2);
        ShowInfo2();
        lvInfo3 = findViewById(R.id.lvInaccountInfo3);
        ShowInfo3();
        lvInfo4 = findViewById(R.id.lvInaccountInfo4);
        ShowInfo4();
// 按钮控件
        Back =findViewById(R.id.back);  // 返回
        refresh=findViewById(R.id.refresh); //刷新
// 返回主页
        Back.setOnClickListener(new View.OnClickListener() {

            @Override
            public void onClick(View view) {

                Intent intent = new Intent();
                intent.setClass(QueryMsgActivity.this,HomePageActivity.class);
                startActivity(intent);
            }
        });
//  刷新页面
        refresh.setOnClickListener(new View.OnClickListener() {

            @Override
            public void onClick(View view) {

                Intent intent = new Intent();
                intent.setClass(QueryMsgActivity.this,QueryMsgActivity.class);
                startActivity(intent);
                ToastMsg("页面刷新成功");
            }
        });

        // 管理操作
        lvInfo4.setOnItemClickListener(new AdapterView.OnItemClickListener() {

            @Override
            public void onItemClick(AdapterView<?> parent, View view, int position, long id) {

                String strInfo=String.valueOf(((TextView)view).getText());
                String strId = strInfo.substring(2, strInfo.indexOf('|'));
                Intent intent = new Intent(QueryMsgActivity.this,
                        InfoManageActivity.class);
                intent.putExtra(FLAG,new String[]{
    strId,strType});
                startActivity(intent);
            }
        });

    }

    //  数据显示  操作
    private void ShowInfo4(){

        String[] strInfos4 =null;
        strType = "btnininfo";
        ArrayAdapter<String> arrayAdapter = null;
        UsersDAO inaccountDAO =new UsersDAO(this);
        List<Tb_user> listInfos = inaccountDAO.getScrollData(0,(int)inaccountDAO.getCount());
        strInfos4 = new String[listInfos.size()];
        int m=0;
        for(Tb_user user_tb:listInfos){

            strInfos4[m] = "管理"+user_tb.getId()+"|";

            m++;
        }
        arrayAdapter = new ArrayAdapter<String>(QueryMsgActivity.this,
                android.R.layout.simple_list_item_1,strInfos4);
        lvInfo4.setAdapter(arrayAdapter);
    }
// 显示id
    private void ShowInfo(){

        String[] strInfos =null;
        strType = "btnininfo";
        ArrayAdapter<String> arrayAdapter = null;
        UsersDAO inaccountDAO =new UsersDAO(this);
        List<Tb_user> listInfos = inaccountDAO.getScrollData(0,(int)inaccountDAO.getCount());
        strInfos = new String[listInfos.size()];
        int m=0;
        for(Tb_user user_tb:listInfos){

            strInfos[m] = user_tb.getId()+"|";
            m++;
        }
        arrayAdapter = new ArrayAdapter<String>(QueryMsgActivity.this,
                android.R.layout.simple_list_item_1,strInfos);
        lvInfo.setAdapter(arrayAdapter);
    }
//  显示收入类型
    private void ShowInfo1(){

        String[] strInfos1 =null;
        ArrayAdapter<String> arrayAdapter = null;
        UsersDAO inaccountDAO =new UsersDAO(this);
        List<Tb_user> listInfos = inaccountDAO.getScrollData(0,(int)inaccountDAO.getCount());
        strInfos1 = new String[listInfos.size()];
        int m=0;
        for(Tb_user user_tb:listInfos){

            strInfos1[m] = user_tb.getType()+" ";
            m++;
        }
        arrayAdapter = new ArrayAdapter<String>(QueryMsgActivity.this,
                android.R.layout.simple_list_item_1,strInfos1);
        lvInfo1.setAdapter(arrayAdapter);
    }

    //  显示金额
    private void ShowInfo2(){

        String[] strInfos2 =null;
        ArrayAdapter<String> arrayAdapter = null;
        UsersDAO inaccountDAO =new UsersDAO(this);
        List<Tb_user> listInfos = inaccountDAO.getScrollData(0,(int)inaccountDAO.getCount());
        strInfos2 = new String[listInfos.size()];
        int m=0;
        for(Tb_user user_tb:listInfos){

            strInfos2[m] = String.valueOf(user_tb.getMoney())+"元 ";
            //+user_tb.getTime();
            m++;
        }
        arrayAdapter = new ArrayAdapter<String>(QueryMsgActivity.this,
                android.R.layout.simple_list_item_1,strInfos2);
        lvInfo2.setAdapter(arrayAdapter);
    }

    // 显示 时间
    private void ShowInfo3(){

        String[] strInfos3 =null;
        ArrayAdapter<String> arrayAdapter = null;
        UsersDAO inaccountDAO =new UsersDAO(this);
        List<Tb_user> listInfos = inaccountDAO.getScrollData(0,(int)inaccountDAO.getCount());
        strInfos3 = new String[listInfos.size()];
        int m=0;
        for(Tb_user user_tb:listInfos){

            strInfos3[m] = user_tb.getTime();
            m++;
        }
        arrayAdapter = new ArrayAdapter<String>(QueryMsgActivity.this,
                android.R.layout.simple_list_item_1,strInfos3);
        lvInfo3.setAdapter(arrayAdapter);
    }
    public void ToastMsg(String msg){

        Toast.makeText(this,msg,Toast.LENGTH_SHORT).show();
    }
}
activity_info_inaccount.xml
<?xml version="1.0" encoding="utf-8"?>
<androidx.constraintlayout.widget.ConstraintLayout
        xmlns:android="http://schemas.android.com/apk/res/android"
        xmlns:tools="http://schemas.android.com/tools"
        xmlns:app="http://schemas.android.com/apk/res-auto"
        android:layout_width="match_parent"
        android:layout_height="match_parent"
        tools:context=".QueryMsgActivity">
    <LinearLayout
            android:layout_marginTop="5dp"
            android:orientation="vertical"
            android:weightSum="1"
            android:layout_width="match_parent"
            android:layout_height="wrap_content"
            tools:ignore="MissingConstraints">
        <LinearLayout
                android:orientation="vertical"
                android:layout_weight="0.06"
                android:layout_width="match_parent"
                android:layout_height="wrap_content"
        >

            <LinearLayout
                    android:orientation="horizontal"
                    android:layout_width="match_parent"
                    android:layout_height="wrap_content">
                <ImageButton
                        android:id="@+id/back"
                        android:background="@color/white"
                        android:src="@mipmap/back"
                        android:layout_width="wrap_content"
                        android:layout_height="wrap_content">

                </ImageButton>

                <TextView
                        android:layout_weight="1"
                        android:background="#03A9F4"
                        android:layout_width="match_parent"
                        android:layout_height="wrap_content"
                        android:gravity="center"
                        android:text="我的资金记录"
                        android:textSize="25dp"
                        android:textColor="@color/black">

                </TextView>
                <Button
                        android:textSize="15dp"
                        android:text="刷新"
                        android:id="@+id/refresh"
                        android:background="@color/white"
                        android:layout_width="wrap_content"
                        android:layout_height="wrap_content">
                </Button>
            </LinearLayout>

        </LinearLayout>

        <LinearLayout
                android:layout_width="match_parent"
                android:layout_height="wrap_content">
            //表头
            <TableLayout

                    android:layout_width="match_parent"
                    android:layout_height="match_parent">
                <TableRow
                        android:background="#00BCD4"
                        android:layout_width="match_parent"
                        android:layout_height="wrap_content">
                    <TextView

                            android:layout_weight="1"
                            android:text="序号"
                            android:textSize="20dp"
                            android:layout_height="match_parent"
                            android:layout_width="match_parent">
                    </TextView>
                    <TextView
                            android:layout_weight="1"
                            android:text="来源 "
                            android:textSize="20dp"
                            android:layout_height="match_parent"
                            android:layout_width="match_parent">
                    </TextView>
                    <TextView
                            android:layout_weight="1"
                            android:text="金额"
                            android:textSize="20dp"
                            android:layout_height="match_parent"
                            android:layout_width="match_parent">
                    </TextView>
                    <TextView
                            android:layout_weight="1"
                            android:text="时间"
                            android:textSize="20dp"
                            android:layout_height="match_parent"
                            android:layout_width="match_parent">
                    </TextView>
                    <TextView
                            android:gravity="center"
                            android:layout_weight="1"
                            android:text="操作"
                            android:textSize="20dp"
                            android:layout_height="match_parent"
                            android:layout_width="match_parent">
                    </TextView>

                </TableRow>
                <TableRow>
                    <ListView
                            android:layout_gravity="left"
                            android:layout_weight="1"
                            android:id="@+id/lvInaccountInfo"
                            android:layout_width="wrap_content"
                            android:layout_height="wrap_content">

                    </ListView>
                    <ListView
                            android:layout_weight="1"
                            android:id="@+id/lvInaccountInfo1"
                            android:layout_width="wrap_content"
                            android:layout_height="wrap_content">

                    </ListView>
                    <ListView
                            android:layout_weight="1"
                            android:id="@+id/lvInaccountInfo2"
                            android:layout_width="wrap_content"
                            android:layout_height="wrap_content">

                    </ListView>
                    <ListView
                            android:layout_weight="1"
                            android:id="@+id/lvInaccountInfo3"
                            android:layout_width="wrap_content"
                            android:layout_height="wrap_content">

                    </ListView>
                    <ListView
                            android:textColor="#F8F3F3"
                            android:background="#EACFA7"
                            android:layout_weight="1"
                            android:id="@+id/lvInaccountInfo4"
                            android:layout_width="wrap_content"
                            android:layout_height="wrap_content">

                    </ListView>
                </TableRow>
            </TableLayout>

        </LinearLayout>

    </LinearLayout>

</androidx.constraintlayout.widget.ConstraintLayout>
5、问题及解决办法
添加表头固定在顶端
在对应的表头下添加列表项ListView显示表格数据,
使用layout_weight=”数值”来调整控件占比
列表列数于表头列数保持相等
刷新页面
使用页面重新加载的方式实现页面内容刷新
方法 在页面布局中添加刷新按钮
在后端获取按钮 监听按钮 设置点击后页面重新加载
主要代码
refresh.setOnClickListener(new View.OnClickListener() {
@Override
public void onClick(View view) {
Intent intent = new Intent();
intent.setClass(QueryMsgActivity.this,QueryMsgActivity.class);
startActivity(intent);
ToastMsg(“页面刷新成功”);
}
});
实验九、修改与删除活动页
1、实验名称
创建修改收入活动页
2、实验目的
1、要求学生掌握SQLiteDatabase数据库表中修改记录的方法。
2、要求学生掌握SQLiteDatabase数据库连接的方法。
3、实验工具
计算机操作系统采用Windows 7 等以上版本操作系统,Intellij idea开发环境。
4、实验内容
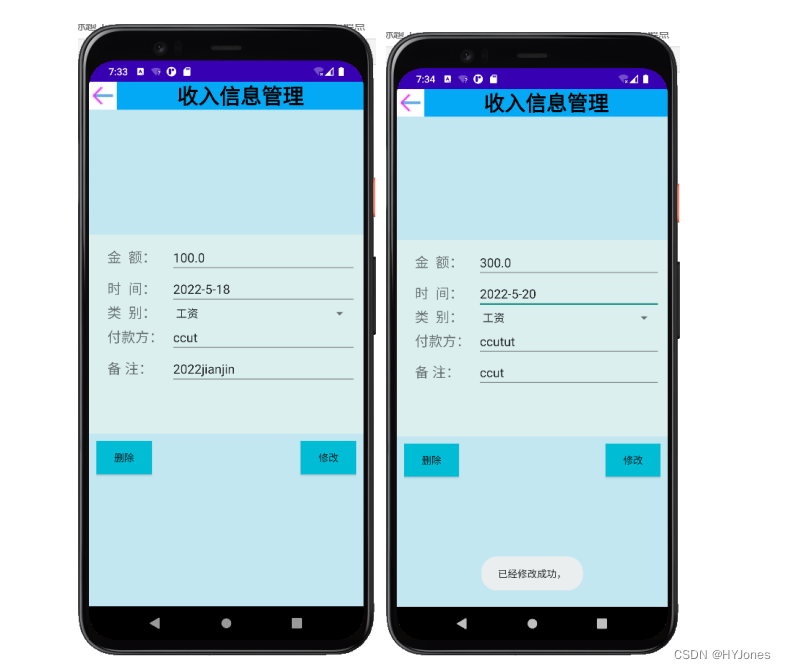
完成修改收入活动页的搭建,实现数据成功修改到user.db数据库user_tb表中。如果修改数据库记录成功,则Toast弹窗提示。如果出现错误,则Toast弹窗提示错误。要求活动名称与例子不同,控件名称与例子不同。在实验报告中记录实验过程,程序的运行结果和程序代码。
4.1、程序清单
InfoManageActivity.java
activity_info_manage.xml
4.2、程序思想
通过InfoManageActivity.java文件对原有的数据进行更新操作并且把更新的数据重新写进数据库中。
通过activity_info_manage.xml进行页面的设置,在通过InfoManageActivity.java文件调用UserDao.java文件中的update和delete两个方法,来实现对收入数据的显示和删出操作。
4.3、实验效果
4.4、实验代码
InfoManageActivity.java
package com.example.dbproject;

import android.widget.*;
import androidx.appcompat.app.AppCompatActivity;
import android.os.Bundle;
import android.content.Intent;
import android.view.View;

public class InfoManageActivity extends AppCompatActivity {


    private static final String TAG = "InfoManageActivity";
    protected static final int DATE_DIALOG_ID =0;
    TextView tvTitle;
    EditText ChangeMoney,ChangeTime,ChangePayer,ChangeNote;  //  控件
    Spinner ChangeType;
    Button Delete,Modify; // 删除  修改
    ImageButton Back;

    String[] strInfos;
    String strId;
    String strType;
    UsersDAO UsersDAO;   // 创建操作对象

    @Override
    protected void onCreate(Bundle savedInstanceState) {

        super.onCreate(savedInstanceState);
        setContentView(R.layout.activity_info_manage);
        // 创建数据操作对象
        UsersDAO = new UsersDAO(this);
        // 获取视图控件
        tvTitle     = (TextView)findViewById(R.id.tvTitle);
        ChangeMoney   = (EditText)findViewById(R.id.ChangeMoney);
        ChangeTime    = (EditText)findViewById(R.id.ChangeTime);
        ChangePayer = (EditText)findViewById(R.id.ChangePayer);
        ChangeNote    = (EditText)findViewById(R.id.ChangeNote);
        ChangeType     = (Spinner)findViewById(R.id.ChangeType);
        // 获取按钮控件
        Modify  = (Button)findViewById(R.id.Modify);
        Delete  = (Button)findViewById(R.id.Delete);
        Back = (ImageButton)findViewById(R.id.back);

//获取intent 对象
        Intent intent = getIntent();
        Bundle bundle = intent.getExtras();
        strInfos = bundle.getStringArray(QueryMsgActivity.FLAG);
        //获得ID
        strId   = strInfos[0];
        //获得类型
        strType = strInfos[1];

        Back.setOnClickListener(new View.OnClickListener() {

            @Override
            public void onClick(View view) {

                Intent intent =new Intent();
                intent.setClass(InfoManageActivity.this,QueryMsgActivity.class);
                startActivity(intent);
            }
        });

        if(strType.equals("btnininfo")){

            tvTitle.setText("收入信息管理");
            Tb_user user_tb = UsersDAO.find(Integer.parseInt(strId));
            ChangeMoney.setText(String.valueOf(user_tb.getMoney()));
            ChangeTime.setText(user_tb.getTime());
            ChangeType.setPrompt(user_tb.getType());
            ChangePayer.setText(user_tb.getPayer());
            ChangeNote.setText(user_tb.getNote());
        }

        Modify.setOnClickListener(new View.OnClickListener() {

            @Override
            public void onClick(View v) {


                if(strType.equals("btnininfo")){

                    Tb_user user_tb = new Tb_user();
                    user_tb.setId(Integer.parseInt(strId));
                    user_tb.setMoney(Double.parseDouble(ChangeMoney.getText().toString()));
                    user_tb.setTime(ChangeTime.getText().toString());
                    user_tb.setType(ChangeType.getSelectedItem().toString());
                    user_tb.setPayer(ChangePayer.getText().toString());
                    user_tb.setNote(ChangeNote.getText().toString());
                    UsersDAO.update(user_tb);
                }

                ToastMsg("已经修改成功,");
            }
        });

        Delete.setOnClickListener(new View.OnClickListener() {

            @Override
            public void onClick(View v) {

                if(strType.equals("btnininfo")){

                    UsersDAO.deleteId(Integer.parseInt(strId));
                    ToastMsg("删除成功,返回查看吧");
                }
            }
        });
    }
// 信息提示类
    public void ToastMsg(String msg){

        Toast.makeText(this,msg,Toast.LENGTH_SHORT).show();
    }
}
activity_info_manage.xml
<?xml version="1.0" encoding="utf-8"?>
<androidx.constraintlayout.widget.ConstraintLayout
        xmlns:android="http://schemas.android.com/apk/res/android"
        xmlns:tools="http://schemas.android.com/tools"
        xmlns:app="http://schemas.android.com/apk/res-auto"
        android:layout_width="match_parent"
        android:layout_height="match_parent"
        android:background="#C2E7F1"
        tools:context=".InfoManageActivity">
    <LinearLayout
            android:layout_width="match_parent"
            android:layout_height="match_parent"
            android:orientation="vertical"
    >
        <LinearLayout
                android:orientation="horizontal"
                android:layout_width="match_parent"
                android:layout_height="wrap_content"
                android:layout_weight="3">
            <ImageButton
                    android:id="@+id/back"
                    android:background="@color/white"
                    android:src="@mipmap/back"
                    android:layout_width="wrap_content"
                    android:layout_height="wrap_content">

            </ImageButton>
            <TextView
                    android:id="@+id/tvTitle"
                    android:layout_weight="1"
                    android:background="#03A9F4"
                    android:layout_width="match_parent"
                    android:layout_height="wrap_content"
                    android:gravity="center_horizontal"
                    android:text="收入管理"
                    android:textSize="30dp"
                    android:textColor="#000000"
                    android:textStyle="bold"
            >

            </TextView>
        </LinearLayout>
        <LinearLayout
                android:background="#DCEFEF"
                android:layout_width="match_parent"
                android:layout_height="wrap_content"
                android:orientation="vertical"
                android:layout_weight="1">
            <RelativeLayout
                    android:layout_width="match_parent"
                    android:layout_height="match_parent"
                    android:padding="10dp">
                <TextView
                        android:id="@+id/Money"
                        android:layout_width="90dp"
                        android:textSize="20sp"
                        android:text="金  额:"
                        android:layout_height="wrap_content"
                        android:layout_alignBaseline="@id/ChangeMoney"
                        android:layout_alignBottom="@id/ChangeMoney"
                        android:layout_alignParentLeft="true"
                        android:layout_marginLeft="16dp">
                </TextView>
                <EditText
                        android:id="@+id/ChangeMoney"
                        android:layout_width="match_parent"
                        android:layout_height="wrap_content"
                        android:layout_toRightOf="@id/Money"
                        android:inputType="numberDecimal"
                        android:numeric="decimal"
                        android:maxLength="9"
                        android:hint="0.00">
                </EditText>
                <TextView
                        android:id="@+id/Time"
                        android:layout_width="90dp"
                        android:textSize="20sp"
                        android:text="时  间:"
                        android:layout_height="wrap_content"
                        android:layout_alignBaseline="@+id/ChangeTime"
                        android:layout_alignBottom="@+id/ChangeTime"
                        android:layout_alignParentLeft="true"
                        android:layout_marginLeft="16dp">
                </TextView>
                <EditText
                        android:id="@+id/ChangeTime"
                        android:layout_width="match_parent"
                        android:layout_height="wrap_content"
                        android:layout_below="@id/ChangeMoney"
                        android:layout_toRightOf="@id/Time"
                        android:inputType="datetime"
                        android:hint="2022-01-01">
                </EditText>
                <TextView
                        android:id="@+id/Type"
                        android:layout_width="90dp"
                        android:textSize="20sp"
                        android:text="类  别:"
                        android:layout_height="wrap_content"
                        android:layout_alignBaseline="@+id/ChangeType"
                        android:layout_alignBottom="@+id/ChangeType"
                        android:layout_alignParentLeft="true"
                        android:layout_marginLeft="16dp">
                </TextView>
                <Spinner
                        android:id="@+id/ChangeType"
                        android:layout_width="match_parent"
                        android:layout_height="wrap_content"
                        android:layout_toRightOf="@id/Type"
                        android:layout_below="@id/ChangeTime"
                        android:entries="@array/Type">
                </Spinner>
                <TextView
                        android:id="@+id/Payer"
                        android:layout_width="90dp"
                        android:textSize="20sp"
                        android:text="付款方:"
                        android:layout_height="wrap_content"
                        android:layout_alignBaseline="@id/ChangePayer"
                        android:layout_alignBottom="@id/ChangePayer"
                        android:layout_alignParentLeft="true"
                        android:layout_marginLeft="16dp">
                </TextView>
                <EditText
                        android:id="@+id/ChangePayer"
                        android:layout_width="match_parent"
                        android:layout_height="wrap_content"
                        android:layout_below="@id/ChangeType"
                        android:layout_toRightOf="@id/Payer"
                        android:singleLine="true">
                </EditText>
                <TextView
                        android:id="@+id/Note"
                        android:layout_width="90dp"
                        android:textSize="20sp"
                        android:text="备 注:"
                        android:layout_height="wrap_content"
                        android:layout_alignBaseline="@id/ChangeNote"
                        android:layout_alignTop="@id/ChangeNote"
                        android:layout_alignParentLeft="true"
                        android:layout_marginLeft="16dp">
                </TextView>
                <EditText
                        android:id="@+id/ChangeNote"
                        android:layout_width="match_parent"
                        android:layout_height="wrap_content"
                        android:layout_below="@id/ChangePayer"
                        android:layout_toRightOf="@id/Note"
                        android:singleLine="true">
                </EditText>
            </RelativeLayout>
        </LinearLayout>
        <LinearLayout
                android:orientation="vertical"
                android:layout_width="match_parent"
                android:layout_height="wrap_content"
                android:layout_weight="3">
            <RelativeLayout
                    android:layout_width="match_parent"
                    android:layout_height="match_parent"
                    android:padding="10dp">

                // 修改
                <Button
                        android:id="@+id/Modify"
                        android:background="#00BCD4"
                        android:layout_width="80dp"
                        android:layout_height="wrap_content"
                        android:layout_alignParentRight="true"
                        android:layout_marginLeft="10dp"
                        android:text="修改"
                >

                </Button>
                // 删除
                <Button
                        android:id="@+id/Delete"
                        android:background="#00BCD4"
                        android:layout_width="80dp"
                        android:layout_height="wrap_content"
                        android:text="删除"
                >

                </Button>
            </RelativeLayout>
        </LinearLayout>
    </LinearLayout>
</androidx.constraintlayout.widget.ConstraintLayout>
5、问题及解决方法
1、当修改成功后返回查看页面实现刷新效果
添加返回按钮 使用重新加载页面的返回刷新页面数据
        Back.setOnClickListener(new View.OnClickListener() {

            @Override
            public void onClick(View view) {

                Intent intent =new Intent();
                intent.setClass(InfoManageActivity.this,QueryMsgActivity.class);
                startActivity(intent);
            }
        });
实验十、ListView主页面
1、实验名称
ListView主页面
2、实验目的
1、要求学生掌握ListView显示图与文字的应用实例。
2、要求学生掌握Intent显示调用组件的应用实例。
3、实验工具
计算机操作系统采用Windows 7 等以上版本操作系统,Intellij idea开发环境。
4、实验内容
完成ListView控件项与图片和文字的绑定。要求至少显示五个ListView控件项。在实验报告中记录实验过程中出现的问题与解决方法,并把程序的运行结果和编写的程序代码记录到实验报告中。
4.1、程序清单
activity_home.xml
HomePageActivity.java
ViewHolder.java
Picture.java
PictureAdapter.java
4.2、程序思想
此实验配合实验十二一起完成利用GridView 显示主页视图内容,更改HomePageActivity活动类代码和activity_home.xml 代码
HomePageActivity监听点击事件使用switch 语句判断获取点击的项目,并设置完成相应的活动事件。
Picture的一个类转换成PictureAdapter类中的一个数组pictures,将PictureAdapter类与GridView绑定。Picture用来存放图片和文字位置,通过get和set方法return数据和对成员赋值。PictureAdapter.java继承父类BaseAdaper,定义LayoutInflater和pictures,定义有参数构造函数,pictures是我们后续数据的来源。获得数据项,若数据为空则返回0,不空则返回项数,用object getItem(int arg0)索引表示要获得哪项。然后继续获得视图View,构建ViewHolder返回arg1,将ViewHolder与arg1建立联系并赋值。
4.3、实验效果
4.4、实验代码
activity_home.xml
<?xml version="1.0" encoding="utf-8"?>
<androidx.constraintlayout.widget.ConstraintLayout
        xmlns:android="http://schemas.android.com/apk/res/android"
        xmlns:tools="http://schemas.android.com/tools"
        xmlns:app="http://schemas.android.com/apk/res-auto"
        android:layout_width="match_parent"
        android:layout_height="match_parent"
        tools:context=".HomePageActivity">

    <LinearLayout
            android:orientation="vertical"
            android:layout_width="match_parent"
            android:layout_height="match_parent">
        <LinearLayout
                android:layout_marginTop="10dp"
                android:background="#49BECD"
                android:orientation="vertical"
                android:layout_width="match_parent"
                android:layout_height="wrap_content"
                tools:ignore="MissingConstraints">
            <TextView
                    android:layout_gravity="center"
                    android:text="我的资金系统"
                    android:textSize="25dp"
                    android:layout_width="wrap_content"
                    android:layout_height="wrap_content">
            </TextView>
        </LinearLayout>
        <LinearLayout
                android:layout_width="wrap_content"
                android:layout_height="wrap_content">
            <GridView
                    xmlns:android="http://schemas.android.com/apk/res/android"
                      android:layout_width="match_parent"
                      android:layout_height="match_parent"
                      android:id="@+id/GridView"
                      android:columnWidth="90dp"
                      android:numColumns="auto_fit"
                      android:verticalSpacing="10dp"
                      android:horizontalSpacing="10dp"
                      android:stretchMode="spacingWidthUniform"
                      android:gravity="center">

            </GridView>

        </LinearLayout>

    </LinearLayout>
</androidx.constraintlayout.widget.ConstraintLayout>
HomePageActivity.java
package com.example.dbproject;
import androidx.appcompat.app.AppCompatActivity;
import android.os.Bundle;
import android.content.Intent;
import android.view.View;
import android.widget.AdapterView;
import android.widget.GridView;
public class HomePageActivity extends AppCompatActivity {
GridView GridView; // 定义控件
//主界面图标文本信息
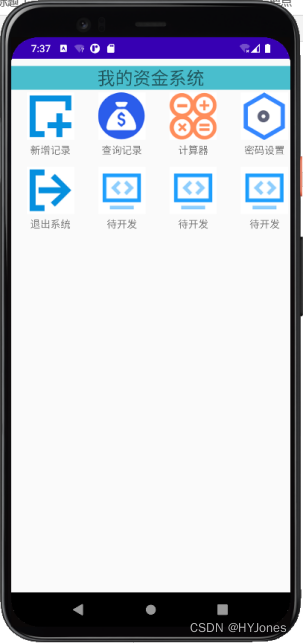
String[] Titles = new String[]{
"新增记录","查询记录","计算器","密码设置","退出系统","待开发","待开发","待开发"};
//主界面图标的图片信息
int[] images = new int[]{
R.drawable.add,R.drawable.salary,
R.drawable.calculator,R.drawable.set,
R.drawable.quit,R.drawable.tool,R.drawable.tool,R.drawable.tool};
@Override
protected void onCreate(Bundle savedInstanceState) {
super.onCreate(savedInstanceState);
setContentView(R.layout.activity_home);
// 获取控件
GridView=(GridView)findViewById(R.id.GridView);
// 创建适配器对象 图片适配器对象
PictureAdapter adapter = new PictureAdapter(Titles,images,this);
// 控件绑定适配器
GridView.setAdapter(adapter);
// 控件监听
GridView.setOnItemClickListener(new AdapterView.OnItemClickListener() {
@Override
public void onItemClick(AdapterView<?> parent, View view, int position, long id) {
Intent intent =null;
switch (position){
case 0:
//增加收入记录
intent = new Intent(HomePageActivity.this, AddMsgActivity.class);
startActivity(intent);
break;
case 1:
//查询收入列表
intent = new Intent(HomePageActivity.this, QueryMsgActivity.class);
startActivity(intent);
break;
case 2:
//计算器
intent = new Intent(HomePageActivity.this,CalculatorActivity.class);
startActivity(intent);
break;
case 3:
//管理员设置密码
intent = new Intent(HomePageActivity.this, SetPwdActivity.class);
startActivity(intent);
break;
case 4:
//退出系统
finish();
//查询
//注册
}
}
});
}
}
PictureAdapter.java
package com.example.dbproject;
import android.content.Context;
import android.view.LayoutInflater;
import android.view.View;
import android.view.ViewGroup;
import android.widget.BaseAdapter;
import android.widget.ImageView;
import android.widget.TextView;
import java.util.ArrayList;
import java.util.List;
public class PictureAdapter extends BaseAdapter {

    private LayoutInflater inflater;
    private List<Picture> pictures;

    public PictureAdapter(String[] titles, int[] images, Context context){

        super();
        pictures = new ArrayList<Picture>();
        inflater = LayoutInflater.from(context);
        for(int i=0;i<images.length;i++){

            Picture picture = new Picture(titles[i],images[i]);
            pictures.add(picture);
        }
    }
    @Override
    public int getCount(){

        if(null != pictures){

            return pictures.size();
        }
        else{

            return 0;
        }
    }

    @Override
    public Object getItem(int arg0){

        return pictures.get(arg0);
    }

    @Override
    public long getItemId(int arg0){

        return arg0;
    }

    @Override
    public View getView(int arg0, View arg1, ViewGroup arg2){

        ViewHolder viewHolder;
        if(arg1 == null){

            arg1= inflater.inflate(R.layout.gvitem,null);
            viewHolder = new ViewHolder();
            viewHolder.title = (TextView)arg1.findViewById(R.id.itemTitle);
            viewHolder.image = (ImageView)arg1.findViewById(R.id.itemImage);
            arg1.setTag(viewHolder);
        }
        else{

            viewHolder = (ViewHolder)arg1.getTag();
        }
        viewHolder.title.setText(pictures.get(arg0).getTitle());
        viewHolder.image.setImageResource(pictures.get(arg0).getImageId());
        return arg1;
    }
}
Picture.java
package com.example.dbproject;

public class Picture {

    private String title;
    private int imageId;

    public Picture(){

        super();
    }

    public Picture(String title,int imageId){

        super();
        this.title = title;
        this.imageId = imageId;
    }

    public String getTitle(){

        return this.title;
    }

    public void setTitle(String title){

        this.title =title;
    }

    public int getImageId(){

        return this.imageId;
    }

    public void setImageId(){

        this.imageId = imageId;
    }

}
ViewHolder.java
package com.example.dbproject;

import android.widget.ImageView;
import android.widget.TextView;

public class ViewHolder {

    public TextView title;
    public ImageView image;
}
智能推荐
艾美捷Epigentek DNA样品的超声能量处理方案-程序员宅基地
文章浏览阅读15次。空化气泡的大小和相应的空化能量可以通过调整完全标度的振幅水平来操纵和数字控制。通过强调超声技术中的更高通量处理和防止样品污染,Epigentek EpiSonic超声仪可以轻松集成到现有的实验室工作流程中,并且特别适合与表观遗传学和下一代应用的兼容性。Epigentek的EpiSonic已成为一种有效的剪切设备,用于在染色质免疫沉淀技术中制备染色质样品,以及用于下一代测序平台的DNA文库制备。该装置的经济性及其多重样品的能力使其成为每个实验室拥有的经济高效的工具,而不仅仅是核心设施。
11、合宙Air模块Luat开发:通过http协议获取天气信息_合宙获取天气-程序员宅基地
文章浏览阅读4.2k次,点赞3次,收藏14次。目录点击这里查看所有博文 本系列博客,理论上适用于合宙的Air202、Air268、Air720x、Air720S以及最近发布的Air720U(我还没拿到样机,应该也能支持)。 先不管支不支持,如果你用的是合宙的模块,那都不妨一试,也许会有意外收获。 我使用的是Air720SL模块,如果在其他模块上不能用,那就是底层core固件暂时还没有支持,这里的代码是没有问题的。例程仅供参考!..._合宙获取天气
EasyMesh和802.11s对比-程序员宅基地
文章浏览阅读7.7k次,点赞2次,收藏41次。1 关于meshMesh的意思是网状物,以前读书的时候,在自动化领域有传感器自组网,zigbee、蓝牙等无线方式实现各个网络节点消息通信,通过各种算法,保证整个网络中所有节点信息能经过多跳最终传递到目的地,用于数据采集。十多年过去了,在无线路由器领域又把这个mesh概念翻炒了一下,各大品牌都推出了mesh路由器,大多数是3个为一组,实现在面积较大的住宅里,增强wifi覆盖范围,智能在多热点之间切换,提升上网体验。因为节点基本上在3个以内,所以mesh的算法不必太复杂,组网形式比较简单。各厂家都自定义了组_802.11s
线程的几种状态_线程状态-程序员宅基地
文章浏览阅读5.2k次,点赞8次,收藏21次。线程的几种状态_线程状态
stack的常见用法详解_stack函数用法-程序员宅基地
文章浏览阅读4.2w次,点赞124次,收藏688次。stack翻译为栈,是STL中实现的一个后进先出的容器。要使用 stack,应先添加头文件include<stack>,并在头文件下面加上“ using namespacestd;"1. stack的定义其定义的写法和其他STL容器相同, typename可以任意基本数据类型或容器:stack<typename> name;2. stack容器内元素的访问..._stack函数用法
2018.11.16javascript课上随笔(DOM)-程序员宅基地
文章浏览阅读71次。<li> <a href = "“#”>-</a></li><li>子节点:文本节点(回车),元素节点,文本节点。不同节点树: 节点(各种类型节点)childNodes:返回子节点的所有子节点的集合,包含任何类型、元素节点(元素类型节点):child。node.getAttribute(at...
随便推点
layui.extend的一点知识 第三方模块base 路径_layui extend-程序员宅基地
文章浏览阅读3.4k次。//config的设置是全局的layui.config({ base: '/res/js/' //假设这是你存放拓展模块的根目录}).extend({ //设定模块别名 mymod: 'mymod' //如果 mymod.js 是在根目录,也可以不用设定别名 ,mod1: 'admin/mod1' //相对于上述 base 目录的子目录}); //你也可以忽略 base 设定的根目录,直接在 extend 指定路径(主要:该功能为 layui 2.2.0 新增)layui.exten_layui extend
5G云计算:5G网络的分层思想_5g分层结构-程序员宅基地
文章浏览阅读3.2k次,点赞6次,收藏13次。分层思想分层思想分层思想-1分层思想-2分层思想-2OSI七层参考模型物理层和数据链路层物理层数据链路层网络层传输层会话层表示层应用层OSI七层模型的分层结构TCP/IP协议族的组成数据封装过程数据解封装过程PDU设备与层的对应关系各层通信分层思想分层思想-1在现实生活种,我们在喝牛奶时,未必了解他的生产过程,我们所接触的或许只是从超时购买牛奶。分层思想-2平时我们在网络时也未必知道数据的传输过程我们的所考虑的就是可以传就可以,不用管他时怎么传输的分层思想-2将复杂的流程分解为几个功能_5g分层结构
基于二值化图像转GCode的单向扫描实现-程序员宅基地
文章浏览阅读191次。在激光雕刻中,单向扫描(Unidirectional Scanning)是一种雕刻技术,其中激光头只在一个方向上移动,而不是来回移动。这种移动方式主要应用于通过激光逐行扫描图像表面的过程。具体而言,单向扫描的过程通常包括以下步骤:横向移动(X轴): 激光头沿X轴方向移动到图像的一侧。纵向移动(Y轴): 激光头沿Y轴方向开始逐行移动,刻蚀图像表面。这一过程是单向的,即在每一行上激光头只在一个方向上移动。返回横向移动: 一旦一行完成,激光头返回到图像的一侧,准备进行下一行的刻蚀。
算法随笔:强连通分量-程序员宅基地
文章浏览阅读577次。强连通:在有向图G中,如果两个点u和v是互相可达的,即从u出发可以到达v,从v出发也可以到达u,则成u和v是强连通的。强连通分量:如果一个有向图G不是强连通图,那么可以把它分成躲个子图,其中每个子图的内部是强连通的,而且这些子图已经扩展到最大,不能与子图外的任一点强连通,成这样的一个“极大连通”子图是G的一个强连通分量(SCC)。强连通分量的一些性质:(1)一个点必须有出度和入度,才会与其他点强连通。(2)把一个SCC从图中挖掉,不影响其他点的强连通性。_强连通分量
Django(2)|templates模板+静态资源目录static_django templates-程序员宅基地
文章浏览阅读3.9k次,点赞5次,收藏18次。在做web开发,要给用户提供一个页面,页面包括静态页面+数据,两者结合起来就是完整的可视化的页面,django的模板系统支持这种功能,首先需要写一个静态页面,然后通过python的模板语法将数据渲染上去。1.创建一个templates目录2.配置。_django templates
linux下的GPU测试软件,Ubuntu等Linux系统显卡性能测试软件 Unigine 3D-程序员宅基地
文章浏览阅读1.7k次。Ubuntu等Linux系统显卡性能测试软件 Unigine 3DUbuntu Intel显卡驱动安装,请参考:ATI和NVIDIA显卡请在软件和更新中的附加驱动中安装。 这里推荐: 运行后,F9就可评分,已测试显卡有K2000 2GB 900+分,GT330m 1GB 340+ 分,GT620 1GB 340+ 分,四代i5核显340+ 分,还有写博客的小盒子100+ 分。relaybot@re...