AES-GCM加密算法-程序员宅基地
技术标签: 安全
AES是一种对称加密算法,它的相关概念在此不赘述。
GCM ( Galois/Counter Mode) 指的是该对称加密采用Counter模式,并带有GMAC消息认证码。
在详细介绍AES-GCM之前,我们先了解一些相关概念。
下文中出现的符号:
| Ek | 使用秘钥k对输入做对称加密运算 |
| XOR | 异或运算 |
| Mh | 将输入与秘钥h在有限域GF(2^128)上做乘法 |
ECB( Electronic Mode 电子密码本模式)
当我们有一段明文,需要对其进行AES加密时,需要对明文进行分组,分组长度可为128,256,或512bits。采用ECB模式的分组密码算法加密过程如下图:
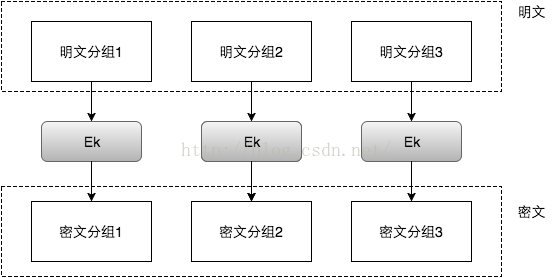
由上图可以看出,明文中重复的排列会反映在密文中。
并且,当密文被篡改时,解密后对应的明文分组也会出错,且解密者察觉不到密文被篡改了。也就是说,ECB不能提供对密文的完整性校验。
因此,在任何情况下都不推荐使用ECB模式。
CTR ( CounTeR 计数器模式)
在计数器模式下,我们不再对密文进行加密,而是对一个逐次累加的计数器进行加密,用加密后的比特序列与明文分组进行 XOR得到密文。过程如下图:
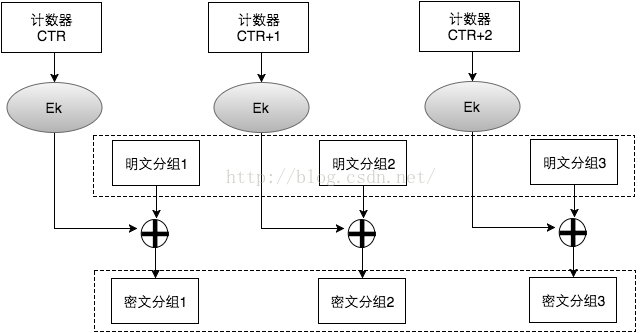
计数器模式下,每次与明文分组进行XOR的比特序列是不同的,因此,计数器模式解决了ECB模式中,相同的明文会得到相同的密文的问题。CBC,CFB,OFB模式都能解决这个问题,但CTR的另两个优点是:1)支持加解密并行计算,可事先进行加解密准备;2)错误密文中的对应比特只会影响明文中的对应比特等优点。
但CTR仍然不能提供密文消息完整性校验的功能。
有的人可能会想到,如果将密文的hash值随密文一起发送,密文接收者对收到的密文计算hash值,与收到的hash值进行比对,这样是否就能校验消息的完整性呢?
再仔细想想,就能发现这其中的漏洞。当篡改者截获原始的密文消息时,先篡改密文,而后计算篡改后的密文hash, 替换掉原始消息中的密文hash。这样,消息接收者仍然没有办法发现对源密文的篡改。可见,使用单向散列函数计算hash值仍然不能解决消息完整性校验的问题。
MAC ( Message Authentication Code, 消息验证码)
想要校验消息的完整性,必须引入另一个概念:消息验证码。消息验证码是一种与秘钥相关的单项散列函数。
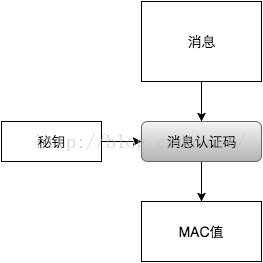
密文的收发双发需要提前共享一个秘钥。密文发送者将密文的MAC值随密文一起发送,密文接收者通过共享秘钥计算收到密文的MAC值,这样就可以对收到的密文做完整性校验。当篡改者篡改密文后,没有共享秘钥,就无法计算出篡改后的密文的MAC值。
如果生成密文的加密模式是CTR,或者是其他有初始IV的加密模式,别忘了将初始的计时器或初始向量的值作为附加消息与密文一起计算MAC。
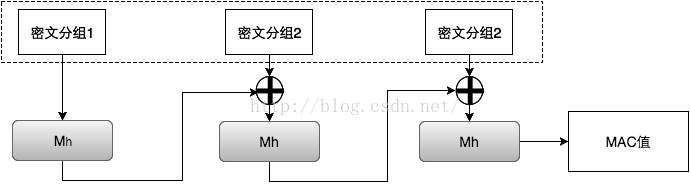
GMAC ( Galois message authentication code mode, 伽罗瓦消息验证码 )
对应到上图中的消息认证码,GMAC就是利用伽罗华域(Galois Field,GF,有限域)乘法运算来计算消息的MAC值。假设秘钥长度为128bits, 当密文大于128bits时,需要将密文按128bits进行分组。应用流程如下图:
GCM( Galois/Counter Mode )
GCM中的G就是指GMAC,C就是指CTR。
GCM可以提供对消息的加密和完整性校验,另外,它还可以提供附加消息的完整性校验。在实际应用场景中,有些信息是我们不需要保密,但信息的接收者需要确认它的真实性的,例如源IP,源端口,目的IP,IV,等等。因此,我们可以将这一部分作为附加消息加入到MAC值的计算当中。下图的Ek表示用对称秘钥k对输入做AES运算。最后,密文接收者会收到密文、IV(计数器CTR的初始值)、MAC值。

AES(Advanced Encryption Standard)即高级加密标准,由美国国家标准和技术协会(NIST)于2000年公布,它是一种对称加密算法。关于AES的更多介绍可以参考:https://blog.csdn.net/fengbingchun/article/details/100139524
AES的GCM(Galois/Counter Mode)模式本质上是AES的CTR模式(计数器模式)加上GMAC(Galois Message Authentication Code, 伽罗华消息认证码)进行哈希计算的一种组合模式。GCM可以提供对消息的加密和完整性校验,另外,它还可以提供附加消息的完整性校验。
OpenSSL中的EVP接口支持执行经过身份验证的加密和解密的功能,以及将未加密的关联数据附加到消息的选项。这种带有关联数据的身份验证加密(AEAD, Authenticated-Encryption with Associated-Data)方案通过对数据进行加密来提供机密性,并通过在加密数据上创建MAC标签来提供真实性保证。
Key:对称密钥,它的长度可以为128、192、256bits,用来加密明文的密码。
IV(Initialisation Vector):初始向量,它的选取必须随机。通常以明文的形式和密文一起传送。它的作用和MD5的”加盐”有些类似,目的是防止同样的明文块,始终加密成同样的密文块。
AAD(Additional Authenticated Data):附加身份验证数据。AAD数据不需要加密,通常以明文形式与密文一起传递给接收者。
Mac tag(MAC标签):将确保数据在传输和存储过程中不会被意外更改或恶意篡改。该标签随后在解密操作期间使用,以确保密文和AAD未被篡改。在加密时,Mac tag由明文、密钥Key、IV、AAD共同产生。
以下为测试代码:
namespace {
static const unsigned char gcm_key[] = { // 32 bytes, Key
0xee, 0xbc, 0x1f, 0x57, 0x48, 0x7f, 0x51, 0x92, 0x1c, 0x04, 0x65, 0x66,
0x5f, 0x8a, 0xe6, 0xd1, 0x65, 0x8b, 0xb2, 0x6d, 0xe6, 0xf8, 0xa0, 0x69,
0xa3, 0x52, 0x02, 0x93, 0xa5, 0x72, 0x07, 0x8f
};
static const unsigned char gcm_iv[] = { // 12 bytes, IV(Initialisation Vector)
0x99, 0xaa, 0x3e, 0x68, 0xed, 0x81, 0x73, 0xa0, 0xee, 0xd0, 0x66, 0x84
};
// Additional Authenticated Data(AAD): it is not encrypted, and is typically passed to the recipient in plaintext along with the ciphertext
static const unsigned char gcm_aad[] = { // 16 bytes
0x4d, 0x23, 0xc3, 0xce, 0xc3, 0x34, 0xb4, 0x9b, 0xdb, 0x37, 0x0c, 0x43,
0x7f, 0xec, 0x78, 0xde
};
std::unique_ptr<unsigned char[]> aes_gcm_encrypt(const char* plaintext, int& length, unsigned char* tag)
{
EVP_CIPHER_CTX* ctx = EVP_CIPHER_CTX_new();
// Set cipher type and mode
EVP_EncryptInit_ex(ctx, EVP_aes_256_gcm(), nullptr, nullptr, nullptr);
// Set IV length if default 96 bits is not appropriate
EVP_CIPHER_CTX_ctrl(ctx, EVP_CTRL_AEAD_SET_IVLEN, sizeof(gcm_iv), nullptr);
// Initialise key and IV
EVP_EncryptInit_ex(ctx, nullptr, nullptr, gcm_key, gcm_iv);
// Zero or more calls to specify any AAD
int outlen;
EVP_EncryptUpdate(ctx, nullptr, &outlen, gcm_aad, sizeof(gcm_aad));
unsigned char outbuf[1024];
// Encrypt plaintext
EVP_EncryptUpdate(ctx, outbuf, &outlen, (const unsigned char*)plaintext, strlen(plaintext));
length = outlen;
std::unique_ptr<unsigned char[]> ciphertext(new unsigned char[length]);
memcpy(ciphertext.get(), outbuf, length);
// Finalise: note get no output for GCM
EVP_EncryptFinal_ex(ctx, outbuf, &outlen);
// Get tag
EVP_CIPHER_CTX_ctrl(ctx, EVP_CTRL_AEAD_GET_TAG, 16, outbuf);
memcpy(tag, outbuf, 16);
// Clean up
EVP_CIPHER_CTX_free(ctx);
return ciphertext;
}
std::unique_ptr<unsigned char[]> aes_gcm_decrypt(const unsigned char* ciphertext, int& length, const unsigned char* tag)
{
EVP_CIPHER_CTX* ctx = EVP_CIPHER_CTX_new();
// Select cipher
EVP_DecryptInit_ex(ctx, EVP_aes_256_gcm(), nullptr, nullptr, nullptr);
// Set IV length, omit for 96 bits
EVP_CIPHER_CTX_ctrl(ctx, EVP_CTRL_AEAD_SET_IVLEN, sizeof(gcm_iv), nullptr);
// Specify key and IV
EVP_DecryptInit_ex(ctx, nullptr, nullptr, gcm_key, gcm_iv);
int outlen;
// Zero or more calls to specify any AAD
EVP_DecryptUpdate(ctx, nullptr, &outlen, gcm_aad, sizeof(gcm_aad));
unsigned char outbuf[1024];
// Decrypt plaintext
EVP_DecryptUpdate(ctx, outbuf, &outlen, ciphertext, length);
// Output decrypted block
length = outlen;
std::unique_ptr<unsigned char[]> plaintext(new unsigned char[length]);
memcpy(plaintext.get(), outbuf, length);
// Set expected tag value
EVP_CIPHER_CTX_ctrl(ctx, EVP_CTRL_AEAD_SET_TAG, 16, (void*)tag);
// Finalise: note get no output for GCM
int rv = EVP_DecryptFinal_ex(ctx, outbuf, &outlen);
// Print out return value. If this is not successful authentication failed and plaintext is not trustworthy.
fprintf(stdout, "Tag Verify %s\n", rv > 0 ? "Successful!" : "Failed!");
EVP_CIPHER_CTX_free(ctx);
return plaintext;
}
} // namespace
int test_openssl_aes_gcm()
{
/* reference:
https://github.com/openssl/openssl/blob/master/demos/evp/aesgcm.c
https://wiki.openssl.org/index.php/EVP_Authenticated_Encryption_and_Decryption
*/
fprintf(stdout, "Start AES GCM 256 Encrypt:\n");
const char* plaintext = "1234567890ABCDEFG!@#$%^&*()_+[]{};':,.<>/?|";
fprintf(stdout, "src plaintext: %s, length: %d\n", plaintext, strlen(plaintext));
int length = 0;
std::unique_ptr<unsigned char[]> tag(new unsigned char[16]);
std::unique_ptr<unsigned char[]> ciphertext = aes_gcm_encrypt(plaintext, length, tag.get());
fprintf(stdout, "length: %d, ciphertext: ", length);
for (int i = 0; i < length; ++i)
fprintf(stdout, "%02x ", ciphertext.get()[i]);
fprintf(stdout, "\nTag: ");
for (int i = 0; i < 16; ++i)
fprintf(stdout, "%02x ", tag.get()[i]);
fprintf(stdout, "\n");
fprintf(stdout, "\nStart AES GCM 256 Decrypt:\n");
std::unique_ptr<unsigned char[]> result = aes_gcm_decrypt(ciphertext.get(), length, tag.get());
fprintf(stdout, "length: %d, decrypted plaintext: ", length);
for (int i = 0; i < length; ++i)
fprintf(stdout, "%c", result.get()[i]);
fprintf(stdout, "\n");
if (strncmp(plaintext, (const char*)result.get(), length) == 0) {
fprintf(stdout, "decrypt success\n");
return 0;
} else {
fprintf(stderr, "decrypt fail\n");
return -1;
}
}
在Windows上执行结果如下:
以上是在OpenSSL较老的版本1.0.1g上执行的,在最新版1.1.1g上以上代码也同样可以执行。
在Windows上编译1.1.1g版本源码执行命令如下:no-asm选项为不开启汇编模式,编译release则将debug-VC-WIN64A改为VC-WIN64即可。
perl Configure debug-VC-WIN64A no-asm --prefix=D:\DownLoad\openssl\win64_debug
nmake
nmake install
在Linux上编译1.1.1g版本源码执行命令如下:
./config --prefix=/home/sensetime/Downloads/openssl/install
make
make insall
在1.1.1g源码的demos/evp目录下给出了gcm的示例aesgcm.c,这里将以上测试代码新加为aesgcm2.cpp,编译脚本如下:
#! /bin/bash
g++ -o test_aesgcm aesgcm.c -L ../../ -lcrypto -lssl -I../../include
g++ -o test_aesgcm2 aesgcm2.cpp -std=c++11 -L ../../ -lcrypto -lssl -I../../include
g++ -o test_aesccm aesccm.c -L ../../ -lcrypto -lssl -I../../include
执行结果如下:注意如果在Windows上执行aesgcm2.cpp,需要额外的 #include <openssl/applink.c>
GitHub:https://github.com//fengbingchun/OpenSSL_Test
----------------------------------------------------------------------------------------------------------------
转自:http://www.thinkemb.com/wordpress/?p=18
参考:http://blog.csdn.net/shuanyancao/article/details/8985963
Openssl是很常见的C接口的库,个人觉得易用。以下是AES加密的使用备忘。如果你有一定的密码学基础,那么就很好理解。代码是从网上弄下来的(原始地址已经忘记了),然后在尝试的过程中改了一点东西。其它的cbc、cfb、ecb加密方式的用法都是类似的,只是函数名有点区别,就不一一列举了。
【yasi】IV: Initialization Vector,即初始化向量
一、接口简介
-
//设置加密密钥,使用字符缓冲区 -
int AES_set_encrypt_key( -
const unsigned char *userKey, -
const int bits, -
AES_KEY *key); -
//设置解密密钥,同样适用字符缓冲区 -
int AES_set_decrypt_key( -
const unsigned char *userKey, -
const int bits, -
AES_KEY *key); -
//加解密的接口,通过最后的enc来区分是加密还是解密操作 -
//每次执行AES_cbc_encrypt后,iv(向量)会被更新, -
//所以需要自己保存它。 -
void AES_cbc_encrypt( -
const unsigned char *in, -
unsigned char *out, -
const unsigned long length, -
const AES_KEY *key, -
unsigned char *ivec, -
const int enc);
二、一个简单的Makefile
【yasi】针对CentOS环境,做了修改
LNK_OPT = -g -L/usr/lib64/ -lssl

all:
        rm -f codec
        g++ -g aes_codec.cpp -o codec $(LNK_OPT)

clean:
        rm -f codec
三、示例代码
【yasi】对源链接的代码做了点修改:随机明码 改 静态明码
-
#include <stdio.h> -
#include <string.h> -
#include <openssl/aes.h> -
#include <openssl/rand.h> -
/* file testaes.cpp */ -
static void hexdump( -
FILE *f, -
const char *title, -
const unsigned char *s, -
int l) -
{ -
int n = 0; -
fprintf(f, "%s", title); -
for (; n < l; ++n) { -
if ((n % 16) == 0) { -
fprintf(f, "\n%04x", n); -
} -
fprintf(f, " %02x", s[n]); -
} -
fprintf(f, "\n"); -
} -
int main(int argc, char **argv) -
{ -
//128bits key. -
unsigned char rkey[16]; -
//Internal key. -
AES_KEY key; -
//Testdata. -
// [yasi] Make static content instead of random text -
unsigned char plaintext[AES_BLOCK_SIZE * 4] = -
{ -
'a', 'b', 'c', 'd', 'e', 'f', 'g', 'i', 'a', 'b', 'c', 'd', 'e', 'f', 'g', 'i', -
'0', '1', '2', '3', '4', '5', '6', '7', '0', '1', '2', '3', '4', '5', '6', '7', -
'a', 'b', 'c', 'd', 'e', 'f', 'g', 'i', 'a', 'b', 'c', 'd', 'e', 'f', 'g', 'i', -
'0', '1', '2', '3', '4', '5', '6', '7', '0', '1', '2', '3', '4', '5', '6', '7' -
}; -
unsigned char ciphertext[AES_BLOCK_SIZE * 4]; -
unsigned char checktext[AES_BLOCK_SIZE * 4]; -
//Init vector. -
unsigned char iv[AES_BLOCK_SIZE * 4]; -
//Save vector. -
unsigned char saved_iv[AES_BLOCK_SIZE * 4]; -
int nr_of_bits = 0; -
int nr_of_bytes = 0; -
//Zeror buffer. -
memset(ciphertext, 0, sizeof ciphertext); -
memset(checktext, 0, sizeof checktext); -
//Generate random -
RAND_pseudo_bytes(rkey, sizeof rkey); -
RAND_pseudo_bytes(saved_iv, sizeof saved_iv); -
hexdump(stdout, "== rkey ==", -
rkey, -
sizeof(rkey)); -
hexdump(stdout, "== iv ==", -
saved_iv, -
sizeof(saved_iv)); -
printf("\n"); -
hexdump(stdout, "== plaintext ==", -
plaintext, -
sizeof(plaintext)); -
printf("\n"); -
//Entrypt -
memcpy(iv, saved_iv, sizeof(iv)); -
nr_of_bits = 8 * sizeof(rkey); -
AES_set_encrypt_key(rkey, nr_of_bits, &key); -
nr_of_bytes = sizeof(plaintext); -
AES_cbc_encrypt(plaintext, -
ciphertext, -
nr_of_bytes, -
&key, -
iv, -
AES_ENCRYPT); -
hexdump(stdout, "== ciphertext ==", -
ciphertext, -
sizeof(ciphertext)); -
printf("\n"); -
// [yasi] iv is changed in encryption -
hexdump(stdout, "== iv changed ==", -
iv, -
sizeof(iv)); -
printf("\n"); -
//Decrypt -
memcpy(iv, saved_iv, sizeof(iv)); // [yasi] without this line, decrypt will fail because iv is changed in encryption -
nr_of_bits = 8 * sizeof(rkey); -
AES_set_decrypt_key(rkey, nr_of_bits, &key); -
nr_of_bytes = sizeof(ciphertext); -
AES_cbc_encrypt(ciphertext, -
checktext, -
nr_of_bytes, -
&key, iv, -
AES_DECRYPT); -
hexdump(stdout, "== checktext ==", -
checktext, -
sizeof(checktext)); -
printf("\n"); -
return 0; -
}
【yasi 运行结果】
[root@ampcommons02 aes-codec]# ./codec
== rkey ==
0000 81 ac 9b 38 1c 02 c5 c8 1d 7c a0 3f 87 be f2 c6
== iv ==
0000 34 a2 f1 f5 f3 93 76 32 cd 77 ad fb c8 82 f2 1b
0010 f3 cc 51 f6 35 f3 49 8d 44 97 8c 2c 89 50 0d d7
0020 68 21 d7 2f 0a 90 29 c1 dd c9 39 bc 7c 4f 18 2f
0030 04 cc 42 5e 84 8e fe a9 c5 49 00 9f 30 55 94 c0

== plaintext ==
0000 61 62 63 64 65 66 67 69 61 62 63 64 65 66 67 69
0010 30 31 32 33 34 35 36 37 30 31 32 33 34 35 36 37
0020 61 62 63 64 65 66 67 69 61 62 63 64 65 66 67 69
0030 30 31 32 33 34 35 36 37 30 31 32 33 34 35 36 37

== ciphertext ==
0000 c4 63 72 29 21 28 7b a2 27 24 4a e4 bb 95 1a d1
0010 b8 13 0e 77 0c 8a a4 09 2f ca 85 43 41 b5 5b d5
0020 a3 60 92 58 5b dd 45 0c e2 62 af f9 43 81 d7 06
0030 41 8e 85 28 3e eb 72 b5 ee 84 8c 27 7e 67 20 f6

== iv changed ==
0000 41 8e 85 28 3e eb 72 b5 ee 84 8c 27 7e 67 20 f6
0010 f3 cc 51 f6 35 f3 49 8d 44 97 8c 2c 89 50 0d d7
0020 68 21 d7 2f 0a 90 29 c1 dd c9 39 bc 7c 4f 18 2f
0030 04 cc 42 5e 84 8e fe a9 c5 49 00 9f 30 55 94 c0

== checktext ==
0000 61 62 63 64 65 66 67 69 61 62 63 64 65 66 67 69
0010 30 31 32 33 34 35 36 37 30 31 32 33 34 35 36 37
0020 61 62 63 64 65 66 67 69 61 62 63 64 65 66 67 69
0030 30 31 32 33 34 35 36 37 30 31 32 33 34 35 36 37
可见,encryption之后,IV立即被修改了。所以,为了能正确decrypt,在decrypt时,必须使用先前encrypt时的IV,即代码第98行。
【第二次运行的结果】
[root@ampcommons02 aes-codec]# ./codec
== rkey ==
0000 29 68 75 4d a5 9e 83 9a ed f8 ec bc 2e b8 09 7e
== iv ==
0000 b8 21 09 de 8f 58 6e be 73 be a7 10 fb 91 87 65
0010 65 9c d7 0e 4c 88 d2 65 ae de 0b 49 40 c7 75 df
0020 19 69 53 0b 11 5d ac e7 08 f6 ae df 16 66 e0 13
0030 75 41 f7 bb be 56 a1 dd a7 3e fb 4e 5d 9e e4 a2

== plaintext ==
0000 61 62 63 64 65 66 67 69 61 62 63 64 65 66 67 69
0010 30 31 32 33 34 35 36 37 30 31 32 33 34 35 36 37
0020 61 62 63 64 65 66 67 69 61 62 63 64 65 66 67 69
0030 30 31 32 33 34 35 36 37 30 31 32 33 34 35 36 37

== ciphertext ==
0000 5e 85 9c e8 65 d6 3b f9 03 9a a0 b5 78 bd f6 d4
0010 11 70 94 c1 c3 78 9a 1d 12 9a 84 48 3a 70 88 13
0020 d6 b5 bf c6 e8 e1 76 dc 3c b9 b0 4e b9 bb c4 74
0030 35 3d ac fc 29 e3 a0 64 d7 76 ab 76 c7 af dd 39

== iv changed ==
0000 35 3d ac fc 29 e3 a0 64 d7 76 ab 76 c7 af dd 39
0010 65 9c d7 0e 4c 88 d2 65 ae de 0b 49 40 c7 75 df
0020 19 69 53 0b 11 5d ac e7 08 f6 ae df 16 66 e0 13
0030 75 41 f7 bb be 56 a1 dd a7 3e fb 4e 5d 9e e4 a2

== checktext ==
0000 61 62 63 64 65 66 67 69 61 62 63 64 65 66 67 69
0010 30 31 32 33 34 35 36 37 30 31 32 33 34 35 36 37
0020 61 62 63 64 65 66 67 69 61 62 63 64 65 66 67 69
0030 30 31 32 33 34 35 36 37 30 31 32 33 34 35 36 37
可见,两次运行,虽然encrypt的明码是一样的,但encrypt出来的结果是不同的。随机明码 改 静态明码 的目的就是为了比较两次encrypt的结果。即,相同的明码用不同的IV做encrypt,结果是不同的。
【屏蔽第98行重新编译后的执行结果】
[root@ampcommons02 aes-codec]# ./codec
== rkey ==
0000 69 ef eb 49 25 5a c2 5e 0d 77 8a cb e6 fe ad 1d
== iv ==
0000 8e 05 8c 50 2f 69 9d fb 64 3e cd e6 2d 38 26 1c
0010 6e 21 00 e6 32 3f c6 ca 93 8b c1 e3 47 9a bd 81
0020 d7 e5 0b 63 dc f8 9d 1f 13 49 35 25 70 4e 64 c2
0030 ea 0c d0 78 e7 6c 65 64 41 4d db 2b 50 4d b4 06

== plaintext ==
0000 61 62 63 64 65 66 67 69 61 62 63 64 65 66 67 69
0010 30 31 32 33 34 35 36 37 30 31 32 33 34 35 36 37
0020 61 62 63 64 65 66 67 69 61 62 63 64 65 66 67 69
0030 30 31 32 33 34 35 36 37 30 31 32 33 34 35 36 37

== ciphertext ==
0000 a4 ed ba 4b 9f e9 74 bd 6d f6 03 76 79 9f 17 4f
0010 0c cd f3 b8 da 69 44 81 c9 f2 8b 03 83 0d 9d 77
0020 12 48 ea 46 3f eb 58 fd 48 c5 cc 2d 74 6c 99 4f
0030 93 bd 0d 06 f3 55 40 11 cb e7 d4 29 3b 8f 15 76

== iv changed ==
0000 93 bd 0d 06 f3 55 40 11 cb e7 d4 29 3b 8f 15 76
0010 6e 21 00 e6 32 3f c6 ca 93 8b c1 e3 47 9a bd 81
0020 d7 e5 0b 63 dc f8 9d 1f 13 49 35 25 70 4e 64 c2
0030 ea 0c d0 78 e7 6c 65 64 41 4d db 2b 50 4d b4 06

== checktext ==
0000 7c da e2 32 b9 5a ba 83 ce bb 7a ab 73 d1 54 03
0010 30 31 32 33 34 35 36 37 30 31 32 33 34 35 36 37
0020 61 62 63 64 65 66 67 69 61 62 63 64 65 66 67 69
0030 30 31 32 33 34 35 36 37 30 31 32 33 34 35 36 37
可见,decrypt时使用和encrypt时不同的IV,不能正确decrypt出先前的明码。
~~~~~~~~~~~~~~~~~~~~~~~~~~~~~~~~~
~~~~~~~~~~~~~~~~~~~~~~~~~~~~~~~~~
【yasi】 Openssl官方wiki, 《EVP Symmetric Encryption and Decryption》 中,有个的简单例子,整理如下(Linux下运行): (代码下载)
algo_aes.h
-
#ifndef ALGO_AES_H -
#define ALGO_AES_H -
int encrypt(unsigned char *plaintext, int plaintext_len, unsigned char *key, -
unsigned char *iv, unsigned char *ciphertext); -
int decrypt(unsigned char *ciphertext, int ciphertext_len, unsigned char *key, -
unsigned char *iv, unsigned char *plaintext); -
#endif
algo_aes.c
-
#include <stdlib.h> -
#include <stdio.h> -
#include "algo_aes.h" -
#include <openssl/evp.h> -
void handleErrors(void) -
{ -
ERR_print_errors_fp(stderr); -
abort(); -
} -
int encrypt(unsigned char *plaintext, int plaintext_len, unsigned char *key, -
unsigned char *iv, unsigned char *ciphertext) -
{ -
EVP_CIPHER_CTX *ctx; -
int len; -
int ciphertext_len; -
/* Create and initialise the context */ -
if(!(ctx = EVP_CIPHER_CTX_new())) handleErrors(); -
/* Initialise the encryption operation. IMPORTANT - ensure you use a key -
* and IV size appropriate for your cipher -
* In this example we are using 256 bit AES (i.e. a 256 bit key). The -
* IV size for *most* modes is the same as the block size. For AES this -
* is 128 bits */ -
if(1 != EVP_EncryptInit_ex(ctx, EVP_aes_256_cbc(), NULL, key, iv)) -
handleErrors(); -
/* Provide the message to be encrypted, and obtain the encrypted output. -
* EVP_EncryptUpdate can be called multiple times if necessary -
*/ -
if(1 != EVP_EncryptUpdate(ctx, ciphertext, &len, plaintext, plaintext_len)) -
handleErrors(); -
ciphertext_len = len; -
/* Finalise the encryption. Further ciphertext bytes may be written at -
* this stage. -
*/ -
if(1 != EVP_EncryptFinal_ex(ctx, ciphertext + len, &len)) handleErrors(); -
ciphertext_len += len; -
/* Clean up */ -
EVP_CIPHER_CTX_free(ctx); -
return ciphertext_len; -
} -
int decrypt(unsigned char *ciphertext, int ciphertext_len, unsigned char *key, -
unsigned char *iv, unsigned char *plaintext) -
{ -
EVP_CIPHER_CTX *ctx; -
int len; -
int plaintext_len; -
/* Create and initialise the context */ -
if(!(ctx = EVP_CIPHER_CTX_new())) handleErrors(); -
/* Initialise the decryption operation. IMPORTANT - ensure you use a key -
* and IV size appropriate for your cipher -
* In this example we are using 256 bit AES (i.e. a 256 bit key). The -
* IV size for *most* modes is the same as the block size. For AES this -
* is 128 bits */ -
if(1 != EVP_DecryptInit_ex(ctx, EVP_aes_256_cbc(), NULL, key, iv)) -
handleErrors(); -
/* Provide the message to be decrypted, and obtain the plaintext output. -
* EVP_DecryptUpdate can be called multiple times if necessary -
*/ -
if(1 != EVP_DecryptUpdate(ctx, plaintext, &len, ciphertext, ciphertext_len)) -
handleErrors(); -
plaintext_len = len; -
/* Finalise the decryption. Further plaintext bytes may be written at -
* this stage. -
*/ -
if(1 != EVP_DecryptFinal_ex(ctx, plaintext + len, &len)) handleErrors(); -
plaintext_len += len; -
/* Clean up */ -
EVP_CIPHER_CTX_free(ctx); -
return plaintext_len; -
}
main.c
-
#include "algo_aes.h" -
#include <stdio.h> -
#include <string.h> -
//#include <openssl/evp.h> -
int main(int arc, char *argv[]) -
{ -
/* Set up the key and iv. Do I need to say to not hard code these in a -
* real application? :-) -
*/ -
/* A 256 bit key */ -
unsigned char *key = "01234567890123456789012345678901"; -
/* A 128 bit IV */ -
unsigned char *iv = "01234567890123456"; -
/* Message to be encrypted */ -
unsigned char *plaintext = -
"The quick brown fox jumps over the lazy dog1234"; -
/* Buffer for ciphertext. Ensure the buffer is long enough for the -
* ciphertext which may be longer than the plaintext, dependant on the -
* algorithm and mode -
*/ -
unsigned char ciphertext[64]; -
/* Buffer for the decrypted text */ -
unsigned char decryptedtext[64]; -
int decryptedtext_len, ciphertext_len; -
/* Initialise the library */ -
/* ERR_load_crypto_strings(); -
OpenSSL_add_all_algorithms(); -
OPENSSL_config(NULL);*/ -
printf("Plaintext is:\n%s~\n", plaintext); -
/* Encrypt the plaintext */ -
ciphertext_len = encrypt(plaintext, strlen(plaintext), key, iv, -
ciphertext); -
/* Do something useful with the ciphertext here */ -
printf("Ciphertext is %d bytes long:\n", ciphertext_len); -
BIO_dump_fp(stdout, ciphertext, ciphertext_len); -
/* Decrypt the ciphertext */ -
decryptedtext_len = decrypt(ciphertext, ciphertext_len, key, iv, -
decryptedtext); -
/* Add a NULL terminator. We are expecting printable text */ -
decryptedtext[decryptedtext_len] = '\0'; -
/* Show the decrypted text */ -
printf("Decrypted text is:\n"); -
printf("%s~\n", decryptedtext); -
/* Clean up */ -
EVP_cleanup(); -
ERR_free_strings(); -
return 0; -
}
Mekefile:
OBJ_DIR = ./obj
BIN_DIR = ./bin
SRC_DIR = ./
OBJS = \
	$(OBJ_DIR)/algo_aes.o \
	$(OBJ_DIR)/main.o
TARGET = $(BIN_DIR)/main
INC_OPT = -I./
LNK_OPT = -lssl

$(TARGET) : clean chkobjdir chkbindir $(OBJS)
	gcc -g -o $@ $(OBJS) $(LNK_OPT)

$(OBJ_DIR)/%.o : $(SRC_DIR)/%.c
	gcc -g $(INC_OPT) -c -o $@ $<

chkobjdir :
	@if test ! -d $(OBJ_DIR) ; \
	then \
		mkdir $(OBJ_DIR) ; \
	fi

chkbindir :
	@if test ! -d $(BIN_DIR) ; \
	then \
		mkdir $(BIN_DIR) ; \
	fi

clean :
	-rm -f $(TARGET)
	-rm -rf $(OBJ_DIR)
运行结果:
Plaintext is:
The quick brown fox jumps over the lazy dog1234~
Ciphertext is 48 bytes long:
0000 - e0 6f 63 a7 11 e8 b7 aa-9f 94 40 10 7d 46 80 a1   .oc.......@.}F..
0010 - 17 99 43 80 ea 31 d2 a2-99 b9 53 02 d4 39 b9 70   ..C..1....S..9.p
0020 - e9 29 d5 a8 03 bd 71 31-b8 c3 6f 3d 39 3a 3d 3d   .)....q1..o=9:==
Decrypted text is:
The quick brown fox jumps over the lazy dog1234~注意:(参考)
AES算法的块(block)的长度固定为16字节。假设一个字符串在AES加密前的长度为cleanLen,加密后的长度为cipherLen,则二者有下面的关系,其中的“/”是整除。
cipherLen = (clearLen/16 + 1) * 16
比如:(注意第二行,即使48刚好能被16整除,也要额外追加一个16字节的块)
| clearLen | cipherLen |
|---|---|
| 47 | 48 |
| 48 | 64 |
| 49 | 64 |
可见,对于AES算法:
1)加密后的长度>=加密前的长度
2)解密后的长度<=解密前的长度
这对于写代码时的指导意义在于:
1)假如我们要做AES加密的字符串为“The quick brown fox jumps over the lazy dog”,它的长度(不带/0)为43字节,则我们可以计算出加密后的串的长度为 (43 / 16 + 1) * 16 = 48 字节,于是就可以申明加密后的数组如下
unsigned char ciphertextp[48];
2)假如我们知道AES加密后的串的长度为64字节,那么就可以申明解密后的数组如下
unsigned char decryptedtext[64];
智能推荐
使用nginx解决浏览器跨域问题_nginx不停的xhr-程序员宅基地
文章浏览阅读1k次。通过使用ajax方法跨域请求是浏览器所不允许的,浏览器出于安全考虑是禁止的。警告信息如下:不过jQuery对跨域问题也有解决方案,使用jsonp的方式解决,方法如下:$.ajax({ async:false, url: 'http://www.mysite.com/demo.do', // 跨域URL ty..._nginx不停的xhr
在 Oracle 中配置 extproc 以访问 ST_Geometry-程序员宅基地
文章浏览阅读2k次。关于在 Oracle 中配置 extproc 以访问 ST_Geometry,也就是我们所说的 使用空间SQL 的方法,官方文档链接如下。http://desktop.arcgis.com/zh-cn/arcmap/latest/manage-data/gdbs-in-oracle/configure-oracle-extproc.htm其实简单总结一下,主要就分为以下几个步骤。..._extproc
Linux C++ gbk转为utf-8_linux c++ gbk->utf8-程序员宅基地
文章浏览阅读1.5w次。linux下没有上面的两个函数,需要使用函数 mbstowcs和wcstombsmbstowcs将多字节编码转换为宽字节编码wcstombs将宽字节编码转换为多字节编码这两个函数,转换过程中受到系统编码类型的影响,需要通过设置来设定转换前和转换后的编码类型。通过函数setlocale进行系统编码的设置。linux下输入命名locale -a查看系统支持的编码_linux c++ gbk->utf8
IMP-00009: 导出文件异常结束-程序员宅基地
文章浏览阅读750次。今天准备从生产库向测试库进行数据导入,结果在imp导入的时候遇到“ IMP-00009:导出文件异常结束” 错误,google一下,发现可能有如下原因导致imp的数据太大,没有写buffer和commit两个数据库字符集不同从低版本exp的dmp文件,向高版本imp导出的dmp文件出错传输dmp文件时,文件损坏解决办法:imp时指定..._imp-00009导出文件异常结束
python程序员需要深入掌握的技能_Python用数据说明程序员需要掌握的技能-程序员宅基地
文章浏览阅读143次。当下是一个大数据的时代,各个行业都离不开数据的支持。因此,网络爬虫就应运而生。网络爬虫当下最为火热的是Python,Python开发爬虫相对简单,而且功能库相当完善,力压众多开发语言。本次教程我们爬取前程无忧的招聘信息来分析Python程序员需要掌握那些编程技术。首先在谷歌浏览器打开前程无忧的首页,按F12打开浏览器的开发者工具。浏览器开发者工具是用于捕捉网站的请求信息,通过分析请求信息可以了解请..._初级python程序员能力要求
Spring @Service生成bean名称的规则(当类的名字是以两个或以上的大写字母开头的话,bean的名字会与类名保持一致)_@service beanname-程序员宅基地
文章浏览阅读7.6k次,点赞2次,收藏6次。@Service标注的bean,类名:ABDemoService查看源码后发现,原来是经过一个特殊处理:当类的名字是以两个或以上的大写字母开头的话,bean的名字会与类名保持一致public class AnnotationBeanNameGenerator implements BeanNameGenerator { private static final String C..._@service beanname
随便推点
二叉树的各种创建方法_二叉树的建立-程序员宅基地
文章浏览阅读6.9w次,点赞73次,收藏463次。1.前序创建#include<stdio.h>#include<string.h>#include<stdlib.h>#include<malloc.h>#include<iostream>#include<stack>#include<queue>using namespace std;typed_二叉树的建立
解决asp.net导出excel时中文文件名乱码_asp.net utf8 导出中文字符乱码-程序员宅基地
文章浏览阅读7.1k次。在Asp.net上使用Excel导出功能,如果文件名出现中文,便会以乱码视之。 解决方法: fileName = HttpUtility.UrlEncode(fileName, System.Text.Encoding.UTF8);_asp.net utf8 导出中文字符乱码
笔记-编译原理-实验一-词法分析器设计_对pl/0作以下修改扩充。增加单词-程序员宅基地
文章浏览阅读2.1k次,点赞4次,收藏23次。第一次实验 词法分析实验报告设计思想词法分析的主要任务是根据文法的词汇表以及对应约定的编码进行一定的识别,找出文件中所有的合法的单词,并给出一定的信息作为最后的结果,用于后续语法分析程序的使用;本实验针对 PL/0 语言 的文法、词汇表编写一个词法分析程序,对于每个单词根据词汇表输出: (单词种类, 单词的值) 二元对。词汇表:种别编码单词符号助记符0beginb..._对pl/0作以下修改扩充。增加单词
android adb shell 权限,android adb shell权限被拒绝-程序员宅基地
文章浏览阅读773次。我在使用adb.exe时遇到了麻烦.我想使用与bash相同的adb.exe shell提示符,所以我决定更改默认的bash二进制文件(当然二进制文件是交叉编译的,一切都很完美)更改bash二进制文件遵循以下顺序> adb remount> adb push bash / system / bin /> adb shell> cd / system / bin> chm..._adb shell mv 权限
投影仪-相机标定_相机-投影仪标定-程序员宅基地
文章浏览阅读6.8k次,点赞12次,收藏125次。1. 单目相机标定引言相机标定已经研究多年,标定的算法可以分为基于摄影测量的标定和自标定。其中,应用最为广泛的还是张正友标定法。这是一种简单灵活、高鲁棒性、低成本的相机标定算法。仅需要一台相机和一块平面标定板构建相机标定系统,在标定过程中,相机拍摄多个角度下(至少两个角度,推荐10~20个角度)的标定板图像(相机和标定板都可以移动),即可对相机的内外参数进行标定。下面介绍张氏标定法(以下也这么称呼)的原理。原理相机模型和单应矩阵相机标定,就是对相机的内外参数进行计算的过程,从而得到物体到图像的投影_相机-投影仪标定
Wayland架构、渲染、硬件支持-程序员宅基地
文章浏览阅读2.2k次。文章目录Wayland 架构Wayland 渲染Wayland的 硬件支持简 述: 翻译一篇关于和 wayland 有关的技术文章, 其英文标题为Wayland Architecture .Wayland 架构若是想要更好的理解 Wayland 架构及其与 X (X11 or X Window System) 结构;一种很好的方法是将事件从输入设备就开始跟踪, 查看期间所有的屏幕上出现的变化。这就是我们现在对 X 的理解。 内核是从一个输入设备中获取一个事件,并通过 evdev 输入_wayland