Spring入门心经之第二章 AOP详解-程序员宅基地
技术标签: spring java 后端 # Spring源码
什么是AOP
AOP(Aspect-Oriented Programming:面向切面编程),是Spring中一个重要内容,在AOP思想中例如权限控制、日志管理、事务控制等被定义为切面,它实际做的就是将核心功能与切面功能拆分,降低核心功能与切面功能的耦合度,然后在把核心功能和切面功能编织在一起。Spring是基于动态代理实现AOP的。Spring默认情况下在目标类实现接口时是通过JDK代理实现的,只有非接口的是通过Cglib代理实现的。

AOP 基础概念
- 连接点(Join point):目标对象,每个成员方法都可以成为连接点。
- 切点(Pointcut):连接点中被做增强操作的方法就叫切点。
- 增强/通知(Advice):拦截到连接点之后要执行的代码。
- 切面(Aspect):切点(Pointcut)+通知(Advice)。
- 织入(Weaving):把切面加入到对象,生成代理对象的过程。
- 目标(Target):被代理的对象。
- 代理(Proxy):代理就是目标对象的增强后返回给用户的代理类。
Spring AOP和AspectJ AOP的区别
AOP除了Spring AOP实现外,还有比较出名的AspectJAOP,下面我们说说AspectJ AOP和Spring AOP的区别:
- Spring AOP属于运行时增强,而AspectJ AOP是编译时增强。
- Spring AOP基于代理(Proxying)实现,而AspectJ AOP则是基于字节码操作(Bytecode Manipulation)实现的。
- AspectJ AOP相比于Spring AOP 功能更加强大,但是Spring AOP相对更简单;在切面不多的情况下,两种性能差异不大,但是切面很多时,则AspectJ AOP比Spring AOP性能强很多。
AspectJ AOP定义的通知类型
- 前置通知(Before Advice):在目标对象的方法被调用前调用通过功能
- 后置通知(After Advice):在目标对象的方法被调用之后调用通知功能
- 返回通知(AfterReturning):在目标对象的方法调用完成,返回结果值后调用通知功能
- 异常通知(AfterThrowing):在目标对象的方法抛出异常之后调用通知功能
- 环绕通知(Aroud):在目标对象前后调用方法,甚至不调用目标对象的方法也能做到
源码分析
创建示例
为了更好的演示源码,我们首先简单创建一个示例,首先是目标类代码,新建AopDemoServiceImpl类
@Service("demoService")
public class AopDemoServiceImpl {


    public void doMethod1(){

        System.out.println("调用AopDemoServiceImpl.doMethod1()");
    }

    public String doMethod2(){

        System.out.println("调用AopDemoServiceImpl.doMethod2() 返回Hello World");
        return "Hello World";
    }

    public String doMethod3() throws Exception {

        System.out.println("调用AopDemoServiceImpl.doMethod3() 抛出Exception");
        throw new Exception("some exception");
    }
}
添加LogAspect切面
@Aspect
@Component
public class LogAspect {


    @Pointcut("execution(* com.example.springboot.spring.aop.*.*(..))")
    private void pointCutMethod() {

    }

    /**
     * 环绕通知
     *
     * @param joinPoint
     * @return
     * @throws Throwable
     */
    @Around("pointCutMethod()")
    public Object doAround(ProceedingJoinPoint joinPoint) throws Throwable {

        System.out.println("-----------------------");
        System.out.println("环绕通知开始,方法名" + joinPoint.getSignature());
        Object o = joinPoint.proceed();
        System.out.println("环绕通知得到结果:" + String.valueOf(o));
        return o;
    }

    /**
     * 前置通知
     */
    @Before("pointCutMethod()")
    public void doBefore() {

        System.out.println("前置通知");
    }

    /**
     * 后置通知
     *
     * @param result return val
     */
    @AfterReturning(value = "pointCutMethod()", returning = "result")
    public void doAfterReturning(String result) {

        System.out.println("后置通知, 返回值: " + result);
    }

    /**
     * 异常通知
     *
     * @param e exception
     */
    @AfterThrowing(value = "pointCutMethod()", throwing = "e")
    public void doAfterThrowing(Exception e) {

        System.out.println("异常通知, 异常: " + e.getMessage());
    }

    /**
     * 最终通知
     */
    @After("pointCutMethod()")
    public void doAfter() {

        System.out.println("最终通知");
    }
}
spring-config.xml配置
<?xml version="1.0" encoding="UTF-8"?>
<beans xmlns="http://www.springframework.org/schema/beans"
       xmlns:xsi="http://www.w3.org/2001/XMLSchema-instance"
       xmlns:aop="http://www.springframework.org/schema/aop"
       xmlns:context="http://www.springframework.org/schema/context"
       xsi:schemaLocation="http://www.springframework.org/schema/beans
       http://www.springframework.org/schema/beans/spring-beans.xsd
       http://www.springframework.org/schema/beans http://www.springframework.org/schema/beans/spring-beans.xsd
       http://www.springframework.org/schema/aop
       http://www.springframework.org/schema/aop/spring-aop.xsd
       http://www.springframework.org/schema/context
       https://www.springframework.org/schema/context/spring-context.xsd">

    <!--aop相关配置-->
     <context:annotation-config/>
    <context:component-scan base-package="com.example.springboot.spring"/>
    <aop:aspectj-autoproxy proxy-target-class="true"/>

</beans>
程序入口:
public class Entrance {

    /**
     * 基于配置文件的依赖注入测试
     *
     * @param args
     */
      public static void main(String[] args) {

        ApplicationContext context = new ClassPathXmlApplicationContext("spring-config.xml");
        // retrieve configured instance
        AopDemoServiceImpl demoService = context.getBean("demoService", AopDemoServiceImpl.class);

        // use configured instance
        demoService.doMethod1();
        demoService.doMethod2();
        try {

            demoService.doMethod3();
        } catch (Exception e) {

            // e.printStackTrace();
        }
    }
}
Spring AOP工作流程
在结合上面代码进行源码分析前,先介绍下整个执行流程,整体分为三步。
- 前置处理,这一步遍历所有类,获取切面列表,将其存入aspectFactoryCache缓存中
- 后置处理,从缓存中获取对应demoService切面方法,结合demoService根据JDK或Cglib创建AOP代理对象。
- 执行切面方法。

AOP切面的实现
我们从AbstractApplicationContext#refresh()进入直奔finishBeanFactoryInitialization()方法,这个方法初始化所有的singleton beans(除了lazy-init)

从beanFactory.preInstantiateSingletons()进入,开始前置处理。

我们在这里打个断点,设置下Condition:beanName.equals("demoService"),跳过其他beanName,只看demoService。

进入到getBean()方法中,点进doGetBean()后直奔创建bean的逻辑代码,如下图:

接下来,我们往下说说前置处理的工作流程,主要是遍历切面,将切面放入缓存中。

进入到create后,我们径直来到前置处理的入口resolveBeforeInstantiation(beanName, mbdToUse)

然后我们进入到resolveBeforeInstantiation(beanName, mbdToUse);,在 applyBeanPostProcessorsBeforeInstantiation(targetType, beanName);开始前置处理,我们直接来到核心方法postProcessBeforeInstantiation,在这里面就是bean实例化前做的处理。
 笔者贴出了bean初始化前置处理器的postProcessBeforeInstantiation的核心逻辑,可以看到AbstractAutoProxyCreator里面会判断当前传入的bean是否是AOP类,如果是则将其生成通知器类然后放入缓存advisedBeans中。

判断是否跳过的逻辑也很简单,如下图所示,它会获取所有切面信息,判断当前这个bean是否跟里面某个切面名字一样,如果一样就返回true。

我们不妨看看findCandidateAdvisors的逻辑,可以看到它又会调用父类的findCandidateAdvisors查找所有的advisor

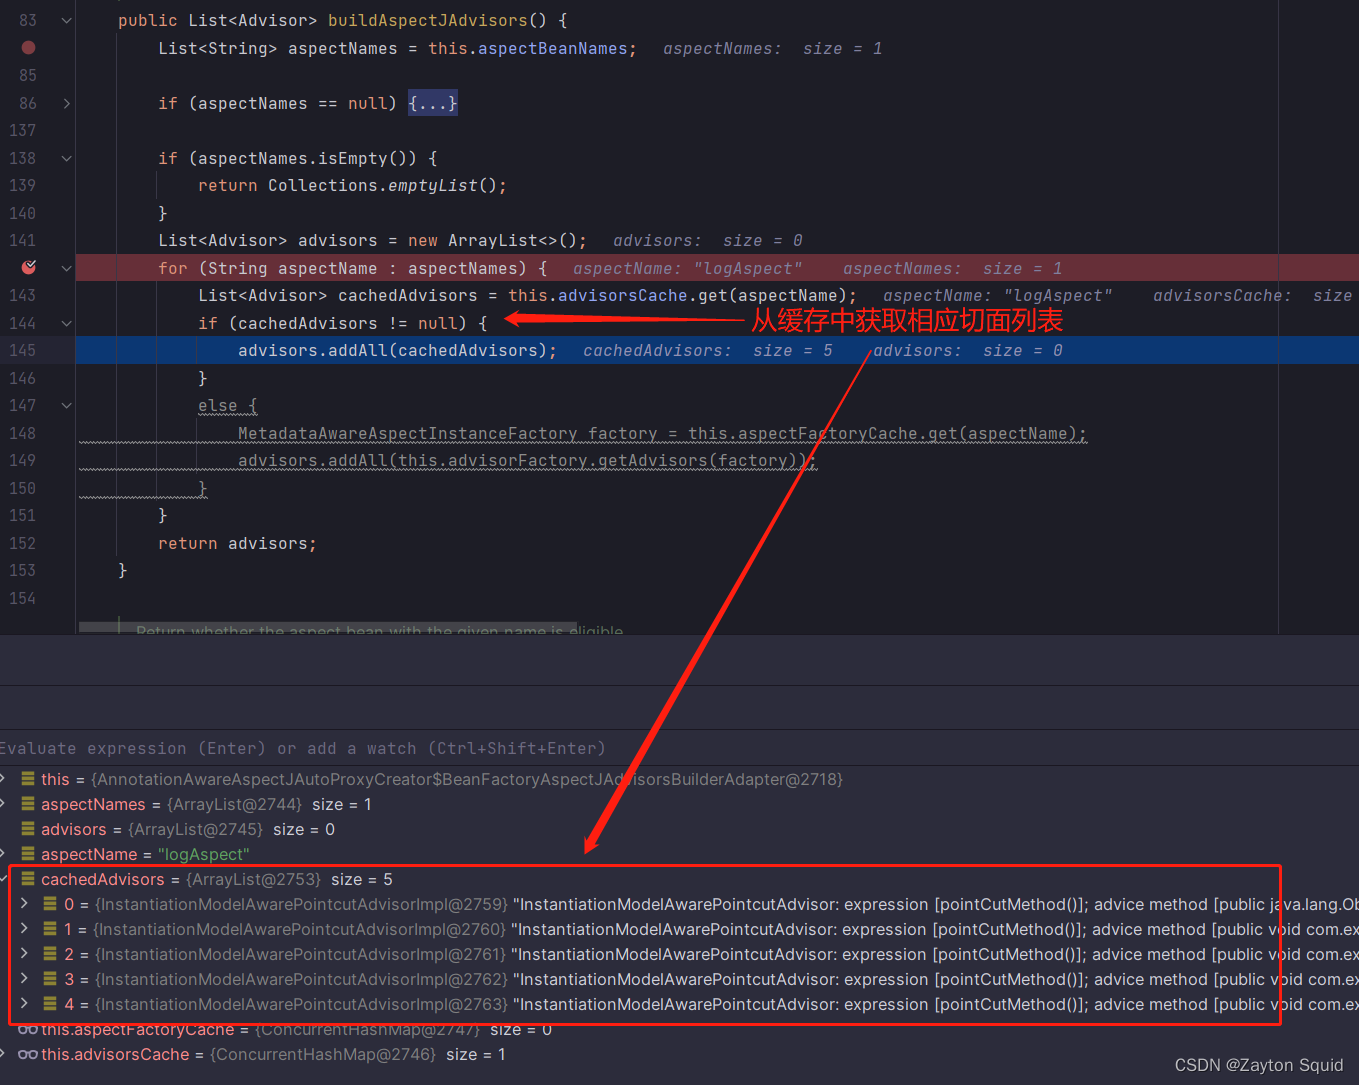
核心逻辑来了buildAspectJAdvisors,在这一步它主要用DCL双重锁的单例实现方式,拿到切面类里的切面方法,将其转换成advisor(并放入缓存中)。

判断是否是切面

获取切面列表
在this.advisorFactory.getAdvisors中返回切面列表,我们进去方法里面看看详细
@Override
	public List<Advisor> getAdvisors(MetadataAwareAspectInstanceFactory aspectInstanceFactory) {

		Class<?> aspectClass = aspectInstanceFactory.getAspectMetadata().getAspectClass();
		String aspectName = aspectInstanceFactory.getAspectMetadata().getAspectName();
		validate(aspectClass);
		//忽略细节....
		List<Advisor> advisors = new ArrayList<>();
		//遍历方法列表
		for (Method method : getAdvisorMethods(aspectClass)) {

			Advisor advisor = getAdvisor(method, lazySingletonAspectInstanceFactory, 0, aspectName);
			if (advisor != null) {

				advisors.add(advisor);
			}
		}
		//忽略细节....
		return advisors;
	}
我们主要看getAdvisor(method, lazySingletonAspectInstanceFactory, 0, aspectName)里面内容,代码如下:
@Override
@Nullable
public Advisor getAdvisor(Method candidateAdviceMethod, MetadataAwareAspectInstanceFactory aspectInstanceFactory,
        int declarationOrderInAspect, String aspectName) {


    validate(aspectInstanceFactory.getAspectMetadata().getAspectClass());

    AspectJExpressionPointcut expressionPointcut = getPointcut(
            candidateAdviceMethod, aspectInstanceFactory.getAspectMetadata().getAspectClass());
    if (expressionPointcut == null) {

        return null;
    }

    // 封装成advisor
    return new InstantiationModelAwarePointcutAdvisorImpl(expressionPointcut, candidateAdviceMethod,
            this, aspectInstanceFactory, declarationOrderInAspect, aspectName);
}
在InstantiationModelAwarePointcutAdvisorImpl中封装Advisor
public InstantiationModelAwarePointcutAdvisorImpl(AspectJExpressionPointcut declaredPointcut,
        Method aspectJAdviceMethod, AspectJAdvisorFactory aspectJAdvisorFactory,
        MetadataAwareAspectInstanceFactory aspectInstanceFactory, int declarationOrder, String aspectName) {


    this.declaredPointcut = declaredPointcut;
    this.declaringClass = aspectJAdviceMethod.getDeclaringClass();
    this.methodName = aspectJAdviceMethod.getName();
    this.parameterTypes = aspectJAdviceMethod.getParameterTypes();
    this.aspectJAdviceMethod = aspectJAdviceMethod;
    this.aspectJAdvisorFactory = aspectJAdvisorFactory;
    this.aspectInstanceFactory = aspectInstanceFactory;
    this.declarationOrder = declarationOrder;
    this.aspectName = aspectName;

    if (aspectInstanceFactory.getAspectMetadata().isLazilyInstantiated()) {

        // Static part of the pointcut is a lazy type.
        Pointcut preInstantiationPointcut = Pointcuts.union(
                aspectInstanceFactory.getAspectMetadata().getPerClausePointcut(), this.declaredPointcut);

        // Make it dynamic: must mutate from pre-instantiation to post-instantiation state.
        // If it's not a dynamic pointcut, it may be optimized out
        // by the Spring AOP infrastructure after the first evaluation.
        this.pointcut = new PerTargetInstantiationModelPointcut(
                this.declaredPointcut, preInstantiationPointcut, aspectInstanceFactory);
        this.lazy = true;
    }
    else {

        // A singleton aspect.
        this.pointcut = this.declaredPointcut;
        this.lazy = false;
        this.instantiatedAdvice = instantiateAdvice(this.declaredPointcut);
    }
}
通过pointcut获取advice
	private Advice instantiateAdvice(AspectJExpressionPointcut pointcut) {

		Advice advice = this.aspectJAdvisorFactory.getAdvice(this.aspectJAdviceMethod, pointcut,
				this.aspectInstanceFactory, this.declarationOrder, this.aspectName);
		return (advice != null ? advice : EMPTY_ADVICE);
	}
交由aspectJAdvisorFactory生成切面信息
@Override
@Nullable
public Advice getAdvice(Method candidateAdviceMethod, AspectJExpressionPointcut expressionPointcut,
        MetadataAwareAspectInstanceFactory aspectInstanceFactory, int declarationOrder, String aspectName) {


    // 获取切面类
    Class<?> candidateAspectClass = aspectInstanceFactory.getAspectMetadata().getAspectClass();
    validate(candidateAspectClass);

    // 获取切面注解
    AspectJAnnotation<?> aspectJAnnotation =
            AbstractAspectJAdvisorFactory.findAspectJAnnotationOnMethod(candidateAdviceMethod);
    if (aspectJAnnotation == null) {

        return null;
    }

    // If we get here, we know we have an AspectJ method.
    // Check that it's an AspectJ-annotated class
    if (!isAspect(candidateAspectClass)) {

        throw new AopConfigException("Advice must be declared inside an aspect type: " +
                "Offending method '" + candidateAdviceMethod + "' in class [" +
                candidateAspectClass.getName() + "]");
    }

    if (logger.isDebugEnabled()) {

        logger.debug("Found AspectJ method: " + candidateAdviceMethod);
    }

    // 切面注解转换成advice
    AbstractAspectJAdvice springAdvice;

    switch (aspectJAnnotation.getAnnotationType()) {

        case AtPointcut: // AtPointcut忽略
            if (logger.isDebugEnabled()) {

                logger.debug("Processing pointcut '" + candidateAdviceMethod.getName() + "'");
            }
            return null;
        case AtAround:
            springAdvice = new AspectJAroundAdvice(
                    candidateAdviceMethod, expressionPointcut, aspectInstanceFactory);
            break;
        case AtBefore:
            springAdvice = new AspectJMethodBeforeAdvice(
                    candidateAdviceMethod, expressionPointcut, aspectInstanceFactory);
            break;
        case AtAfter:
            springAdvice = new AspectJAfterAdvice(
                    candidateAdviceMethod, expressionPointcut, aspectInstanceFactory);
            break;
        case AtAfterReturning:
            springAdvice = new AspectJAfterReturningAdvice(
                    candidateAdviceMethod, expressionPointcut, aspectInstanceFactory);
            AfterReturning afterReturningAnnotation = (AfterReturning) aspectJAnnotation.getAnnotation();
            if (StringUtils.hasText(afterReturningAnnotation.returning())) {

                springAdvice.setReturningName(afterReturningAnnotation.returning());
            }
            break;
        case AtAfterThrowing:
            springAdvice = new AspectJAfterThrowingAdvice(
                    candidateAdviceMethod, expressionPointcut, aspectInstanceFactory);
            AfterThrowing afterThrowingAnnotation = (AfterThrowing) aspectJAnnotation.getAnnotation();
            if (StringUtils.hasText(afterThrowingAnnotation.throwing())) {

                springAdvice.setThrowingName(afterThrowingAnnotation.throwing());
            }
            break;
        default:
            throw new UnsupportedOperationException(
                    "Unsupported advice type on method: " + candidateAdviceMethod);
    }

    // 最后将其它切面信息配置到advice
    springAdvice.setAspectName(aspectName);
    springAdvice.setDeclarationOrder(declarationOrder);
    String[] argNames = this.parameterNameDiscoverer.getParameterNames(candidateAdviceMethod);
    if (argNames != null) {

        springAdvice.setArgumentNamesFromStringArray(argNames);
    }
    springAdvice.calculateArgumentBindings();

    return springAdvice;
}
AOP代理的创建

从上文切面信息处理完后,我们接着分析代理对象的创建,这一步主要是从缓存中拿切面,和demoService的方法匹配,并创建AOP代理对象。回到AbstractAutowireCapableBeanFactory#createBean,进入doCreateBean()方法。

径直来到初始化实例bean这段代码


进入applyBeanPostProcessorsAfterInitialization(bean, beanName);后,我们会看到本次的核心方法postProcessAfterInitialization(result, beanName);,这个方法总的来说主要负责将Advisor注入到合适的位置,然后以Cglib或者JDK形式创建代理,为后面给代理进行增强实现做准备。

在AbstractAutoProxyCreator#postProcessAfterInitialization中如果bean被子类标识为代理,则使用配置的拦截器创建一个代理
	/**
	 * Create a proxy with the configured interceptors if the bean is
	 * identified as one to proxy by the subclass.
	 * @see #getAdvicesAndAdvisorsForBean
	 */
	@Override
	public Object postProcessAfterInitialization(@Nullable Object bean, String beanName) {

		if (bean != null) {

			Object cacheKey = getCacheKey(bean.getClass(), beanName);
			//如果不是提前暴露的代理
			if (this.earlyProxyReferences.remove(cacheKey) != bean) {

				return wrapIfNecessary(bean, beanName, cacheKey);
			}
		}
		return bean;
	}
wrapIfNecessary方法主要用于判断是否需要创建代理,如果Bean能够获取到advisor才需要创建代理

获取切面
我们看下getAdvicesAndAdvisorsForBean方法是如何获取 demoService的切面列表。

通过findEligibleAdvisors方法获取advisor
protected List<Advisor> findEligibleAdvisors(Class<?> beanClass, String beanName) {

  // 和上文一样,获取所有切面类的切面方法生成Advisor
  List<Advisor> candidateAdvisors = findCandidateAdvisors();
  // 找到这些Advisor中能够应用于beanClass的Advisor
  List<Advisor> eligibleAdvisors = findAdvisorsThatCanApply(candidateAdvisors, beanClass, beanName);
  // 如果需要,交给子类拓展
  extendAdvisors(eligibleAdvisors);
  // 对Advisor排序
  if (!eligibleAdvisors.isEmpty()) {

    eligibleAdvisors = sortAdvisors(eligibleAdvisors);
  }
  return eligibleAdvisors;
}
上文从findCandidateAdvisors中进入到buildAspectJAdvisors()方法中是为了将切面信息存入到缓存中,而本次则是从缓存中获取domeService切面列表
回到findEligibleAdvisors(),获取完切面列表来到findAdvisorsThatCanApply(),找到这些Advisor中能够增强demoService的Advisor
protected List<Advisor> findAdvisorsThatCanApply(
			List<Advisor> candidateAdvisors, Class<?> beanClass, String beanName) {

		ProxyCreationContext.setCurrentProxiedBeanName(beanName);
		try {

			return AopUtils.findAdvisorsThatCanApply(candidateAdvisors, beanClass);
		}
		finally {

			ProxyCreationContext.setCurrentProxiedBeanName(null);
		}
}

public static List<Advisor> findAdvisorsThatCanApply(List<Advisor> candidateAdvisors, Class<?> clazz) {

		if (candidateAdvisors.isEmpty()) {

			return candidateAdvisors;
		}
		List<Advisor> eligibleAdvisors = new ArrayList<>();
		for (Advisor candidate : candidateAdvisors) {

			// 通过Introduction实现的advice
			if (candidate instanceof IntroductionAdvisor && canApply(candidate, clazz)) {

				eligibleAdvisors.add(candidate);
			}
		}
		boolean hasIntroductions = !eligibleAdvisors.isEmpty();
		//遍历每个增强器
		for (Advisor candidate : candidateAdvisors) {

			if (candidate instanceof IntroductionAdvisor) {

				// already processed
				continue;
			}
			// 看看是否能够在demoSerce上增强
			if (canApply(candidate, clazz, hasIntroductions)) {

				eligibleAdvisors.add(candidate);
			}
		}
		return eligibleAdvisors;
}
在canApply中遍历demoSerivce所有方法,然后与增强器进行匹配,符合则返回true
public static boolean canApply(Advisor advisor, Class<?> targetClass, boolean hasIntroductions) {

		if (advisor instanceof IntroductionAdvisor) {

			return ((IntroductionAdvisor) advisor).getClassFilter().matches(targetClass);
		}
		else if (advisor instanceof PointcutAdvisor) {

			PointcutAdvisor pca = (PointcutAdvisor) advisor;
			return canApply(pca.getPointcut(), targetClass, hasIntroductions);
		}
		else {

			// It doesn't have a pointcut so we assume it applies.
			return true;
		}
}

public static boolean canApply(Pointcut pc, Class<?> targetClass, boolean hasIntroductions) {

	//忽略细节....

	for (Class<?> clazz : classes) {

		Method[] methods = ReflectionUtils.getAllDeclaredMethods(clazz);
		//遍历demoSerivce所有方法
		for (Method method : methods) {

			//与增强器进行匹配
			if (introductionAwareMethodMatcher != null ?
					introductionAwareMethodMatcher.matches(method, targetClass, hasIntroductions) :
					methodMatcher.matches(method, targetClass)) {

				return true;
			}
		}
	}

	return false;
}
创建代理对象
获取demoService相关切面列表后,就可以开始创建代理对象
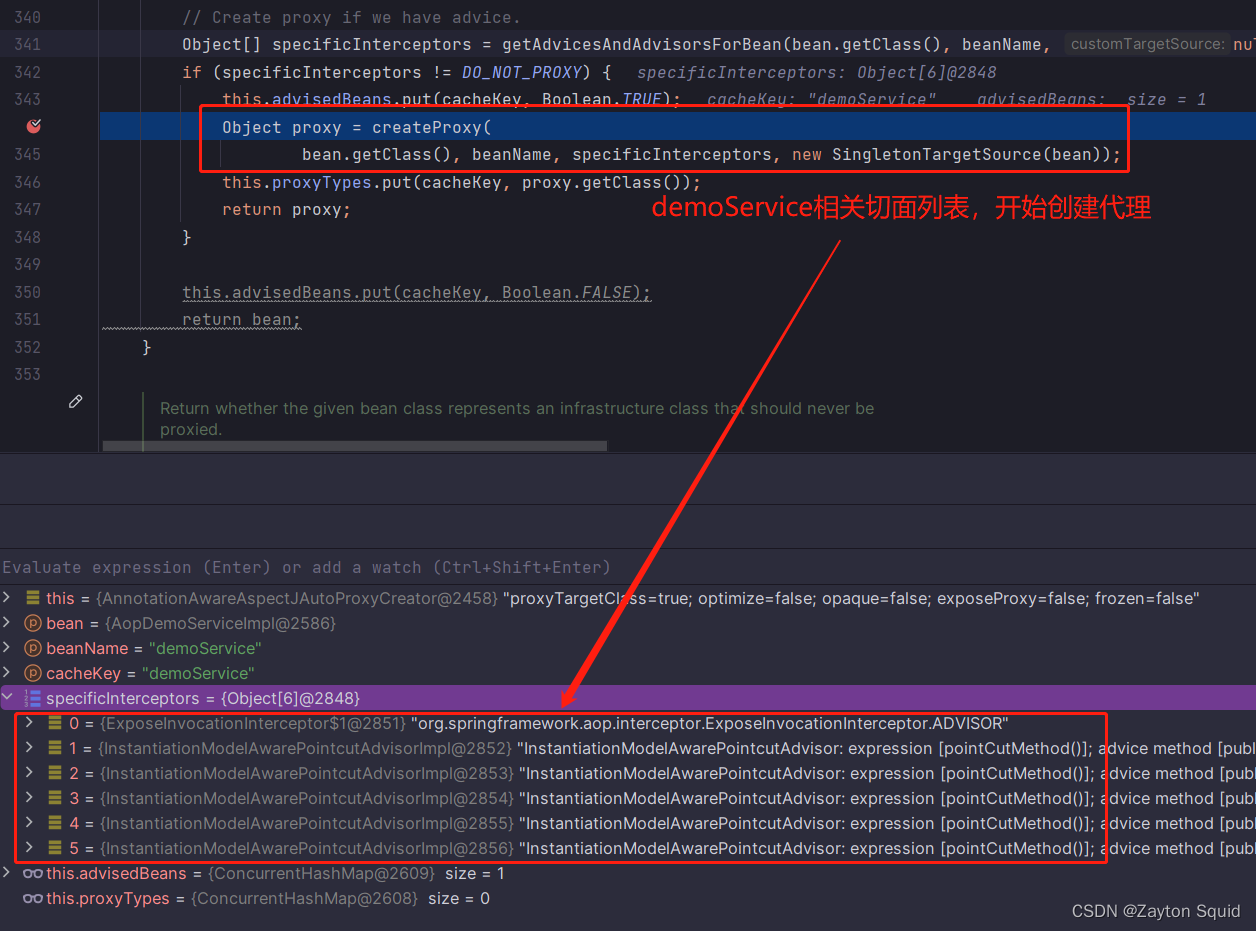
createProxy方法主要是在内部创建要给ProxyFactory的实例,然后设置一些内容,最后通过ProxyFactory创建代理。
	protected Object createProxy(Class<?> beanClass, @Nullable String beanName,
			@Nullable Object[] specificInterceptors, TargetSource targetSource) {


		if (this.beanFactory instanceof ConfigurableListableBeanFactory) {

			AutoProxyUtils.exposeTargetClass((ConfigurableListableBeanFactory) this.beanFactory, beanName, beanClass);
		}
		// 创建 ProxyFactory 实例
		ProxyFactory proxyFactory = new ProxyFactory();
		proxyFactory.copyFrom(this);

		// 判断是否代理目标类,默认是false
		if (proxyFactory.isProxyTargetClass()) {

			// Explicit handling of JDK proxy targets (for introduction advice scenarios)
			// 显式处理 JDK 代理目标
			if (Proxy.isProxyClass(beanClass)) {

				// Must allow for introductions; can't just set interfaces to the proxy's interfaces only.
				// 必须允许引介;不能只将接口设置为代理的接口。
				for (Class<?> ifc : beanClass.getInterfaces()) {

					proxyFactory.addInterface(ifc);
				}
			}
		}
		else {

			// 判断是否应该使用cglib代理
			if (shouldProxyTargetClass(beanClass, beanName)) {

				proxyFactory.setProxyTargetClass(true);
			}
			else {

				evaluateProxyInterfaces(beanClass, proxyFactory);
			}
		}
		// 构建增强器
		Advisor[] advisors = buildAdvisors(beanName, specificInterceptors);
		// 添加增强器
		proxyFactory.addAdvisors(advisors);
		// 设置要代理的目标类
		proxyFactory.setTargetSource(targetSource);
		// 定制代理工厂
		customizeProxyFactory(proxyFactory);
		// 控制代理工厂被配置后 是否允许修改通知。
		// 默认false
		proxyFactory.setFrozen(this.freezeProxy);
		if (advisorsPreFiltered()) {

			proxyFactory.setPreFiltered(true);
		}
		// 初始化工作准备完毕,通过ProxyFactory创建代理
		return proxyFactory.getProxy(getProxyClassLoader());
	}
最后我们直接来到DefaultAopProxyFactory#createAopProxy方法,这里会根据条件判断创建代理(jdk或cglib)。

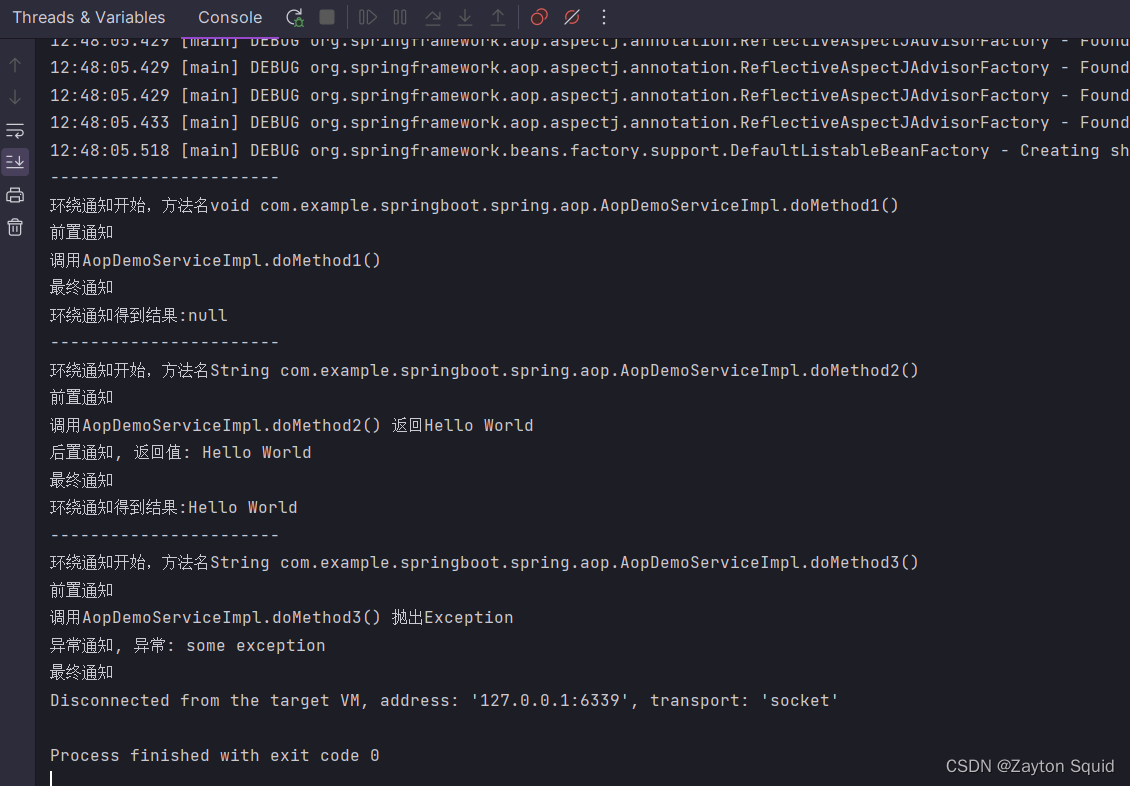
切面执行
代理对象创建完成后,终于来到最后一步,切面的执行;上文从创建完代理后调用CglibAopProxy#intercept方法

核心代码proceed()

proceed()是执行的核心,执行方法和执行通知都是在此处搞定的。 这里是递归调用的方式,执行所有的拦截器链。执行完递归后依次退出递归,整个流程结束。

结果输出
什么是动态代理
上文介绍了SpringAOP的切面实现和创建动态代理的过程,那么动态代理是如何工作的呢?
什么是代理
代理模式(Proxy pattern):通过代理对象访问目标对象,在目标对象的基础上,增加额外的操作,扩展目标对象的功能。
什么是动态代理
说白了就是在运行期间,为目标对象创建代理对象,目标对象不变,然后通过对方法进行动态拦截,进行前置或者后置功能执行等等增强操作,上文说的Cglib动态代理和JDK动态代理就是动态代理。
Cglib代理
什么是Cglib代理
Cglib是一个强大的、高性能的代码生成包。它使用ASM操作字节码,动态生成代理,对目标对象的方法进行增强操作,它广泛被许多AOP框架使用,为他们提供方法的拦截。

Cglib创建的案例
引入cglib依赖包
<dependency>
      <groupId>cglib</groupId>
      <artifactId>cglib</artifactId>
      <version>3.3.0</version>
</dependency>
创建实体类User
public class User {

    private String name;

    private int age;

    public String getName() {

        return name;
    }

    public void setName(String name) {

        this.name = name;
    }

    public int getAge() {

        return age;
    }

    public void setAge(int age) {

        this.age = age;
    }


    public User() {

    }

    public User(String name, int age) {

        this.name = name;
        this.age = age;
    }


    @Override
    public String toString() {

        return "User{" +
                "name='" + name + '\'' +
                ", age=" + age +
                '}';
    }
}
目标类,Service类
public class UserServiceImpl {

    public List<User> findUserList() {

        return Collections.singletonList(new User("zayton", 24));
    }
}
cglib代理类
public class CglibProxy<T> implements MethodInterceptor {


    private static final Logger logger = LoggerFactory.getLogger(CglibProxy.class);

    private Object target;


    public  T getTargetClass(Object target) {

        //设置被代理的目标类
        this.target = target;
        // 创建加强器设置代理类以及回调,当代理类被调用时,callback就会去调用intercept
        Enhancer enhancer = new Enhancer();
        enhancer.setSuperclass(this.target.getClass());
        enhancer.setCallback(this);
        //返回代理类
        return (T) enhancer.create();
    }

    @Override
    public Object intercept(Object o, Method method, Object[] args, MethodProxy methodProxy) throws Throwable {

        logger.info("调用被代理对象的方法,代理对象:[{}],代理方法:[{}]", o.getClass().getName(), method.getName());
        Object result = methodProxy.invokeSuper(o, args);
        logger.info("代理调用结束,返回结果:[{}]", String.valueOf(result));

        return null;
    }
}
测试代码
public class CglibProxyDemo {

    public static void main(String[] args) {

        UserServiceImpl targetClass = new CglibProxy<UserServiceImpl>().getTargetClass(new UserServiceImpl());
        targetClass.findUserList();
    }
}
Cglib代理流程
如下图所示,通过Enhancer去配置各种代理类的参数,然后生成代理类;其中final类不能被代理,因为它无法被子类覆盖。

SpringAOP中Cglib代理实现
源码如下,大致流程跟我们写的示例代码差不多。
@Override
public Object getProxy(@Nullable ClassLoader classLoader) {

  //忽略....

  try {

     //忽略....

    // 重点看这里,通过enhancer设置各种参数来构建代理对象
    Enhancer enhancer = createEnhancer();
    if (classLoader != null) {

      enhancer.setClassLoader(classLoader);
      if (classLoader instanceof SmartClassLoader &&
          ((SmartClassLoader) classLoader).isClassReloadable(proxySuperClass)) {

        enhancer.setUseCache(false);
      }
    }
    enhancer.setSuperclass(proxySuperClass);
    enhancer.setInterfaces(AopProxyUtils.completeProxiedInterfaces(this.advised));
    enhancer.setNamingPolicy(SpringNamingPolicy.INSTANCE);
    enhancer.setStrategy(new ClassLoaderAwareGeneratorStrategy(classLoader));

    // 获取目标代理类中的方法
    Callback[] callbacks = getCallbacks(rootClass);
    Class<?>[] types = new Class<?>[callbacks.length];
    for (int x = 0; x < types.length; x++) {

      types[x] = callbacks[x].getClass();
    }
    enhancer.setCallbackFilter(new ProxyCallbackFilter(
        this.advised.getConfigurationOnlyCopy(), this.fixedInterceptorMap, this.fixedInterceptorOffset));
    enhancer.setCallbackTypes(types);

    // 生成代理对象(重点)
    return createProxyClassAndInstance(enhancer, callbacks);
  }
  catch (CodeGenerationException | IllegalArgumentException ex) {

    //忽略....
  }
  catch (Throwable ex) {

   //忽略....
  }
}
JDK代理
什么是JDK代理
JDK动态代理是JDK自带的一种代理,我们通过继承InvocationHandler就可以实现。前提是目标类需要实现接口才能使用JDK代理。
JDK动态代理创建的案例
JDK动态代理不需要额外引用其他依赖,首先我们定义接口,实体类则沿用上文的User类
public interface UserService {

    List<User> findUserList();
}
创建实现类UserServiceImpl
public class UserServiceImpl implements UserService{


    @Override
    public List<User> findUserList() {

        return Collections.singletonList(new User("zayton", 24));
    }
}
JDK代理类
public class JDKProxy<T> {

    private static final Logger logger = LoggerFactory.getLogger(JDKProxy.class);

    private Object target;

    public JDKProxy(Object target) {

        this.target = target;
    }

    public T getTargetProxy() {

        UserService proxy;
        ClassLoader loader = target.getClass().getClassLoader();
        Class[] interfaces = new Class[]{
    UserService.class};
        //objProxy: 代理对象。 一般不使用该对象 method: 正在被调用的方法 args: 调用方法传入的参数
        InvocationHandler handler = (objProxy, method, args) -> {

            logger.info("代理方法被调用前,方法名称[{}]", method.getName());
            Object result = null;
            try {

                result = method.invoke(target, args);
            } catch (NullPointerException e) {

                e.printStackTrace();
            }
            logger.info("代理方法调用结束,方法名称[{}],返回结果:[{}]", method.getName(), String.valueOf(result));
            return result;
        };
        /**
         * loader: 代理对象使用的类加载器.
         * interfaces: 指定代理对象的类型. 即代理代理对象中可以有哪些方法.
         * h: 当具体调用代理对象的方法时, 应该如何进行响应, 实际上就是调用 InvocationHandler 的 invoke 方法
         */
        proxy = (UserService) Proxy.newProxyInstance(loader, interfaces, handler);
        return (T) proxy;
    }
}
测试代码
public class JDKProxyDemo {

    public static void main(String[] args) {


        JDKProxy<UserService> jdkProxy=new JDKProxy<>(new UserServiceImpl());
        UserService userService = jdkProxy.getTargetProxy();
        System.out.println(userService.findUserList());
		 //将JDK动态代理生成的类保存本地
        System.getProperties().put("jdk.proxy.ProxyGenerator.saveGeneratedFiles", "true");
    }
}
JDK代理流程
通过debug可以发现上述代码执行到这段代码,它会通过generateClassFile()方法生成一个ClassFile
public static byte[] generateProxyClass(final String name,
                                        Class<?>[] interfaces,
                                        int accessFlags)
{

    ProxyGenerator gen = new ProxyGenerator(name, interfaces, accessFlags);
    final byte[] classFile = gen.generateClassFile();
    ...
}
generateClassFile方法如下,可以看到它将代理类的所有方法都封装成ProxyMethod对象,然后写入class文件:
private byte[] generateClassFile() {


    /* 第一步:将所有方法包装成ProxyMethod对象 */

    // 将Object类中hashCode、equals、toString方法包装成ProxyMethod对象
    addProxyMethod(hashCodeMethod, Object.class);
    addProxyMethod(equalsMethod, Object.class);
    addProxyMethod(toStringMethod, Object.class);

    // 将代理类接口方法包装成ProxyMethod对象
    for (Class<?> intf : interfaces) {

        for (Method m : intf.getMethods()) {

            addProxyMethod(m, intf);
        }
    }

    // 校验返回类型
    for (List<ProxyMethod> sigmethods : proxyMethods.values()) {

        checkReturnTypes(sigmethods);
    }

    /* 第二步:为代理类组装字段,构造函数,方法,static初始化块等 */
    try {

        // 添加构造函数,参数是InvocationHandler
        methods.add(generateConstructor());

        // 代理方法
        for (List<ProxyMethod> sigmethods : proxyMethods.values()) {

            for (ProxyMethod pm : sigmethods) {


                // 字段
                fields.add(new FieldInfo(pm.methodFieldName,
                    "Ljava/lang/reflect/Method;",
                        ACC_PRIVATE | ACC_STATIC));

                // 上述ProxyMethod中的方法
                methods.add(pm.generateMethod());
            }
        }

        // static初始化块
        methods.add(generateStaticInitializer());

    } catch (IOException e) {

        throw new InternalError("unexpected I/O Exception", e);
    }

    if (methods.size() > 65535) {

        throw new IllegalArgumentException("method limit exceeded");
    }
    if (fields.size() > 65535) {

        throw new IllegalArgumentException("field limit exceeded");
    }

    /* 第三步:写入class文件 */

    /*
        * Make sure that constant pool indexes are reserved for the
        * following items before starting to write the final class file.
        */
    cp.getClass(dotToSlash(className));
    cp.getClass(superclassName);
    for (Class<?> intf: interfaces) {

        cp.getClass(dotToSlash(intf.getName()));
    }

    /*
        * Disallow new constant pool additions beyond this point, since
        * we are about to write the final constant pool table.
        */
    cp.setReadOnly();

    ByteArrayOutputStream bout = new ByteArrayOutputStream();
    DataOutputStream dout = new DataOutputStream(bout);

    try {

        /*
            * Write all the items of the "ClassFile" structure.
            * See JVMS section 4.1.
            */
                                    // u4 magic;
        dout.writeInt(0xCAFEBABE);
                                    // u2 minor_version;
        dout.writeShort(CLASSFILE_MINOR_VERSION);
                                    // u2 major_version;
        dout.writeShort(CLASSFILE_MAJOR_VERSION);

        cp.write(dout);             // (write constant pool)

                                    // u2 access_flags;
        dout.writeShort(accessFlags);
                                    // u2 this_class;
        dout.writeShort(cp.getClass(dotToSlash(className)));
                                    // u2 super_class;
        dout.writeShort(cp.getClass(superclassName));

                                    // u2 interfaces_count;
        dout.writeShort(interfaces.length);
                                    // u2 interfaces[interfaces_count];
        for (Class<?> intf : interfaces) {

            dout.writeShort(cp.getClass(
                dotToSlash(intf.getName())));
        }

                                    // u2 fields_count;
        dout.writeShort(fields.size());
                                    // field_info fields[fields_count];
        for (FieldInfo f : fields) {

            f.write(dout);
        }

                                    // u2 methods_count;
        dout.writeShort(methods.size());
                                    // method_info methods[methods_count];
        for (MethodInfo m : methods) {

            m.write(dout);
        }

                                        // u2 attributes_count;
        dout.writeShort(0); // (no ClassFile attributes for proxy classes)

    } catch (IOException e) {

        throw new InternalError("unexpected I/O Exception", e);
    }

    return bout.toByteArray();
}
然后我们来看下通过 System.getProperties().put("jdk.proxy.ProxyGenerator.saveGeneratedFiles", "true");命令生成的代码,可以看它实现了UserSerivce,然后通过创建的Proxy调用InvocationHandler的invoke方法,执行我们自定义的invoke方法。
public final class $Proxy0 extends Proxy implements UserService {

    private static final Method m0;
    private static final Method m1;
    private static final Method m2;
    private static final Method m3;

    public $Proxy0(InvocationHandler var1) {

        super(var1);
    }

    public final int hashCode() {

        try {

            return (Integer)super.h.invoke(this, m0, (Object[])null);
        } catch (RuntimeException | Error var2) {

            throw var2;
        } catch (Throwable var3) {

            throw new UndeclaredThrowableException(var3);
        }
    }

    public final boolean equals(Object var1) {

        try {

            return (Boolean)super.h.invoke(this, m1, new Object[]{
    var1});
        } catch (RuntimeException | Error var2) {

            throw var2;
        } catch (Throwable var3) {

            throw new UndeclaredThrowableException(var3);
        }
    }

    public final String toString() {

        try {

            return (String)super.h.invoke(this, m2, (Object[])null);
        } catch (RuntimeException | Error var2) {

            throw var2;
        } catch (Throwable var3) {

            throw new UndeclaredThrowableException(var3);
        }
    }

    public final List findUserList() {

        try {

            return (List)super.h.invoke(this, m3, (Object[])null);
        } catch (RuntimeException | Error var2) {

            throw var2;
        } catch (Throwable var3) {

            throw new UndeclaredThrowableException(var3);
        }
    }

    static {

        try {

            m0 = Class.forName("java.lang.Object").getMethod("hashCode");
            m1 = Class.forName("java.lang.Object").getMethod("equals", Class.forName("java.lang.Object"));
            m2 = Class.forName("java.lang.Object").getMethod("toString");
            m3 = Class.forName("com.example.springboot.spring.aop.jdk.UserService").getMethod("findUserList");
        } catch (NoSuchMethodException var2) {

            throw new NoSuchMethodError(var2.getMessage());
        } catch (ClassNotFoundException var3) {

            throw new NoClassDefFoundError(var3.getMessage());
        }
    }

    private static MethodHandles.Lookup proxyClassLookup(MethodHandles.Lookup var0) throws IllegalAccessException {

        if (var0.lookupClass() == Proxy.class && var0.hasFullPrivilegeAccess()) {

            return MethodHandles.lookup();
        } else {

            throw new IllegalAccessException(var0.toString());
        }
    }
}
SpringAOP中JDK代理流程
执行源码如下:
@Override
public Object getProxy(@Nullable ClassLoader classLoader) {

	if (logger.isTraceEnabled()) {

		logger.trace("Creating JDK dynamic proxy: " + this.advised.getTargetSource());
	}
	// 调用 JDK 的 Proxy#newProxyInstance(..) 方法创建代理对象
  		// 传入的参数就是当前 ClassLoader 类加载器、需要代理的接口、InvocationHandler 实现类
	return Proxy.newProxyInstance(classLoader, this.proxiedInterfaces, this);
}

@Override
@Nullable
public Object invoke(Object proxy, Method method, Object[] args) throws Throwable {

   Object oldProxy = null;
   boolean setProxyContext = false;

   TargetSource targetSource = this.advised.targetSource;
   Object target = null;

   try {

       // 执行的是equal方法
       if (!this.equalsDefined && AopUtils.isEqualsMethod(method)) {

           // The target does not implement the equals(Object) method itself.
           return equals(args[0]);
       }
       // 执行的是hashcode方法
       else if (!this.hashCodeDefined && AopUtils.isHashCodeMethod(method)) {

           // The target does not implement the hashCode() method itself.
           return hashCode();
       }
       // 如果是包装类,则dispatch to proxy config
       else if (method.getDeclaringClass() == DecoratingProxy.class) {

           // There is only getDecoratedClass() declared -> dispatch to proxy config.
           return AopProxyUtils.ultimateTargetClass(this.advised);
       }
       // 用反射方式来执行切点
       else if (!this.advised.opaque && method.getDeclaringClass().isInterface() &&
               method.getDeclaringClass().isAssignableFrom(Advised.class)) {

           // Service invocations on ProxyConfig with the proxy config...
           return AopUtils.invokeJoinpointUsingReflection(this.advised, method, args);
       }

       Object retVal;

       if (this.advised.exposeProxy) {

           // Make invocation available if necessary.
           oldProxy = AopContext.setCurrentProxy(proxy);
           setProxyContext = true;
       }

       // Get as late as possible to minimize the time we "own" the target,
       // in case it comes from a pool.
       target = targetSource.getTarget();
       Class<?> targetClass = (target != null ? target.getClass() : null);

       // 获取拦截链
       List<Object> chain = this.advised.getInterceptorsAndDynamicInterceptionAdvice(method, targetClass);

       // Check whether we have any advice. If we don't, we can fallback on direct
       // reflective invocation of the target, and avoid creating a MethodInvocation.
       if (chain.isEmpty()) {

           // We can skip creating a MethodInvocation: just invoke the target directly
           // Note that the final invoker must be an InvokerInterceptor so we know it does
           // nothing but a reflective operation on the target, and no hot swapping or fancy proxying.
           Object[] argsToUse = AopProxyUtils.adaptArgumentsIfNecessary(method, args);
           retVal = AopUtils.invokeJoinpointUsingReflection(target, method, argsToUse);
       }
       else {

           // We need to create a method invocation...
           MethodInvocation invocation =
                   new ReflectiveMethodInvocation(proxy, target, method, args, targetClass, chain);
           // Proceed to the joinpoint through the interceptor chain.
           retVal = invocation.proceed();
       }

       // Massage return value if necessary.
       Class<?> returnType = method.getReturnType();
       if (retVal != null && retVal == target &&
               returnType != Object.class && returnType.isInstance(proxy) &&
               !RawTargetAccess.class.isAssignableFrom(method.getDeclaringClass())) {

           // Special case: it returned "this" and the return type of the method
           // is type-compatible. Note that we can't help if the target sets
           // a reference to itself in another returned object.
           retVal = proxy;
       }
       else if (retVal == null && returnType != Void.TYPE && returnType.isPrimitive()) {

           throw new AopInvocationException(
                   "Null return value from advice does not match primitive return type for: " + method);
       }
       return retVal;
   }
   finally {

       if (target != null && !targetSource.isStatic()) {

           // Must have come from TargetSource.
           targetSource.releaseTarget(target);
       }
       if (setProxyContext) {

           // Restore old proxy.
           AopContext.setCurrentProxy(oldProxy);
       }
   }
}
参考文献
https://www.pdai.tech/md/spring/spring-x-framework-aop-source-3.html
https://www.pdai.tech/md/spring/spring-x-framework-aop-source-4.html
https://javadoop.com/post/spring-aop-source
https://juejin.cn/post/7153214385236738055
智能推荐
oracle 12c 集群安装后的检查_12c查看crs状态-程序员宅基地
文章浏览阅读1.6k次。安装配置gi、安装数据库软件、dbca建库见下:http://blog.csdn.net/kadwf123/article/details/784299611、检查集群节点及状态:[root@rac2 ~]# olsnodes -srac1 Activerac2 Activerac3 Activerac4 Active[root@rac2 ~]_12c查看crs状态
解决jupyter notebook无法找到虚拟环境的问题_jupyter没有pytorch环境-程序员宅基地
文章浏览阅读1.3w次,点赞45次,收藏99次。我个人用的是anaconda3的一个python集成环境,自带jupyter notebook,但在我打开jupyter notebook界面后,却找不到对应的虚拟环境,原来是jupyter notebook只是通用于下载anaconda时自带的环境,其他环境要想使用必须手动下载一些库:1.首先进入到自己创建的虚拟环境(pytorch是虚拟环境的名字)activate pytorch2.在该环境下下载这个库conda install ipykernelconda install nb__jupyter没有pytorch环境
国内安装scoop的保姆教程_scoop-cn-程序员宅基地
文章浏览阅读5.2k次,点赞19次,收藏28次。选择scoop纯属意外,也是无奈,因为电脑用户被锁了管理员权限,所有exe安装程序都无法安装,只可以用绿色软件,最后被我发现scoop,省去了到处下载XXX绿色版的烦恼,当然scoop里需要管理员权限的软件也跟我无缘了(譬如everything)。推荐添加dorado这个bucket镜像,里面很多中文软件,但是部分国外的软件下载地址在github,可能无法下载。以上两个是官方bucket的国内镜像,所有软件建议优先从这里下载。上面可以看到很多bucket以及软件数。如果官网登陆不了可以试一下以下方式。_scoop-cn
Element ui colorpicker在Vue中的使用_vue el-color-picker-程序员宅基地
文章浏览阅读4.5k次,点赞2次,收藏3次。首先要有一个color-picker组件 <el-color-picker v-model="headcolor"></el-color-picker>在data里面data() { return {headcolor: ’ #278add ’ //这里可以选择一个默认的颜色} }然后在你想要改变颜色的地方用v-bind绑定就好了,例如:这里的:sty..._vue el-color-picker
迅为iTOP-4412精英版之烧写内核移植后的镜像_exynos 4412 刷机-程序员宅基地
文章浏览阅读640次。基于芯片日益增长的问题,所以内核开发者们引入了新的方法,就是在内核中只保留函数,而数据则不包含,由用户(应用程序员)自己把数据按照规定的格式编写,并放在约定的地方,为了不占用过多的内存,还要求数据以根精简的方式编写。boot启动时,传参给内核,告诉内核设备树文件和kernel的位置,内核启动时根据地址去找到设备树文件,再利用专用的编译器去反编译dtb文件,将dtb还原成数据结构,以供驱动的函数去调用。firmware是三星的一个固件的设备信息,因为找不到固件,所以内核启动不成功。_exynos 4412 刷机
Linux系统配置jdk_linux配置jdk-程序员宅基地
文章浏览阅读2w次,点赞24次,收藏42次。Linux系统配置jdkLinux学习教程,Linux入门教程(超详细)_linux配置jdk
随便推点
matlab(4):特殊符号的输入_matlab微米怎么输入-程序员宅基地
文章浏览阅读3.3k次,点赞5次,收藏19次。xlabel('\delta');ylabel('AUC');具体符号的对照表参照下图:_matlab微米怎么输入
C语言程序设计-文件(打开与关闭、顺序、二进制读写)-程序员宅基地
文章浏览阅读119次。顺序读写指的是按照文件中数据的顺序进行读取或写入。对于文本文件,可以使用fgets、fputs、fscanf、fprintf等函数进行顺序读写。在C语言中,对文件的操作通常涉及文件的打开、读写以及关闭。文件的打开使用fopen函数,而关闭则使用fclose函数。在C语言中,可以使用fread和fwrite函数进行二进制读写。 Biaoge 于2024-03-09 23:51发布 阅读量:7 ️文章类型:【 C语言程序设计 】在C语言中,用于打开文件的函数是____,用于关闭文件的函数是____。
Touchdesigner自学笔记之三_touchdesigner怎么让一个模型跟着鼠标移动-程序员宅基地
文章浏览阅读3.4k次,点赞2次,收藏13次。跟随鼠标移动的粒子以grid(SOP)为partical(SOP)的资源模板,调整后连接【Geo组合+point spirit(MAT)】,在连接【feedback组合】适当调整。影响粒子动态的节点【metaball(SOP)+force(SOP)】添加mouse in(CHOP)鼠标位置到metaball的坐标,实现鼠标影响。..._touchdesigner怎么让一个模型跟着鼠标移动
【附源码】基于java的校园停车场管理系统的设计与实现61m0e9计算机毕设SSM_基于java技术的停车场管理系统实现与设计-程序员宅基地
文章浏览阅读178次。项目运行环境配置:Jdk1.8 + Tomcat7.0 + Mysql + HBuilderX(Webstorm也行)+ Eclispe(IntelliJ IDEA,Eclispe,MyEclispe,Sts都支持)。项目技术:Springboot + mybatis + Maven +mysql5.7或8.0+html+css+js等等组成,B/S模式 + Maven管理等等。环境需要1.运行环境:最好是java jdk 1.8,我们在这个平台上运行的。其他版本理论上也可以。_基于java技术的停车场管理系统实现与设计
Android系统播放器MediaPlayer源码分析_android多媒体播放源码分析 时序图-程序员宅基地
文章浏览阅读3.5k次。前言对于MediaPlayer播放器的源码分析内容相对来说比较多,会从Java-&amp;gt;Jni-&amp;gt;C/C++慢慢分析,后面会慢慢更新。另外,博客只作为自己学习记录的一种方式,对于其他的不过多的评论。MediaPlayerDemopublic class MainActivity extends AppCompatActivity implements SurfaceHolder.Cal..._android多媒体播放源码分析 时序图
java 数据结构与算法 ——快速排序法-程序员宅基地
文章浏览阅读2.4k次,点赞41次,收藏13次。java 数据结构与算法 ——快速排序法_快速排序法