Unity优化之Texture (记录1)_unity avpro video texture has out of range width /-程序员宅基地
技术标签: unity压缩包和优化相关
///一些Texture的设置Unity2019.4新特性
HDR Textures
When importing from an EXR or HDR
file containing HDR information, the Texture Importer automatically chooses the right HDR format for the output Texture. This format changes automatically depending on which platform you are building for.
Ideally, Texture dimension sizes should be powers of two on each side (that is, 2, 4, 8, 16, 32, 64, 128, 256, 512, 1024, 2048 pixels (px), and so on). The Textures do not have to be square; that is the width can be different from height.
It is possible to use NPOT (non-power of two) Texture sizes with Unity. However, NPOT Texture sizes generally take slightly more memory and might be slower for the GPU to sample, so it’s better for performance to use power of two sizes whenever you can.
If the platform or GPU does not support NPOT Texture sizes, Unity scales and pads the Texture up to the next power of two size. This process uses more memory and makes loading slower (especially on older mobile devices). In general, you should only use NPOT sizes for GUI purposes.
You can scale up NPOT Texture Assets at import time using the Non Power of 2 option in the Advanced section of the Texture Importer.
Note: Specific platforms may impose maximum Texture dimension sizes. For DirectX, the maximum Texture sizes for different feature levels are as follows:
| Graphics APIs / Feature levels |
Maximum 2D and Cubemap |
| DX9 Shader |
2048 |
| DX9 Shader Model 3 (PC GPUs before 2006) / Windows Phone DX11 9.3 level / OpenGL ES 3.0 |
4096 |
| DX10 Shader Model 4 / GL3 (PC GPUs before 2007) / OpenGL ES 3.1 |
8192 |
| DX11 Shader Model 5 / GL4 (PC GPUs since 2008) |
16384 |
Notes:
- The Texture Importer only allows you to choose dimension sizes up to 8K (that is 8192 x 8192 px).
- Most Mail GPUs support Texture dimension sizes up to 4K for cubemaps.
Mip maps are lists of progressively smaller versions of an image. When a texture uses mip maps, Unity automatically uses a smaller version of the texture when it is far away from the Camera
. This reduces the performance cost of rendering
the texture, without noticeable loss of detail. Mip maps can also reduce texture aliasing and shimmering.
Enabling mipmaps uses 33% more memory, so you should use it only on textures whose distance from the Camera will change. You should not use it on textures whose distance from the Camera will not change, such as textures used for UI
, skyboxes, and so on.
You can control the way that Unity loads mipmaps at runtime using Texture Streaming.
Normal maps are used by normal map Shaders to make low-polygon models look as if they contain more detail. Unity uses normal maps encoded as RGB images. You also have the option to generate a normal map from a grayscale height map image.
An alpha map is a Texture that contains only alpha information. You can use an alpha map to apply varying levels of transparency to a Material.
You can create an alpha map by creating a Texture with information in the alpha channel, or by creating a grayscale Texture and converting the grayscale values to alpha in Unity.
See the documentation on the Alpha Source Texture import setting for more information.
If you want to make a Terrain, you normally use your main Texture to show areas of terrain
such as grass, rocks and sand. If your terrain is large, it may end up very blurry. Detail Textures hide this fact by fading in small details as your main Texture gets closer.
When drawing Detail Textures, a neutral gray is invisible, white makes the main Texture twice as bright, and black makes the main Texture completely black.
See documentation on Secondary Maps (Detail Maps) for more information.
To use a Texture for reflection maps (for example, in Reflection Probes
or a cubemapped Skybox
, set the Texture Shape to Cube. See documentation on Cubemap Textures for more information.
Anisotropic filtering increases Texture quality when viewed from a grazing angle. This rendering is resource-intensive on the graphics card. Increasing the level of anisotropy is usually a good idea for ground and floor Textures. Use Quality settings to force anisotropic filtering for all Textures or disable it completely.
Unity can read the following file formats:
- BMP
- EXR
- GIF
- HDR
- IFF
- JPG
- PICT
- PNG
- PSD
- TGA
- TIFF
Note that Unity can import multi-layer Photoshop PSD or TIFF files, which Unity automatically flattens on import so that there is no size penalty for your game. This flattening happens to the imported data in Unity, not to the file itself, so you can continue to save and import your PSD or TIFF files without losing any of your work when using these file types natively. This is important, because it allows you to have just one copy of each Texture which you can use in different applications: Photoshop; your 3D modeling application; and in Unity.
Texture Import Settings
The Texture Import Settings window defines how Unity imports images from your project’s Assets folder into the Unity Editor.
To access this window, select the image file in the Project window
. The Texture Import Settings window appears in the Inspector
.
Note: Some of the less commonly used properties are hidden by default. Expand the Advanced section in the Inspector window to view these.

The Texture Import Settings window
There are several sections on the Texture Import Settings window:
(A) Texture Type. Select the type of Texture you want to create.
(B) Texture Shape. Select the shape and set properties specific to that shape in this area.
(C) Type-specific and advanced settings. Depending on what Texture Type value you select, extra properties might appear in this area. For more information, see the documentation on Texture types.
(D) Platform-specific overrides. Use the Platform-specific overrides panel to set default options and their overrides for a specific platforms.
(E) Texture preview. You can preview the Texture and adjust its values here.
Texture Type
Use the Texture Type property to select the type of Texture you want to create from the source image file. The other properties in the Texture Import settings window change depending on the value you set.
For information about specific Texture Types, see the Texture Types documentation.
| Property: |
Function: |
| Default |
This is the most common setting used for all Textures. It provides access to most of the properties for Texture importing. For more information, see the Default Texture type. |
| Normal map |
Select this to turn the color channels into a format suitable for real-time normal mapping. For more information, see the Normal map Texture type documentation. |
| Editor GUI and Legacy GUI |
Select this if you are using the Texture on any HUD or GUI controls. For more information, see the Editor GUI and Legacy GUI Texture type documentation. |
| Sprite (2D and UI) |
Select this if you are using the Texture in a 2D game as a Sprite |
| Cursor |
Select this if you are using the Texture as a custom cursor. For more information, see the Cursor Texture type documentation. |
| Cookie |
Select this to set your Texture up with the basic parameters used for the Cookies of your Scene |
| Lightmap |
Select this if you are using the Texture as a Lightmap. This option enables encoding into a specific format (RGBM or dLDR, depending on the platform) and a post-processing |
| Single Channel |
Select this if you only need one channel in the Texture. For information on the properties available only for the this type, see the Single Channel Texture type documentation. |
Texture Shape
Use the Texture Shape property to select and define the shape and structure of the Texture. There are two shape types:
- 2D is the most common setting for all Textures; it defines the image file as a 2D Texture. These are used to map Textures to 3D Meshes and GUI elements, among other Project elements.
- Cube defines the Texture as a cubemap
. You could use this for Skyboxes or Reflection Probes
, for example. This type is only available with the Default, Normal Map, and Single Channel Texture types.
Cubemap mapping
You can further refine cubemaps with the following properties (not available with the 2D Texture shape):
| Property: |
Function: |
|
| Mapping |
Use Mapping to specify how the Texture is projected onto your GameObject |
|
| Auto |
Unity tries to create the layout from the Texture information. |
|
| 6 Frames Layout (Cubic Environment) |
The Texture contains six images arranged in one of the standard cubemap layouts: cross, or sequence (+x -x +y -y +z -z). The images can be orientated either horizontally or vertically. |
|
| Latitude Longitude (Cylindrical) |
Maps the Texture to a 2D Latitude-Longitude representation. |
|
| Mirrored Ball (Sphere Mapped) |
Maps the Texture to a sphere-like cubemap. |
|
| Convolution Type |
Choose the type of pre-convolution (filtering) that you want to use for this Texture. The result of pre-convolution is stored in mips. |
|
| None |
The Texture has no pre-convolution (no filtering). This is the default. |
|
| Specular (Glossy Reflection) |
Select this to use cubemaps as Reflection Probes. The Texture mip maps are pre-convoluted (filtered) with the engine BRDF. For more information, see Wikipedia’s page on Bidirectional reflectance distribution function. |
|
| Diffuse (Irradiance) |
The Texture is convoluted (filtered) to represent irradiance. This is useful if you use the cubemap as a Light Probe |
|
| Fixup Edge Seams |
This option is only available with the None or Diffuse convolution (filter). Use this on low-end platforms as a work-around for filtering limitations, such as cubemaps incorrectly filtered between faces. |
|
Type-specific and advanced settings
Depending on which Texture Type you select, different options might appear on the Texture Import Settings window. Some of these options are specific to the Texture Type itself, such as the Sprite Mode settings available with the Sprite (2D and UI) type.
The Advanced settings allow you to make finer adjustments to the way Unity handles your Texture. The order and availability of these settings might vary slightly depending on the Texture Type you choose.
| Property: |
Description: |
Supported by: |
|
| Enable this property to specify that the Texture is stored in gamma space. This should always be checked for non-HDR color Textures (such as Albedo and Specular Color). If the Texture stores information that has a specific meaning, and you need the exact values in the Shader (for example, the smoothness or the metalness), disable this property. This property is enabled by default. |
|||
| Specify how the alpha channel of the Texture is generated. This is set to None by default. |
Default, |
||
| None |
The imported Texture does not have an alpha channel, whether or not the input Texture has one. |
||
| Input Texture Alpha |
This uses the alpha from the input Texture if a Texture is provided. |
||
| From Gray Scale |
This generates the alpha from the mean (average) of the input Texture RGB values. |
||
| Enable this property to dilate the color and avoid filtering artifacts on the edges if the alpha channel you specify is Transparency. |
Default, |
||
| Enable special processing for Photoshop files that use transparency (blending color pixels with white). |
Default, |
||
| Enable this property to ignore the Gamma attribute in PNG files. This property does not effect other file formats. |
|||
| If the Texture has a non-power of two (NPOT) dimension size, this defines a scaling behavior at import time. See documentation on Importing Textures for more information on non-power of two sizes. This is set to None by default. |
Default, |
||
| None |
Texture dimension size stays the same. |
||
| To nearest |
Scale the Texture to the nearest power-of-two dimension size at import time. For example, a 257x511 px Texture is scaled to 256x512 px. Note that PVRTC |
||
| To larger |
Scale the Texture to the power-of-two dimension size of the largest dimension size value at import time. For example, a 257x511 px Texture is scaled to 512x512 px. |
||
| To smaller |
Scale the Texture to the power-of-two dimension size of the smallest dimension size value at import time. For example, a 257x511 px Texture is scaled to 256x256 px. |
||
| Enable this property to access the Texture data from scripts using Texture2D.SetPixels, Texture2D.GetPixels and other Texture2D methods. Internally, Unity uses a copy of the Texture data for script access, which doubles the amount of memory required for the Texture. This property is therefore disabled by default, and you should enable it only if you require script access. For more information, see Texture2D. |
|||
| Enable this property to use the Texture solely in combination with a Texture Stack for Virtual Texturing. When enabled, the texture is not guaranteed to be available as a Texture2D in the Player (that is, not accessible from a script). When disabled, the Player includes the texture both as a Texture2D (accessible from script) and as a streamable texture in a Texture Stack. |
|||
| Enable this property to use Texture Streaming on this Texture. This setting is valid for any Texture in the 3D environment that Unity displays with a Mesh Renderer. Diffuse Textures, normal maps and light maps are all valid for Texture Streaming. |
|||
| Mip Map Priority |
Use this to set the priority of the mipmap. Unity uses this to determine which mipmaps to prioritize when assigning resources. Higher values represent a higher priority (for example, 3 is a higher priority than 1). This setting is only available when Streaming Mip Maps is enabled. |
||
| Enable this property to enable mip map generation. Mip maps are smaller versions of the Texture that get used when the Texture is very small on screen. See documentation on Importing Textures for more information on mip maps. |
|||
| Border Mip Maps |
Enable this property to avoid colors bleeding out to the edge of the lower MIP levels. Used for light cookies (see below). This property is disabled by default. |
||
| Mip Map Filtering |
There are two ways of mipmap filtering available for optimizing image quality. The default option is Box. |
||
| Box |
This is the simplest way to fade out mipmaps. The MIP levels become smoother as they go down in dimension size. |
||
| Kaiser |
A sharpening algorithm runs on the mipmaps as they go down in dimension size. Try this option if your Textures are too blurry in the distance. (The algorithm is of the Kaiser Window type; see Wikipediafor further information.) |
||
| Mip Maps Preserve Coverage |
Enable this property if you want the alpha channel of generated mipmaps to preserve coverage during the alpha test. See TextureImporterSettings.mipMapsPreserveCoverage for more information. |
||
| Alpha Cutoff Value |
Set the reference value for controlling the Mip Map coverage during the alpha test. |
||
| Fadeout Mip Maps |
Enable this property to make the mipmaps fade to gray as the MIP levels progress. This is used for detail maps. The left-most scroll is the first MIP level to begin fading out. The right-most scroll defines the MIP level where the Texture is completely grayed out. |
||
| Select how the Texture behaves when tiled. The default option is Repeat. |
|||
| Repeat |
Repeats the Texture in tiles. |
||
| Clamp |
Stretches the Texture’s edges. |
||
| Mirror |
Mirrors the Texture at every integer boundary to create a repeating pattern. |
||
| Mirror Once |
Mirrors the Texture once, then clamps it to edge pixels. |
||
| Per-axis |
Choose this to individually control how Unity wraps Textures at the U axis and V axis. |
||
| Select how the Texture is filtered when it gets stretched by 3D transformations. The default option is Bilinear. |
|||
| Point (no filter) |
The Texture appears blocky up close. |
||
| Bilinear |
The Texture appears blurry up close. |
||
| Trilinear |
Like Bilinear, but the Texture also blurs between the different MIP levels. |
||
| Increases Texture quality when viewing the Texture at a steep angle. Anisotrpic filtering is good for floor and ground Textures but comes at a high performance cost. See documentation on Importing Textures for more information on Anisotropic filtering. |
|||
Platform-specific overrides
When building for different platforms, you need to think about the resolution, the file size with associated memory size requirements, the quality of your Textures, and what compression format to use for each target platform. The Platform-specific overrides panel provides one tab for the Default options, and one tab for every target platform you are building for.

Platform-specific overrides panel
To set up override values:
- Set the default properties on the Default tab.
- Navigate to a specific target platform tab and enable the Override for <target-platform> option.
- Set the override properties.
The following table describes which properties are available:
| Property: |
Function: |
|
| Max Size |
Set the maximum imported Texture dimensions in pixels |
|
| Resize Algorithm |
Choose an algorithm for downscaling the Texture when the Texture dimensions are larger than the specified Max Size. |
|
| Mitchell |
Resize the Texture using the Mitchell algorithm. This is the default resize algorithm. |
|
| Bilinear |
Resize the Texture using bilinear interpolation. For images where small, sharp details are important, this can preserve more of these details than Mitchell. |
|
| Format |
Bypass the automatic system to specify what internal representation to use for the Texture. The list of available formats depends on the platform and Texture type. For more information, see Texture formats for platform-specific overrides. |
|
| Compression |
Choose the compression type for the Texture. This helps Unity choose the right compression format for a Texture. Depending on the platform and the availability of compression formats, different settings might end up with the same internal format. For example, Low Quality Compression affects mobile platforms, but not desktop platforms. |
|
| None |
Do not compress the Texture. |
|
| Low Quality |
Compress the Texture in a low-quality format. This might use less memory than Normal Quality. |
|
| Normal Quality |
Compress the Texture using a standard format. |
|
| High Quality |
Compress the Texture in a high-quality format. This might use more memory than Normal Quality. |
|
| Use Crunch Compression |
Use crunch compression, if applicable. Crunch is a lossy compression format on top of DXT or ETC Texture compression |
|
| Compressor Quality |
When using Crunch Texture compression, use the slider to adjust the quality. A higher compression quality means larger Textures and longer compression times. |
|
| Allows alpha splitting for this Texture on these platforms: tvOS, iOS |
||
| ETC2 texture decompression fallback override on Android devices that don’t support ETC2. |
||
Texture types
You can import different Texture
types into the Unity Editor via the Texture Importer.
Below are the properties available to configure the various Texture types in Unity in the Texture Inspector
window. Scroll down or select from the list below to find details of the Texture type you wish to learn about.
Default
Default is the most common Texture type used for all Textures. It provides access to most of the properties for Texture importing. With this Texture type, you can also change the Texture Shape property to define the Texture Shape.

Settings for the Default Texture Type
When you choose the Default Texture type, the following properties are available (click the links for detailed information on each property):
| Property: |
Function: |
| sRGB (Color Texture) |
Enable this property to specify that the Texture is stored in gamma space. More info. |
| Alpha Source |
Specify how the alpha channel of the Texture is generated. More info. |
| Alpha is Transparency |
Enable this property to dilate the color and avoid filtering artifacts on the edges if the alpha channel you specify is Transparency. More info. |
| Remove Matte (PSD) |
Enable special processing for Photoshop files that use transparency (blending color pixels with white). More info |
| Ignore PNG file gamma |
Enable this property to ignore the Gamma attribute in PNG files. More info. |
| Non Power of 2 |
If the Texture has a non-power of two (NPOT) dimension size, this defines a scaling behavior at import time. More info. |
| Read/Write Enabled |
Enable this to access the Texture data from scripts |
| Virtual Texture Only |
Enable this texture to use it solely in combination with a Texture Stack for Virtual Texturing. More info. |
| Streaming Mip Maps |
Enable this checkbox to use Texture Streaming on this Texture. More info. |
| Generate Mip Maps |
Check this box to enable mipmap generation. More info. |
| Wrap Mode |
Select how the Texture behaves when tiled. More info. |
| Filter Mode |
Select how the Texture is filtered when it gets stretched by 3D transformations. More info. |
| Aniso Level |
Increases Texture quality when viewing the Texture at a steep angle. More info. |
In addition, you can use the Platform-specific overrides panel to set default options and their overrides for a specific platforms.
Normal map
Select Normal map
to turn the color channels into a format suitable for real-time normal mapping. With this Texture type, you can also change the Texture Shape property to define the Texture Shape.
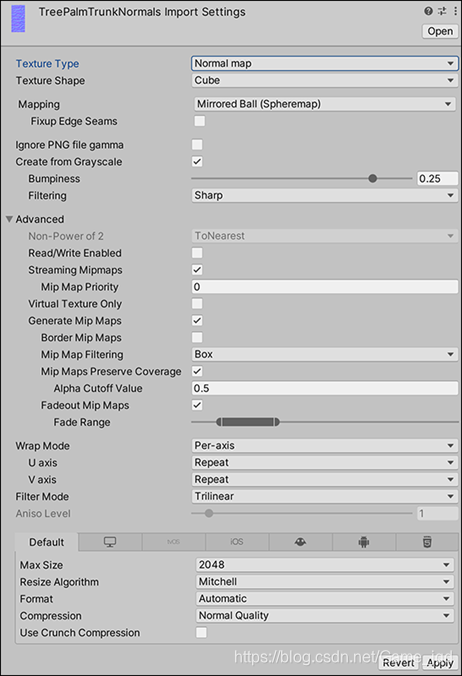
Settings for the Normal map Texture Type
When you choose the Normal map Texture type, you can set the following additional properties:
| Property: |
Function: |
|
| Create from Greyscale |
Enable this property to create the Normal Map from a greyscale heightmap |
|
| Bumpiness |
Control the amount of bumpiness. A low bumpiness value means that even sharp contrast in the heightmap is translated to gentle angles and bumps. A high value creates exaggerated bumps and very high-contrast lighting responses to the bumps. This option is only visible if Create from Greyscale is checked. |
|
| Filtering |
Determine how the bumpiness is calculated: |
|
| Ignore PNG file gamma |
Enable this property to ignore the Gamma attribute in PNG files. More info. |
|
| Non Power of 2 |
If the Texture has a non-power of two (NPOT) dimension size, this defines a scaling behavior at import time. More info. |
|
| Read/Write Enabled |
Enable this to access the Texture data from scripts using Texture2D.SetPixels, Texture2D.GetPixels and other Texture2Dmethods. More info. |
|
| Virtual Texture Only |
Enable this texture to use it solely in combination with a Texture Stack for Virtual Texturing. More info. |
|
| Streaming Mip Maps |
Enable this checkbox to use Texture Streaming on this Texture. More info. |
|
| Generate Mip Maps |
Check this box to enable mipmap generation. More info. |
|
| Wrap Mode |
Select how the Texture behaves when tiled. More info. |
|
| Filter Mode |
Select how the Texture is filtered when it gets stretched by 3D transformations. More info. |
|
| Aniso Level |
Increases Texture quality when viewing the Texture at a steep angle. More info. |
|
In addition, you can use the Platform-specific overrides panel to set default options and their overrides for a specific platforms.
Editor GUI and Legacy GUI
Select Editor GUI and Legacy GUI if you are using the Texture on any HUD or GUI controls. With this Texture type, the Texture Shape property is always set to 2D for this Texture Type. For more information, see the documentation on Texture Shapes.

Settings for the Editor GUI and Legacy GUI Texture Type
When you choose the Editor GUI and Legacy GUI Texture type, you can set the following additional properties:
| Property: |
Function: |
| Alpha Source |
Specify how the alpha channel of the Texture is generated. More info. |
| Alpha is Transparency |
Enable this property to dilate the color and avoid filtering artifacts on the edges if the alpha channel you specify is Transparency. More info. |
| Remove Matte (PSD) |
Enable special processing for Photoshop files that use transparency (blending color pixels with white). More info |
| Ignore PNG file gamma |
Enable this property to ignore the Gamma attribute in PNG files. More info. |
| Non Power of 2 |
If the Texture has a non-power of two (NPOT) dimension size, this defines a scaling behavior at import time. More info. |
| Read/Write Enabled |
Enable this to access the Texture data from scripts using Texture2D.SetPixels, Texture2D.GetPixels and other Texture2Dmethods. More info. |
| Generate Mip Maps |
Check this box to enable mipmap generation. More info. |
| Wrap Mode |
Select how the Texture behaves when tiled. More info. |
| Filter Mode |
Select how the Texture is filtered when it gets stretched by 3D transformations. More info. |
| Aniso Level |
Increases Texture quality when viewing the Texture at a steep angle. More info. |
In addition, you can use the Platform-specific overrides panel to set default options and their overrides for a specific platforms.
Sprite (2D and UI)
Select Sprite (2D and UI) if you are using the Texture in a 2D game as a Sprite
. With this Texture type, the Texture Shape property is always set to 2D for this Texture Type. For more information, see the documentation on Texture Shapes.

Settings for the Sprite (2D and UI) Texture Type
When you choose the Sprite (2D and UI) Texture type, you can set the following additional properties:
| Property: |
Function: |
|
| Specify how to extract the Sprite graphic from the image. The default for this option is Single. |
||
| Single |
Use the Sprite image as is. You can clip and edit the image in the Sprite Editor to refine it further, but Unity treats the Sprite generated from the imported Texture as a single Asset. |
|
| Multiple |
Choose this value if your image has several elements in the same image. You can then define the location of the elements in the Sprite Editor so that Unity knows how to split the image into different sub-Assets. For example, you can create animation frames from a single sheet with multiple poses, create Tiles |
|
| Polygon |
Choose this value to clip the Sprite Texture according to the Mesh |
|
| Packing Tag |
Specify (by name) the Sprite Atlas |
|
| Pixels Per Unit |
The number of pixels |
|
| Mesh Type |
Define the Mesh type for the Sprite you want Unity to generate. The default for this option is Tight. |
|
| Full Rect |
Choose this value to create a quad |
|
| Tight |
Choose this value to generate a Mesh based on pixel alpha value. The Mesh that Unity generates generally follows the shape of the Sprite. |
|
| Extrude Edges |
Use the slider to determine how much area to leave around the Sprite in the generated Mesh. |
|
| Pivot |
The location in the image where the Sprite’s local coordinate system originates. Choose one of the pre-set options, or select Custom to set your own Pivot location in X and Y. |
|
| Generate Physics Shape |
When this is enabled and you have not defined a Custom Physics Shape for this Sprite, Unity generates a default Physics Shape from the outline of the Sprite. |
|
| Sprite Editor |
Click this button to define how you want Unity to separate the elements on an image with Multiple elements (to create sub-Assets) or refine the shape, size, and pivot position of a Polygon shape. |
|
| sRGB (Color Texture) |
Enable this property to specify that the Texture is stored in gamma space. More info. |
|
| Alpha Source |
Specify how the alpha channel of the Texture is generated. More info. |
|
| Alpha is Transparency |
Enable this property to dilate the color and avoid filtering artifacts on the edges if the alpha channel you specify is Transparency. More info. |
|
| Remove Matte (PSD) |
Enable special processing for Photoshop files that use transparency (blending color pixels with white). More info |
|
| Ignore PNG file gamma |
Enable this property to ignore the Gamma attribute in PNG files. More info. |
|
| Read/Write Enabled |
Enable this to access the Texture data from scripts using Texture2D.SetPixels, Texture2D.GetPixels and other Texture2Dmethods. More info. |
|
| Generate Mip Maps |
Check this box to enable mipmap generation. More info. |
|
| Wrap Mode |
Select how the Texture behaves when tiled. More info. |
|
| Filter Mode |
Select how the Texture is filtered when it gets stretched by 3D transformations. More info. |
|
| Aniso Level |
Increases Texture quality when viewing the Texture at a steep angle. More info. |
|
In addition, you can use the Platform-specific overrides panel to set default options and their overrides for a specific platforms.
Cursor
Select Cursor to use the Texture as a custom cursor. With this Texture type, the Texture Shape property is always set to 2D for this Texture Type. For more information, see the documentation on Texture Shapes.

Settings for the Cursor Texture Type
When you choose the Cursor Texture type, you can set the following additional properties:
| Property: |
Function: |
| Alpha Source |
Specify how the alpha channel of the Texture is generated. More info. |
| Alpha is Transparency |
Enable this property to dilate the color and avoid filtering artifacts on the edges if the alpha channel you specify is Transparency. More info. |
| Remove Matte (PSD) |
Enable special processing for Photoshop files that use transparency (blending color pixels with white). More info |
| Ignore PNG file gamma |
Enable this property to ignore the Gamma attribute in PNG files. More info. |
| Non Power of 2 |
If the Texture has a non-power of two (NPOT) dimension size, this defines a scaling behavior at import time. More info. |
| Read/Write Enabled |
Enable this to access the Texture data from scripts using Texture2D.SetPixels, Texture2D.GetPixels and other Texture2Dmethods. More info. |
| Generate Mip Maps |
Check this box to enable mipmap generation. More info. |
| Wrap Mode |
Select how the Texture behaves when tiled. More info. |
| Filter Mode |
Select how the Texture is filtered when it gets stretched by 3D transformations. More info. |
| Aniso Level |
Increases Texture quality when viewing the Texture at a steep angle. More info. |
In addition, you can use the Platform-specific overrides panel to set default options and their overrides for a specific platforms.
Cookie
Select Cookie to set your Texture up with the basic parameters used for cookies in the Built-in Render Pipeline. With this Texture type, Unity updates the Texture Shapes property automatically based on the selected Light Type:
- Directional and Spotlight cookies are always 2D Textures (the 2D shape type).
- Point Light cookies must be cubemaps
(the Cube shape type).

Settings for the Cookie Texture Type
When you choose the Cookie Texture type, you can set the following additional properties:
| Property: |
Function: |
|
| Light Type |
Define the type of Light that the cookie is applied to. |
|
| Spotlight |
With this type of Light, you want the edges of your Cookie Texture to be solid black to get the proper effect, so Unity sets the Wrap Mode to Clamp by default. |
|
| Directional |
With this type of Light, this Texture tiles, so Unity sets the Wrap Mode to Repeatby default. |
|
| Point |
When you choose this type of Light, you can also customize the Cube shape-specific |
|
| Alpha Source |
Specify how the alpha channel of the Texture is generated. More info. |
|
| Alpha is Transparency |
Enable this property to dilate the color and avoid filtering artifacts on the edges if the alpha channel you specify is Transparency. More info. |
|
| Remove Matte (PSD) |
Enable special processing for Photoshop files that use transparency (blending color pixels with white). More info |
|
| Ignore PNG file gamma |
Enable this property to ignore the Gamma attribute in PNG files. More info. |
|
| Non Power of 2 |
If the Texture has a non-power of two (NPOT) dimension size, this defines a scaling behavior at import time. More info. |
|
| Read/Write Enabled |
Enable this to access the Texture data from scripts using Texture2D.SetPixels, Texture2D.GetPixels and other Texture2Dmethods. More info. |
|
| Generate Mip Maps |
Check this box to enable mipmap generation. More info. |
|
| Wrap Mode |
Select how the Texture behaves when tiled. More info. |
|
| Filter Mode |
Select how the Texture is filtered when it gets stretched by 3D transformations. More info. |
|
| Aniso Level |
Increases Texture quality when viewing the Texture at a steep angle. More info. |
|
In addition, you can use the Platform-specific overrides panel to set default options and their overrides for a specific platforms.
Lightmap
Select Lightmap
if you are using the Texture as a Lightmap. This option enables encoding into a specific format (RGBM or dLDR, depending on the platform) and a post-processing
step on Texture data (a push-pull dilation pass). With this Texture type, the Texture Shape property is always set to 2Dfor this Texture Type. For more information, see the documentation on Texture Shapes.

Settings for the Lightmap Texture Type
When you choose the Lightmap Texture type, you can set the following additional properties:
| Property: |
Function: |
| Ignore PNG file gamma |
Enable this property to ignore the Gamma attribute in PNG files. More info. |
| Non Power of 2 |
If the Texture has a non-power of two (NPOT) dimension size, this defines a scaling behavior at import time. More info. |
| Read/Write Enabled |
Enable this to access the Texture data from scripts using Texture2D.SetPixels, Texture2D.GetPixels and other Texture2Dmethods. More info. |
| Streaming Mip Maps |
Enable this checkbox to use Texture Streaming on this Texture. More info. |
| Generate Mip Maps |
Check this box to enable mipmap generation. More info. |
| Wrap Mode |
Select how the Texture behaves when tiled. More info. |
| Filter Mode |
Select how the Texture is filtered when it gets stretched by 3D transformations. More info. |
| Aniso Level |
Increases Texture quality when viewing the Texture at a steep angle. More info. |
In addition, you can use the Platform-specific overrides panel to set default options and their overrides for a specific platforms.
Single Channel
Select Single Channel if you only need one channel in the Texture. With this Texture type, you can also change the Texture Shape property to define the Texture Shape.

Settings for the Single Channel Texture Type
When you choose the Single Channel Texture type, you can set the following additional properties:
| Property: |
Function: |
|
| Specify whether you want Unity to treat the Texture as an Alpha or Red channel. |
||
| Alpha |
Use the alpha channel. This setting does not allow compression |
|
| Red |
Use the red color component. |
|
| Alpha Source |
Specify how the alpha channel of the Texture is generated. More info. |
|
| Alpha is Transparency |
Enable this property to dilate the color and avoid filtering artifacts on the edges if the alpha channel you specify is Transparency. More info. |
|
| Remove Matte (PSD) |
Enable special processing for Photoshop files that use transparency (blending color pixels with white). More info |
|
| Ignore PNG file gamma |
Enable this property to ignore the Gamma attribute in PNG files. More info. |
|
| Non Power of 2 |
If the Texture has a non-power of two (NPOT) dimension size, this defines a scaling behavior at import time. More info. |
|
| Read/Write Enabled |
Enable this to access the Texture data from scripts using Texture2D.SetPixels, Texture2D.GetPixels and other Texture2Dmethods. More info. |
|
| Streaming Mip Maps |
Enable this checkbox to use Texture Streaming on this Texture. More info. |
|
| Generate Mip Maps |
Check this box to enable mipmap generation. More info. |
|
| Wrap Mode |
Select how the Texture behaves when tiled. More info. |
|
| Filter Mode |
Select how the Texture is filtered when it gets stretched by 3D transformations. More info. |
|
| Aniso Level |
Increases Texture quality when viewing the Texture at a steep angle. More info. |
|
In addition, you can use the Platform-specific overrides panel to set default options and their overrides for a specific platforms.
Texture compression formats
The Unity Editor can import texture source files with a number of common formats, such as JPEG or PNG. However, GPUs do not use these formats at runtime; instead, they use different, specialized compression
formats that are optimized for memory usage and speed of sampling operations.
You can configure the texture compression
format for a texture asset in its import settings. When you add a texture asset to your project, the Unity Editor automatically chooses an appropriate compression format for each build target; however, most platforms support several texture compression formats.
Texture compression format can affect load times, GPU frame times, memory usage, visual quality, build size, and compression times; it is therefore important to understand this subject before you make changes to this setting.
This page contains the following information:
- Texture compression overview
- Crunch compression
- Applying texture compression formats to texture assets
For general information on texture asset import settings, see Texture import settings. For information on the recommended, default, and supported texture compression formats for each platform, see Recommended, default, and supported texture compression formats, by platform.
Texture compression overview
Bits per pixel
(bpp) is the amount of storage required for a single texture pixel. Textures with a lower bpp value have a smaller size on disk and in memory. A lower bpp value also means that the GPU uses less memory bandwidth to read the texture pixels. GPU memory bandwidth can often be a frame rate bottleneck, and thus texture compression helps to avoid it.
The higher the visual quality of a texture asset, the higher the bits per pixel; which, consequently, leads to greater build size, loading time, and runtime memory usage. All texture compression formats are lossy, to some extent. Uncompressed textures offer the highest quality, but they also have the highest bits per pixel. Different texture compression formats offer different trade-offs.
In general, for the best runtime performance and size on disk, for most of your texture assets, you should choose a texture compression format that is supported by your target device, and has the fewest bits per pixel for the visual quality you want.
When you use a texture for a specific purpose, you can change its individual settings. For example, if you are using a texture with only one channel as a mask, you might choose the BC4 format to reduce file size but preserve quality. If you are using some textures for pixel-perfect UI
, you might choose not to compress them.
Choose a format that your target platforms and devices support. When Unity loads a texture with a compression format that the device does not support, it decompresses the texture to the default uncompressed format for that platform and stores the uncompressed copy in memory alongside the original compressed texture. This increases texture loading time and uses additional memory. When Unity loads a texture with a compression format that the device supports, the GPU can use the data without any need for conversion.
Crunch compression
Crunch is a compression format that works on top of DXT or ETC compression, by providing additional variable bit rate compression. When Unity loads a Crunch-compressed texture, it decompresses the texture to DXT or ETC on the CPU, and then uploads the DXT or ETC compressed texture data to the GPU.
Crunch compression helps the texture use the lowest possible amount of disk space, but has no effect on runtime memory usage. Crunch textures can take a long time to compress, but decompression at runtime is fairly fast. You can adjust how lossy Crunch compression is, to strike a balance between file size and quality.
If you are particularly concerned about the size of your build and Crunch is supported on your target platform, consider adding Crunch compression.
Applying texture compression formats to texture assets
For information about texture import settings and how to set up platform-specific overrides, see Texture Import Settings.
Recommended, default, and supported texture compression formats, by platform
This page contains the following information:
- Terminology
- Recommended texture compression formats, by platform
- Desktop
- iOS and tvOS
- Android
- Default texture compression formats, by platform
- Supported texture compression formats, by platform
This page does not contain information about console platforms. For information about console platforms, see the platform-specific documentation.
For an overview of texture compression formats, see Texture compression formats. For information about texture import settings and how to set up platform-specific overrides, see Texture import settings.
Terminology
This page uses the following terminology:
- Bits per pixel
(bpp) is the amount of storage required for a single texture pixel. Textures with a lower bpp value have a smaller size on disk and in memory. A lower bpp value also means that the GPU can store more pixels in its cache, which results in faster texture access. - LDR (Low Dynamic Range) refers to most typical images where colors are conceptually between 0.0 (black) and 1.0 (white) values. The majority of image files (such as PNG and JPG) have low dynamic range.
- HDR
(High Dynamic Range) refers to special image and texture formats where colors can have a higher range than 0 through 1. Image file formats like .exr or .hdr are often used for HDR image data. At runtime and on the GPU, there are several HDR formats, trading off accuracy, range and memory usage. - RGB is a color model in which red, green and blue combine to reproduce an array of colors.
- RGBA is a version of RGB with an alpha channel, which supports blending and opacity alteration.
- Variable bit rate (VBR) means that bits per pixel is not a fixed value, and depends on the actual content instead. VBR only applies to Crunch compression, and only texture size on disk. The size in memory is the same as when using the underlying texture format (for example, RGB Compressed DXT1 for RGB Crunched DXT1).
Recommended texture compression formats, by platform
Desktop
For devices with DirectX 11 or better class GPUs, where support for BC7 and BC6H formats is guaranteed to be available, the recommended choice of compression formats is: RGB textures - DXT1 at four bits/pixel. RGBA textures - BC7 (higher quality, slower to compress) or DXT5 (faster to compress), both at eight bits/pixel. HDR textures - BC6H at eight bits/pixel. If you need to support DirectX 10 class GPUs on PC (NVIDIA GPUs before 2010, AMD before 2009, Intel before 2012), then DXT5 instead of BC7 would be preferred, since these GPUs do not support BC7 nor BC6H.
See the Supported texture compression formats reference table for detailed information about all supported formats.
iOS and tvOS
For Apple devices that use the A8 chip (2014) or above, ATSC is the recommended texture compression format for RGB and RGBA textures. This format allows you to choose between texture quality and size on a granular level: all the way from eight bits/pixel (4x4 block size) down to 0.89 bits/pixel (12x12 block size). If support for older devices is needed, or you want additional Crunch compression, then Apple devices support ETC/ETC2 formats starting with A7 chip (2013). For even older devices, PVRTC is the compression format to use. On iOS
, Unity’s default texture compression format is PVRTC, for the broadest possible compatibility. If your application does not include OpenGL ES 2 support, change this to one of the above formats. Unity only supports tvOS devices that have Metal support, and so the default texture compression format is ASTC. If you manually add OpenGL ES 2 support to your tvOS project, you must change the texture compression to either PVRTC or ETC to avoid texture decompression at runtime.
See the Supported texture compression formats reference table for detailed information about all supported formats.
Android
Texture compression support on Android is complicated, and you might need to build several application versions with different sub-targets.
Unless your app targets specific hardware that supports a limited range of texture compression formats, you can choose between several compressed and uncompressed formats, which offer different trade-offs.
For LDR RGB and RGBA textures, most modern Android GPUs support ASTC compression format, including: Qualcomm GPUs since Adreno 4xx / Snapdragon 415 (2015) ARM GPUs since Mali T624 (2012) NVIDIA GPUs since Tegra K1 (2014) PowerVR GPUs since GX6250 (2014) If you need support for older devices, or you want additional Crunch compression, then all GPUs that run Vulkan or OpenGL ES 3.0 support ETC2 format. The resulting image quality is quite high, and it supports one- to four-component texture data. OpenGL ES 2 devices do not support the ETC2 format, so Unity decompresses the texture at runtime to the format ETC2 fallback specifies. For even older devices, usually only ETC format is available. The drawback is that there is no direct alpha channel support. For Sprites
, Unity offers an option to use ETC1 compression by splitting a texture into two ETC1 textures: one for RGB, one for alpha. To enable this, enable the Android-specific Split Alpha Channel option for the Texture when importing a Sprite Atlas
. The sprite shader
samples both textures and combines them into the final result. For HDR textures, ASTC HDR is the only compressed format available on Android devices. ASTC HDR requires Vulkan or GL_KHR_texture_compression_astc_hdr support. ASTC is the most flexible format.
For devices that don’t support ASTC HDR, all devices running Vulkan or OpenGL ES 3.0 support RGB9e5, which is suitable for textures without an alpha channel. If an alpha channel or even wider support is needed, use RGBA Half: this takes twice as much memory as RGB9e5.
See the Supported texture compression formats reference table for detailed information about all supported formats.
Default texture compression formats, by platform
The following table shows the default formats used for each platform.
| Platform |
Color model |
None |
Normal quality (default) |
High quality |
Low quality (higher performance) |
| Windows, Linux, macOS |
RGB |
RGB 24 bit |
RGB Compressed DXT1 |
RGB(A) Compressed BC7 |
RGB Compressed DXT1 |
| RGBA |
RGBA 32 bit |
RGBA Compressed DXT5 |
RGB(A) Compressed BC7 |
RGBA Compressed DXT5 |
|
| HDR |
RGBA Half |
RGB Compressed BC6H |
RGB Compressed BC6H |
RGB Compressed BC6H |
|
| WebGL |
RGB |
RGB 24 bit |
RGB Compressed DXT1 |
RGB Compressed DXT1 |
RGB Compressed DXT1 |
| RGBA |
RGBA 32 bit |
RGBA Compressed DXT5 |
RGBA Compressed DXT5 |
RGBA Compressed DXT5 |
|
| Android (only when Don’t override is enabled in the build settings) |
RGB |
RGB 24 bit |
RGB Compressed ETC |
RGB Compressed ETC |
RGB Compressed ETC |
| RGBA |
RGBA 32 bit |
RGBA Compressed ETC2 |
RGBA Compressed ETC2 |
RGBA Compressed ETC2 |
|
| iOS |
RGB |
RGB 24 bit |
RGB Compressed PVRTC 4 bits |
RGB Compressed PVRTC 4 bits |
RGB Compressed PVRTC 2 bits |
| RGBA |
RGBA 32 bit |
RGBA Compressed PVRTC 4 bits |
RGBA Compressed PVRTC 4 bits |
RGBA Compressed PVRTC 2 bits |
|
| tvOS |
RGB |
RGB 24 bit |
RGB Compressed ASTC 6x6 block |
RGB Compressed ASTC 4x4 block |
RGB Compressed ASTC 8x8 block |
| RGBA |
RGBA 32 bit |
RGBA Compressed ASTC 6x6 block |
RGBA Compressed ASTC 4x4 block |
RGBA Compressed ASTC 8x8 block |
|
| Default |
RGBA |
RGBA 32 bit |
RGBA 16 bit |
RGBA 16 bit |
RGBA 16 bit |
Supported texture compression formats, by platform
The table below shows each compression format available in Unity, and the platforms that support it.
| Texture compression format |
Description |
Channels |
Quality |
Bits per pixel |
Size of 1024x1024 texture, in MB |
Windows |
Mac |
Linux |
Android |
iOS & tvOS |
WebGL |
| RGB(A) Compressed BC7 |
Compressed RGB or RGBA |
RGB or RGBA |
High |
8 |
1 |
yes (1) |
yes (1) |
yes |
no |
no |
no |
| RGBA Compressed DXT5 |
Compressed RGBA (also known as BC3) |
RGBA |
Medium |
8 |
1 |
yes |
yes |
yes |
no (3) |
no |
partial (2) |
| RGBA Crunched DXT5 |
Compressed RGBA, with additional on-disk Crunch compression |
RGBA |
Low to medium |
Variable |
Variable |
yes |
yes |
yes |
no (3) |
no |
partial (2) |
| RGBA 64 bit |
Uncompressed RGBA, very high precision |
RGBA |
Very high |
64 |
8 |
yes |
yes |
yes |
partial (6) |
yes |
no |
| RGBA 32 bit |
Uncompressed RGBA |
RGBA |
High |
32 |
4 |
yes |
yes |
yes |
yes |
yes |
yes |
| RGBA 16 bit |
Quantized RGBA |
RGBA |
Medium |
16 |
2 |
yes |
yes |
yes |
yes |
yes |
yes |
| RGB Compressed DXT1 |
Compressed RGB (also known as BC1) |
RGB |
Medium |
4 |
0.5 |
yes |
yes |
yes |
no (3) |
no |
partial (2) |
| RGB Crunched DXT1 |
Compressed RGB, with additional on-disk Crunch compression |
RGB |
Low to medium |
Variable |
Variable |
yes |
yes |
yes |
no (3) |
no |
partial (2) |
| RGB 48 bit |
Uncompressed RGB, very high precision. Converted to RGBA 64 bit for the GPU |
RGB |
Very high |
48 disk, 64 GPU |
6 disk, 8 GPU |
yes |
yes |
yes |
partial (6) |
yes |
no |
| RGB 24 bit |
Uncompressed RGB. Converted to RGBA 32 bit for the GPU |
RGB |
High |
24 disk, 32 GPU |
3 disk, 4 GPU |
yes |
yes |
yes |
yes |
yes |
yes |
| RGB 16 bit |
Quantized RGB |
RGB |
Medium |
16 |
2 |
yes |
yes |
yes |
yes |
yes |
yes |
| RG Compressed BC5 |
Compressed two channel (RG) |
RG |
High |
8 |
1 |
yes |
yes |
yes |
no |
no |
no |
| RG 32 bit |
Uncompressed two channel (RG), very high precision |
RG |
Very high |
32 |
4 |
yes |
yes |
yes |
partial (6) |
yes |
no |
| R Compressed BC4 |
Compressed single channel (R) |
R |
High |
4 |
0.5 |
yes |
yes |
yes |
no |
no |
no |
| R 8 |
Uncompressed single channel (R) |
R |
High |
8 |
1 |
yes |
yes |
yes |
partial (5) |
yes |
partial (5) |
| R 16 bit |
Uncompressed single channel (R), very high precision |
R |
Very high |
16 |
2 |
yes |
yes |
yes |
partial (6) |
partial (6) |
no |
| Alpha 8 |
Uncompressed single channel (A) |
A |
High |
8 |
1 |
yes |
yes |
yes |
yes |
yes |
yes |
| RGBA Half |
HDR, half-precision (FP16) RGBA, –64k to +64k range |
RGBA |
High |
64 |
8 |
yes |
yes |
yes |
partial (7) |
yes |
partial (7) |
| RGB Compressed BC6H |
HDR, compressed RGB, 0 to +64k range |
RGB |
High |
8 |
1 |
yes (1) |
yes (1) |
yes |
no |
no |
no |
| RGB9e5 32 Bit Shared Exponent Float |
HDR, quantized RGB, 0 to +64k range |
RGB |
Medium |
32 |
4 |
yes |
yes |
yes |
partial (4) |
yes |
partial (4) |
| RGB(A) Compressed ASTC |
Compressed RGB or RGBA, size & quality dependent on block size |
RGB or RGBA |
Low to high |
12x12: 0.89, 10x10: 1.28, 8x8: 2, 6x6: 3.56, 5x5: 5.12, 4x4: 8 |
12x12: 0.11, 10x10: 0.16, 8x8: 0.25, 6x6: 0.45, 5x5: 0.64, 4x4: 1.0 |
no |
no |
no |
partial (8) |
yes (10) |
no |
| RGBA Compressed ETC2 |
Compressed RGBA |
RGBA |
Medium |
8 |
1 |
no |
no |
no |
partial (9) |
yes |
no |
| RGBA Crunched ETC2 |
Compressed RGBA, with additional on-disk Crunch compression |
RGBA |
Low to medium |
Variable |
Variable |
no |
no |
no |
partial (9) |
yes |
no |
| RGB + 1-bit Alpha Compressed ETC2 4 bits |
Compressed RGBA, with alpha values fully opaque or fully transparent |
RGBA |
Medium |
4 |
0.5 |
no |
no |
no |
partial (9) |
yes |
no |
| RGBA Compressed PVRTC 4 bits |
Compressed RGBA, texture required to be square |
RGBA |
Medium |
4 |
0.5 |
no |
no |
no |
no (12) |
yes |
no |
| RGBA Compressed PVRTC 2 bits |
Compressed RGBA, texture required to be square |
RGBA |
Low |
2 |
0.25 |
no |
no |
no |
no (12) |
yes |
no |
| RGB Compressed ETC2 |
Compressed RGB |
RGB |
Medium |
4 |
0.5 |
no |
no |
no |
partial (9) |
yes |
no |
| RGB Compressed ETC |
Compressed RGB |
RGB |
Low |
4 |
0.5 |
no |
no |
no |
yes |
yes |
no |
| RGB Crunched ETC |
Compressed RGB, with additional on-disk Crunch compression |
RGB |
Low |
Variable |
Variable |
no |
no |
no |
yes |
yes |
no |
| RGB Compressed PVRTC 4 bits |
Compressed RGB, texture required to be square |
RGB |
Medium |
4 |
0.5 |
no |
no |
no |
no (12) |
yes |
no |
| RGB Compressed PVRTC 2 bits |
Compressed RGB, texture required to be square |
RGB |
Low |
2 |
0.25 |
no |
no |
no |
no (12) |
yes |
no |
| RG Compressed EAC 8 bit |
Compressed two channel (RG) |
RG |
High |
8 |
1 |
no |
no |
no |
partial (9) |
yes |
no |
| R Compressed EAC 4 bit |
Compressed single channel (R) |
R |
High |
4 |
0.5 |
no |
no |
no |
partial (9) |
yes |
no |
| RGB(A) Compressed ASTC HDR |
HDR, compressed RGB or RGBA, size & quality dependent on block size |
RGB or RGBA |
Low to High |
12x12: 0.89, 10x10: 1.28, 8x8: 2, 6x6: 3.56, 5x5: 5.12, 4x4: 8 |
12x12: 0.11, 10x10: 0.16, 8x8: 0.25, 6x6: 0.45, 5x5: 0.64, 4x4: 1.0 |
no |
no |
no |
partial (11) |
partial (11) |
no |
Notes:
- Except on pre-DX11 level GPUs, or macOS when using OpenGL. When not supported, BC6H textures get decompressed to RGBA Half, and BC7 get decompressed to RGBA32 at load time.
- With linear rendering on web browsers that do not support sRGB DXT, textures are decompressed to RGBA32 at load time.
- Except on Android devices with NVIDIA Tegra GPUs; these do support DXT/BC formats.
- Except on OpenGL ES 2.0 / WebGL 1.
- When on OpenGL ES 2.0 / WebGL 1: requires GL_EXT_texture_rg extension support.
- Requires GL_EXT_texture_norm16 or corresponding Vulkan capability on Android.
- When on OpenGL ES 2.0 / WebGL 1: requires OES_texture_half_float extension support.
- Requires Vulkan or GL_KHR_texture_compression_astc_ldr OpenGL ES extension.
- Except on OpenGL ES 2.0; there ETC2 textures are decompressed into the format ETC2 fallback specifies in the Android Build Settings or on the Android tab for the Platform-specific overrides.
- Except on Apple A7 chip devices (2013).
- Android: requires GL_KHR_texture_compression_astc_hdr extension. iOS: requires A13 or later chip (2019). When not supported, the texture is decompressed to RGB9E5 format, losing the alpha channel.
- Except on Android devices with Imagination PowerVR GPUs; these do support PVRTC formats.
Render Texture
Render Textures are special types of Textures
that are created and updated at run time. To use them, you first create a new Render Texture and designate one of your Cameras
to render into it. Then you can use the Render Texture in a Material
just like a regular Texture. The Water prefabs
in Unity Standard Assets are an example of real-world use of Render Textures for making real-time reflections and refractions.
Properties
The Render Texture Inspector
is different from most Inspectors, but very similar to the Texture Inspector.

The Render Texture Inspector is almost identical to the Texture Inspector
The Render Texture inspector displays the current contents of Render Texture in realtime and can be an invaluable debugging tool for effects that use render textures.
| Property: |
Function: |
|
| Dimension |
The dimensionality (type) of the render texture. |
|
| 2D |
The render texture is two-dimensional. |
|
| Cube |
The render texture is a cube map. |
|
| 3D |
The render texture is three-dimensional. |
|
| Size |
The size of the render texture in pixels |
|
| Anti-Aliasing |
The number of anti-aliasing samples. You can select None, 2 samples, 4 samples, or 8 samples. If you select None, Unity does not apply anti-aliasing. |
|
| Enable Compatible Color Format |
Enable this checkbox to make Unity apply a compatible format to the render texture if the defined Color Format is not supported by the platform. |
|
| Color Format |
The color format of the render texture. |
|
| Depth Buffer |
The format of the depth buffer. You can select No depth buffer, At least 16 bits depth (no stencil), or At least 24 bits depth (with stencil). The stencil buffer is a general purpose buffer that allows you to store an additional unsigned 8-bit integer (0–255) for each pixel drawn to the screen. |
|
| Enable Mip Maps |
Check this box to make the render texture generate mipmaps. |
|
| Auto generate Mip Maps |
Check this box to automatically fill the generated mipmaps with relevant data. If you don’t enable this, you’ll have to use the |
|
| Dynamic Scaling |
Check this box to let dynamic resolution scaling resize the render texture. If you don’t enable this, the render texture maintains the same size regardless of the Dynamic Resolution |
|
| Wrap Mode |
Controls how the texture is wrapped: |
|
| Repeat |
Tiles the texture to create a repeating pattern. |
|
| Clamp |
Stretches the edges of the texture. This is useful for preventing wrapping artifacts when you map an image onto an object and you don’t want the texture to tile. |
|
| Mirror |
Tiles the texture to create a repeating pattern that mirrors the texture at every integer boundary. |
|
| Mirror Once |
Mirrors the texture once, and then falls back to clamping. |
|
| Per-axis |
Lets you set different wrap modes for the U axis and the V axis. The available options are also Repeat, Clamp, Mirrorand Mirror Once. For example, when you use latitude-longitude environment maps for reflection probes |
|
| Filter Mode |
Controls how the sampling of the texture uses nearby pixels. The options are: |
|
| Point |
Uses the nearest pixel. This makes the texture appear pixelated. |
|
| Bilinear |
Uses a weighted average of the four nearest texels. This makes the texture appear blurry when you magnify it. |
|
| Trilinear |
Uses a weighted average of the two nearest mips, which are bilinearly filtered. This creates a soft transition between mips, at the cost of a slightly more blurry appearance. |
|
| Aniso Level |
Anisotropic filtering level of the texture. This increases texture quality when you view the texture at a steep angle. Good for floor, ground, or road textures. |
|
Example
A very quick way to make a live arena-camera in your game:
- Create a new Render Texture asset using Assets >Create >Render Texture.
- Create a new Camera using GameObject > Camera.
- Assign the Render Texture to the Target Texture of the new Camera.
- Create a new 3D cube using GameObject > 3D Object > Cube.
- Drag the Render Texture onto the cube to create a Material that uses the render texture.
- Enter Play Mode, and observe that the cube’s texture is updated in real-time based on the new Camera’s output.

Render Textures are set up as demonstrated above
Custom Render Textures
Custom Render Textures
are an extension to Render Textures that allows users to easily update said texture with a shader. This is useful to implement all kind of complex simulations like caustics, ripple simulation for rain effects, splatting liquids against a wall, etc. It also provides a scripting and Shader
framework to help with more complicated configuration like partial or multi-pass updates, varying update frequency etc.
To use them, you need to create a new Custom Render Texture asset and assign a Material to it. This Material will then update the content of the texture according to its various parameters. The Custom Render Texture can then be assigned to any kind of Material just like a regular texture, even one used for another Custom Render Texture.
Properties

The inspector
for Custom Render Textures will display most of the properties of the Render Texture inspector as well as many specific ones.
Render Texture:
| Property: |
Function: |
| Dimension |
Dimension of the Render Texture |
| 2D |
Render Texture will be two dimensional. |
| Cube |
Render Texture will be a cube map |
| 3D |
Render Texture will be three dimensional |
| Size |
The size of the Render Texture in pixels |
| Color Format |
Format of the Render Texture |
| sRGB (Color Render Texture) |
Does this render texture use sRGB read/write conversions (Read Only). |
| Enable Mip Maps |
Does this render texture use Mip Maps? |
| Auto generate Mip Maps |
Enable to automatically generate Mip Maps. |
| Wrap Mode |
Selects how the Texture behaves when tiled |
| Repeat |
The Texture repeats (tiles) itself |
| Clamp |
The Texture’s edges get stretched |
| Filter Mode |
Selects how the Texture is filtered when it gets stretched by 3D transformations: |
| Point |
The Texture becomes blocky up close |
| Bilinear |
The Texture becomes blurry up close |
| Trilinear |
Like Bilinear, but the Texture also blurs between the different mip levels |
| Aniso Level |
Increases Texture quality when viewing the texture at a steep angle. Good for floor and ground textures |
Custom Texture:
Custom Texture parameters are separated in three main categories:
- Material: Defines what shader is used to update the texture.
- Initialization: Controls how the texture is initialized before any update is done by the shader
- Update: Controls how the texture is updated by the shader.
| Property: |
Function: |
| Material |
Material used to update the Custom Render Texture |
| Shader Pass |
Shader Pass used to update the Custom Texture. The combo box will show all passes available in your Material. |
| Initialization Mode |
Rate at which the texture should be initialized. |
| OnLoad |
The texture is initialized once upon creation. |
| Realtime |
The texture is initialized every frame. |
| OnDemand |
The texture is initialized on demand from the script. |
| Source |
How the texture should be initialized. |
| Texture and Color |
The texture will be initialized by a texture multiplied by a color. |
| Initialization Color |
Color with which the custom texture is initialized. If an initialization texture is provided as well, the custom texture will be initialized by the multiplication of the color and the texture. |
| Initialization Texture |
Texture with which the custom texture is initialized. If an initialization color is provided as well, the custom texture will be initialized by the multiplication of the color and the texture. |
| Material |
The texture will be initialized by a material. |
| Initialization Material |
Material with which the custom texture is initialized. |
| Update Mode |
Rate at which the texture should be updated by the shader. |
| OnLoad |
The texture is updated once upon creation. |
| Realtime |
The texture is updated every frame. |
| OnDemand |
The texture is updated on demand from script. |
| Period |
(Realtime only) Period in seconds at which real-time texture is updated (0.0 will update every frame). |
| Double Buffered |
The texture will be double buffered. Each update will swap the two buffers, allowing user to read the result of the preceding update in the shader. |
| Wrap Update Zones |
Enable to allow partial update zones to wrap around the border of the texture. |
| Cubemap Faces |
(Cubemap only) Series of toggle allowing user to enable/disable update on each of the cubemap |
| Update Zone Space |
Coordinate system in which update zones are defined. |
| Normalized |
All coordinates and sizes are between 0 and 1 with the top-left corner starting at (0, 0) |
| Pixel |
All coordinates and sizes are expressed in pixels limited by the width and height of the texture. Top-left corner starting at (0, 0) |
| Update Zone List |
List of update zones for the texture (see below for more details) |
Exporting Custom Render Texture to a file:
Custom Render Textures can be exported to a PNG or EXR file (depending on the texture format) via the contextual “Export” menu.
Update Zones:
By default, when the Custom Render Texture is updated, the whole texture is updated at once by the Material. One of the important features of the Custom Texture is the ability for the user to define zones of partial update. With this, users can define as many zones as they want and the order in which they are processed.
This can be used for several different purpose. For example, you could have multiple small zones to splat water drops on the texture and then do a full pass to simulate the ripples. This can also be used as an optimization when you know that you don’t need to update the full texture.
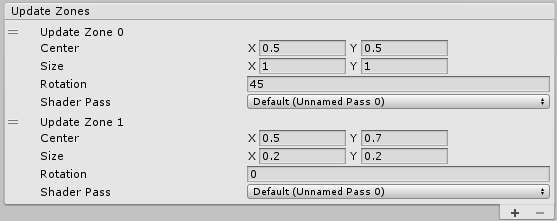
Update zones have their own set of properties. The Update Zone Space will be reflected in the display. Depending on the Dimension of the texture, coordinates will be 2D (for 2D and Cube textures) or 3D (for 3D textures).
| Property: |
Function: |
| Center |
Coordinate of the center of the update zone. |
| Size |
Size of the update zone. |
| Rotation |
Orientation of the update zone in degrees (unavailable for 3D textures). |
| Shader Pass |
Shader Pass to use for this update zone. If left as default, this update zone will use the Shader Pass defined in the main part of the inspector otherwise it will use the provided one. |
| Swap (Double Buffer) |
(Only for Double Buffered textures) If this is true, the buffers will be swapped before this update zone is processed. |
Double Buffered Custom Textures
Custom Render Textures can be “Double Buffered”. Internally, there are two textures but from the user standpoint they are the same. After each update, the two textures will be swapped. This allows the user to read the result of the last update while writing a new result in the Custom Render Texture. This is particularly useful if the shader needs to use the content already written in the texture but cannot mix the values with classic blend modes. This is also needed if the shaders has to sample different pixels of the preceding result.
Performance Warning: Due to some technicalities, the double buffering currently involves a copy of the texture at each swap which can lead to a drop in performance depending on the frequency at which it is done and the resolution of the texture.
Chaining Custom Render Textures
Custom Render Textures need a Material to be updated. This Material can have textures as input. This means that the a Custom Texture can be used as an input to generate another one. This way, users can chain up several Custom Textures to generate a more complex multi-step simulation. The system will correctly handle all the dependencies
so that the different updates happen in the right order.
Writing a shader for a Custom Render Texture
Updating a Custom Texture is like doing a 2D post process in a Render Texture. To help users write their custom texture shaders, we provide a small framework with utility functions and built-in helper variables.
Here is a really simple example that will fill the texture with a color multiplied by a color:
Shader "CustomRenderTexture/Simple"{
Properties {
_Color ("Color", Color) = (1,1,1,1) _Tex("InputTex", 2D) = "white" {} } SubShader {
Lighting Off Blend One Zero Pass {
CGPROGRAM #include "UnityCustomRenderTexture.cginc" #pragma vertex CustomRenderTextureVertexShader #pragma fragment frag #pragma target 3.0 float4 _Color; sampler2D _Tex; float4 frag(v2f_customrendertexture IN) : COLOR {
return _Color * tex2D(_Tex, IN.localTexcoord.xy); } ENDCG } }}The only mandatory steps when writing a shader for a custom texture are:
* #include “UnityCustomRenderTexture.cginc”
- Use the provided Vertex Shader
CustomRenderTextureVertexShader - Use the provided input structure v2f_customrendertexture for the pixel shader
Other than that, the user is free to write the pixel shader as he wishes.
Here is another example for a shader used in an initialization material:
Shader "CustomRenderTexture/CustomTextureInit"{
Properties {
_Color ("Color", Color) = (1,1,1,1) _Tex("InputTex", 2D) = "white" {} } SubShader {
Lighting Off Blend One Zero Pass {
CGPROGRAM #include "UnityCustomRenderTexture.cginc" #pragma vertex InitCustomRenderTextureVertexShader #pragma fragment frag #pragma target 3.0 float4 _Color; sampler2D _Tex; float4 frag(v2f_init_customrendertexture IN) : COLOR {
_Color * tex2D(_Tex, IN.texcoord.xy); } ENDCG } }}Same as for the update shader, the only mandatory steps are these:
* #include “UnityCustomRenderTexture.cginc”
- Use the provided Vertex Shader InitCustomRenderTextureVertexShader
- Use the provided input structure v2f_init_customrendertexture for the pixel shader
In order to help the user in this process we provide a set of built-in values:
Input values from the v2f_customrendertexture structure:
| Name |
Type |
Value |
|
|
|
Texture coordinates relative to the update zone being currently processed. |
|
|
|
Texture coordinates relative to the Custom Render Texture itself |
|
|
|
Index of the update zone being currently processed. |
|
|
|
For Cube Custom Render Texture, direction of the current pixel inside the cubemap. |
Input values from the v2f_init_customrendertexture structure:
| Name |
Type |
Value |
|
|
float3 |
Texture coordinates relative to the Custom Render Texture itself. |
Global values:
| Name |
Type |
Value |
|
|
|
Width of the Custom Texture in pixels |
|
|
|
Height of the Custom Texture in pixels |
|
|
|
Depth of the Custom Texture in pixels (only for 3D textures, otherwise will always be equal to 1). |
|
|
|
Only for Cubemaps: Index of the current cubemap face being processed (-X, +X, -Y, +Y, -Z, +Z). |
|
|
|
Only for 3D textures: Index of the current 3D slice being processed. |
|
|
|
For double buffered textures: Texture containing the result of the last update before the last swap. |
|
|
|
For double buffered textures: Texture containing the result of the last update before the last swap. |
|
|
|
For double buffered textures: Texture containing the result of the last update before the last swap. |
Controlling Custom Render Texture from Script
Most of the functionalities described here can be accessed via the Scripting API. Changing material parameters, update frequency, update zones, requesting an update etc, can all be done with the script.
One thing to keep in mind though is that any update requested for the Custom Texture will happen at a very specific time at the beginning of the frame with the current state of the Custom Texture. This guarantees that any material using this texture will have the up-to-date result.
This means that this kind of pattern:
customRenderTexture.updateZones = updateZones1;customRenderTexture.Update();customRenderTexture.updateZones = updateZones2;customRenderTexture.Update();Will not yield the “expected” result of one update done with the first array of update zones and then a second update with the other array. This will do two updates with the second array.
The good rule of thumb is that any property modified will only be active in the next frame.
Movie Textures
Note: MovieTexture is due to be deprecated in a future version of Unity. You should use VideoPlayer for video download and movie playback.
Movie Textures are animated Textures
that are created from a video file. By placing a video file in your project’s Assets Folder, you can import the video to be used exactly as you would use a regular Texture.
Video files are imported via Apple QuickTime. Supported file types are what your QuickTime installation can play (usually .mov, .mpg, .mpeg, .mp4, .avi, .asf). On Windows, movie importing requires Quicktime to be installed. Download Quicktime from Apple Support Downloads.
Properties
The Movie Texture Inspector
is very similar to the regular Texture Inspector.

Video files are Movie Textures in Unity
| Property: |
Function: |
| Aniso Level |
Increases Texture quality when viewing the texture at a steep angle. Good for floor and ground textures |
| Filtering Mode |
Selects how the Texture is filtered when it gets stretched by 3D transformations |
| Loop |
If enabled, the movie will loop when it finishes playing |
| Quality |
Compression |
Details
When a video file is added to your Project, it will automatically be imported and converted to Ogg Theora format. Once your Movie Texture has been imported, you can attach it to any GameObject
or Material
, just like a regular Texture.
Playing the Movie
Your Movie Texture will not play automatically when the game begins running. You must use a short script to tell it when to play.
// this line of code will make the Movie Texture begin playing((MovieTexture)GetComponent<Renderer>().material.mainTexture).Play(); Attach the following script to toggle Movie playback when the space bar is pressed:
public class PlayMovieOnSpace : MonoBehaviour {
void Update () {
if (Input.GetButtonDown ("Jump")) {
Renderer r = GetComponent<Renderer>(); MovieTexture movie = (MovieTexture)r.material.mainTexture; if (movie.isPlaying) {
movie.Pause(); } else {
movie.Play(); } } }} For more information about playing Movie Textures, see the Movie Texture Script Reference page
Movie Audio
When a Movie Texture is imported, the audio track accompanying the visuals are imported as well. This audio appears as an AudioClip child of the Movie Texture.
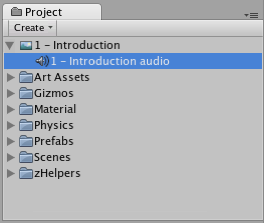
The video’s audio track appears as a child of the Movie Texture in the Project View
To play this audio, the Audio Clip
must be attached to a GameObject, like any other Audio Clip. Drag the Audio Clip from the Project View onto any GameObject in the Scene
or Hierarchy View. Usually, this will be the same GameObject that is showing the Movie. Then use AudioSource.Play() to make the the movie’s audio track play along with its video.
iOS
Movie Textures are not supported on iOS
. Instead, full-screen streaming playback is provided using Handheld.PlayFullScreenMovie.
You need to keep your videos inside the StreamingAssets folder located in the Assets folder of your project.
Unity iOS supports any movie file types that play correctly on an iOS device, implying files with the extensions .mov, .mp4, .mpv, and .3gp and using one of the following compression standards:
- H.264 Baseline Profile Level 3.0 video
- MPEG–4 Part 2 video
For more information about supported compression standards, consult the iPhone SDK MPMoviePlayerController Class Reference.
As soon as you call Handheld.PlayFullScreenMovie the screen will fade from your current content to the designated background color. It might take some time before the movie is ready to play but in the meantime, the player will continue displaying the background color and may also display a progress indicator to let the user know the movie is loading. When playback finishes, the screen will fade back to your content.
The video player does not respect switching to mute while playing videos
As written above, video files are played using Apple’s embedded player (as of SDK 3.2 and iPhone OS 3.1.2 and earlier). This contains a bug that prevents Unity switching to mute.
The video player does not respect the device’s orientation
The Apple video player and iPhone SDK do not provide a way to adjust the orientation of the video. A common approach is to manually create two copies of each movie in landscape and portrait orientations. Then, the orientation of the device can be determined before playback so the right version of the movie can be chosen.
Android
Movie Textures are not supported on Android. Instead, full-screen streaming playback is provided using Handheld.PlayFullScreenMovie.
You need to keep your videos inside the StreamingAssets folder located in the Assets folder of your project.
Unity Android supports any movie file type supported by Android, (ie, files with the extensions .mp4 and .3gp) and using one of the following compression standards:
- H.263
- H.264 AVC
- MPEG–4 SP
However, device vendors are keen on expanding this list, so some Android devices are able to play formats other than those listed, such as HD videos.
For more information about the supported compression standards, consult the Android SDK Core Media Formats documentation.
As soon as you call Handheld.PlayFullScreenMovie the screen will fade from your current content to the designated background color. It might take some time before the movie is ready to play but in the meantime, the player will continue displaying the background color and may also display a progress indicator to let the user know the movie is loading. When playback finishes, the screen will fade back to your content.
3D textures
A 3D texture is a bitmap image that contains information in three dimensions rather than the standard two. 3D textures are commonly used to simulate volumetric effects such as fog or smoke, to approximate a volumetric 3D mesh
, or to store animated textures and blend between them smoothly.
In your Unity Project, the Unity Editor represents 3D textures as Texture Assets. To configure a Texture Asset’s import settings you can select the Texture Asset and use the Inspector
, or write a script that uses the TextureImporter API.
In the Unity engine, Unity uses the Texture3D class to represent 3D textures. Use this class to interact with 3D textures in C# scripts
.
3D texture size
The maximum resolution of a 3D texture is 2048 x 2048 x 2048.
Be aware that the size of a 3D texture in memory and on disk increases quickly as its resolution increases. An RGBA32 3D texture with no mip maps and a resolution of 16 x 16 x 16 has a size of 128KB, but with a resolution of 256 x 256 x 256 it has a size of 512MB.
Creating a 3D texture
To create a 3D texture in your Project, you must use a script.
The following example is an Editor script that creates an instance of the Texture3D class, populates it with color data, and then saves it to your Project as a Texture Asset.
using UnityEditor;using UnityEngine; public class ExampleEditorScript : MonoBehaviour{
[MenuItem("CreateExamples/3DTexture")] static void CreateTexture3D() {
// Configure the texture int size = 32; TextureFormat format = TextureFormat.RGBA32; TextureWrapMode wrapMode = TextureWrapMode.Clamp; // Create the texture and apply the configuration Texture3D texture = new Texture3D(size, size, size, format, false); texture.wrapMode = wrapMode; // Create a 3-dimensional array to store color data Color[] colors = new Color[size * size * size]; // Populate the array so that the x, y, and z values of the texture will map to red, blue, and green colors float inverseResolution = 1.0f / (size - 1.0f); for (int z = 0; z < size; z++) {
int zOffset = z * size * size; for (int y = 0; y < size; y++) {
int yOffset = y * size; for (int x = 0; x < size; x++) {
colors[x + yOffset + zOffset] = new Color(x * inverseResolution, y * inverseResolution, z * inverseResolution, 1.0f); } } } // Copy the color values to the texture texture.SetPixels(colors); // Apply the changes to the texture and upload the updated texture to the GPU texture.Apply(); // Save the texture to your Unity Project AssetDatabase.CreateAsset(texture, "Assets/Example3DTexture.asset"); }}Using a 3D texture in a shader
Here is an example of a simple raymarching shader
that uses a 3D texture to visualize a volume.
Shader "Unlit/VolumeShader"{
Properties {
_MainTex ("Texture", 3D) = "white" {} _Alpha ("Alpha", float) = 0.02 _StepSize ("Step Size", float) = 0.01 } SubShader {
Tags { "Queue" = "Transparent" "RenderType" = "Transparent" } Blend One OneMinusSrcAlpha LOD 100 Pass {
CGPROGRAM #pragma vertex vert #pragma fragment frag #include "UnityCG.cginc" // Maximum amount of raymarching samples #define MAX_STEP_COUNT 128 // Allowed floating point inaccuracy #define EPSILON 0.00001f struct appdata {
float4 vertex : POSITION; }; struct v2f {
float4 vertex : SV_POSITION; float3 objectVertex : TEXCOORD0; float3 vectorToSurface : TEXCOORD1; }; sampler3D _MainTex; float4 _MainTex_ST; float _Alpha; float _StepSize; v2f vert (appdata v) {
v2f o; // Vertex in object space this will be the starting point of raymarching o.objectVertex = v.vertex; // Calculate vector from camera to vertex in world space float3 worldVertex = mul(unity_ObjectToWorld, v.vertex).xyz; o.vectorToSurface = worldVertex - _WorldSpaceCameraPos; o.vertex = UnityObjectToClipPos(v.vertex); return o; } float4 BlendUnder(float4 color, float4 newColor) {
color.rgb += (1.0 - color.a) * newColor.a * newColor.rgb; color.a += (1.0 - color.a) * newColor.a; return color; } fixed4 frag(v2f i) : SV_Target {
// Start raymarching at the front surface of the object float3 rayOrigin = i.objectVertex; // Use vector from camera to object surface to get ray direction float3 rayDirection = mul(unity_WorldToObject, float4(normalize(i.vectorToSurface), 1)); float4 color = float4(0, 0, 0, 0); float3 samplePosition = rayOrigin; // Raymarch through object space for (int i = 0; i < MAX_STEP_COUNT; i++) {
// Accumulate color only within unit cube bounds if(max(abs(samplePosition.x), max(abs(samplePosition.y), abs(samplePosition.z))) < 0.5f + EPSILON) {
float4 sampledColor = tex3D(_MainTex, samplePosition + float3(0.5f, 0.5f, 0.5f)); sampledColor.a *= _Alpha; color = BlendUnder(color, sampledColor); samplePosition += rayDirection * _StepSize; } } return color; } ENDCG } }}If you use this shader with the 3D texture created in the example at the top of the page, the result looks like this:

Texture arrays
A texture array is a collection of same size/format/flags 2D textures that look like a single object to the GPU, and can be sampled in the shader
with a texture element index. They are useful for implementing custom terrain
rendering
systems or other special effects where you need an efficient way of accessing many textures of the same size and format. Elements of a 2D texture array are also known as slices, or layers.
Platform Support
Texture arrays need to be supported by the underlying graphics API and the GPU. They are available on:
- Direct3D 11/12 (Windows, Xbox One)
- OpenGL Core
(Mac OS X, Linux) - Metal (iOS, Mac OS X)
- OpenGL ES 3.0 (Android, iOS, WebGL 2.0)
- PlayStation 4
Other platforms do not support texture arrays (OpenGL ES 2.0 or WebGL 1.0). Use SystemInfo.supports2DArrayTextures to determine texture array support at runtime.
Creating and manipulating texture arrays
As there is no texture import pipeline for texture arrays, they must be created from within your scripts
. Use the Texture2DArray class to create and manipulate them. Note that texture arrays can be serialized as assets, so it is possible to create and fill them with data from editor scripts.
Normally, texture arrays are used purely within GPU memory, but you can use Graphics.CopyTexture, Texture2DArray.GetPixels and Texture2DArray.SetPixels to transfer pixels
to and from system memory.
Using texture arrays as render targets
Texture array elements may also be used as render targets. Use RenderTexture.dimension to specify in advance whether the render target is to be a 2D texture array. The depthSlice argument to Graphics.SetRenderTarget specifies which mipmap level or cube map face to render to. On platforms that support “layered rendering” (i.e. geometry shaders), you can set the depthSlice argument to –1 to set the whole texture array as a render target. You can also use a geometry shader to render into individual elements.
Using texture arrays in shaders
See Using texture arrays in shaders.
Cubemaps
A Cubemap is a collection of six square textures that represent the reflections on an environment. The six squares form the faces of an imaginary cube that surrounds an object; each face represents the view along the directions of the world axes (up, down, left, right, forward and back).
Cubemaps are often used to capture reflections or “surroundings” of objects; for example skyboxes and environment reflections often use cubemaps.

Cubemapped skybox and reflections
Creating Cubemaps from Textures
The fastest way to create cubemaps is to import them from specially laid out Textures
. Select the Texture in the Project window
, to see the Import Settings in the Inspector
window. In the Import Settings, set the Texture Type to Default, Normal Map
or Single Channel, and the Texture Shape to Cube. Unity then automatically sets the Texture up as a Cubemap.

Cubemap texture import type
Several commonly-used cubemap layouts are supported (and in most cases, Unity detects them automatically).
Vertical and horizontal cross layouts, as well as column and row of cubemap faces are supported:

Another common layout is LatLong (Latitude-Longitude, sometimes called cylindrical). Panorama images are often in this layout:
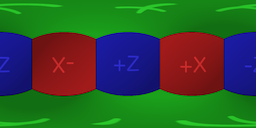
SphereMap (spherical environment map) images can also be found:
By default Unity looks at the aspect ratio
of the imported texture to determine the most appopriate layout from the above. When imported, a cubemap is produced which can be used for skyboxes and reflections:

Selecting Glossy Reflection option is useful for cubemap textures that will be used by Reflection Probes
. It processed cubemap mip levels in a special way (specular convolution) that can be used to simulate reflections from surfaces of different smoothness:

Cubemap used in a Reflection Probe on varying-smoothness surface
Legacy Cubemap Assets
Unity also supports creating cubemaps out of six separate textures. Select Assets > Create > Legacy > Cubemap from the menu, and drag six textures into empty slots in the inspector.

Legacy Cubemap Inspector
| Property: |
Function: |
| Right..Back Slots |
Textures for the corresponding cubemap face. |
| Face Size |
Width and Height of each Cubemap face in pixels |
| Mipmap |
Should mipmaps be created? |
| Linear |
Should the cubemap use linear color? |
| Readable |
Should the cubemap allow scripts |
Note that it is preferred to create cubemaps using the Cubemap texture import type (see above) - this way cubemap texture data can be compressed; edge fixups and glossy reflection convolution be performed; and HDR
cubemaps are supported.
Other Techniques
Another useful technique is to generate the cubemap from the contents of a Unity scene
using a script. The Camera.RenderToCubemap function can record the six face images from any desired position in the scene; the code example on the function’s script reference page adds a menu command to make this task easy.
智能推荐
oracle 12c 集群安装后的检查_12c查看crs状态-程序员宅基地
文章浏览阅读1.6k次。安装配置gi、安装数据库软件、dbca建库见下:http://blog.csdn.net/kadwf123/article/details/784299611、检查集群节点及状态:[root@rac2 ~]# olsnodes -srac1 Activerac2 Activerac3 Activerac4 Active[root@rac2 ~]_12c查看crs状态
解决jupyter notebook无法找到虚拟环境的问题_jupyter没有pytorch环境-程序员宅基地
文章浏览阅读1.3w次,点赞45次,收藏99次。我个人用的是anaconda3的一个python集成环境,自带jupyter notebook,但在我打开jupyter notebook界面后,却找不到对应的虚拟环境,原来是jupyter notebook只是通用于下载anaconda时自带的环境,其他环境要想使用必须手动下载一些库:1.首先进入到自己创建的虚拟环境(pytorch是虚拟环境的名字)activate pytorch2.在该环境下下载这个库conda install ipykernelconda install nb__jupyter没有pytorch环境
国内安装scoop的保姆教程_scoop-cn-程序员宅基地
文章浏览阅读5.2k次,点赞19次,收藏28次。选择scoop纯属意外,也是无奈,因为电脑用户被锁了管理员权限,所有exe安装程序都无法安装,只可以用绿色软件,最后被我发现scoop,省去了到处下载XXX绿色版的烦恼,当然scoop里需要管理员权限的软件也跟我无缘了(譬如everything)。推荐添加dorado这个bucket镜像,里面很多中文软件,但是部分国外的软件下载地址在github,可能无法下载。以上两个是官方bucket的国内镜像,所有软件建议优先从这里下载。上面可以看到很多bucket以及软件数。如果官网登陆不了可以试一下以下方式。_scoop-cn
Element ui colorpicker在Vue中的使用_vue el-color-picker-程序员宅基地
文章浏览阅读4.5k次,点赞2次,收藏3次。首先要有一个color-picker组件 <el-color-picker v-model="headcolor"></el-color-picker>在data里面data() { return {headcolor: ’ #278add ’ //这里可以选择一个默认的颜色} }然后在你想要改变颜色的地方用v-bind绑定就好了,例如:这里的:sty..._vue el-color-picker
迅为iTOP-4412精英版之烧写内核移植后的镜像_exynos 4412 刷机-程序员宅基地
文章浏览阅读640次。基于芯片日益增长的问题,所以内核开发者们引入了新的方法,就是在内核中只保留函数,而数据则不包含,由用户(应用程序员)自己把数据按照规定的格式编写,并放在约定的地方,为了不占用过多的内存,还要求数据以根精简的方式编写。boot启动时,传参给内核,告诉内核设备树文件和kernel的位置,内核启动时根据地址去找到设备树文件,再利用专用的编译器去反编译dtb文件,将dtb还原成数据结构,以供驱动的函数去调用。firmware是三星的一个固件的设备信息,因为找不到固件,所以内核启动不成功。_exynos 4412 刷机
Linux系统配置jdk_linux配置jdk-程序员宅基地
文章浏览阅读2w次,点赞24次,收藏42次。Linux系统配置jdkLinux学习教程,Linux入门教程(超详细)_linux配置jdk
随便推点
matlab(4):特殊符号的输入_matlab微米怎么输入-程序员宅基地
文章浏览阅读3.3k次,点赞5次,收藏19次。xlabel('\delta');ylabel('AUC');具体符号的对照表参照下图:_matlab微米怎么输入
C语言程序设计-文件(打开与关闭、顺序、二进制读写)-程序员宅基地
文章浏览阅读119次。顺序读写指的是按照文件中数据的顺序进行读取或写入。对于文本文件,可以使用fgets、fputs、fscanf、fprintf等函数进行顺序读写。在C语言中,对文件的操作通常涉及文件的打开、读写以及关闭。文件的打开使用fopen函数,而关闭则使用fclose函数。在C语言中,可以使用fread和fwrite函数进行二进制读写。 Biaoge 于2024-03-09 23:51发布 阅读量:7 ️文章类型:【 C语言程序设计 】在C语言中,用于打开文件的函数是____,用于关闭文件的函数是____。
Touchdesigner自学笔记之三_touchdesigner怎么让一个模型跟着鼠标移动-程序员宅基地
文章浏览阅读3.4k次,点赞2次,收藏13次。跟随鼠标移动的粒子以grid(SOP)为partical(SOP)的资源模板,调整后连接【Geo组合+point spirit(MAT)】,在连接【feedback组合】适当调整。影响粒子动态的节点【metaball(SOP)+force(SOP)】添加mouse in(CHOP)鼠标位置到metaball的坐标,实现鼠标影响。..._touchdesigner怎么让一个模型跟着鼠标移动
【附源码】基于java的校园停车场管理系统的设计与实现61m0e9计算机毕设SSM_基于java技术的停车场管理系统实现与设计-程序员宅基地
文章浏览阅读178次。项目运行环境配置:Jdk1.8 + Tomcat7.0 + Mysql + HBuilderX(Webstorm也行)+ Eclispe(IntelliJ IDEA,Eclispe,MyEclispe,Sts都支持)。项目技术:Springboot + mybatis + Maven +mysql5.7或8.0+html+css+js等等组成,B/S模式 + Maven管理等等。环境需要1.运行环境:最好是java jdk 1.8,我们在这个平台上运行的。其他版本理论上也可以。_基于java技术的停车场管理系统实现与设计
Android系统播放器MediaPlayer源码分析_android多媒体播放源码分析 时序图-程序员宅基地
文章浏览阅读3.5k次。前言对于MediaPlayer播放器的源码分析内容相对来说比较多,会从Java-&amp;gt;Jni-&amp;gt;C/C++慢慢分析,后面会慢慢更新。另外,博客只作为自己学习记录的一种方式,对于其他的不过多的评论。MediaPlayerDemopublic class MainActivity extends AppCompatActivity implements SurfaceHolder.Cal..._android多媒体播放源码分析 时序图
java 数据结构与算法 ——快速排序法-程序员宅基地
文章浏览阅读2.4k次,点赞41次,收藏13次。java 数据结构与算法 ——快速排序法_快速排序法